KitchenAid KDTM704LPA - Installation Manual
KitchenAid KDTM704LPA Dishwasher – Installation Manual, read for free online in PDF format. We hope this helps you resolve any issues you may have. If you have further questions, please contact us through the contact form.


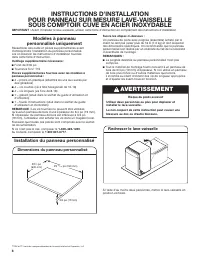
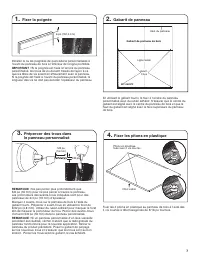
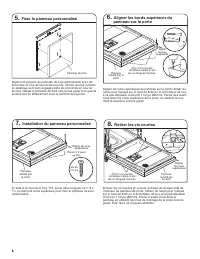
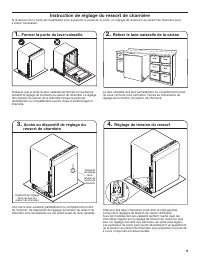
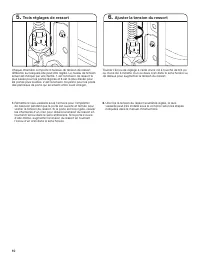

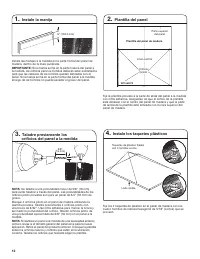


Table of Contents:
- Page 2 – Attach handle
- Page 4 – Hinge Spring Adjustment Instruction; Close dishwasher door
- Page 6 – Modèles à panneau; Installation du panneau personnalisé; Dimensions du panneau personnalisé; AVERTISSEMENT; Redresser le lave-vaisselle
- Page 7 – Prépercer des trous dans
- Page 9 – Instruction de réglage du ressort de charnière; Fermer la porte du lave-vaisselle
- Page 11 – Solo para modelos con panel a la medida; Instalación del panel a la medida; Dimensiones del panel a la medida; ADVERTENCIA; Ponga la lavavajillas de pie
- Page 12 – Taladre previamente los
- Page 14 – Instrucciones para ajustar el resorte de la bisagra; Cierre la puerta de la lavavajillas.
1
INSTALLATION INSTRUCTIONS FOR CUSTOM PANEL
UNDERCOUNTER DISHWASHER
STAINLESS STEEL TUB
IMPORTANT:
Before installing your dishwasher, please use this instruction sheet as a supplement to the installation instructions.
Custom Panel Models Only
Gather these additional tools and parts before starting
attachment of the custom panel. Read and follow the
instructions provided in this instruction sheet.
Additional Tools Needed:
■
3/32" drill bit
■
Torx
†
T15 screwdriver
Additional Parts Supplied with Custom Panel Models:
■
4 – Plastic studs (attached to each other by runners)
■
4 – Short screws (10-16 hex-head screw)
■
4 – Long screws (8-18 Torx head screws)
■
1 – Template (located inside Use and Care Guide bag
assembly)
■
1 – Instruction sheet (located inside Use and Care Guide bag
assembly)
NOTE:
The screws supplied are used for only 3/4" (19 mm) thick
wooden panel. If the wooden panel is less than 3/4" (19 mm)
thick, customer must purchase screws locally.
Make sure all these parts are included in the literature package.
If parts are not included, call
1-800-422-1230
.
In Canada, call
1-800-807-6777
.
Install Custom Panel
Follow Steps Below:
A customer supplied door panel and handle (together) must
weigh no more than 16 lbs (7.3 kg) and must be made to specific
dimensions. It is recommended that a cabinetmaker cut the
customer panel because of the precise dimensions needed.
NOTES:
■
The handle for the custom panel is not included.
■
All mounting hardware supplied is for a 3/4" (19 mm) thick
wood panel. If a thinner wood panel or materials other than
wood are used, it is the customer’s responsibility to obtain the
proper length screws and adjust the pilot holes accordingly.
Using 2 or more people, stand the dishwasher up.
Custom panel dimensions
WARNING
Excessive Weight Hazard
Use two or more people to move and install
dishwasher.
Failure to do so can result in back or other injury.
Stand dishwasher upright
W11428482A
†
TORX and T15 are trademarks of Acument Intellectual Properties, LLC.
23
5
/
8
"
(600 mm)
29
15
/
16
"(760 mm)
3/4" (19 mm)
"Loading the manual" means you need to wait until the file loads and becomes available for online reading. Some manuals are very large, and the time they take to appear depends on your internet speed.
Other Manuals for KitchenAid KDTM704LPA
Summary
2 Install the custom hardware handle(s) on the front of the wooden panel inside dotted line. IMPORTANT: If the handle is attached from the back of the custom panel, the screw holes should be countersunk for the screw heads to be flush with the panel. If the handle is attached to the front of the cus...
4 Hinge Spring Adjustment Instruction If door tension is insufficient to support the weight of the door, adjustment of the hinge spring tension may be needed. Make sure that the dishwasher door is closed at all times while hinge spring tension is being adjusted. Adjusting the hinge spring tension wh...
6 INSTRUCTIONS D’INSTALLATION POUR PANNEAU SUR MESURE LAVE-VAISSELLE SOUS COMPTOIR CUVE EN ACIER INOXYDABLE IMPORTANT : Avant d’installer le lave-vaisselle, utiliser cette fiche d’instruction en complément des instructions d’installation. Modèles à panneau personnalisé uniquement Rassembler ces outi...