KitchenAid KDFE204KBL - User Manual
KitchenAid KDFE204KBL Dishwasher – User Manual, read for free online in PDF format. We hope this helps you resolve any issues you may have. If you have further questions, please contact us through the contact form.


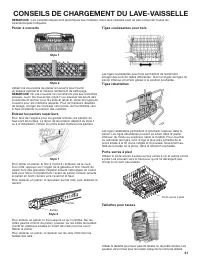

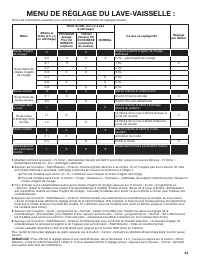
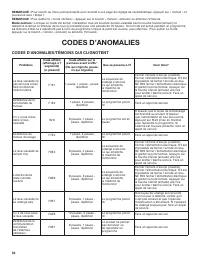
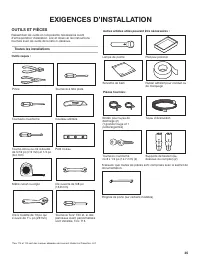
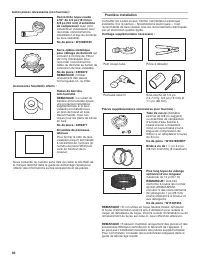


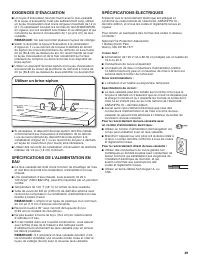


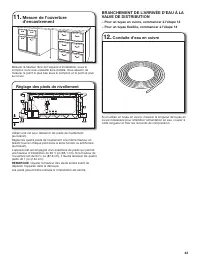
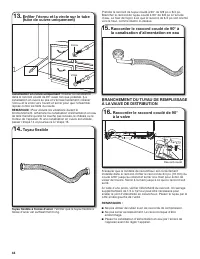
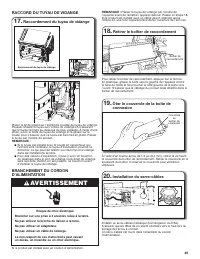

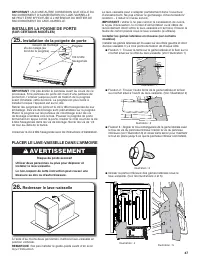
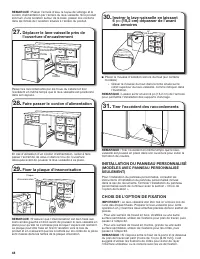

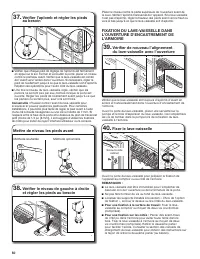
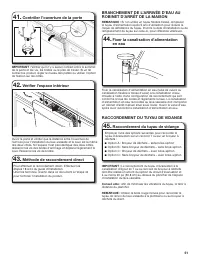
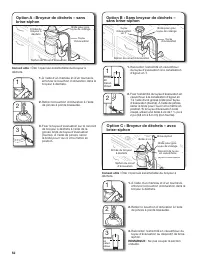
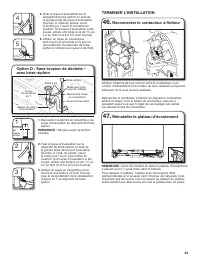


Table of Contents:
- Page 3 – DISHWASHER MAINTENANCE; Detergents; WARNING
- Page 4 – DISHWASHER LOADING TIPS
- Page 5 – DISHWASHER CARE
- Page 6 – DISHWASHER SETTING MENU:
- Page 7 – ERROR CODES; ERROR CODES / BLINKING LIGHTS
- Page 8 – INSTALLATION REQUIREMENTS; TOOLS AND PARTS; All Installations
- Page 9 – First-Time Installations
- Page 10 – LOCATION REQUIREMENTS
- Page 11 – PRODUCT AND CABINET OPENING DIMENSIONS:
- Page 13 – INSTALLATION INSTRUCTIONS; RECOMMENDED FOR WOOD COUNTERTOPS
- Page 16 – CONNECT WATER LINE TO FILL VALVE; Measure cabinet opening; Leveling leg adjustment
- Page 19 – Suggested wire length relative to strain relief; Connect ground wire
- Page 20 – Stand dishwasher upright
- Page 22 – Countertop Attachment:; Counter top attachment
- Page 25 – Option C: Waste disposer – with air gap
- Page 29 – Votre sécurité et celle des autres est très importante.; AVERTISSEMENT; INSTRUCTIONS DE MISE À LA TERRE; CONSERVERCESINSTRUCTIONS
- Page 30 – ENTRETIEN DU LAVE-VAISSELLE; Détergents
- Page 31 – CONSEILS DE CHARGEMENT DU LAVE-VAISSELLE; Panier à couverts
- Page 34 – CODES D’ANOMALIES; CODES D’ANOMALIES/TÉMOINS QUI CLIGNOTENT
- Page 35 – EXIGENCES D’INSTALLATION; OUTILS ET PIÈCES; Toutes les installations
- Page 36 – Première installation
- Page 37 – EXIGENCES D’EMPLACEMENT
- Page 38 – DIMENSIONS D’OUVERTURE DU PRODUIT ET DE L’ARMOIRE :
- Page 40 – INSTRUCTIONS D’INSTALLATION; RECOMMANDÉE POUR LES
- Page 46 – Longueur de câble suggérée en lien avec le serre-câbles
- Page 47 – Redresser le lave-vaisselle
- Page 48 – po; (MODÈLES AVEC PANNEAU PERSONNALISÉ
- Page 49 – Fixation à la surface de travail :; Fixation au comptoir; Fixation sur les côtés :
- Page 52 – Option C : Broyeur de déchets – avec
- Page 56 – Su seguridad y la seguridad de los demás es muy importante.; GUARDEESTASINSTRUCCIONES; INSTRUCCIONES DE CONEXIÓN A TIERRA; ADVERTENCIA
- Page 57 – MANTENIMIENTO DE LA LAVAVAJILLAS; Detergentes
- Page 58 – CONSEJOS PARA CARGAR LA LAVAVAJILLAS
- Page 59 – CUIDADO DE LA LAVAVAJILLAS
- Page 60 – MENÚ DE AJUSTES DE LA LAVAVAJILLAS:
- Page 61 – CÓDIGOS DE ERROR; CÓDIGOS DE ERROR / LUCES PARPADEANTES
- Page 62 – REQUISITOS DE INSTALACIÓN; HERRAMIENTAS Y PIEZAS; Todas las instalaciones
- Page 63 – Instalaciones nuevas
- Page 64 – REQUISITOS DE UBICACIÓN
- Page 65 – DIMENSIONES DEL PRODUCTO Y DE LA ABERTURA DEL GABINETE:
- Page 67 – INSTRUCCIONES DE INSTALACIÓN; LOS MOSTRADORES DE MADERA)
- Page 70 – Mida la abertura del gabinete; Ajuste de pata niveladora
- Page 74 – Ponga la lavavajillas de pie
- Page 75 – (EN MODELOS CON PANELES A LA MEDIDA
- Page 76 – Sujeción al mostrador:; Sujeción al mostrador
- Page 79 – purga de aire
OWNER’S MANUAL
MANUEL DE L’UTILISATEUR
MANUAL DEL PROPIETARIO
DISHWASHER MAINTENANCE ...... 3
DISHWASHER LOADING TIPS ........ 4
DISHWASHER CARE ....................... 5
DISHWASHER SETTING MENU ...... 6
ERROR CODES ................................ 7
Error codes / blinking lights .................. 7
INSTALLATION REQUIREMENTS ... 8
Tools and parts ..................................... 8
Location requirements ........................ 10
Product and cabinet opening
dimensions: ......................................... 11
Drain requirements ............................. 12
Water supply requirements ................. 12
Electrical requirements ....................... 12
INSTALLATION INSTRUCTIONS ... 13
Prepare cabinet opening—
new utilities ......................................... 13
Install optional moisture barrier -
recommended for wood countertops ...13
Electrical connection .......................... 14
Prepare dishwasher ............................ 15
Remove access panel and insulation ....15
Disconnect and remove drip tray
assembly ............................................. 15
Connect water line to fill valve ............ 16
Connect fill hose to fill valve ............... 17
Drain hose connection ........................ 18
Power cord connection ....................... 18
Install door handle
(on some models) ............................... 20
Place dishwasher in cabinet ............... 20
Custom panel installation
(custom panel models only) ................ 21
Choose anchor attachment method ... 21
Final installation check........................ 22
Secure dishwasher in cabinet
opening ............................................... 23
Connect water line to house
shut-off valve ...................................... 24
Connect drain hose ............................ 24
Complete installation .......................... 26
Check operation ................................. 27
Install access panels ........................... 27
If dishwasher does not operate .......... 28
ENTRETIEN DU
LAVE-VAISSELLE ........................... 30
CONSEILS DE CHARGEMENT
DU LAVE-VAISSELLE .................... 31
ENTRETIEN DU
LAVE-VAISSELLE ........................... 32
MENU DE RÉGLAGE DU
LAVE-VAISSELLE : ......................... 33
CODES D’ANOMALIES .................. 34
Codes d’anomalies/témoins
qui clignotent ...................................... 34
EXIGENCES D’INSTALLATION ..... 35
Outils et pièces ................................... 35
Exigences d’emplacement ................. 37
Dimensions d’ouverture du produit
et de l’armoire : ................................... 38
Exigences d’évacuation ...................... 39
Spécifications de l’alimentation
en eau ................................................. 39
Spécifications électriques ................... 39
INSTRUCTIONS D’INSTALLATION ...40
Préparation de l’ouverture
d’encastrement de l’armoire –
nouveaux raccordements de service ... 40
Installer la barrière anti-humidité
en option – recommandée pour
les comptoirs en bois ......................... 40
Raccordement électrique.................... 41
Préparation du lave-vaisselle .............. 42
Retrait du panneau d’accès
et de l’isolation ................................... 42
Débrancher et enlever le plateau
d’écoulement ...................................... 42
Branchement de l’arrivée d’eau
à la valve de distribution ..................... 43
Branchement du tuyau de remplissage
à la valve de distribution ..................... 44
Raccord du tuyau de vidange ............. 45
Branchement du cordon
d’alimentation ..................................... 45
Installer la poigne de porte
(sur certains modèles) ......................... 47
Placer le lave-vaisselle dans l’armoire ... 47
Installation du panneau personnalisé
(modèles avec panneau personnalisé
seulement) .......................................... 48
Choix de l’option de fixation ............... 48
Vérification finale de l’installation ........ 49
Fixation du lave-vaisselle dans
l’ouverture d’encastrement
de l’armoire ......................................... 50
Branchement de l’arrivée d’eau
au robinet d’arrêt de la maison ........... 51
Raccordement du tuyau de vidange ... 51
Terminer l’installation .......................... 53
Contrôle du fonctionnement ............... 54
Installation des panneaux d’accès ..... 54
Si le lave-vaisselle ne fonctionne pas ...55
MANTENIMIENTO DE
LA LAVAVAJILLAS ......................... 57
CONSEJOS PARA CARGAR
LA LAVAVAJILLAS ......................... 58
CUIDADO DE LA LAVAVAJILLAS ... 59
MENÚ DE AJUSTES DE
LA LAVAVAJILLAS: ........................ 60
CÓDIGOS DE ERROR .................... 61
Códigos de error / Luces
parpadeantes ...................................... 61
REQUISITOS DE INSTALACIÓN ... 62
Herramientas y piezas ........................ 62
Requisitos de ubicación ..................... 64
Dimensiones del producto
y de la abertura del gabinete: ............. 65
Requisitos de desagüe ....................... 66
Requisitos de suministro de agua ...... 66
Requisitos eléctricos........................... 66
INSTRUCCIONES
DE INSTALACIÓN .......................... 67
Preparación de la abertura del
gabinete: instalaciones nuevas ........... 67
Instalación opcional de la barrera
contra la humedad (recomendado
para los mostradores de madera) ....... 67
Conexión eléctrica .............................. 68
Prepare la lavavajillas .......................... 69
Retire el panel de acceso
y el aislante ........................................ 69
Desconecte y retire el ensamblaje
de la bandeja de goteo ....................... 69
Conecte la tubería de agua
a la válvula de llenado......................... 70
Conecte la manguera de llenado
a la válvula de llenado......................... 71
Conexiones de la manguera
de desagüe ......................................... 72
Conexión del cable de alimentación ... 72
Instale la manija de la puerta
(en algunos modelos) .......................... 74
Coloque la lavavajillas en el gabinete . 74
Instalación del panel a la medida
(en modelos con paneles a la medida
solamente) .......................................... 75
Selección del método de sujeción
de anclaje ............................................ 75
Verificación final de la instalación ....... 76
Asegure la lavavajillas en la abertura
del gabinete ........................................ 77
Conexión de tubería de agua a
manguera de válvula de cierre
del hogar ............................................. 78
Conecte la manguera de desagüe ...... 78
Complete la instalación ...................... 80
Verifique el funcionamiento ................. 81
Instale los paneles de acceso ............. 81
Si la lavavajillas no funciona ............... 82
TABLE OF CONTENTS/TABLE DES MATIÈRES/ÍNDICE
W11323304B
"Loading the manual" means you need to wait until the file loads and becomes available for online reading. Some manuals are very large, and the time they take to appear depends on your internet speed.
Other Manuals for KitchenAid KDFE204KBL
Summary
3 DISHWASHER MAINTENANCE Detergents High-quality premeasured tablets and packs are recommended for improved performance. Quality tablets and packs have been proven better than powder, liquid, or gel detergents at reducing filming on dishes. Using tablets and packs over time will start to reduce or e...
4 DISHWASHER LOADING TIPS NOTE: Features are model specific. Your dishwasher may not have all features described. Silverware Baskets Use silverware basket lids to provide optimal spacing and best cleaning performance. NOTE: If your silverware does not fit into the designated slots, open the lids (St...
5 DISHWASHER CARE Interior Cleaning Many detergents may leave white spots or a white residue on dishware and on the interior of the dishwasher. Over time this residue can become unsightly and could affect dishwasher performance. Use of a dishwasher cleaning product such as affresh ® Dishwasher Clean...