JL Audio 98679 - User Manual
JL Audio 98679 Car Amplifier – User Manual, read for free online in PDF format. We hope this helps you resolve any issues you may have. If you have further questions, please contact us through the contact form.


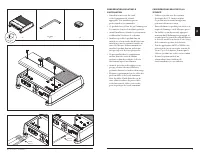
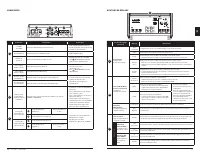


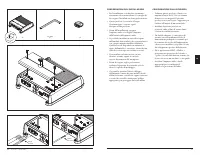

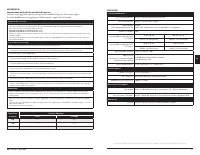

Table of Contents:
- Page 3 – CONNECTIONS; Setting; CONTROLS
- Page 4 – Input Sensitivity Level Setting; channel pair to achieve overall system balance.; Necessary Equipment; not recommended; SPECIFICATIONS
- Page 6 – CONNEXIONS; BOUTONS DE RÉGLAGE
- Page 7 – Réglage du niveau de sensibilité d’entrée; Matériel nécessaire; non conseillé; SPÉCIFICATIONS TECHNIQUES
- Page 9 – Input Mode; CONEXIONES; LED de estado; CONTROLES
- Page 10 – Ajuste del nivel de sensibilidad de entrada; Equipos necesarios; no recomendado; ESPECIFICACIONES; Calibre mínimo del cable de cobre
- Page 12 – ANSCHLÜSSE; STEUERUNG
- Page 13 – Einstellung der Eingangsempfindlichkeit; Benötigte Ausrüstung; nicht empfohlen; TECHNISCHE DATEN
- Page 15 – COLLEGAMENTI; Impostazione; COMANDI
- Page 16 – Impostazione del livello di sensibilità d’ingresso; Apparecchiature necessarie; Non consigliato; SPECIFICHE
- Page 17 – Printed in China
20 0W 2- CHANNEL AMPLIFIER
O W N E R ’S MA N UA L
MA N U E L D ’U T I L I S AT I O N
MA N UA L D E L P R O P I E TA R I O
B E D I E N U N G S A N L E I T U N G
MA N UA L E D E L P R O P R I E TA R I O
"Loading the manual" means you need to wait until the file loads and becomes available for online reading. Some manuals are very large, and the time they take to appear depends on your internet speed.
Summary
4 | JL Audio® - XDM200/2 5 Connection Description Notes 1 +12 VDC Positive (+12V) Power Connection • 4 AWG wire (8 AWG minimum) • Install 20A fuse at (+) battery post Ground Negative (GND) Ground Connection • 4 AWG wire (required) Remote Positive (+12V) Activation Connection • 18 – 12 AWG wire capac...
7 APPENDIX A: Input Sensitivity Level Setting Follow the steps below to adjust the input sensitivity of each amplifier channel pair to achieve overall system balance. Necessary Equipment • Digital AC Voltmeter • Sine-wave test tone recorded at 0 dBfs reference level in the frequency range to be ampl...
11 FR 10 | JL Audio® - XDM200/2 Connexion Description Remarques 1 +12 VDC (+12 VCC) Connexion d’alimentation positive (+12 V) • Câble 4 AWG (8 AWG minimum) • Installer le fusible de 20 A à la borne positive (+) de la batterie Ground (Masse) Connexion de masse (GND) négative • Câble 4 AWG (requis) Re...