Page 2 - Quick Operation Guide
Compartment A: For each wash cycle.Compartment B: For programs with pre-wash only.(Follow the user instructions) Mechanical indicator C. Electric indicator on control panel (if provided). Check the rinse aid level Load the baskets Select a programme T machine will start working after about 10 second...
Page 4 - IMPORTANT SAFETY INFORMATION; When using your dishwasher,; EARTHING INSTRUCTIONS
1 applications such as: -staff kitchen areas in shops, offices and other working environments; -farm houses; -by clients in hotels, motels and other residential type environments; -bed and breakfast type environments. This appliance can be used by children aged from 8 years and above and persons wit...
Page 6 - Disposal
3 This appliance's packaging materials are recyclable. Dispose of the packaging into a suitable waste collection container to recycle it. It is prohibited to dispose of this appliance as household waste.Correct Disposal of this product: this symbol on the product or in its packing indicates that thi...
Page 7 - Operation Instruction; Dishwasher Features; IMPORTANT
2.Operation Instruction 4 Dishwasher Features Control Panel before using it for the first time. To get the best performance from your dishwasher, read all operating instructions IMPORTANT Back View Filter assembly Detergent Dispenser Cup Shelf Cutlery Basket Rinse Aid Dispenser Inlet pipe connector ...
Page 8 - Prior; to; using for the first time; When to Refill the Rinse Aid Dispenser; How to fill the Rinse Aid Dispenser
A. Rinse Aid Dispenser The rinse aid is released during the final rinse to prevent water forming droplets on your dishes, which spots and streaks. It also improves drying by allowing water to roll off the dishes. Your dishwasher is designed to use liquid rinse aids. The rinse aid dispenser is locate...
Page 9 - Adjusting Rinse Aid Dispenser; Concentrated Detergent
Adjusting Rinse Aid Dispenser The rinse aid dispenser has six or four settings. Always start with the dispenser set on "4". If spots and poor drying are a problem, increase the amount of rinse aid dispensed by removing the dispenser lid and rotating the dial to "5". If the dishes sti...
Page 10 - Adding detergent to dispenser; Fill in detergent dispenser; Dishwasher detergent is corrosive!
7 Adding detergent to dispenser Always add the detergent just before starting each wash cycle. Only use branded detergent and rinse aid for dishwasher. If the lid is closed: push the latch to open. NOTE: Fill the detergent dispenser with detergent. The marking indicates the dosing levels, as illustr...
Page 11 - Loading the Dishwasher Baskets; Suitability of use in the dishwasher; Not suitable for use
8 4.Loading the Dishwasher Baskets Suitability of use in the dishwasher Cutlery with wooden, horn china or mother-of-pearl handles. Plastic items that are not heat resistant. Older cutlery with glued parts that is not temperature resistant. Bonded cutlery items or dishes. Pewter or copper items. Cry...
Page 12 - Loading the Basket; Tea spoons; Cutlery Basket; IN; Do not let any item extend through bottom.
Position the dishes and cookware so that they do not get moved by the spray of water. Loading the Basket 9 1 6 3 7 4 5 2 IN Saucers 2 3 Glasses 1 Cups 5 Dinner plates 6 Soup plates Dessert dishes 4 7 Tea spoons 5 Soup spoons 2 Forks 1 Knives 4 3 Dessert spoons Cutlery should be placed into the cutle...
Page 13 - Starting a washing programme; Turning On the Appliance; Wash Cycle Table
5.Starting a washing programme 10 NOTE: Turning On the Appliance 1. Draw out the basket(see the section entitled " Loading the Dishwasher basket " ). 2. Pour in the detergent (see the section entitled " Detergent and Rinse Aid " ). 3. Insert the plug into the socket. The power supply...
Page 14 - It is dangerous to open the door when washing,; Switch Off the Dishwasher
11 Change the Program Forget to Add a Dish? and press the start/reset Button, the machine will keep on working after 10 seconds. If you open the door during washing, the machine will pause. When you close the door NOTE: At the end of the Wash Cycle WARNING! It is dangerous to open the door when wash...
Page 15 - Maintenance and Cleaning; Filtering System
6.Maintenance and Cleaning The filter prevent larger remnants of food or other objects from getting inside the pump. The filter system consists of a coarse filter, a flat (Main filter) and a micro filter (fine filter). Food and soil particles trapped by this filter are pulverized by a special jet on...
Page 16 - The entire filter assembly should be cleaned once a week.
The control panel can be cleaned by using a lightly dampened cloth. After cleaning, make sure to dry it thoroughly. For the exterior, use a good appliance polish wax. Never use sharp objects, scouring pads or harsh cleaners on any part of the dishwasher. Protect Against Freezing 1. Cut off electrica...
Page 17 - How to Keep Your Dishwasher in Shape; Installation instruction; After Every Wash; Installation preparation; Warning; Electrical Shock Hazard Disconnect electrical power
How to Keep Your Dishwasher in Shape It is recommend that you run a wash cycle with the dishwasher empty and then remove the plug from the socket, turn off the water supply and leave the door of the appliance slightly open. This will help the door seals to last longer and prevent odours from forming...
Page 18 - Positioning the Appliance; and water supply
Positioning the Appliance and the sides, along the adjacent cabinets or wall. The dishwasher is equipped with water supply Position the appliance in the desired location. The back should rest against the wall behind it, and drain hoses that can be positioned to the right or the left to facilitate pr...
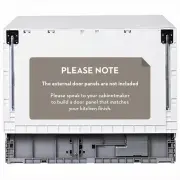
Page 20 - decorative panel; Step 2; Assemble the
17 decorative panel Step 2 : Weight of the decorative panel should be min 3Kg-max 4Kg.Dim.A and B could be alterable by handle,Dim.C,D and E could be alterable by fact, Dim.E should be in range 16~22mm,besides the appliance assembling decorative panel. Step 3: Assemble the . Note: If the m decorativ...
Page 21 - supporting foot
18 Step 4: Install the into the base supporting feet Step 5 Install the dishwasher in aperture,but not full, as figure, supporting feet, let its bottom align aperture’s base, then let the machine door be flush with the cabinet frame. : supporting foot
Page 23 - Electrical Requirements; Electrical Connection; Cold Water Connection; Water Connection; Do not use an extension cord or an adapter plug
Electrical Requirements Ensure the voltage and frequency of the power being corresponds to those on the rating plate. Only insert the plug into an electrical socket which is earthed properly. If the electrical socket to which the appliance must be connected is not appropriate for the plug , replace ...
Page 24 - Connection of drain hoses; avoid the backflow of it.; NOTE; Counter; Front
Connection of drain hoses Insert the drain hose into a drain pipe with a minimum diameter of 4cm, or let it run into the sink, making sure to avoid bending or crimping it. The free end of the hose must be at a height lower than 30 cm and must not be immersed into water to avoid the backflow of it. 2...
Page 25 - Water Outlet; Start of dishwasher; The dishwasher is level and fixed properly.; Inlet
22 If the sink is more than 300mm higher than the floor, the excess water in hoses cannot be drained directly into the sink. It will be necessary to drain excess water from hoses into a bowl or suitable container that is held outside and lower than the sink. Connect the water drain hose. The drain h...
Page 26 - Troubleshooting Tips; Problem; Before Calling for Service
8.Troubleshooting Tips Problem Possible Causes What To Do Fuse blown, or the circuit breaker tripped. Replace fuse or reset circuit breaker. Remove any other appliances sharing the same circuit with the dishwasher Suds in the tub Spilled rinse-aid Always wipe up rinse-aid spills immediately. Review ...
Page 27 - Error Codes
Problem Possible Causes What To Do The dishes were not loaded correctly. See notes in " Loading the Dishwasher Baskets ". The dishes are not clean Cloudiness on glassware Black or gray marks on dishes Detergent left in dispenser cups The dishes are not drying Select a more intensive programm...
Page 28 - Depth : 518mm(without decorative panel); Technical Information
Technical Information 25 Height : 452mm(without decorative panel) Width : 550mm(without decorative panel) Depth : 518mm(without decorative panel) Voltage connected Load : see rating label Water pressure: 0.04-1.0MPa Power supply: see rating label Capacity: 6 Place settings Technical Information The ...
Page 30 - ILVE ACCESSORIES ONLINE SHOP; For a wide range of coffee machines, pods, and other ILVE
OPEN 24 / 7 ILVE ACCESSORIES ONLINE SHOP For a wide range of coffee machines, pods, and other ILVE accessories at the click of a button shop.ilve.com.au ILVE Dishwasher Installation and Operating Instructions template pages.indd 3 1/05/2015 9:16 am
Page 31 - ILVE LIMITED WARRANTY
ILVE LIMITED WARRANTY Eurolinx Pty Limited A.B.N. 50 001 473 347 trading as ILVE (“ILVE”) Office: 48-50 Moore Street, Leichhardt N.S.W 2040 Post: Locked Bag 3000, Annandale, N.S.W 2038P: 1300 MY ILVE (694 583) WARRANTY REGISTRATION Your ongoing satisfaction with your ILVE product is important to us....
Page 33 - NOTES
01052015 facebook.com/ILVEappliances twitter.com/ILVE_appliances youtube.com/ILVEappliances livewithilve.com You can now find us on: NOTES ILVE.COM.AU ILVE Dishwasher Installation and Operating Instructions template pages.indd 7 1/05/2015 9:16 am