Page 2 - Table of contents
2 Dear customer! Thank you for purchasing our product. For safety, it is strongly recommended to read this manual carefully before connecting, operating and/or adjusting the product and keep the manual for reference in the future. Table of contents Table of contents.....................................
Page 3 - Important safeguards; Do not install the detachable panel before connecting the wire.
3 Important safeguards • Using the device at temperature below -10º may cause the breakage of the device. Before using please heat up the passenger compartment to the recommended temperature! • Read carefully through this manual to familiarize yourself with this high-quality sound system. • Disconne...
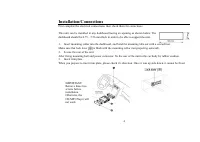
Page 4 - Installation/Connections
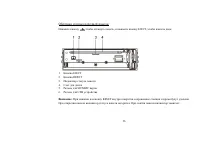
Installation/Connections First complete the electrical connections, then check them for correctness. This unit can be installed in any dashboard having an opening as shown below. The dashboard should be 4.75 – 5.56 mm thick in order to be able to support the unit. 1. Insert mounting collar into the ...
Page 5 - Electrical connections
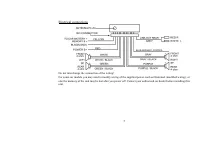
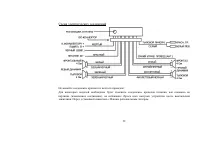
Electrical connections Do not interchange the connection of the wiring! For some car models you may need to modify wiring of the supplied power cord as illustrated (modified wiring), or else the memory of the unit may be lost after you power off. Contact your authorized car dealer before installing ...
Page 6 - Using the ISO Connector; Function
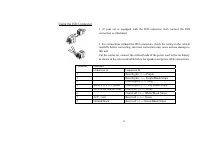
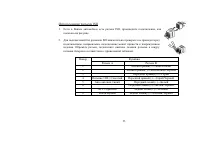
Using the ISO Connector 1. If your car is equipped with the ISO connector, then connect the ISO connectors as illustrated. 6 2. For connections without the ISO connectors, check the wiring in the vehicle carefully before connecting, incorrect connection may cause serious damage to this unit. Cut the...
Page 7 - Panel controls; Front panel
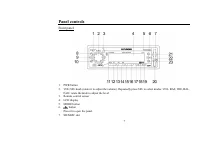
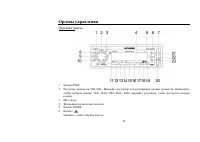
Panel controls Front panel 1. PWR button 2. VOL/SEL knob (rotate it to adjust the volume). Repeatedly press SEL to select modes: VOL, BAS, TRE, BAL, FAD; rotate the knob to adjust the level. 3. Remote control sensor 4. LCD display 5. MODE button 6. button Press it to open the panel. 7. SD/MMC slot 7
Page 9 - Back of the front panel
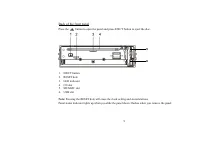
Back of the front panel Press the button to open the panel and press EJECT button to eject the disc. 5 6 1. EJECT button 2. RESET hole 3. LED indicator 4. CD slot 5. SD/MMC slot 6. USB slot Note: Pressing the RESET hole will erase the clock setting and stored stations. Panel status indicator lights ...
Page 10 - Battery information of RC
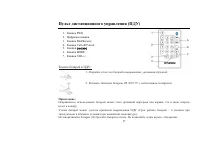
Remote controller (RC) 10 1. PWR button 2. Numeric pad 3. Dial/Receive call 4. Call off/cancel 5. / buttons 6. MODE button 7. VOL+/- buttons Battery information of RC 1. Press the catch and at the same time pull out the battery tray. 2. Insert the 1 x lithium battery, type CR 2025 3V battery with th...
Page 11 - General operation; Source select; button on the; VOL/SEL knob functions; control
General operation Power on/off Press PWR button on the front panel or RC to turn the unit on. To turn the unit off press PWR button on the front panel once more or press and hold PWR button on the RC. When you switch off the system or car ignition, the settings, tuner presets and the volume level wi...
Page 13 - Turning the sound off
13 • CONNT A mode: bluetooth is connected automatically. • CONNT M mode: bluetooth is connected manually. Turning the sound off Short press the PWR button to turn the sound off. Press it again or use the VOLUME buttons to turn the sound on. Adjusting clock Press and hold DISP button for more than 2 ...
Page 14 - Digital tuner; Band selection
Digital tuner Note: RDS (Radio Data System) service availability varies with areas. Please understand if RDS service is not available in you area, the following service is not available, either. Band selection Press PWR to turn the power on, then press the MODE button once or more to select TUNER. P...
Page 16 - Folk
16 AF: The frequency list of preset RDS stations is updated by EON data. EON enables the radio to make fuller use of RDS information. It constantly updates the AF list of preset stations, including the one that currently tuned into. If you preset a station around the area at your home, you will late...
Page 17 - Disc operations; Loading a disc; For CD, the CD icon will appear on the display.; Pausing playback; Press
Disc operations Loading a disc 1. Press button on the panel to slide down the panel. Insert the disc with the printed side facing upward into the slot. 2. Press button to slide down the panel. Press EJECT button on the panel to eject the disc. Playing a disc 1. When disc inserted, display shows READ...
Page 18 - or forward skip during playback.; Intro playing
18 ID3 tags display Press BAND button repeatedly during playback to access the ID3 information manually. The display will show following track information: folder name, file name, track title, artist name, album name, if available. Scanning forward and backward 1. Press and hold 9 / : buttons for mo...
Page 19 - appear on the display.
19 appear on the display. • Press RDM/4 button again to select RDM FOLD and randomly play all the files in the current folder. • To turn off random playback, press RDM/4 button again. The same operations are performed by pressing the “4” numeric button on the RC. Direct track search (for WMA/MP3) 1....
Page 22 - Bluetooth operations; Pairing; Press and hold BAND button to reconnect manually.; Call answering
22 Bluetooth operations Pairing Turn on Bluetooth function of your mobile phone. Press and hold MODE button more than two seconds to enter pairing mode, if you want to terminate pairing process, press Call off/Cancel button. Keep phone within 3 meters to the unit, enter mobile phone’s bluetooth setu...
Page 24 - Removing the panel; button to slide down the panel.; Install the panel
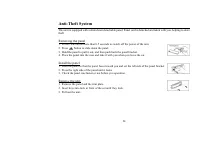
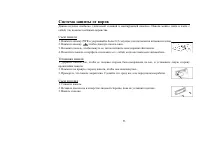
Anti-Theft System This unit is equipped with a slide-down detachable panel. Panel can be detached and taken with you, helping to deter theft. Removing the panel 1. Press PWR button more than 0.5 seconds to switch off the power of the unit. 2. Press button to slide down the panel. 3. Hold the panel t...
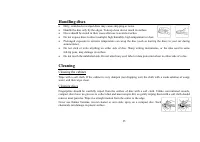
Page 25 - Handling discs; Dirty, scratched or warped discs may cause skip ping or noise.; Cleaning; Cleaning the cabinet
Handling discs • Dirty, scratched or warped discs may cause skip ping or noise. • Handle the disc only by the edges. To keep clean do not touch its surface. • Discs should be stored in their cases after use to avoid scratches. • Do not expose discs to direct sunlight, high humidity, high temperature...
Page 26 - Troubleshooting guide; Symptom
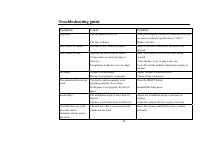
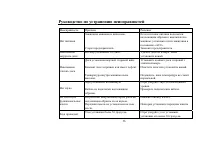
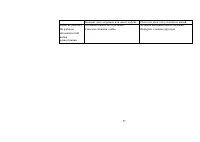
26 Troubleshooting guide Symptom Cause Solution No power The car ignition is not on. The fuse is blown. If the power supply is properly connected to the car accessory switch the ignition key to “ACC”. Replace the fuse. Disc cannot be loaded. Presence of disc inside the player. Remove the disc in the...
Page 27 - Specification
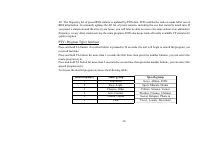
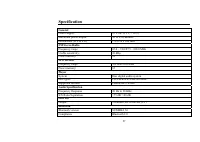
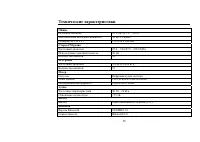
27 Specification General Power supply: 12 V DC (11 V – 16 V) Maximum power output: 50 W x 4 channels Dimensions (W x H x D) 178 x 50 x 166 mm FM Stereo Radio Frequency range: 65.0 – 74.0/87.5 - 108.0 MHz Usable sensitivity: 10 dBµ Preset memory: 18 MW Section Frequency range: 522 kHz-1620 kHz Preset...
Page 33 - ISO
ISO 1. ISO, , . 2. ISO , . , . A B 1 (+)--- 2 (-)--- / 3 (+)--- 4 12 (+)/ (-)--- / 5 / (+)--- 6 ((-)--- / 7 ACC+/ (+)--- 8 / (-)--- / 33
Page 41 - RDS
: RDS ( ) . , RDS , . PWR, . MODE, . BAND, : FM1, FM2, FM (OIRT), AM1, AM2. / • : 9 / : / , . . . , . • : 9 / : / , . 30 (18 FM [12 FM + 6 FM (OIRT)], 12 AM). • : - ( ). - 9 / : / . - 1-6, . • : - ( ). - 1-6. 41
Page 46 - ID; BAND; Intro
46 . ID № BAND , ID3 . : , , , , . 1. 2 9 / : , . : 2, 4, 8, 20. 2. 9 / : , . 3. . Intro 10 . 1. INT/2 . INT ON/OFF. 2. , . «2» . • RPT/3, (RPT ON) . RPT. • RPT/3, (RPT FOLD)
Page 49 - USB; USB
49 USB/SD/MMC SD/MMC SD/MMC . MEM-CARD LCD «CARD» SD. SD/MMC MODE, , . USB , USB . USB, «USB» SUB. USB MODE, , . : USB-DRIV MEM-CARD , DISC.
Page 50 - Bluetooth
50 Bluetooth Bluetooth . MODE 2 , . , Call off/Cancel. 3 . bluetooth , H-CDM8022 1234. , «PAIR OK» Bluetooth. «PAIR ERR». bluetooth, BAND. «NO CONNT», bluetooth . , BAND. Dial/Receive, . , Call off/Cancel. , «CALL WAITING». Dial/Receive, ,
Page 51 - BAND –; BT; Advanced Audio Distribution Profile (A2DP)
51 2 . . , Call off/Cancel. Dial/Receive, . . : AF – «7», TA – «8», AS/PS – «9», BAND – « * », 9 - «0», : - «#», MODE – «+». Dial/Receive . Dial/Receive, . «TRANSFER». , . , . Dial/Receive, . «VOIC DIAL». , . , . , «NO MATCH». BT , , Advanced Audio Distribution Profile (A2DP) Audio/Video Remote Cont...
Page 53 - PWR
щ . , . 1. PWR 0,5 . 2. , . 3. , , . 4. , . 1. , , . 2. , . 3. , . , . 1. . 2. , . 3. . 53
Page 56 - CD
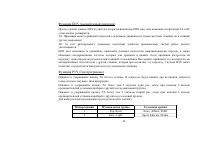
56 . . , « ». . CD . , . . . . . . , . . . . . - . . RESET. . 30 . , 30 .