Page 4 - IMPORTANT SAFETY INSTRUCTIONS; SAVE THESE INSTRUCTIONS; READ ALL INSTRUCTIONS BEFORE USING THIS APPLIANCE.
IMPORTANT SAFETY INSTRUCTIONS SAVE THESE INSTRUCTIONS When using an electrical appliance, basic precautions should always be followed, including the following: READ ALL INSTRUCTIONS BEFORE USING THIS APPLIANCE. THIS PRODUCT IS INTENDED FOR HOUSEHOLD USE ONLY. IF USED COMMERCIALLY WARRANTY IS VOID. W...
Page 6 - TO REDUCE THE RISK OF DAMAGE:; BATTERY DISPOSAL; RISK OF EXPLOSION OR
3 CAUTION: TO REDUCE THE RISK OF DAMAGE: • Avoid picking up hard, sharp objects with this product, as they may cause damage. • Store appropriately indoors in a dry place. Do not expose machine to freezing temperatures. This product includes rechargeable lithium-ion batteries. Do not expose batteries...
Page 7 - Charging the battery
44 Getting started with your LithiumLife ™ or LithiumLife ™ Extended Runtime battery To bring the battery to full life, place the battery onto the charger. LithiumLife ™ battery does not come fully charged. When charging, the charger light will turn solid blue and the blue LEDs on the battery will l...
Page 8 - Getting started with your Air
5 Set battery as shown and pivot into place. Battery does not come fully charged. Place the battery on the charger if full runtime is needed. Insert wand until it clicks. 1 3 2 Getting started with your Air ™ Cordless Lift
Page 9 - CAUTION
Using your Air ™ Cordless Lift as an upright It’s easiest to lift and carry by the handle. Push here to activate Boost Mode for improved suction. Using Boost Mode will shorten battery runtime. Step here and pull the handle back to activate brush roll and begin vacuuming. For optimal cleaning keep th...
Page 10 - WARNING
Using your Air ™ Cordless Lift as a canister Pivot canister forward and lift off. The canister is designed to be held by the carry handle or stand on its own. Use Power & Boost buttons as described on pg. 6. The brushroll button does not function in canister mode. Holding carry handle, align bot...
Page 11 - Using your Air
To use the hose in upright or canister mode, press hose release button and pull out. Remove the wand by pressing the wand release lever down and pulling the wand out. Insert the hose end into the wand handle until it clicks. Attach tools to clean stairs, upholstery and more. Reinsert wand when you'r...
Page 15 - LUBRICATION NOT REQUIRED; Keep your Air
Keep your Air ™ Cordless Lift running properly: brush roll Remove battery & lower the handle. Pull tabs towards the brush roll and lift up. Pull the brush roll out from this end and remove debris. Flip vacuum over. Replace clean brush roll into belt and seat both ends. Reinsert the plate as show...
Page 16 - Available Accessories; Included with select models. All available on Hoover.com
WARNING To reduce the risk of personal injury, remove battery before cleaning or servicing. ! ! Available Accessories Included with select models. All available on Hoover.com *Slides on to Extended Length Crevice tool 13 Extended Length Crevice Brush 2-in-1 Dusting and Crevice Tool Additional Filter...
Page 18 - SERVICE & WARRANTY FOR HOOVER; SERVICE INFORMATION
ANY SERVICING SHOULD BE DONE BY AN AUTHORIZED SERVICE REPRESENTATIVE Call (888) 679-2121 USA & Canada In the event that further assistance is required, visit and authorized service center. Find one nearest you by visiting our website at www.hoover.com. Costs of any transportation to and from any...
Page 19 - Devenez officiellement propriétaire.; Textez « AirCordlessLift » au 72105. Textez « HELP »; de 5 ans. Consultez la garantie pour obtenir; Guide d’utilisation; FRANÇAIS
SERVICE & WARRANTY FOR HOOVER ® AIR ™ CORDLESS LIFT PRODUCT & BATTERY SERVICE INFORMATION Devenez officiellement propriétaire. • Visitez le hoover.com/AirCordlessLift • Composez le 888 679-2121 • Textez « AirCordlessLift » au 72105. Textez « HELP » pour connaître les options. (Des frais de m...
Page 20 - CONSIGNES DE SÉCURITÉ IMPORTANTES; CONSERVEZ CES INSTRUCTIONS
CONSIGNES DE SÉCURITÉ IMPORTANTES CONSERVEZ CES INSTRUCTIONS Lorsque vous utilisez des appareils électriques, veuillez toujours respecter entre autres les consignes de sécurité élémentaires suivantes : VEUILLEZ LIRE TOUTES LES INSTRUCTIONS AVANT D’UTILISER CET APPAREIL. CE PRODUIT EST DESTINÉ À UN U...
Page 22 - POUR RÉDUIRE LES RISQUES; AVERTISSEMENT RELATIF; RISQUE D’EXPLOSION OU; BATTERIE AU LITHIUM-ION
MISE EN GARDE : POUR RÉDUIRE LES RISQUES DE DOMMAGE : • Évitez d'utiliser l’appareil pour ramasser des objets durs ou aux arêtes tranchantes, car ils pourraient endommager l’appareil. • Rangez l’appareil adéquatement à l’intérieur et dans un endroit sec. N’exposez pas l’appareil à des conditions de ...
Page 23 - Premiers pas avec la batterie LithiumLife; ou la batterie longue duree Lithium Life; Recharge de la batterie; Elle est prête quand
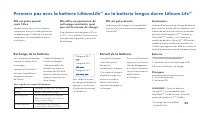
Premiers pas avec la batterie LithiumLife MC ou la batterie longue duree Lithium Life MC Pour chargercomplètement la batterie, placez-la sur le chargeur. La batterie LithiumLife MC n’est pas complètement chargée au moment de l’achat. Si le voyant du chargeur clignote en rouge, une erreur s’est produ...
Page 24 - Premiers pas avec l’aspirateur sans fil amovible Air; Mode aspirateur-balai de l’aspirateur sans fil amovible Air; MISE EN GARDE
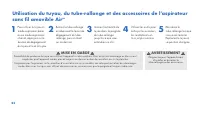
Faites glisser la batterie en place comme l’indique la figure. La batterie n’est pas complètement chargée au moment de l’achat. Placez la batterie sur le chargeur si vous avez besoin qu’elle soit complètement chargée. Insérez le tube-rallonge jusqu’à ce qu’il s’enclenche. 1 3 2 Premiers pas avec l’a...
Page 25 - Mode aspirateur-chariot de l’aspirateur sans fil amovible Air; AVERTISSEMENT
Mode aspirateur-chariot de l’aspirateur sans fil amovible Air MC Inclinez l’aspirateur- chariot vers l’avant et soulevez-le. L’aspirateur-chariot est conçu pour être tenu par la poignée ou être placé sur le sol. Utilisez les boutons d’alimentation et de suralimentation comme il est décrit à la page ...
Page 26 - sans fil amovible Air
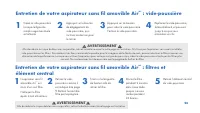
Pour utiliser le tuyau en mode aspirateur-balai ou en mode aspirateur- chariot, appuyez sur le bouton de dégagement du tuyau et tirez le tuyau. Retirez le tube-rallonge en abaissant le levier de dégagement du tube- rallonge, puis en tirant sur ce dernier. Insérez l’extrémité du tuyau dans la poignée...
Page 27 - Entretien de votre aspirateur sans fil amovible Air; élément central
Entretien de votre aspirateur sans fil amovible Air MC : vide-poussière Videz le vide-poussière lorsque la ligne de remplissage maximale est atteinte. Appuyez sur ce bouton pour vider le vide-poussière. Fermez le vide-poussière. Replacez le vide-poussière, le bas d’abord, et poussez jusqu’à ce que v...
Page 28 - AUCUNE LUBRIFICATION REQUISE
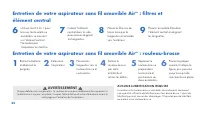
Insérez l’élément central dans le vide- poussière en alignant les languettes. Utilisez l’outil 2 en 1 pour brosser toute saleté ou tout débris se trouvant sur l’élément central. Ne mettez pas l’aspirateur en marche. Placez l’ensemble filtre dans l’élément central en alignant les languettes. Placez l...
Page 29 - Gamme d’accessoires
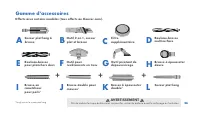
Entretien de votre aspirateur sans fil amovible Air MC : filtres et élément central Entretien de votre aspirateur sans fil amovible Air MC : rouleau-brosse AVERTISSEMENT Afin de réduire le risque de blessures corporelles, retirez la batterie avant le nettoyage ou l’entretien. ! ! Gamme d’accessoires...
Page 30 - Aide
Mon aspirateur sans fil amovible Air MC ne s’allume pas. Votre batterie n’est peut-être pas chargée. Vérifiez l’indicateur de charge et chargez la batterie si le niveau est bas. Consultez le tableau ci-dessous afin de déterminer la durée de charge de votre modèle. * La batterie LithiumLife MC n’est ...
Page 31 - ENTRETIEN ET GARANTIE DE L’ASPIRATEUR SANS FIL AIR; CORDLESS LIFT HOOVER; ET DE LA BATTERIE; RENSEIGNEMENTS RELATIFS À L’ENTRETIEN
TOUTE TÂCHE D’ENTRETIEN DOIT ÊTRE CONFIÉE À UN REPRÉSENTANT DE SERVICE AUTORISÉ. Appelez au 888 679-2121 (É.-U. et Canada). Si vous avez besoin de plus d’aide, visitez un centre de service autorisé. Trouvez le centre le plus près de chez vous en visitant notre site Web à www.hoover.com. Les frais de...
Page 32 - Podemos garantizarlo.; . Consulte la Garantía para; Guía del usuario; ESPAÑOL
Para siempre. • Visite Hoover.com/AirCordlessLift • Llame al 1-888-679-2121 • Envíe un mensaje de texto al 72105 con "Air Cordless Lift". Envíe un mensaje de texto con la palabra HELP para que lo asistan. (Pueden aplicarse tarifas de datos y mensajes. Para conocer los términos y condiciones ...
Page 33 - INSTRUCCIONES DE SEGURIDAD IMPORTANTES; CONSERVE ESTAS INSTRUCCIONES; LEA TODAS LAS INSTRUCCIONES ANTES DE UTILIZAR ESTE
30 INSTRUCCIONES DE SEGURIDAD IMPORTANTES CONSERVE ESTAS INSTRUCCIONES Cuando se utilizan aparatos eléctricos, siempre deben seguirse precauciones básicas, incluidas las siguientes: LEA TODAS LAS INSTRUCCIONES ANTES DE UTILIZAR ESTE APARATO. ESTE PRODUCTO SOLO TIENE COMO FIN SU USO DOMÉSTICO. SI SE ...
Page 35 - PARA DISMINUIR EL RIESGO; ADVERTENCIA SOBRE EL; RIESGO DE EXPLOSIÓN O EXPOSICIÓN A
32 PRECAUCIÓN: PARA DISMINUIR EL RIESGO DE DAÑOS: • Evite aspirar objetos duros y filosos con este producto, ya que pueden dañarlo. • Almacénelo apropiadamente en interiores, en un lugar seco. No exponga la máquina a temperaturas muy frías. Este producto incluye baterías recargables de iones de liti...
Page 36 - Carga de la batería
33 Cómo comenzar con su batería LithiumLife ™ o batería LithiumLife ™ de desempeño extendido Para hacer funcionar la batería, colóquela en el cargador. La batería LithiumLife ™ no viene completamente cargada. Si el LED del cargador emite una luz roja parpadeante, significa que se ha producido un err...
Page 37 - PRECAUCIÓN
34 Coloque la batería como se muestra en la imagen y gírela en su lugar. La batería no viene completamente cargada. Coloque la batería en el cargador si necesita que el tiempo de funcionamiento sea completo. Inserte el tubo de extensión hasta que se enganche haciendo un sonido de clic. 1 3 2 Cómo co...
Page 38 - ADVERTENCIA
35 Uso de la aspiradora inalámbrica Air ™ como recolectora de residuos por tubo Gire el tubo hacia adelante y levántelo para extraerlo. El tubo de recolección de residuos está diseñado para sostenerse por medio del mango de transporte o para quedarse parado por sí solo. Utilice los botones de alimen...
Page 40 - Mantenimiento correcto de la aspiradora Air
Mantenimiento correcto de la aspiradora Air ™ inalámbrica: Filtros y núcleo La aspiradora inalámbrica Air ™ viene equipada con un filtro.Limpie dicho filtro cada 4-6 usos. Tire de la lengüeta de malla para extraerlo. Enjuáguelo durante 2 minutos en agua tibia limpia. Deje secar durante 24 horas. Des...
Page 41 - NO SE REQUIERE LUBRICACIÓN
Mantenimiento correcto de la aspiradora Air ™ inalámbrica: Cepillo giratorio Extraiga la batería y baje el mango. Empuje las lengüetas hacia el cepillo giratorio y levántelas. Tire del cepillo giratorio hacia afuera desde este extremo y retire los desechos. Dé vuelta la aspiradora. Vuelva a colocar ...
Page 42 - Accesorios disponibles
ADVERTENCIA Para disminuir el riesgo de lesiones físicas, extraiga la batería antes de limpiar o realizar un servicio de mantenimiento en la unidad. ! ! Accesorios disponibles Incluidos con los modelos seleccionados. Todos disponibles en Hoover.com. *Se desliza sobre la herramienta para limpieza en ...
Page 44 - MANTENIMIENTO Y GARANTÍA DE LA ASPIRADORA INALÁMBRICA AIR; DE HOOVER; Y SU BATERÍA; INFORMACIÓN SOBRE EL MANTENIMIENTO
PERSONAL TÉCNICO AUTORIZADO DEBERÁ REALIZA TODO TIPO DE MANTENIMIENTO. Llame al (888) 679-2121 en los EE. UU. y Canadá. En caso de necesitar más ayuda, diríjase a un Centro Técnico autorizado. Encuentre el más cercano a su domicilio visitando nuestro sitio web www.hoover.com. Los gastos derivados de...