Page 2 - SAFETY DEFINITIONS; READ THESE INSTRUCTIONS CAREFULLY AND COMPLETELY BEFORE; CAUTION; NOTICE; supplier’s instructions.; IF THE INFORMATION IN THIS MANUAL IS NOT FOLLOWED; TIP OVER HAZARD
SAFETY DEFINITIONS THIS INDICATES THAT DEATH OR SERIOUS INJURY MAY OCCUR AS A RESULT OF NOT OBSERVING THIS WARNING.THIS INDICATES THAT MINOR OR MODERATE INJURY MAY OCCUR AS A RESULT OF NOT OBSERVING THIS WARNING.THIS INDICATES THAT DAMAGE TO THE APPLIANCE OR PROPERTY MAY OCCUR AS A RESULT OF NOT OBS...
Page 3 - Message from Hestan
© 2021 Hestan Commercial Corporation 1 EN Message from Hestan Message from Hestan Hestan’s award-winning culinary innovations and purpose-built features reinvented the restaurant kitchen and redefined culinary experience in some of America’s most acclaimed restaurants. Hestan now takes this performa...
Page 5 - SAFETY PRECAUTIONS - BEFORE YOU BEGIN; ELECTRICAL SHOCK HAZARD; TABLE OF CONTENTS
© 2021 Hestan Commercial Corporation 3 EN When properly cared for, your Hestan appliance will provide safe, reliable service for many years. When using this appliance, basic safety practices must be followed as outlined below.INSTALLER: Please leave these Installation Instructions with the owner.OWN...
Page 6 - ELECTRICAL SUPPLY
©2021 Hestan Commercial Corporation 4 EN SAFETY PRECAUTIONS - BEFORE YOU BEGIN (CONTINUED) ELECTRICAL SUPPLY ELECTRICAL SUPPLY This appliance must be connected to a dedicated circuit, 240 VAC, Single Phase, 60 Hz, with a current rating as shown in the model number listing on pg. 8. Have the installe...
Page 7 - VENTILATION REQUIREMENTS; CONSULT WITH YOUR HESTAN DEALER ON SELECTING THE APPROPRIATE; IN CASE OF POWER OUTAGE; result in an explosion.; CHILD SAFETY; severe burns or injury.; TECHNICAL SAFETY
© 2021 Hestan Commercial Corporation 5 EN SAFETY PRECAUTIONS - BEFORE YOU BEGIN (CONTINUED) VENTILATION REQUIREMENTS VENTILATION REQUIREMENTS A vent hood is REQUIRED above this appliance. It is strongly recommended that this appliance be installed with a Hestan vent hood. Hestan vent hoods have been...
Page 8 - USER SAFETY; the oven. Keep your face away from the opening to avoid injury.; FIRE SAFETY
©2021 Hestan Commercial Corporation 6 EN SAFETY PRECAUTIONS - BEFORE YOU BEGIN (CONTINUED) USER SAFETY USER SAFETY BURN HAZARD - All parts of the range can get very hot during operation. The oven door glass and areas surrounding the door get very hot, especially during self-cleaning operations. Do n...
Page 9 - fabrics are highly flammable and could ignite.; IF THE FLAMES DO NOT GO OUT - EVACUATE AND CALL THE FIRE; SAFETY DURING CLEANING
© 2021 Hestan Commercial Corporation 7 EN extinguisher, or baking soda if the fire is small and relatively contained. DO NOT USE WATER ON A GREASE FIRE. Doing so may result in spreading the fire elsewhere.NEVER pick up a flaming pan. You may spill the grease on yourself and be severely burned.If acc...
Page 10 - MODEL NUMBERS; RANGE MODELS; DESCRIPTION
©2021 Hestan Commercial Corporation 8 EN MODEL NUMBERS RANGE MODELS RANGE MODELS MODEL NO. MODEL NO. DESCRIPTION DESCRIPTION CIRCUIT BREAKER CIRCUIT BREAKER REQUIRED REQUIRED KRD304-NG / -LP 30” DUAL-FUEL RANGE WITH 4 BURNERS 40 Amp KRD365-NG / -LP 36” DUAL-FUEL RANGE WITH 5 BURNERS 40 Amp KRDS365-N...
Page 11 - REGULATORY / CODE REQUIREMENTS; WARNING; SMART COOKWARE
© 2021 Hestan Commercial Corporation 9 EN REGULATORY / CODE REQUIREMENTS Installation of this cooking appliance must be made in accordance with local codes. In the absence of local codes, this unit should be installed in accordance with the National Fuel Gas Code ANSI Z223.1/NFPA 54, Natural Gas and...
Page 12 - GETTING STARTED WITH YOUR APPLIANCE; COMPONENT IDENTIFICATION; Control Knob
©2021 Hestan Commercial Corporation 10 EN GETTING STARTED WITH YOUR APPLIANCE COMPONENT IDENTIFICATION COMPONENT IDENTIFICATION Use the images below to familiarize yourself with the various parts of the rangetop and oven. KRD30, KRD36/KRDS36 KRD30, KRD36/KRDS361. Island Trim Backguard (included)*2. ...
Page 13 - Oven
© 2021 Hestan Commercial Corporation 11 EN COMPONENT IDENTIFICATION (CONTINUED) COMPONENT IDENTIFICATION (CONTINUED) KRD48 KRD481. Island Trim Backguard (included)*2. Griddle (GD models)3. Sealed Dual-Flow Burner4. Single Flow Power Burner5. Burner Grate6. Control Knobs7. Oven Light Switch - Compani...
Page 15 - OVEN RACKS; PLACING THE OVEN RACKS
© 2021 Hestan Commercial Corporation 13 EN GETTING STARTED WITH YOUR APPLIANCE (CONTINUED) OVEN RACKS OVEN RACKS BURN HAZARD - To help prevent burns, never remove or reposition the oven racks when the oven is in operation, or is cooling. For safety considerations, NEVER cover any slots, holes, or pa...
Page 16 - PLACING RACKS - COMPANION OVEN
©2021 Hestan Commercial Corporation 14 EN GETTING STARTED WITH YOUR APPLIANCE (CONTINUED) 1. While raising the front of the rack slightly, place the rear lower hooks under the desired side ladder, then slide the rack back approximately 5” [13 cm]. 2. Lower the rack until it is level. 3. Continue sli...
Page 17 - SEALED BURNERS; at the same time as the main oven.; DUAL FLOW
© 2021 Hestan Commercial Corporation 15 EN GETTING STARTED WITH YOUR APPLIANCE (CONTINUED) SEALED BURNERS SEALED BURNERS Ensure the sealed burner heads are properly installed and seated on the burner base as shown below. There are notches on the burner base and cross ring to help with alignment. The...
Page 18 - BURNER HEADS
©2021 Hestan Commercial Corporation 16 EN GETTING STARTED WITH YOUR APPLIANCE (CONTINUED) BURNER HEADS BURNER HEADS If the burner head is not properly positioned, one or more of the following issues may occur:• Flames too high• Flames shoot out of the burners• Burners do not ignite• Flames are uneve...
Page 19 - USING THE RANGETOP; BURNER CONTROL KNOBS; BURNER TYPES & OUTPUT; MANUAL LIGHTING / POWER FAILURE; CANNOT BE USED DURING A POWER FAILURE.
© 2021 Hestan Commercial Corporation 17 EN USING THE RANGETOP BURNER CONTROL KNOBS BURNER CONTROL KNOBS Each sealed burner has its own control knob. The symbol below each knob indicates which burner is controlled by each knob. Push and turn LEFT (counter-clockwise) to HI to ignite the flame, then tu...
Page 20 - FLAME HEIGHT; Natural gas normal flame; HOW TO USE YOUR RANGETOP; DUAL FLOW BURNERS; COOKWARE RECOMMENDATIONS
©2021 Hestan Commercial Corporation 18 EN USING THE RANGETOP (CONTINUED) FLAME HEIGHT FLAME HEIGHT Proper flame height depends on the size of the pan being used, and the amount of food or liquid in the pan. In other words, don’t use a small pan over a large flame. For safety reasons, control the fla...
Page 21 - USING THE GRIDDLE; GRIDDLE CONTROL KNOB; Always remove the cover before use.; FIRST TIME OPERATION; what foods you cook on the surface.
© 2021 Hestan Commercial Corporation 19 EN Large stock pots should be staggered when used on the rangetop (see below).Do not cook on aluminum foil or thin, disposable aluminum pans. These can melt.Never let a pot boil dry. If left too long, the pan could melt, or damage the appliance.Use only high-q...
Page 22 - COOKING ON THE GRIDDLE
©2021 Hestan Commercial Corporation 20 EN COOKING ON THE GRIDDLE COOKING ON THE GRIDDLE When it comes to using the griddle, there are a few things to keep in mind:• As time goes on and griddle use increases, discoloration of the griddle plate may happen and is normal. • When emptying the grease tray...
Page 23 - INTRODUCTION; COOKWARE AND CAPSULES; BATTERY INSTALLATION; SMART BURNER
© 2021 Hestan Commercial Corporation 21 EN INTRODUCTION INTRODUCTION This appliance features a unique Smart Burner TM with a special control knob. The knob communicates with Hestan Cue cookware via Bluetooth ® wireless technology and the GloConnect app to provide a unique thermostatic control of the...
Page 24 - PAIRING WITH THE COOKTOP; UPDATES; THERMOSTATIC COOKING CONTROL MODE
©2021 Hestan Commercial Corporation 22 EN PAIRING WITH THE COOKTOP PAIRING WITH THE COOKTOP See the KNOB / COOKWARE SETUP section on page 23 for details. NON-CUE COOKWARE NON-CUE COOKWARE Traditional cookware may be used on the Smart Burner TM , but only in Manual Mode. See COOKWARE RECOMMENDATIONS ...
Page 25 - KNOB / COOKWARE SETUP; Knob and cookware setup must be performed before the Smart Burner; can be used for the first; ER; AVAILABLE SETTINGS
© 2021 Hestan Commercial Corporation 23 EN SMART BURNER TM - SETUP KNOB / COOKWARE SETUP KNOB / COOKWARE SETUP Knob and cookware setup must be performed before the Smart Burner TM can be used for the first time.• If you wish to use Manual Mode, no setup is required. Proceed directly to OPERATION - M...
Page 26 - Automatic; Clock
©2021 Hestan Commercial Corporation 24 EN SMART BURNER TM - SETUP (CONTINUED) KNOB / COOKWARE SETUP KNOB / COOKWARE SETUP (CONTINUED) (CONTINUED) The other available settings are shown below: ER F°C° F° C° If entering °F/ °C Rotate to the ºF/°C icon and tap to select. Choose ºF or °C and tap again t...
Page 27 - Info
© 2021 Hestan Commercial Corporation 25 EN SMART BURNER TM - SETUP (CONTINUED) KNOB / COOKWARE SETUP KNOB / COOKWARE SETUP (CONTINUED) (CONTINUED) The other available settings are shown below: Firmware: xxxxx Serial: xxxxx Program: xxxxx If entering Info Fry Pan Tap Pan 3.5 QT 5.5 QT If entering Pan...
Page 28 - Rotate to the; Error Codes; Error Code; Error Screen; The other available settings are shown below:
©2021 Hestan Commercial Corporation 26 EN Rotate to the ER icon and tap to select. The applicable error code will be highlighted (in this example, error code 03 - Low Battery is shown). See the Troubleshooting section of this manual for further details. ER F°C° 01 05 02 04 Low Battery 03 ER01 ER01 E...
Page 29 - OPERATION - MANUAL MODE; MAX; MANUAL
© 2021 Hestan Commercial Corporation 27 EN SMART BURNER TM - MANUAL MODE OPERATION - MANUAL MODE OPERATION - MANUAL MODE Manual Mode of the Smart Burner TM is similar to operation of the other burners, only with a numerical range of 1 to 12. This mode will work with Hestan Cue cookware or regular co...
Page 30 - OPERATION - THERMOSTATIC MODE; its actual temperature back to the knob via Bluetooth; THERMOSTATIC; PAN; NO PAN
©2021 Hestan Commercial Corporation 28 EN SMART BURNER TM - THERMOSTATIC MODE OPERATION - THERMOSTATIC MODE OPERATION - THERMOSTATIC MODE Thermostatic Mode allows the user to set a desired temperature, and the cookware will communicate its actual temperature back to the knob via Bluetooth ® wireless...
Page 31 - - THERMOSTATIC MODE; BOIL; WARM; Preheat; Boil recognition
© 2021 Hestan Commercial Corporation 29 EN SMART BURNER TM - THERMOSTATIC MODE (CONTINUED) OPERATION - THERMOSTATIC MODE OPERATION - THERMOSTATIC MODE (CONTINUED) (CONTINUED) 250° 125° 250° WARM 78° 500° 78° BOIL WARM 250° 250° Preheat At set temp Boil recognition Setting for Thermostatic Control No...
Page 32 - USING THE OVEN; OVEN FEATURES
©2021 Hestan Commercial Corporation 30 EN USING THE OVEN OVEN FEATURES OVEN FEATURES The oven in the 30” range, the 36” range, and the main oven of the 48” range have exactly the same features and capabilities. The 48” range’s companion oven does not have a meat probe, and does not include the True ...
Page 33 - OVEN MODE; RACK POSITIONS / USES FOR COMPANION OVEN
© 2021 Hestan Commercial Corporation 31 EN USING THE OVEN (CONTINUED) OVEN MODE OVEN MODE SUGGESTED RACK POSITIONS SUGGESTED RACK POSITIONS USES USES CONVECTION BAKE Single Rack: #3 Two Racks: #3 & #5 During this mode, a fan in the back of the oven helps air move evenly throughout, allowing for ...
Page 34 - MEAT PROBE; cancels the alert and is prompted to turn both control knobs to OFF.
©2021 Hestan Commercial Corporation 32 EN USING THE OVEN (CONTINUED) MEAT PROBE MEAT PROBE The meat probe only works in the following modes: Bake, Convection Bake, Roast, Convection Roast, True Convection.The probe measures between 115 - 185°F [46 - 85°C]. In the 36” oven, the probe inserts into a j...
Page 35 - COOKING WITH THE OVEN
© 2021 Hestan Commercial Corporation 33 EN USING THE OVEN (CONTINUED) COOKING WITH THE OVEN COOKING WITH THE OVEN The following pages will help you with the various oven controls. Your recipe will guide you on which cooking modes are best. However, food safety (handling, cooking, storage) is very im...
Page 36 - OVEN CONTROLS; DISPLAY LAYOUT / KNOB ICONS
©2021 Hestan Commercial Corporation 34 EN OVEN CONTROLS DISPLAY LAYOUT / KNOB ICONS DISPLAY LAYOUT / KNOB ICONS 30”, 36” Oven, Main Oven of 48” Range OVEN MODE SELECT OVEN MODE SELECT OVEN TEMPERATURE OVEN TEMPERATURE TOUCH SCREEN TOUCH SCREEN True Convection Bake Convection Bake Roast Convection Ro...
Page 37 - DISPLAY LAYOUT / KNOB ICONS - COMPANION OVEN; companion oven display does not offer the “advanced” menu.; OFF; COMPANION OVEN TEMPERATURE; TIMER; TOUCH SCREEN
© 2021 Hestan Commercial Corporation 35 EN OVEN CONTROLS (CONTINUED) DISPLAY LAYOUT / KNOB ICONS - COMPANION OVEN DISPLAY LAYOUT / KNOB ICONS - COMPANION OVEN (in 48” Range only)Some functions and settings are only performed from the main oven display, such as Sabbath. The companion oven display doe...
Page 38 - DISPLAY ACTIVATION
©2021 Hestan Commercial Corporation 36 EN OVEN CONTROLS (CONTINUED) DISPLAY ACTIVATION DISPLAY ACTIVATION When inactive, the display will be dark. Turning any control knob, or touching anywhere on the screen for 2 or more seconds will activate the display. After more than 1 minute of inactivity, the...
Page 39 - SETTING THE CLOCK
© 2021 Hestan Commercial Corporation 37 EN OVEN CONTROLS (CONTINUED) SETTING THE CLOCK SETTING THE CLOCK 1. Activate the display by touching and holding for 2 or more seconds. At first power-up, or after a power failure, the display will flash 00:00. Press the Menu icon. 2. Touch the CLOCK button. 3...
Page 40 - SETTING THE TIMER; Menu
©2021 Hestan Commercial Corporation 38 EN OVEN CONTROLS (CONTINUED) SETTING THE TIMER SETTING THE TIMER 1. Activate the display by touching and holding for 2 seconds. Touch the Menu icon. 2. Touch the TIMER button. 3. Touch the UP and DOWN arrows to set the desired amount of hours, then touch HOUR t...
Page 41 - SETTING THE PROBE TEMPERATURE
© 2021 Hestan Commercial Corporation 39 EN OVEN CONTROLS (CONTINUED) SETTING THE PROBE TEMPERATURE SETTING THE PROBE TEMPERATURE 1. Activate the display by touching and holding for 2 seconds. Touch the Menu icon. 2. Touch the PROBE button. 3. Touch the UP and DOWN arrows to set the desired cooking p...
Page 42 - SETTING FAHRENHEIT / CELSIUS
©2021 Hestan Commercial Corporation 40 EN OVEN CONTROLS (CONTINUED) SETTING FAHRENHEIT / CELSIUS SETTING FAHRENHEIT / CELSIUS 1. Activate the display by touching and holding for 2 seconds. Touch the Menu icon. 2. Touch the ADVANCED button. 3. Touch the °F / °C button. 4. Touch the °F or °C button an...
Page 43 - SETTING COOK TIME
© 2021 Hestan Commercial Corporation 41 EN OVEN CONTROLS (CONTINUED) SETTING COOK TIME SETTING COOK TIME 1. Activate the display by touching and holding for 2 seconds. Touch the Menu icon. 2. Touch the ADVANCED button. 3. Touch the COOK TIME button. 4. Touch the UP and DOWN arrows to set the amount ...
Page 44 - SETTING DELAYED START
©2021 Hestan Commercial Corporation 42 EN OVEN CONTROLS (CONTINUED) SETTING DELAYED START SETTING DELAYED START 1. Activate the display by touching and holding for 2 seconds. Touch the Menu icon. 2. Touch the ADVANCED button. 3. Touch the DELAY SRT button. 4. Touch the UP and DOWN arrows to set the ...
Page 45 - SETTING SABBATH MODE
© 2021 Hestan Commercial Corporation 43 EN OVEN CONTROLS (CONTINUED) SETTING SABBATH MODE SETTING SABBATH MODE On 48” ranges, Sabbath Mode is set by using the main oven’s display, not the companion oven display. 1. Activate the display by touching and holding for 2 seconds. Touch the Menu icon. 2. T...
Page 47 - TRUE CONVECTION COOKING MODE
© 2021 Hestan Commercial Corporation 45 EN OVEN CONTROLS (CONTINUED) 1. Turn the Mode Select knob to the TRUE CONVECTION setting. 2. Set the Temperature knob to the desired cooking temperature. In this example, it has been set to 350°F which is also displayed. 3. The display will now show “PRE” indi...
Page 48 - BAKE COOKING MODE
©2021 Hestan Commercial Corporation 46 EN OVEN CONTROLS (CONTINUED) NOTES: a. Once settings for Timed Cook or Probe Cook have been entered, the user has 2 minutes to set the cooking mode and temperature before the unit will revert back to the default and re-entering the settings will be required. BA...
Page 49 - CONVECTION BAKE COOKING MODE
© 2021 Hestan Commercial Corporation 47 EN OVEN CONTROLS (CONTINUED) NOTES: a. Once settings for Timed Cook or Probe Cook have been entered, the user has 2 minutes to set the cooking mode and temperature before the unit will revert back to the default and re-entering the settings will be required. b...
Page 50 - ROAST COOKING MODE
©2021 Hestan Commercial Corporation 48 EN OVEN CONTROLS (CONTINUED) NOTES: a. Once settings for Timed Cook or Probe Cook have been entered, the user has 2 minutes to set the cooking mode and temperature before the unit will revert back to the default and re-entering the settings will be required. RO...
Page 51 - CONVECTION ROAST COOKING MODE
© 2021 Hestan Commercial Corporation 49 EN OVEN CONTROLS (CONTINUED) NOTES: a. Once settings for Timed Cook or Probe Cook have been entered, the user has 2 minutes to set the cooking mode and temperature before the unit will revert back to the default and re-entering the settings will be required. b...
Page 52 - BROIL COOKING MODE
©2021 Hestan Commercial Corporation 50 EN OVEN CONTROLS (CONTINUED) NOTE: a. Timed Cook or Probe Cook should not be used in the BROIL mode. BROIL COOKING MODE BROIL COOKING MODE 1. Turn the Mode Select knob to the BROIL setting. 2. Set the Temperature knob to the BROIL setting. The display will show...
Page 53 - CONVECTION BROIL COOKING MODE
© 2021 Hestan Commercial Corporation 51 EN OVEN CONTROLS (CONTINUED) NOTES: a. Timed Cook or Probe Cook should not be used in the CONVECTION BROIL mode. b. In general, convection cooking should be done using low, shallow bakeware or pans to allow the heated air to circulate around the food. Removal ...
Page 54 - PROOF COOKING MODE
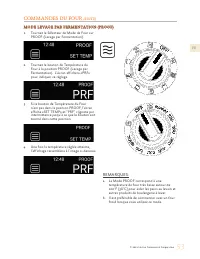
©2021 Hestan Commercial Corporation 52 EN OVEN CONTROLS (CONTINUED) NOTE: a. The PROOF setting is a very low oven temperature around 100°F [38°C] for assisting yeast-leavened breads and other baked goods to rise. b. It is best to start with a cool oven when using this setting. PROOF COOKING MODE PRO...
Page 56 - ADDITIONAL ITEMS; COOLING BLOWERS
©2021 Hestan Commercial Corporation 54 EN ADDITIONAL ITEMS COOLING BLOWERS COOLING BLOWERS The range has a cooling blower (two in the 48” ranges) to protect the electronic components. The blower(s) activate at the start of any cook cycle, and will stay on throughout that cycle. After cooking, even t...
Page 57 - OVEN LATCH; OVEN
© 2021 Hestan Commercial Corporation 55 EN CARE & MAINTENANCE (CONTINUED) OVEN LATCH OVEN LATCHThe self-clean cycle will engage an automatic door latch to prevent the user from opening the oven door and being exposed to the high heat. When you see the lock icon displayed, check the door to be su...
Page 58 - LADDER RACKS / OVEN RACKS
©2021 Hestan Commercial Corporation 56 EN CARE & MAINTENANCE (CONTINUED) LADDER RACKS / OVEN RACKS LADDER RACKS / OVEN RACKSThe oven racks and the left & right ladder racks can be removed from the oven for cleaning. DO NOT clean these items in a self-cleaning oven. The racks may be cleaned w...
Page 59 - EXTERIOR SURFACES
© 2021 Hestan Commercial Corporation 57 EN CARE & MAINTENANCE (CONTINUED) SUGGESTED CLEANERS:BRASS BURNER / HEADS Hot water & mild detergent Bon-Ami ® Kleen King ® CERAMIC IGNITER Hot water & mild detergent Fantastik ® CAST IRON COOKING GRATES WITH PORCELAIN ENAMEL Hot water & mild d...
Page 60 - REPLACING THE OVEN LIGHT BULB; Customer Care for more information.
©2021 Hestan Commercial Corporation 58 EN CARE & MAINTENANCE (CONTINUED) REPLACING THE OVEN LIGHT BULB REPLACING THE OVEN LIGHT BULB ELECTRICAL SHOCK HAZARD - Make sure the power has been shut off to the range. The light socket is energized when the door is open. Failure to shut off the power wh...
Page 61 - SYMPTOM; TROUBLESHOOTING GUIDE
© 2021 Hestan Commercial Corporation 59 EN SYMPTOM SYMPTOM POSSIBLE CAUSE POSSIBLE CAUSE SOLUTION SOLUTION Range does not operate(no display, knob lights, interior lights, etc.). Power cord not plugged in, or no power to receptacle, or breaker tripped. Check breaker. Call for service for other issue...
Page 63 - COMPLIANCE INFORMATION; FEDERAL COMMUNICATIONS COMMISSION (FCC) STATEMENT; operation instructions as documented in the manual.; COMPLIANCE INFORMATION:
© 2021 Hestan Commercial Corporation 61 EN COMPLIANCE INFORMATION FEDERAL COMMUNICATIONS COMMISSION (FCC) STATEMENT FEDERAL COMMUNICATIONS COMMISSION (FCC) STATEMENT This equipment has been tested and found to comply with the limits for a consumer ISM equipment, pursuant to Part 15 of FCC rules. The...
Page 64 - LIMITED WARRANTY; WHAT THIS LIMITED WARRANTY COVERS:
©2021 Hestan Commercial Corporation 62 EN LIMITED WARRANTY WHAT THIS LIMITED WARRANTY COVERS: WHAT THIS LIMITED WARRANTY COVERS: Hestan Commercial Corporation (“HCC”) warrants to the original consumer purchaser of a Hestan Indoor Cooking product (the “Product”) from an HCC authorized dealer that the...
Page 65 - LIMITATION OF LIABILITY:
© 2021 Hestan Commercial Corporation 63 EN LIMITED WARRANTY (CONTINUED) ARBITRATION: ARBITRATION: This Limited Warranty is governed by the Federal Arbitration Act. Any dispute between Purchaser and HCC regarding or related to the Product or to this Limited Warranty shall be resolved by binding arbit...
Page 66 - DÉFINITIONS DE SÉCURITÉ; LISEZ ATTENTIVEMENT ET COMPLÈTEMENT CES INSTRUCTIONS AVANT; PRÉCAUTION; AVIS; PROPRIÉTAIRE: CONSERVEZ CE MANUEL POUR RÉFÉRENCE FUTURE.; LE NON-RESPECT À LA LETTRE DE CES INSTRUCTIONS PEUT CAUSER; DANGER DE BASCULEMENT
DÉFINITIONS DE SÉCURITÉ CECI INDIQUE QUE L’INOBSERVATION DE CET AVERTISSEMENT PEUT ENTRAÎNER DES BLESSURES GRAVES VOIRE MORTELLES. CECI INDIQUE QUE L’INOBSERVATION DE CET AVERTISSEMENT PEUT ENTRAÎNER DES BLESSURES MINEURES OU MODÉRÉES. CECI INDIQUE QUE L’INOBSERVATION DE CET AVERTISSEMENT PEUT ENTRA...
Page 67 - Un message from Hestan
FR © 2021 Hestan Commercial Corporation 1 Un message from Hestan Un message from Hestan Les innovations culinaires primées de Hestan et les caractéristiques spéciales ont réinventé la cuisine du restaurant et redéfini l’expérience culinaire dans certains des restaurants les plus acclamés de l’Amériq...
Page 69 - PRÉCAUTIONS DE SÉCURITÉ - AVANT DE COMMENCER; RISQUE DE CHOC ÉLECTRIQUE; TABLE DES MATIÈRES
FR © 2021 Hestan Commercial Corporation 3 S’il est bien entretenu, cet appareil Hestan procurera un service sûr et fiable pendant de nombreuses années. Lorsqu’on se sert de cet appareil, les pratiques élémentaires suivantes en matière de sécurité doivent être adoptées.INSTALLATEUR: Veuillez laisser ...
Page 70 - ALIMENTATION ÉLECTRIQUE
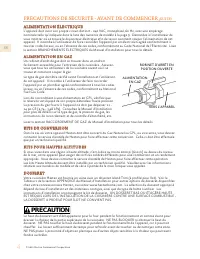
FR © 2021 Hestan Commercial Corporation 4 PRÉCAUTIONS DE SÉCURITÉ - AVANT DE COMMENCER (SUITE) ALIMENTATION ÉLECTRIQUE ALIMENTATION ÉLECTRIQUE L’appareil doit avoir son propre circuit distinct - 240 VAC, monophasé, 60 Hz, avec une ampérage nominale telle qu’indiquée dans la liste des numéros de modè...
Page 71 - EXIGENCES DE VENTILATION; APPROPRIÉ POUR VOTRE APPAREIL HESTAN.; EN CAS DE PANNE DE COURANT; LA SÉCURITÉ DES ENFANTS; qu’en la tenant par ses côtés.
FR © 2021 Hestan Commercial Corporation 5 PRÉCAUTIONS DE SÉCURITÉ - AVANT DE COMMENCER (SUITE) EXIGENCES DE VENTILATION EXIGENCES DE VENTILATION Une hotte de ventilation est REQUISE au-dessus de cet appareil. Il est fortement recommandé d’installer cet appareil avec une hotte Hestan. Les hottes Hest...
Page 72 - SÉCURITÉ DE L’UTILISATEUR; des objets inflammables à proximité.; SÉCURITÉ CONTRE L’INCENDIE
FR © 2021 Hestan Commercial Corporation 6 PRÉCAUTIONS DE SÉCURITÉ - AVANT DE COMMENCER (SUITE) SÉCURITÉ DE L’UTILISATEUR SÉCURITÉ DE L’UTILISATEUR RISQUE DE BRÛLURE - Toutes les parties de la cuisinière peuvent devenir très chaudes pendant le fonctionnement. La vitre de la porte du four et les zones...
Page 73 - sont hautement inflammables et pourraient s’enflammer.; SÉCURITÉ PENDANT LE NETTOYAGE
FR © 2021 Hestan Commercial Corporation 7 ou sur la cuisinière, ni près des surfaces de cuisson. Ne pas obstruer le flux d’air de combustion et de ventilation de l’appareil.TOUJOURS avoir un détecteur de fumée fonctionnel près de la cuisine.TOUJOURS avoir un extincteur à poudre chimique approprié à ...
Page 74 - UTILISATION APPROPRIÉE
FR © 2021 Hestan Commercial Corporation 8 PRÉCAUTIONS DE SÉCURITÉ - AVANT DE COMMENCER (SUITE) UTILISATION APPROPRIÉE UTILISATION APPROPRIÉE Ne laissez pas les aliments dans le four plus d’une heure avant ou après la cuisson. Cela pourrait entraîner une intoxication alimentaire ou une maladie. Ne pa...
Page 75 - NUMÉROS DE MODÈLE; MODÈLES DE CUISINIÈRE
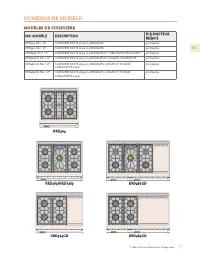
FR © 2021 Hestan Commercial Corporation 9 NUMÉROS DE MODÈLE MODÈLES DE CUISINIÈRE MODÈLES DE CUISINIÈRE NO. MODÉLE NO. MODÉLE DESCRIPTION DESCRIPTION DISJONCTEUR DISJONCTEUR REQUIS REQUIS KRD304-NG / -LP CUISINIÈRE MIXTE 30 po A 4 BRÛLEURS 40 Ampères KRD365-NG / -LP CUISINIÈRE MIXTE 36 po A 5 BRÛLEU...
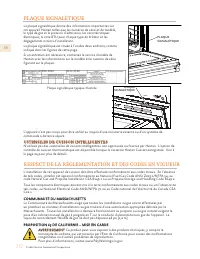
Page 76 - COMMUNAUTÉ DU MASSACHUSETTS; PLAQUE SIGNALÉTIQUE; RESPECT DE LA RÉGLEMENTATION ET DES CODES EN VIGUEUR; USTENSILES DE CUISSON INTELLIGENTES
FR © 2021 Hestan Commercial Corporation 10 L’installation de cet appareil de cuisson doit être effectuée conformément aux codes locaux. En l’absence de tels codes, installer cet appareil conformément au National Fuel Gas Code ANSI Z223.1/NFPA 54, au code Natural Gas and Propane Installation CSA B149...
Page 77 - COMMENT COMMENCER AVEC VOTRE APPAREIL; IDENTIFICATION DE COMPOSANTS; pour Brûleu; r Intelligent; * Dosseret Bas ou Étagère Haute commandé séparément.; principal de cuisinière de 48 po)
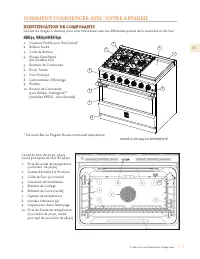
FR © 2021 Hestan Commercial Corporation 11 COMMENT COMMENCER AVEC VOTRE APPAREIL IDENTIFICATION DE COMPOSANTS IDENTIFICATION DE COMPOSANTS Utilisez les images ci-dessous pour vous familiariser avec les différentes parties de la cuisinière et du four. KRD30, KRD36/KRDS36 KRD30, KRD36/KRDS36 1. Dosser...
Page 78 - compagnon
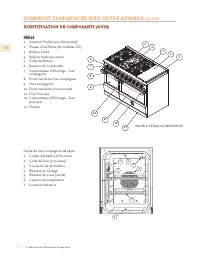
FR © 2021 Hestan Commercial Corporation 12 COMMENT COMMENCER AVEC VOTRE APPAREIL (SUITE) IDENTIFICATION DE COMPOSANTS IDENTIFICATION DE COMPOSANTS (SUITE) (SUITE) KRD48 KRD48 1. Dosseret Profilé pour Îlot (inclus)*2. Plaque Chauffante (les modèles GD) 3. Brûleur Scellé4. Brûleur haute puissance5. Gr...
Page 80 - GRILLES DU FOUR; PLACEMENT DES GRILLES DE FOUR
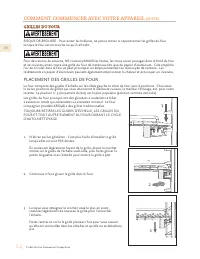
FR © 2021 Hestan Commercial Corporation 14 COMMENT COMMENCER AVEC VOTRE APPAREIL (SUITE) GRILLES DU FOUR GRILLES DU FOUR RISQUE DE BRÛLURE - Pour éviter les brûlures, ne jamais retirer ni repositionner les grilles du four lorsque le four est en marche ou qu’il refroidit. Pour des raisons de sécurité...
Page 81 - PLACEMENT DES GRILLES DE FOUR COMPAGNON
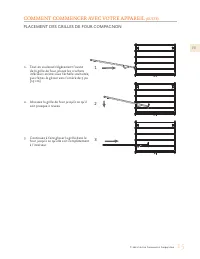
FR © 2021 Hestan Commercial Corporation 15 COMMENT COMMENCER AVEC VOTRE APPAREIL (SUITE) 1. Tout en soulevant légèrement l’avant de la grille de four, placez les crochets inférieurs arrière sous l’échelle souhaitée, puis faites-le glisser vers l’arrière de 5 po [13 cm]. 2. Abaissez la grille de four...
Page 82 - BRÛLEURS SCELLÉS; MODELÉS À DOUBLE FOUR; Cela peut être fait en même temps que le four principal.; BRÛLEUR
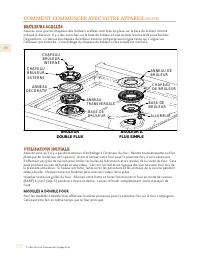
FR © 2021 Hestan Commercial Corporation 16 COMMENT COMMENCER AVEC VOTRE APPAREIL (SUITE) BRÛLEURS SCELLÉS BRÛLEURS SCELLÉS Assurez-vous que les chapeaux des brûleurs scellées sont bien en place sur la base du brûleur comme indiqué ci-dessous. Il y a des encoches sur la base du brûleur et une anneau ...
Page 83 - CHAPEAUX DE BRÛLEURS
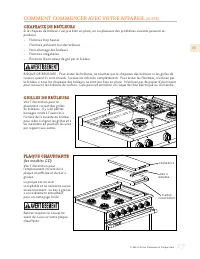
FR © 2021 Hestan Commercial Corporation 17 COMMENT COMMENCER AVEC VOTRE APPAREIL (SUITE) CHAPEAUX DE BRÛLEURS CHAPEAUX DE BRÛLEURS Si le chapeau de brûleur n’est pas bien en place, un ou plusieurs des problèmes suivants peuvent se produire:• Flammes trop hautes• Flammes jaillissant hor des brûleurs•...
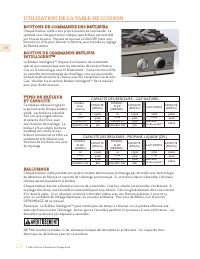
Page 84 - UTILISATION DE LA TABLE DE CUISSON; BOUTONS DE COMMANDE DES BRÛLEURS; TYPES DE BRÛLEUR; CAPACITÉ DES BRÛLEURS - GAZ NATUREL
FR © 2021 Hestan Commercial Corporation 18 UTILISATION DE LA TABLE DE CUISSON BOUTONS DE COMMANDE DES BRÛLEURS BOUTONS DE COMMANDE DES BRÛLEURS Chaque brûleur scellé a son propre bouton de commande. Le symbole sous chaque bouton indique quel brûleur est contrôlé par chaque bouton. Poussez et tournez...
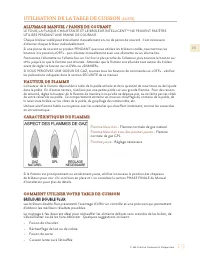
Page 85 - ALLUMAGE MANUEL / PANNE DE COURANT; LE FOUR, LA PLAQUE CHAUFFANTE ET LE BRÛLEUR INTELLIGENT; NE PEUVENT PAS ÊTRE; HAUTEUR DE FLAMME; Flamme bleu clair; d’Installation pour plus de détails.; COMMENT UTILISER VOTRE TABLE DE CUISSON; BRÛLEURS DOUBLE FLUX
FR © 2021 Hestan Commercial Corporation 19 UTILISATION DE LA TABLE DE CUISSON (SUITE) ALLUMAGE MANUEL / PANNE DE COURANT ALLUMAGE MANUEL / PANNE DE COURANT LE FOUR, LA PLAQUE CHAUFFANTE ET LE BRÛLEUR INTELLIGENT TM NE PEUVENT PAS ÊTRE UTILISÉS PENDANT UNE PANNE DE COURANT. Chaque brûleur scellé peut...
Page 86 - surfaces; RECOMMANDATIONS EN MATIÈRE D’USTENSILES
FR © 2021 Hestan Commercial Corporation 20 UTILISATION DE LA TABLE DE CUISSON (SUITE) BRÛLEUR FLUX SIMPLE (CERTAINS MODÈLES) BRÛLEUR FLUX SIMPLE (CERTAINS MODÈLES)Ideal pour:• Saisie• Ébullition de l’eau• Grandes casseroles – elles permettent une répartition uniforme de la chaleur sur des grandes su...
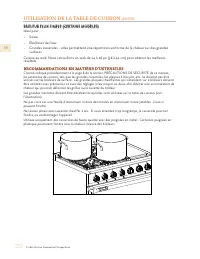
Page 87 - UTILISATION DE LA PLAQUE CHAUFFANTE; BOUTON DE COMMANDE DE PLAQUE CHAUFFANTE; en place. Retirez le couvercle avant de cuisiner.; chauffante. NE PAS couper directement sur la plaque de cuisson.; PREMIÈRE OPÉRATION; PRODUIT ALIMENTAIRE; DES ŒUFS; NETTOYAGE DE LA PLAQUE CHAUFFANTE
FR © 2021 Hestan Commercial Corporation 21 UTILISATION DE LA PLAQUE CHAUFFANTE BOUTON DE COMMANDE DE PLAQUE CHAUFFANTE BOUTON DE COMMANDE DE PLAQUE CHAUFFANTE La plaque chauffante offre une plage de température allant de 120°F - MAX (environ 500°F) [49 - 260°C]. Poussez et tournez vers la DROITE (da...
Page 88 - USTENSILE DE CUISSON ET CAPSULES; INSTALLATION DE LA BATTERIE; BRÛLEUR INTELLIGENT
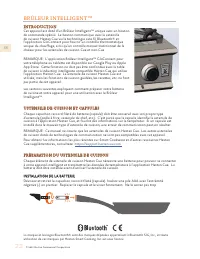
FR © 2021 Hestan Commercial Corporation 22 INTRODUCTION INTRODUCTION Cet appareil est doté d’un Brûleur Intelligent TM unique avec un bouton de commande spécial. Le bouton communique avec la ustensile de cuisson Hestan Cue via la technologie sans fil Bluetooth® et l’application GloConnect pour fourn...
Page 89 - COUPLAGE AVEC LA TABLE DE CUISSON; MISES À JOUR; MODE THERMOSTATIQUE DE CUISSON; apparaîtront sur
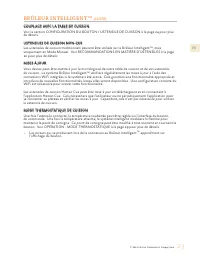
FR © 2021 Hestan Commercial Corporation 23 COUPLAGE AVEC LA TABLE DE CUISSON COUPLAGE AVEC LA TABLE DE CUISSON Voir la section CONFIGURATION DU BOUTON / USTENSILE DE CUISSON à la page 24 pour plus de détails. USTENSILES DE CUISSON USTENSILES DE CUISSON NON-CUE NON-CUE Les ustensiles de cuisson tradi...
Page 90 - CONFIGURATION DU BOUTON / USTENSILE DE CUISSON; Intelligent; puisse être utilisé pour la première fois.; PARAMÈTRES DISPONIBLES
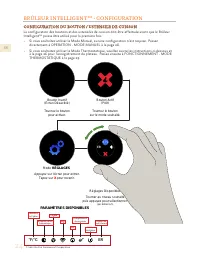
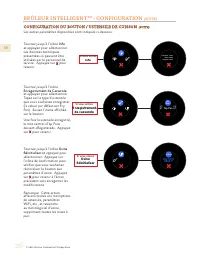
FR © 2021 Hestan Commercial Corporation 24 BRÛLEUR INTELLIGENT TM - CONFIGURATION CONFIGURATION DU BOUTON / USTENSILE DE CUISSON CONFIGURATION DU BOUTON / USTENSILE DE CUISSON La configuration des boutons et des ustensiles de cuisson doit être effectuée avant que le Brûleur Intelligent TM puisse êtr...
Page 91 - Horloge
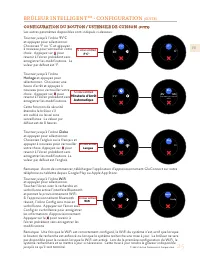
FR © 2021 Hestan Commercial Corporation 25 BRÛLEUR INTELLIGENT TM - CONFIGURATION (SUITE) CONFIGURATION DU BOUTON / USTENSILE DE CUISSON CONFIGURATION DU BOUTON / USTENSILE DE CUISSON (SUITE) (SUITE) Les autres paramètres disponibles sont indiqués ci-dessous: ER F°C° F° C° Si vous entrez F°C° F°C° 4...
Page 93 - Faites pivoter jusqu’à l’icône; Tableau des Erreurs; Écran d’Erreur; Les autres paramètres disponibles sont indiqués ci-dessous:
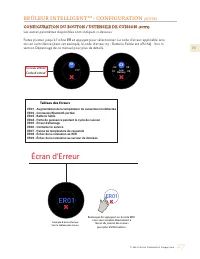
FR © 2021 Hestan Commercial Corporation 27 Faites pivoter jusqu’à l’icône ER et appuyez pour sélectionner. Le code d’erreur applicable sera mis en surbrillance (dans cet exemple, le code d’erreur 03 - Batterie Faible est affiché). Voir la section Dépannage de ce manuel pour plus de détails. ER F°C° ...
Page 94 - OPERATION - MODE MANUEL; MANUEL; NIVEAU
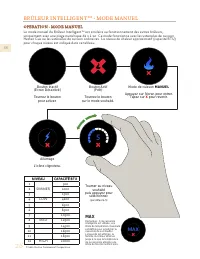
FR © 2021 Hestan Commercial Corporation 28 BRÛLEUR INTELLIGENT TM - MODE MANUEL OPERATION - MODE MANUEL OPERATION - MODE MANUEL Le mode manuel du Brûleur Intelligent TM est similaire au fonctionnement des autres brûleurs, uniquement avec une plage numérique de 1 à 12. Ce mode fonctionne avec les ust...
Page 95 - - MODE THERMOSTATIQUE; OPERATION - MODE THERMOSTATIQUE; THERMOSTATIQUE
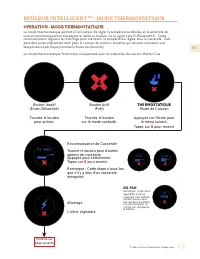
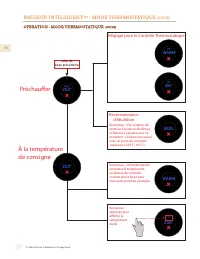
FR © 2021 Hestan Commercial Corporation 29 BRÛLEUR INTELLIGENT TM - MODE THERMOSTATIQUE OPERATION - MODE THERMOSTATIQUE OPERATION - MODE THERMOSTATIQUE Le mode thermostatique permet à l’utilisateur de régler la température désirée, et la ustensile de cuisson communiquera sa température réelle au bou...
Page 96 - Préchauffer; Reconnaissance
FR © 2021 Hestan Commercial Corporation 30 BRÛLEUR INTELLIGENT TM - MODE THERMOSTATIQUE (SUITE) OPERATION - MODE THERMOSTATIQUE OPERATION - MODE THERMOSTATIQUE (SUITE) (SUITE) 250° 125° 250° WARM 78° 500° 78° BOIL WARM 250° 250° Préchauffer À la température de consigne Reconnaissance d'ébullition Ré...
Page 97 - UTILISATION DU FOUR; CARACTÉRISTIQUES DU FOUR
FR © 2021 Hestan Commercial Corporation 31 UTILISATION DU FOUR CARACTÉRISTIQUES DU FOUR CARACTÉRISTIQUES DU FOUR Le four de la unité 30 po, 36 po, et le four principal de la unité 48 po, ont exactement les mêmes caractéristiques et capacités. Le four compagnon de la unité 48 po ne comporte pas de so...
Page 98 - MODE DU; POSITIONS / UTILISATIONS POUR LE FOUR COMPAGNON
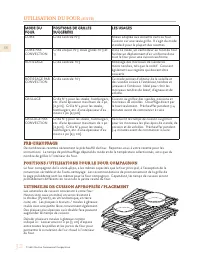
FR © 2021 Hestan Commercial Corporation 32 UTILISATION DU FOUR (SUITE) MODE DU MODE DU FOUR FOUR POSITIONS DE GRILLES POSITIONS DE GRILLES SUGGÉRÉES SUGGÉRÉES LES USAGES LES USAGES CUIRE Grille centrale N°3 Mieux adaptée aux aliments cuits au four. Cuisson sur une seule grille. Il s'agit du mode sta...
Page 99 - SONDE DE TEMPÉRATURE
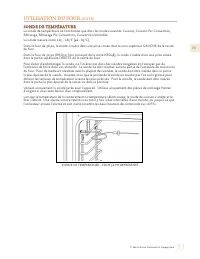
FR © 2021 Hestan Commercial Corporation 33 UTILISATION DU FOUR (SUITE) SONDE DE TEMPÉRATURE – FOUR 36 PO REPRÉSENTÉ SONDE DE TEMPÉRATURE SONDE DE TEMPÉRATURE La sonde de température ne fonctionne que dans les modes suivants: Cuisson, Cuisson Par Convection, Rôtissage, Rôtissage Par Convection, Conve...
Page 100 - CUISSON AU FOUR
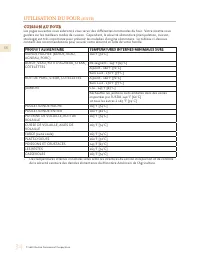
FR © 2021 Hestan Commercial Corporation 34 CUISSON AU FOUR CUISSON AU FOUR Les pages suivantes vous aideront à vous servir des différentes commandes du four. Votre recette vous guidera sur les meilleurs modes de cuisson. Cependant, la sécurité alimentaire (manipulation, cuisson, stockage) est très i...
Page 101 - COMMANDES DU FOUR; FORMAT DE L’AFFICHAGE / ICÔNES DES BOUTONS; Four de 30 po, 36 po, four principal de 48 po; SELECTEUR DE MODE
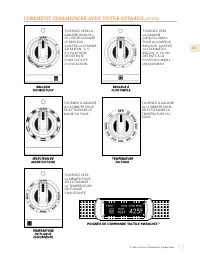
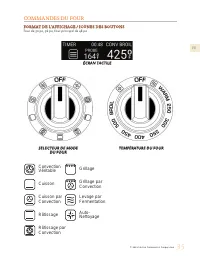
FR © 2021 Hestan Commercial Corporation 35 COMMANDES DU FOUR FORMAT DE L’AFFICHAGE / ICÔNES DES BOUTONS FORMAT DE L’AFFICHAGE / ICÔNES DES BOUTONS Four de 30 po, 36 po, four principal de 48 po SELECTEUR DE MODE SELECTEUR DE MODE DU FOUR DU FOUR TEMPÉRATURE DU FOUR TEMPÉRATURE DU FOUR ÉCRAN TACTILE É...
Page 102 - FORMAT DE L’AFFICHAGE / ICÔNES DES BOUTONS - FOUR COMPAGNON
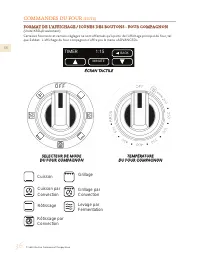
FR © 2021 Hestan Commercial Corporation 36 COMMANDES DU FOUR (SUITE) FORMAT DE L’AFFICHAGE / ICÔNES DES BOUTONS - FOUR COMPAGNON FORMAT DE L’AFFICHAGE / ICÔNES DES BOUTONS - FOUR COMPAGNON (Unité KRD48 seulement)Certaines fonctions et certains réglages ne sont effectués qu’à partir de l’affichage pr...
Page 103 - ACTIVATION DE L’AFFICHAGE; Tournez le bouton de température du four pour; MENUS D’AFFICHAGE
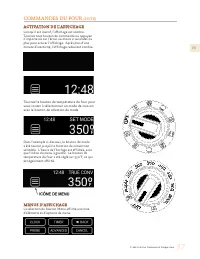
FR © 2021 Hestan Commercial Corporation 37 COMMANDES DU FOUR (SUITE) ACTIVATION DE L’AFFICHAGE ACTIVATION DE L’AFFICHAGE Lorsqu’il est inactif, l’affichage est sombre. Tournez tout bouton de commande ou appuyez n’importe où sur l’écran au moins 2 secondes ou plus pour activer l’affichage. Après plus...
Page 104 - RÉGLAGE DE L’HORLOGE
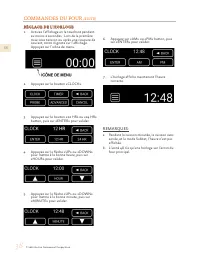
FR © 2021 Hestan Commercial Corporation 38 COMMANDES DU FOUR (SUITE) RÉGLAGE DE L’HORLOGE RÉGLAGE DE L’HORLOGE 1. Activez l’affichage en le touchant pendant au moins 2 secondes. Lors de la première mise sous tension ou après une coupure de courant, 00:00 clignote sur l’affichage. Appuyez sur l’icône...
Page 105 - RÉGLAGE DE LA MINUTERIE
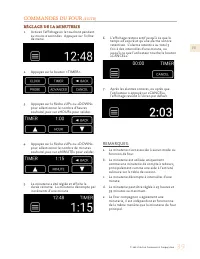
FR © 2021 Hestan Commercial Corporation 39 COMMANDES DU FOUR (SUITE) RÉGLAGE DE LA MINUTERIE RÉGLAGE DE LA MINUTERIE 1. Activez l’affichage en le touchant pendant au moins 2 secondes. Appuyez sur l’icône de menu. 2. Appuyez sur le bouton « TIMER ». 3. Appuyez sur la flèche «UP» ou «DOWN» pour sélect...
Page 106 - RÉGLAGE DE TEMPÉRATURE POUR LA SONDE (PROBE COOK)
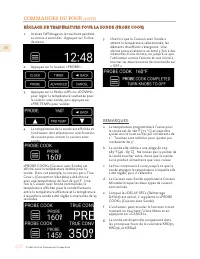
FR © 2021 Hestan Commercial Corporation 40 COMMANDES DU FOUR (SUITE) 1. Activez l’affichage en le touchant pendant au moins 2 secondes. Appuyez sur l’icône de menu. 2. Appuyez sur le bouton « PROBE ». 3. Appuyez sur la flèche «UP» ou «DOWN» pour régler la température souhaitée pour la cuisson avec s...
Page 107 - RÉGLAGE FAHRENHEIT / CELSIUS
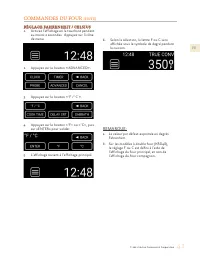
FR © 2021 Hestan Commercial Corporation 41 COMMANDES DU FOUR (SUITE) RÉGLAGE FAHRENHEIT / CELSIUS RÉGLAGE FAHRENHEIT / CELSIUS 1. Activez l’affichage en le touchant pendant au moins 2 secondes. Appuyez sur l’icône de menu. 2. Appuyez sur le bouton « ADVANCED ». 3. Appuyez sur le bouton « °F / °C » ....
Page 108 - RÉGLAGE POUR CUISSON MINUTÉE (TIMED COOK)
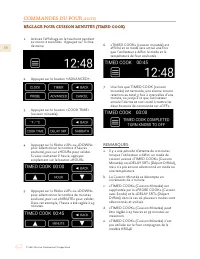
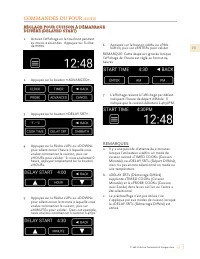
FR © 2021 Hestan Commercial Corporation 42 COMMANDES DU FOUR (SUITE) 1. Activez l’affichage en le touchant pendant au moins 2 secondes. Appuyez sur l’icône de menu. 2. Appuyez sur le bouton « ADVANCED ». 3. Appuyez sur le bouton « COOK TIME » ( cuisson minutée). 4. Appuyez sur la flèche «UP» ou «DOW...
Page 109 - menu; RÉGLAGE POUR CUISSON À DÉMARRAGE
FR © 2021 Hestan Commercial Corporation 43 COMMANDES DU FOUR (SUITE) 1. Activez l’affichage en le touchant pendant au moins 2 secondes. Appuyez sur l’icône de menu . 2. Appuyez sur le bouton « ADVANCED ». 3. Appuyez sur le bouton « DELAY SRT ». 4. Appuyez sur la flèche «UP» ou «DOWN» pour sélectionn...
Page 110 - RÉGLAGE DU MODE SABBAT
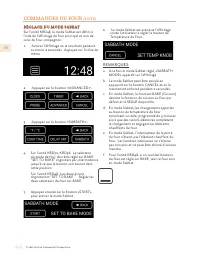
FR © 2021 Hestan Commercial Corporation 44 COMMANDES DU FOUR (SUITE) RÉGLAGE DU MODE SABBAT RÉGLAGE DU MODE SABBAT Sur l’unité KRD48, le mode Sabbat est défini à l’aide de l’affichage du four principal et non de celui du four compagnon. 1. Activez l’affichage en le touchant pendant au moins 2 second...
Page 111 - REMARQUES SUPPLÉMENTAIRES:
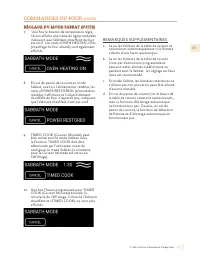
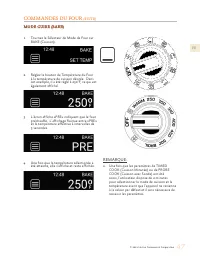
FR © 2021 Hestan Commercial Corporation 45 COMMANDES DU FOUR (SUITE) 7. Une fois le bouton de température réglé, l’écran affiche une icône de lignes ondulées indiquant que l’élément chauffant du four est actif. Les mots «OVEN HEATING ON» (chauffage du four allumé) sont également affichés. 8. En cas ...
Page 112 - MODE CONVECTION VÉRITABLE (TRUE CONVECTION)
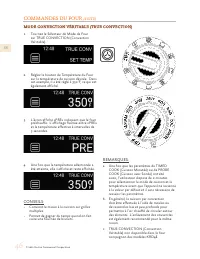
FR © 2021 Hestan Commercial Corporation 46 COMMANDES DU FOUR (SUITE) 1. Tournez le Sélecteur de Mode de Four sur TRUE CONVECTION (Convection Véritable). 2. Réglez le bouton de Température du Four sur la température de cuisson désirée. Dans cet exemple, il a été réglé à 350°F, ce qui est également af...
Page 114 - MODE CUIRE PAR CONVECTION (CONVECTION BAKE)
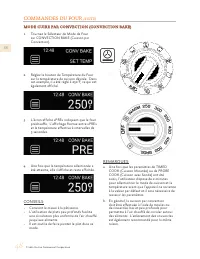
FR © 2021 Hestan Commercial Corporation 48 COMMANDES DU FOUR (SUITE) REMARQUES: a. Une fois que les paramètres de TIMED COOK (Cuisson Minutée) ou de PROBE COOK (Cuisson avec Sonde) ont été saisis, l’utilisateur dispose de 2 minutes pour sélectionner le mode de cuisson et la température avant que l’a...
Page 116 - MODE RÔTISSAGE PAR CONVECTION (CONVECTION ROAST)
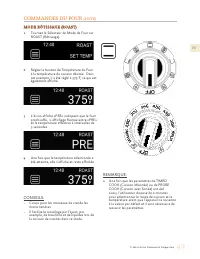
FR © 2021 Hestan Commercial Corporation 50 COMMANDES DU FOUR (SUITE) REMARQUES: a. Une fois que les paramètres de TIMED COOK (Cuisson Minutée) ou de PROBE COOK (Cuisson avec Sonde) ont été saisis, l’utilisateur dispose de 2 minutes pour sélectionner le mode de cuisson et la température avant que l’a...
Page 117 - Sonde) ne doit pas être utilisée en mode
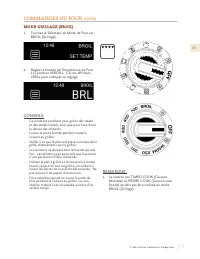
FR © 2021 Hestan Commercial Corporation 51 COMMANDES DU FOUR (SUITE) REMARQUE: a. La cuisson par TIMED COOK (Cuisson Minutée) ou PROBE COOK (Cuisson avec Sonde) ne doit pas être utilisée en mode BROIL (Grillage). MODE GRILLAGE (BROIL) MODE GRILLAGE (BROIL) 1. Tournez le Sélecteur de Mode de Four sur...
Page 118 - MODE GRILLAGE PAR CONVECTION (CONVECTION BROIL)
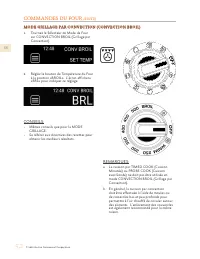
FR © 2021 Hestan Commercial Corporation 52 COMMANDES DU FOUR (SUITE) REMARQUES: a. La cuisson par TIMED COOK (Cuisson Minutée) ou PROBE COOK (Cuisson avec Sonde) ne doit pas être utilisée en mode CONVECTION BROIL (Grillage par Convection). b. En général, la cuisson par convection doit être effectuée...
Page 121 - attendre que le four refroidisse complètement à température; ÉLÉMENTS SUPPLÉMENTAIRES; VENTILATEURS DE REFROIDISSEMENT
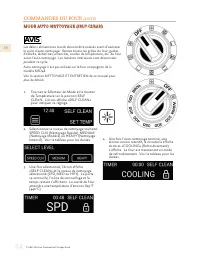
FR © 2021 Hestan Commercial Corporation 55 COMMANDES DU FOUR (SUITE) 5. Une fois que la cavité du four a atteint une température sûre (550°F / 288°C), la porte se déverrouille, l’icône de verrouillage s’éteint et l’écran invite l’utilisateur à remettre les deux boutons du four en position «OFF». PRE...
Page 122 - autour de l’appareil, même lorsqu’il n’est pas en service.; NETTOYAGE ET ENTRETIEN
FR © 2021 Hestan Commercial Corporation 56 FOUR AUTO-NETTOYANT FOUR AUTO-NETTOYANT RISQUE DE BRÛLURE - Toutes les parties de la cuisinière peuvent devenir très chaudes pendant le fonctionnement. La vitre de la porte du four et les zones entourant la porte deviennent très chaudes, en particulier lors...
Page 123 - FOUR EXTÉRIEUR / VERRE; ÉVENTS
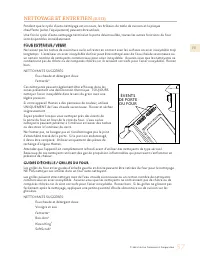
FR © 2021 Hestan Commercial Corporation 57 NETTOYAGE ET ENTRETIEN (SUITE) Pendant que le cycle d’auto-nettoyage est en cours, les brûleurs de table de cuisson et la plaque chauffante (selon l’équipement) peuvent être utilisés.Une fois le cycle d’auto-nettoyage terminé et la porte déverrouillée, tout...
Page 125 - nettoyant abrasif. Rincer à fond et sécher immédiatement.; PLAQUE CHAUFFANTE ET BAC À GRAISSE (LE CAS ÉCHÉANT); de grattoirs, car cela pourrait endommager les surfaces.; SURFACES EXTÉRIEURES; Eau chaude et détergent doux
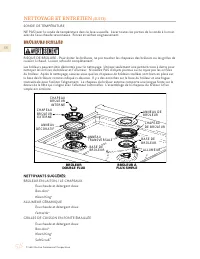
FR © 2021 Hestan Commercial Corporation 59 NETTOYAGE ET ENTRETIEN (SUITE) Soyez prudent lorsque vous manipulez les grilles. Elles sont lourdes et peuvent se fêler si elles tombent sur le sol ou sur une surface dure. NE PAS nettoyer les grilles dans un four auto-nettoyant. Ne pas laisser les taches d...
Page 126 - REMPLACEMENT DE L’AMPOULE DU FOUR; service clientèle de Hestan.
FR © 2021 Hestan Commercial Corporation 60 REMPLACEMENT DE L’AMPOULE DU FOUR REMPLACEMENT DE L’AMPOULE DU FOUR RISQUE DE CHOC ÉLECTRIQUE - Assurez-vous que l’alimentation a été coupée à la cuisinière. La douille de lampe est sous tension lorsque la porte est ouverte. Le fait de ne pas couper l’alime...
Page 127 - SYMPTÔME; GUIDE DE DÉPANNAGE
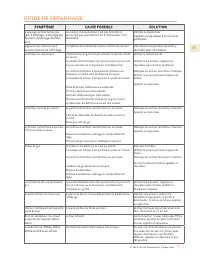
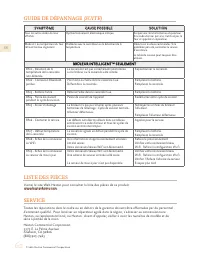
FR © 2021 Hestan Commercial Corporation 61 SYMPTÔME SYMPTÔME CAUSE POSSIBLE CAUSE POSSIBLE SOLUTION SOLUTION L’appareil ne fonctionne pas (pas d’affichage, d’éclairage des boutons, d’éclairage intérieur, etc.) Le cordon d’alimentation n’est pas branché, la prise n’est pas sous tension ou le disjonct...
Page 128 - LISTE DES PIÈCES; SEULEMENT
FR © 2021 Hestan Commercial Corporation 62 LISTE DES PIÈCES SERVICE Toutes les réparations dans le cadre ou en dehors de la garantie doivent être effectuées par du personnel d’entretien qualifié. Pour localiser un réparateur agréé dans la région, s’adresser au concessionnaire Hestan, au représentant...
Page 129 - DÉCLARATION DE LA COMMISSION FÉDÉRALE DES COMMUNICATIONS (FCC); l’autorité de l’utilisateur à faire fonctionner l’équipement.; INFORMATIONS DE CONFORMITÉ
FR © 2021 Hestan Commercial Corporation 63 DÉCLARATION DE LA COMMISSION FÉDÉRALE DES COMMUNICATIONS (FCC) DÉCLARATION DE LA COMMISSION FÉDÉRALE DES COMMUNICATIONS (FCC) Cet équipement a été testé et déclaré conforme aux limites d’un équipement ISM grand public, conformément à la partie 15 des règles...
Page 130 - GARANTIE LIMITÉE; ÉLÉMENTS COUVERTS PAR LA PRÉSENTE GARANTIE LIMITÉE :
FR © 2021 Hestan Commercial Corporation 64 GARANTIE LIMITÉE ÉLÉMENTS COUVERTS PAR LA PRÉSENTE GARANTIE LIMITÉE : ÉLÉMENTS COUVERTS PAR LA PRÉSENTE GARANTIE LIMITÉE : Hestan Commercial Corporation (« HCC ») garantit à l’acheteur initial d’un appareil de cuisson Hestan (le « Produit ») chez un revende...
Page 131 - représentant de tiers.
FR © 2021 Hestan Commercial Corporation 65 GARANTIE LIMITÉE (SUITE) Produit; dommages dont HCC n’a pas été avisé ou qui se sont produits après l’expiration de la Période de Garantie Limitée; dommages accessoires et indirects causés par tout vice de matériaux ou de fabrication. ARBITRAGE : ARBITRAGE ...
Page 132 - Hestan Commercial Corporation; RETAIN THIS MANUAL FOR FUTURE REFERENCE
Hestan Commercial Corporation 3375 E. La Palma Ave. Anaheim, CA 92806 (888) 905-7463 RETAIN THIS MANUAL FOR FUTURE REFERENCE CONSERVEZ CE MANUEL POUR UNE RÉFÉRENCE FUTURE ©2021 Hestan Commercial Corporation P/N 020050 REV L