Harbor Breeze 41176 - User Manual
Harbor Breeze 41176 Remote Control – User Manual, read for free online in PDF format. We hope this helps you resolve any issues you may have. If you have further questions, please contact us through the contact form.

2H
4H
8H
H
arb or Bree z
e
H
a rb or Br eez
e
Black (hot/power)
White (neutral)
Red
Whit
e
White
White
Black
Blue
Blue
Black
Antenna
2H
4H
8H
ASSEMBLY INSTRUCTIONS
OPERATING INSTRUCTIONS
SAFETY INFORMATION
CEILING FAN
REMOTE CONTROL
ITEM #0745361
MODEL #41176
Serial Number
Purchase Date
ATTACH YOUR RECEIPT HERE
Harbor Breeze
®
is a registered trademark
of LF, LLC. All rights reserved.
XXXXXXX
9128 • 102715
Read instructions completely before installing the remote.
WARNING:
If the color of the household supply wires is different than what is referred to in the instructions below, a professional electrician should determine
proper wiring.
CAUTION:
•
Do not install in damp locations. For indoor use only.
•
Do not use with fans that have integrated remote controls.
•
Be sure the outlet box is properly grounded or that a green or bare (ground) wire is present.
•
This unit is intended to control a ceiling fan with electrical source of AC 110/120V, 60Hz.
•
To reduce the risk of fire or electric shock, do NOT use a full-range dimmer switch to control the fan speed.
•
This device complies with Part 15 of the FCC Rules. Operation is subject to the following two conditions: (1) this device may not cause interference, and (2) this
device must accept any interference received, including interference that may cause undesired operation.
Printed in
China
3
4
1
2
5
7
8
9
1
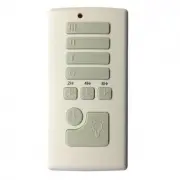
Fan Pull
Chain
Light Pull
Chain
Light Control
Home Shield
Delay
Off
Timers
Low
Medium
High
Learn
D/O
Canopy
High
LED Indicator
5. Wrap electrical tape (not included)
around each wire connector (F)
down to the wire. Then, push wire
connections into the outlet box. Place
the Green and White wire connections
on the opposite side of the outlet
box from the Black and Blue wire
connections.
6. Reinstall the canopy.
7. Turn on power supply and wall switch
to the fan. Then, remove the battery
cover from the back of the remote
(A) and install two AAA batteries (C).
Replace the battery cover and press
the high button to ensure the LED
indicator illuminates and the fan turns
on.
8. If desired, the wall bracket (B) can be
attached to a wall using the mounting
screws (G). Then rest the remote
(A) in the wall bracket (B) for easy
storage.
9. To control the remote via Bluetooth
®
,
download the Fan Smart Sync app for
your smartphone. Load the app and
follow the in-app instructions in order
to sync with the remote.
1. To operate the fan using the remote (A), press and release the following buttons:
High
- Turns fan on high speed.
Medium
- Turns fan on medium speed.
Low
- Turns fan on low speed.
Fan Off
- Turns fan off.
Walk Away Light Delay
TM
- Tap Delay once to turn fan light off after 1 minute.
Note:
Light blinks to confirm that Walk
Away Light Delay is active. Press any other button to cancel.
Timer -
Press desired timer button (2, 4 or 8 hour). Fan light (if applicable) to confirm timer is active. Press fan off to
cancel timer.
Light Control
-
Incandescent Bulbs
- Press Light Control to turn lights off and on. Press and hold Light Control to dim or brighten the
lights.
CFL
-Turns the lights on and off.
Note:
The dimmer function does not work with CFL.
Home Shield
TM
- Press and hold Light Control and Delay buttons for 3 seconds. Lights cycle on for 5-20 minutes and
off for 60 minutes, simulating occupancy. Cycle repeats continuously until any other button is pushed to discontinue
Home Shield mode.
D/O
- Switch should be set to “O” for CFLs, which disables the dimming function. Flip to “D” for incandescent and other
dimmable bulbs.
Learn
- Syncs remote control to receiver. The remote was synced at the factory. Should it become necessary to
re-sync the remote, turn off the main power, then turn it back on. Within 30 seconds, use a small screwdriver to press
and hold the learn button on the remote for 3 seconds. The fan will turn on and light (if applicable) will blink three
times, signaling a successful synchronization.
Questions?
Call our customer service department
at 1-800-643-0067, 8 a.m. - 6 p.m., EST, Monday -
Thursday, 8 a.m. - 5 p.m., EST, Friday.
Remote
Qty. 1
Wall Bracket
Qty. 1
Battery
Qty. 2
Receiver
Qty. 1
Wire Connector
Qty. 3
Push-on
Connector
Qty. 3
Mounting Screw
Qty. 2
A
B
C
E
D
F
G
1. Use existing pull chains on the desired
fan to set fan speed to high and to turn
the light on.
2. Turn off circuit breakers and wall
switch to the fan.
DANGER:
Failure to disconnect
power supply prior to installation may
result in serious injury or death.
3. Lower the canopy of the previously
assembled fan and insert receiver (E).
Note:
If installing the remote in a
new fan, insert the receiver (E) in
the mounting bracket before wiring
the fan; wire the fan according to
these instructions, then continue fan
assembly as directed in the fan’s
instruction manual.
from the receiver (E) to the White fan wire.
• Connect the Red wire with red label from the receiver (E) to the Black
(hot/power) supply wire.
• Connect the White wire with red label from the receiver (E) to the White
(neutral) supply wire.
4. Disconnect existing wire connections,
then secure all wire connections with
wire connectors (F) and push-on
connectors (D) according to diagram
and these steps:
• Connect the Blue wire with white
label from the receiver (E) to the
Blue fan wire.
• Connect the Black wire with white
label from the receiver (E) to the
Black fan wire.
• Connect the White wire with white label
E
F
E
C
B
A
F
F
6
D
"Loading the manual" means you need to wait until the file loads and becomes available for online reading. Some manuals are very large, and the time they take to appear depends on your internet speed.