Page 2 - English; SAFETY PRECAUTIONS; SAVE THESE INSTRUCTIONS
1 English SAFETY PRECAUTIONS When using this appliance, always exercise basic safety precautions, including the following:1. Read all of the instructions before using this appliance. 2. Use this appliance only for its intended purpose as described in this use and care guide. 3. This water dispenser ...
Page 3 - TABLE OF CONTENTS
English 2 PAGE SAFETY PRECAUTIONS ...................................................................... 1 PARTS AND FEATURES ................................................................... 3-4 INSTALLATION INSTRUCTIONS ......................................................... 5 START-UP INSTRUC...
Page 4 - PARTS AND FEATURES - WDNS115BW
3 English 1. Water Receptacle2. Cold Water Button3. Removable Drip Tray4. Removable Shelf5. Storage Compartment6. Hot Water Button 7. Child Safety Lock8. Hot Water, Cold Water and Power Indicator Lights 9. Drain (not shown/back of unit)10. Cold Water Switch (on back)11. Hot Water Switch (on back) 1 ...
Page 5 - PARTS AND FEATURES - WDNS32BW
4 English 1. Water Receptacle2. Cold Water Button (Blue)3. Removable Drip Tray4. Storage Compartment5. Hot Water Button (Red) 6. Child Safety Lock7. Hot and Cold Water Indicator Lights8. Drain (not shown/back of unit)9. Cold Water Switch (on back)10. Hot Water Switch (on back) 1 3 2 7 5 4 PARTS AND ...
Page 6 - PREPARATION BEFORE FIRST OPERATION; INSTALLATION INSTRUCTIONS
5 English 1. Remove all packing materials. This includes the foam base and all adhesive tape holding the accessories inside and outside. 2. Inspect and remove any remaining packaging, tape and printed material before turning on the water dispenser. Note: Allow the water dispenser to stand in an upri...
Page 7 - START-UP INSTRUCTIONS
3. Fill water tank with tap water full to capacity, wait 5 minutes until water settles.4. Activate the child safety button and press the hot water lever until water starts to come out, then stop. 5. Plug the dispenser into the electrical socket. 6. Press the hot water switch (back of unit) to the ON...
Page 8 - OPERATING YOUR WATER DISPENSER; HOT
This water dispenser maintains instant hot and cold water for your cooking and drinking needs. It accepts 3 or 5-gallon water bottles. WDNS32BW COLD (BLUE) / HOT (RED) WATER RELEASE BUTTONS • Press the button down to release the water flow.• Pull the tap lever up to stop the water flow. Note: The ho...
Page 9 - ELECTRICAL CONECTIONS
GROUNDING INSTRUCTIONS This appliance must be grounded. In the event of an electrical short circuit, grounding reduces the risk of electric shock by providing an escape wire for the electric current. This appliance is equipped with a cord containing a grounding wire and a grounded plug. The plug mus...
Page 10 - PROPER CARE AND CLEANING
9 • This appliance is not intended for use by persons (including children) with reduced physical, sensory or mental capabilities, or lack of experience and knowledge, unless they have been given supervision or instruction concerning use of the appliance by a person responsible for their safety. • Do...
Page 12 - TROUBLESHOOTING GUIDE
11 English If the power is switched on and the compressor will not start up: • Make sure the power cord is plugged in properly • If the water dispenser is brought indoors in the winter, give it a few hours to warm up to room temperature before plugging it in. Cold bottled water or the temperature of...
Page 13 - LImITED WARRANTY
12 English What is covered and for how long? This warranty covers all defects in workmanship or materials for a period of: 12 months labor (carry-in only) 12 months parts The warranty commences on the date the item was purchased and the origi- nal purchase receipt must be presented to the authorized...
Page 14 - CONSIGNES DE SÉCURITÉ; CONSERVEZ CES INSTRUCTIONS; Français
1 CONSIGNES DE SÉCURITÉ Lors de l'utilisation de cet appareil, des consignes de sécurité de base doivent être respectées, y compris ce qui suit :1. Lisez toutes les instructions avant d'utiliser cet appareil. 2. N'utilisez cet appareil qu'aux fins prévues, comme il est décrit dans ce guide d'utilisa...
Page 15 - TABLE DES mATIÈRES
2 PAGE PRÉCAUTIONS DE SÉCURITÉ .............................................................. 1 PIÈCES ET CARACTÉRISTIqUES ....................................................... 3-4 INSTRUCTIONS D’INSTALLATION ..................................................... 5 INSTRUCTIONS DE DÉmARRAGE ..........
Page 16 - PIÈCES ET CARACTÉRISTIqUES – WDNS115BW
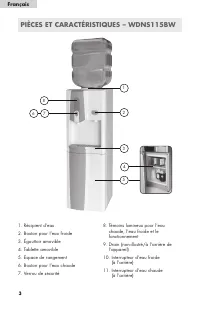
3 1. Récipient d’eau2. Bouton pour l’eau froide3. Égouttoir amovible4. Tablette amovible5. Espace de rangement6. Bouton pour l’eau chaude7. Verrou de sécurité 8. Témoins lumineux pour l’eau chaude, l’eau froide et le fonctionnement 9. Drain (non-illustré/à l’arrière de l’appareil) 10. Interrupteur d...
Page 17 - PIÈCES ET CARACTÉRISTIqUES – WDNS32BW
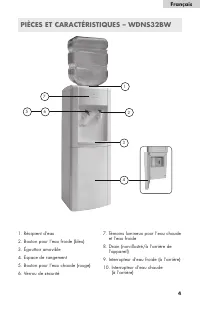
4 1. Récipient d’eau2. Bouton pour l’eau froide (bleu)3. Égouttoir amovible4. Espace de rangement5. Bouton pour l’eau chaude (rouge)6. Verrou de sécurité 7. Témoins lumineux pour l’eau chaude et l’eau froide 8. Drain (non-illustré/à l’arrière de l’appareil) 9. Interrupteur d’eau froide (à l’arrière)...
Page 18 - INSTRUCTIONS D'INSTALLATION
5 1. Retirez tous les matériaux d'emballage. Cela inclut la base en styromousse ainsi que tous les rubans adhésifs retenant des accessoires à l'intérieur et à l'extérieur. 2. Inspectez l'appareil et enlevez tout résidu d'emballage, de ruban adhésif ou de matériel imprimé avant de mettre le distribut...
Page 19 - INSTRUCTIONS DE DÉmARRAGE
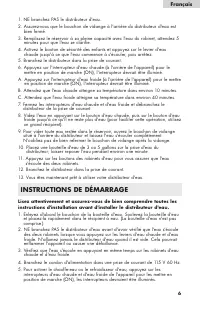
1. NE branchez PAS le distributeur d'eau.2. Assurez-vous que le bouchon de vidange à l'arrière du distributeur d'eau est bien fermé. 3. Remplissez le réservoir à sa pleine capacité avec l'eau du robinet, attendez 5 minutes pour que l'eau se clarifie. 4. Activez le bouton de sécurité des enfants et a...
Page 20 - INTERRUPTEUR D’EAU FROIDE (VERT) ET D’EAU CHAUDE; FONCTIONNEmENT DE VOTRE DISTRIBUTEUR D’EAU
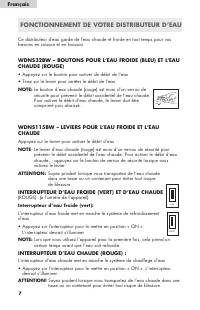
Ce distributeur d’eau garde de l’eau chaude et froide en tout temps pour vos besoins en cuisson et en boisson. WDNS32BW – BOUTONS POUR L’EAU FROIDE (BLEU) ET L’EAU CHAUDE (ROUGE) • Appuyez sur le bouton pour activer de débit de l’eau• Tirez sur le levier pour arrêter le débit de l’eau NOTE: Le bouto...
Page 21 - CONNExIONS ÉLECTRIqUES
INSTRUCTIONS DE mISE À TERRE Cet appareil doit être mis à terre. Dans l’éventualité d’un court circuit électrique, la mise à la terre réduit les risques de choc électrique en fournissant un moyen de fuite pour le courant électrique. Cet appareil est muni d’un fil électrique contenant un fil et une f...
Page 22 - ENTRETIEN ET NETTOYAGE APPROPRIÉS
9 • Cet appareil n'est pas conçu pour être utilisé par des personnes (y compris les enfants) dont les capacités physiques, sensorielles ou mentales sont réduites, ou qui manquent d'expérience et de connaissances, à moins d'être supervisées ou d'avoir reçu des instructions concernant l'utilisation de...
Page 24 - GUIDE DE DÉPANNAGE
Si l'appareil est mis en marche et que le compresseur ne démarre pas : • Assurez-vous que le cordon d'alimentation est bien branché.• Si le distributeur d'eau est apporté à l'intérieur durant l'hiver, laissez-le réchauffer pendant quelques heures à la température ambiante avant de le brancher. L'eau...
Page 25 - GARANTIE LImITÉE
12 que recouvre la garantie et pour combien de temps ? Cette garantie recouvre tous les défauts de fabrication ou de matériaux pour une période de : 12 mois pour la main d’œuvre (au service uniquement) 12 mois pour les pièces (au service uniquement) 5 ans pour système frigorifique (au service unique...
Page 26 - PRECAUCIONES DE SEGURIDAD; GUARDE ESTAS INSTRUCCIONES; Español
1 PRECAUCIONES DE SEGURIDAD Siempre que opere esta unidad tenga en cuentas las normas básicas de seguridad incluyendo las siguientes:1. Lea todas las instrucciones antes de utilizar esta unidad. 2. Utilice esta unidad sólo para su uso entendido, como se describe en este manual y guía de cuidados. 3....
Page 27 - CONTENIDOS
2 PAGE PRECAUCIONES DE SEGURIDAD ...................................................... 1 PIEZAS Y FUNCIONES ................................................................... 3-4 INSTRUCCIONES DE INSTALACIÓN ................................................. 5 INSTRUCCIONES PARA LA PUESTA EN mARCHA...
Page 28 - PIEZAS Y FUNCIONES - WDNS115BW
3 1. Receptáculo para agua2. Botón para el agua fría3. Bandeja de goteo extraíble4. Bandeja extraíble5. Compartimiento para el guardado6. Botón para el agua caliente7. Dispositivo de seguridad para niños 8. Luces indicadoras de agua caliente, agua fría y encendido 9. Desagüe (no se muestra/parte pos...
Page 29 - PIEZAS Y FUNCIONES - WDNS32BW
4 1. Receptáculo para agua2. Botón para el agua fría (azul)3. Bandeja de goteo extraíble4. Compartimiento para el guardado5. Botón para el agua caliente (rojo)6. Dispositivo de seguridad para niños 7. Luces indicadoras de agua caliente y fría. 8. Desagüe (no se muestra/parte posterior de la unidad) ...
Page 30 - INSTRUCCIONES DE INSTALACIÓN
5 1. Quite todos los materiales de empaque. Esto incluye la base de espuma y toda la cinta adhesiva que sostiene los accesorios por dentro y por fuera. 2. Revise y quite los restos de embalaje, cinta o materiales impresos antes de encender el surtidor de agua. Nota: Deje el surtidor de agua en posic...
Page 31 - INSTRUCCIONES PARA LA PUESTA EN mARCHA
3. Llene el tanque de agua con agua del grifo hasta que esté lleno, espere 5 minutos hasta que el agua se asiente. 4. Deslice el botón de seguridad para niños y presione la palanca de agua caliente hasta que el agua comience a salir, luego deténgase. 5. Enchufe el surtidor en el tomacorriente.6. Pre...
Page 32 - PALANCAS DE AGUA FRÍA Y CALIENTE DE WDNS115BW; INTERRUPTORES DE ENCENDIDO DEL AGUA FRÍA; FUNCIONAmIENTO DE SU SURTIDOR DE AGUA
Este surtidor de agua mantiene el agua caliente y fría de manera instantánea tanto para cocinar como para beber. Puede utilizarse con botellones de agua de 3 o 5 galones. BOTONES DE AGUA FRÍA (AZUL) / CALIENTE (ROJO) DE WDNS32BW • Presione el botón para liberar el flujo de agua.• Jale la palanca hac...
Page 33 - CONExIONES ELÉCTRICAS
INSTRUCCIONES DE PUESTA A TIERRA Este artefacto debe tener conexión a tierra. En el caso de un cortocircuito eléctrico, la conexión a tierra reduce el riesgo de descarga eléctrica al proporcionar un cable de escape para la corriente eléctrica. Este artefacto está equipado con un cable que cuenta con...
Page 34 - GENERAL; CUIDADO Y LImPIEZA ADECUADOS
9 • Este artefacto no fue diseñado para que lo usen personas (niños incluidos) con capacidades físicas, sensoriales o mentales disminuidas, ni falta de experiencia y conocimiento, a menos que, por su seguridad, una persona responsable los supervise o instruya en relación con el uso del artefacto. • ...
Page 36 - GUÍA PARA LA DETECCIÓN Y SOLUCIÓN DE PROBLEmAS
11 Español Si la unidad está encendida y el compresor no se pone en funcionamiento: • Asegúrese de que el cable de energía esté bien enchufado• Si el surtidor de agua se ubica en el interior en el invierno, permita que llegue a la temperatura ambiente antes de enchufarlo. El agua fría embotellada o ...
Page 37 - GARANTIA LImITADA
12 que es lo que cubre y por cuanto tiempo? Esta garantía cubre todos los defectos en el funcionamiento o materiales por un período de tiempo de: 12 meses labor (En el lugar de centro de servicios) 12 meses partes La garantía comienza desde la fecha de compra del producto, la factura original de com...
Page 38 - Do Not Return This Product To The Store; ImPORTANT; Ne pas Réexpédier ce Produit au magasin; ImPORTANTE; No regrese este producto a la tienda
115V, 60Hz Made in China Fabriqué en Chine Hecho en China Haier America New York, NY 10018 ImPORTANT Do Not Return This Product To The Store If you have a problem with this product, please contact the “Haier Customer Satisfaction Center” at 1-877-337-3639. DATED PROOF OF PURCHASE REqUIRED FOR WARRAN...