Haier HCW3485AES - Installation Manual

Haier HCW3485AES – Installation Manual, read for free online in PDF format. We hope this helps you resolve any issues you may have. If you have further questions, please contact us through the contact form.


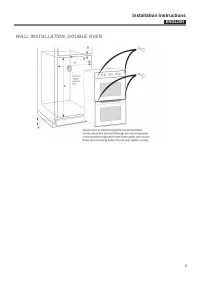


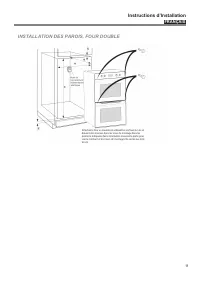
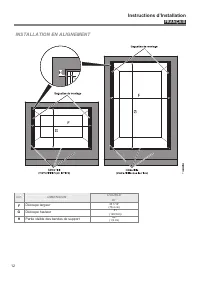
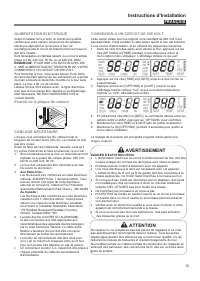
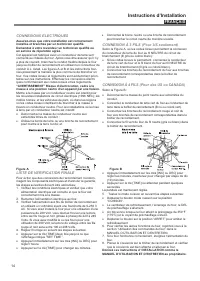


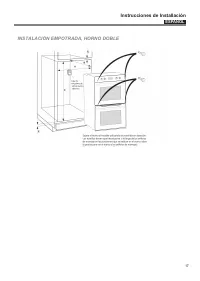


Table of Contents:
- Page 3 – ENGLISH; Installation Instructions; TABLE OF CONTENTS; WARNING; INTRODUCTION; OWNER: Please keep this manual for future reference.
- Page 4 – INSTALLATION NOTES; DOUBLE; TECHNICAL DATA; SINGLE OVEN; TECHNICAL DATA
- Page 5 – WALL INSTALLATION, DOUBLE OVEN
- Page 6 – FLUSH INSTALLATION
- Page 7 – ELECTRICAL SUPPLY; NOTE; Location of rating plate; In the United States:; CONNECTING TO 208 VOLT CIRCUIT; ELECTRICAL SHOCK HAZARD; CAUTION
- Page 8 – ELECTRICAL CONNECTIONS; FINAL CHECKLIST
- Page 9 – FRANÇAIS; Instructions d’Installation; TABLE DES MATIERES; AVERTISSEMENT
- Page 10 – REMARQUES D’INSTALLATION; DONNEES TECHNIQUES
- Page 11 – INSTALLATION DES PAROIS, FOUR DOUBLE
- Page 12 – INSTALLATION EN ALIGNEMENT
- Page 13 – ALIMENTATION ELECTRIQUE; REMARQUE; Endroit de la plaque de valeurs; CONNEXION A UN CIRCUIT DE 208 VOLT; DANGER D’ELECTROCUTION; ATTENTION
- Page 14 – CONNEXIONS ELECTRIQUES
- Page 15 – ESPAÑOL; Instrucciones de Installación; TABELA DE CONTENIDO; ATENCIÓN; INTRODUCCIÓN
- Page 16 – NOTAS PARA LA INSTALACIÓN; ADVERTENCIA; DOBLE; DATOS TÉCNICOS
- Page 17 – INSTALACIÓN EMPOTRADA, HORNO DOBLE
- Page 18 – INSTALACIÓN �����
- Page 19 – ALIMENTACIÓN ELÉCTRICA; NOTA; Localización de la placa de potencia; En los Estados Unidos:; CONEXIÓN A UN CIRCUITO DE 208 VOLTIOS; PELIGRO DE ELECTROCUCIÓN; PRECAUCIÓN
- Page 20 – CONEXIONES ELÉCTRICAS
- Page 21 – Notes
- Page 24 – Do Not Return This Product To The Store; IMPORTANT; Ne pas Réexpédier ce Produit au Magasin; IMPORTANTE; No regrese este producto a la tienda; Italy; Printed in
30” Double Convection Oven
Four à convection double de 30”
Horno de convección doble de 30”
Installation Instructions
Instructions d’installation
Instrucciones de instalación
HCW3485AES
"Loading the manual" means you need to wait until the file loads and becomes available for online reading. Some manuals are very large, and the time they take to appear depends on your internet speed.
Other Manuals for Haier HCW3485AES
Summary
ENGLISH Installation Instructions 3 TABLE OF CONTENTS page page page Introduction 1 Installation notes 2 Connecting to 208V circuit 5 Tools you will need 1 Wall or under counter installation, single oven 3 Electrical connections 6 Power requirements 1 Wall installation double oven 3 3-wire branch ci...
ENGLISH Installation Instructions 4 ***Digits identifying oven color and version INSTALLATION NOTES 1. Do not slide oven across floor. Damage to floor covering or floor could result. 2. The oven support surface must be a minimum 3/4" (2cm) thick plywood platform. For single ovens, it must suppor...
ENGLISH Installation Instructions 5 WALL INSTALLATION, DOUBLE OVEN