Gymax GYM06925 - User Manual
Gymax GYM06925 Air Conditioner – User Manual, read for free online in PDF format. We hope this helps you resolve any issues you may have. If you have further questions, please contact us through the contact form.

INTRODUCTIO'I
•Thank you for purchasing our air cooler
• Each unit has been manufactured to ensure safety and reliab山ty
• Before first use, read the instruetions eareful\y and keep them for further referenee
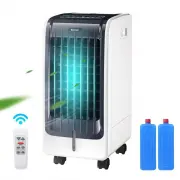
DIAGRAM
USER'S MANUAL
AIR COOLER
p
m
u
氮
』
声二
刍
国
n
e
e
c
s
e
A
Water inlet
Water tank
Castors
PERFORMANCE PA肛YIETERS
Air Vent
Water level
indicator
Back
Ice-crystal box
/
Model
EP23430
FUNCTIONS
Rating Power
II0-120V-60H乙
Fan power
75W
Max Water
lnje山on Rate
6L
Specification
14.17*1l.81*24.21 m
• Principle of cool humidify: take cool water from the water tank by pump, after reaching the top,
the cool water will flow through the wetted pad, then blow off humid cool air rounding the
wetted pad by rotational wind wheel. Use the water evaporation principle,
• Mechanical control: safe and durable, attractive appearance
• Adjustable speed: have three speeds, blow at wide angle
• Cool/humidify: adopt ice crystal refrigeration and air hum曲fying technology, can cut down the
temperature from air vent and raise relative hom汕ty, prevent air drymg.
• Deliver wind at wide angle: swing the blades automatically, deliver wind at horizontal wide
angle. Also can swing the blades vertically manually, select the direction discretionarily
ASSEMBLING AND WATERING
I. Assemble castors: put the appliance on a flat surface, take out the wrench from foam box, then
assemble the castors
Attention: the back castor is with brake, but the front one is not.(mapl)
2. Watering: unlock the water tank at the bottom of back side , draw the water tank, then add water
into it, then push the water tank into the unit, and loek the water tank .(map 2)
Attention
a. Pay attention lo Lhe level uf water tank when atld water.(rnap 3)
b. The level of water tank should not over "MAX" scale at any time, when hum曲fying, the
total level of water tank should not below "MTN" scale
c. Put ice to the water tank or put frozen ice -crystal box in the space at the top of the unit if
you want to strengthen the efficiency of cooling. But the total level of water tank should not
over "MAX" scale.
OPERATION
• Oi'i/OFF/SPEED: Connect the plug of air cooler with the power, it will be ready. Rotate the
speed button at "I" (Low Speed), at 2(Middle Speed), at 3(High Speed), it has 3 speeds, you can
adjust the speed according to your need. At "O", it will be OFF
• Swing: press the key of swing, the wind swings horizontal automatically. Cancel this functrnn
when press again. Swing the blades vertically manually, select the direction discretionarily
• Cool/humidify: press the key of cool. if add frozen ice crystal box, the temperature from a IT
ventt can lower about 3 7
°
F after a few minutes. Cancel this function when press agam
A. COOLER MODE:
0---0FF, 1---LOW, 2---MlDDLE, 3---HIGH
B. SWlNC: Under the swing mode, wind can be swing automat,cally on left and right and choose
the wind up and down by hand.
THE USE OF ICE-CRYSTAL BOX
The ice-crystal box has a particular feaiure of keeping cool, it can absorb heat and let 1lie water
temperature below the environmental temperature
Using methods:
a. Put the ice-crystal boxes into the refrigerator to make sure that they iced absolutely
b. Unlock the water tank, draw the water tank, then put a frozen ice-crystal box into it. And push
the water tank into to the unit. Then lock the water tank
c. There have two ice-crystal boxes, so can use circularly.
CAUTION
I. Use as per the rating voltage
2. Do not repair or remake the appliance b y yourself, it should be repaired by the repairmen
3. Do not operate the appliance with wet hands, in order to avoid damage
4. If the supply cord is damaged, it must be replaced by the manufactlJrer, its service agenl or
similarly qualified persons in order to avoid a hazard
5. When the appliance is not in use, switch off and unplug it
6. Do not insert foreign things to"" outlets and inlets, in order to avoid damage
7. Do not use the appliance near explosive and combustible gas. Avoid long-term direct solar
radiation.
8. Use the appliance only on a flat surface.
9. Do not use outdoors
2
3
JO. The level of water tank should not over·'11,IAX" scale at any time, when humidifymg, the total
level ot water tank should not below "MIN" scale
11. Do not turnover the appliance. If it is toppled over and there is some v.ater in the body, should
unplug the power supply first. Then send it to repair department or after-sales service and
overhaul
12. Clean the appearance with a damp cloth lightly. Do not use any type of detergents or solutions
Du nul nnse the appliance.
13. Do not make air outlets near the wall or curtain
14. Do not knock or shake the body when using, otherw函,t may cause stop automatically
15. The water of tank will easily metamorphose and has odor m summer, please renew the water
frequently.
16. This appliance 1s not intended for use by persons (including children) with reduced physical,
sensory or mental capabilities, or lack of experience and knowledge, unless they have been
gi,en supervision or instruction concerning use of the appliance by a person responsible for their
safety.
17. Children should be supervised to ensure that they do not play with the appliance
18. To avoid the risk caused by instability of unit, you must fix the unit fiimly according lo manual
book
I 9. Do not use this appliance in the immediate surroundings of a bath, a shower or a sw1mmmg
pool
20. Should it be necessary to move the unit after the water has been added, roll gently to the
required Pos山on and activate the bracket the castors
21. WARNrN G: Ensure that the fan is switched off from the supply mams before removmg the a1r
filter screen
22. Attention: cut off the power supply when clean the appliance
ELECTRIC PRINCIPLE DIAGRAM
main motor
Brown
Blue
power plug
circuit
board
Transformer
CLEANING AND MAINTENANCE
...,,,
m叩3
m叩4
WARNING: Ensure t气hat the fan is switched off from the supply mains before removing the air
filter screen
I. Clean the air filter screen (map I)
Cut off the power supply, unscrew the screw on the top edge of air filter screen, pull the
handle of air filter screen, remove it from appliance. Clean the air !liter screen with neutral
detergent and banister brush, then clean it with clear water. Finally, reinstall to the
appliance. Thcn screw the screw on the top cdgc of the air filtcr screen
2. Clean the wetted pad (map2, map3)
Cut off the power supply, unscrew the screw on the top edge of air filter screen, take down
the air filter screen, unlock the wetted pad and its support, and take out them, then draw the
wetted pad from support Clean the wetted pad with neutral detergent and banister bmsh,
then clean it with clear water .Finally, reinstall to the appliance and lock the support with
wetted pad. Then screw the screw on the top edge of the air filter screen
Attention: the wetted pad must be mstalled honzontally, m order to av1od leakmg
3. Clean the shell
Clean with neutral detergent and soft cloth
Attention: cut off the power supply when clean the appliance, as there have a high pressure
m the body. Do not leave any water on the surface of eontrol panel
MALFUNCTION心D MAINTENANCE
Malfimction
Causes
Solution
No act10n
l Power off or poor
I Plug the power cord and
connection.
make sure It connects
2 Not rotate the "SPEED"
well
on the control panel
2 Rotate the "SPEED'' on
the control panel
Poor elTect of <le<lust
I. Block Lhe alf filter screen
I Punfy the air filler screen.
with dust
2 Remove corpus ahenum
2 Rlock the air mlet with
from the a,r inlet
corpus alienum
Repa1r the appliance under the s1tualion as tollows:
1. Abnormal action or no action. it is invalid by the above approach.
2. Abnormal action caused by ingress of water or corpus breakdown
4
5
6
"Loading the manual" means you need to wait until the file loads and becomes available for online reading. Some manuals are very large, and the time they take to appear depends on your internet speed.