Page 2 - Contents
Contents 2 3A4803D Contents Models – Cordless Airless HandHelds . . . . . . . . . . . . . . . . . . . . . . . . . . . 3Important User Information . . . . . . . . . . . . . . . . . . . . . . . . . . . . . . . . . . . . 4General Power Tool Safety Information . . . . . . . . . . . . . . . . . . . . . ....
Page 3 - Models – Cordless Airless HandHelds
Models – Cordless Airless HandHelds 3A4803D 3 Models – Cordless Airless HandHelds Operating pressure range: 500 – 2000 psi (35 – 138 bar, 3.5 MPa – 14 MPa) Model Sprayer Name Charger Voltage Tip Family Tip Size 17M367 Ultra MAX 120V FFLPxxx 0.008 – 0.016 in. (0.20 – 0.41 mm) 17P928 * 17N222 Ultimate...
Page 4 - Important User Information; Thank You for Your Purchase!
Important User Information 4 3A4803D Important User Information Thank You for Your Purchase! Before using your sprayer read this Owners Manual for complete instructions on proper use and safety warnings. Congratulations! You have purchased a high-quality paint sprayer made by Graco Inc.This sprayer ...
Page 5 - General Power Tool Safety Information
General Power Tool Safety Information 3A4803D 5 General Power Tool Safety Information Read all safety warnings and all instructions. Failure to follow the warnings and instructions may result in electric shock, fire and/or serious injury. Save all warnings and instructions for future reference. The ...
Page 7 - Warnings
Warnings 3A4803D 7 Warnings The following warnings are for the setup, use, maintenance, and repair of this equipment. The exclamation point symbol alerts you to a general warning and the hazard symbols refer to procedure-specific risks. When these symbols appear in the body of this manual or on warn...
Page 10 - Know Your Sprayer; SPRAY
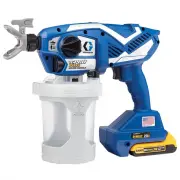
Know Your Sprayer 10 3A4803D Know Your Sprayer N SPRAY PRIME PUMP P J D E L G H K T F M T ti30555a A B C A Cup Cover B FlexLiner C Cup Support D VacuValve Cap E VacuValve Air Hole F VacuValve Reservoir G Pump Filter H Ground Plug and Spool J Prime Pump/Spray Knob K Battery L Sprayer Trigger M Speed ...
Page 11 - Start Up; Pressure Relief Procedure
Start Up 3A4803D 11 Start Up Always start with a fully charged battery. Do not splash or immerse battery or charger in water or solvents. See battery and charger information shipped with the sprayer. Pressure Relief Procedure Follow the Pressure Relief Procedure whenever you see this symbol. 1. Remo...
Page 12 - Starting a New Job
Start Up 12 3A4803D Starting a New Job If you are using the sprayer for the very first time, see Flush a New Sprayer , page 25. Strain the Paint Previously opened paint may contain dried paint or other debris. To avoid priming problems and tip clogs it is advisable to strain the paint before using. ...
Page 14 - Refilling FlexLiner
Start Up 14 3A4803D If sprayer does not spray, try one of the steps below: • Make certain there is only one FlexLiner in cup support. It is possible for two liners to nest tightly together and appear as only one. • Make certain the cup cover is properly threaded to the cup support. If threads are vi...
Page 15 - How to Spray; Speed Control
How to Spray 3A4803D 15 How to Spray Take a few moments prior to spraying and review these simple tips to ensure your spraying project is a success. NOTE: For proper sprayer operation use only a tip from the same tip family that came with your sprayer. Speed Control The speed control allows for infi...
Page 16 - Triggering Sprayer
How to Spray 16 3A4803D Triggering Sprayer Pull trigger after starting stroke. Release trigger before end of stroke. Sprayer must be moving when trigger is pulled and released. Aiming Sprayer Aim sprayer at bottom edge of previous stroke, overlapping each stroke by half. Rotating the spray tip guard...
Page 17 - Spray Pattern Quality; Clear Tip Clog
How to Spray 3A4803D 17 When spraying vertical corners turn spray tip guard to the horizontal orientation and move sprayer up and down. Spray Pattern Quality A good spray pattern is evenly distributed as it hits the surface. • Spray should be atomized (evenly distributed, no gaps at edges). If tails...
Page 19 - Cleanup; Cleaning Sprayer
Cleanup 3A4803D 19 Cleanup Cleaning your sprayer properly and after every spray job is of the utmost importance! Proper care and maintenance will make your paint sprayer last and work for you trouble free. See Cleaning Fluid Compatibility , page 28 and Static Grounding Instructions (Oil-Based or fla...
Page 22 - Cleaning Sprayer Exterior
Cleanup 22 3A4803D 16. Remove spray tip, spray tip guard, and pump filter. Clean with appropriate cleaning fluid (water or mineral spirits). A soft brush can be used to loosen and remove dried material if needed. 17. Use a soft cloth to clean the cup support and cup cover. Cleaning Sprayer Exterior ...
Page 23 - Storage
Storage 3A4803D 23 Storage With proper storage, the sprayer will be ready to use the next time it is needed. Pump Armor fluid protects the sprayer while in storage. It helps protect sprayer against freezing and corrosion when not in use.1. Clean the sprayer and cup assembly. See Cleanup , page 19 . ...
Page 24 - Common Procedures; Spray Tip Installation
Common Procedures 24 3A4803D Common Procedures Spray Tip Installation To prevent spray tip leaks make certain spray tip and tip guard are installed properly.1. Perform Pressure Relief Procedure , page 11. 2. Use spray tip (A) to insert seal (B) into tip guard (C). 3. Insert Spray Tip. Spray tip must...
Page 27 - Reference; Spray Tip Selection; Selecting Tip Size; Fan Width
Reference 3A4803D 27 Reference Spray Tip Selection Selecting Tip Size Spray tips come in a variety of hole sizes for spraying a range of fluids. Your sprayer includes a tip for use in most paint spraying applications. Use the coatings table on page 15 to determine the range of recommended tip hole s...
Page 29 - Maintenance; Cleaning Outlet Valves
Maintenance 3A4803D 29 Maintenance Routine maintenance is important to ensure proper operation of your sprayer. Cleaning Outlet Valves Dirt and debris in the outlet valve assemblies may affect sprayer performance and require cleaning.1. To clean the three outlet valves, remove two pump plugs and fro...
Page 30 - Grounding Wire Repair
Maintenance 30 3A4803D Grounding Wire Repair If the grounding wire breaks at the spool end , perform the following steps:1. Unwind wire from grounding spool and use a flat screwdriver to pry apart the grounding spool. 2. Loosen screw on terminal and remove broken wire. Strip insulation from groundin...
Page 31 - Notes
Page 33 - Parts List
Replacement Parts 3A4803D 33 Parts List Ref. Sprayer Name Part # Description 1 All 17P187 Kit, pump assembly includes 4, 9, 11, 25 3 All 17P554 Filter. pump, 60 mesh, 3 pack All 17P555 Filter. pump, 100 mesh, 3 pack 4 All 17P183 Kit, outlet valve repair includes 3 of 4a, 2 of 4b, 2 of 50,1 of 51 4a ...
Page 38 - Spray Pattern Diagnostics
Troubleshooting 38 3A4803D Spray Pattern Diagnostics Problem Cause Solution Spray pattern is uneven: Operator is moving too fast while spraying. Slow speed of movement. Spray tip is clogged. Unclog spray tip or clean spray tip see Clear Tip Clog , page 17. Material difficult to atomize. Increase spe...
Page 40 - Technical Specifications
Technical Specifications 40 3A4803D Technical Specifications Brushless Cordless HandHeld Sprayer U.S. Metric Max Working Pressure 2000 psi 14 MPa, 138bar Weight 5.25 lb 2.4 kg Dimensions: Length 14.0 in. 36.1 cm Width 5 in. 12.7 cm Height 10.5 in. 26.7 cm Storage Temperature Range 32° to 113° F 0...
Page 41 - Graco Limited Warranty
Graco Limited Warranty 3A4803D 41 Graco Limited Warranty Graco warrants all equipment referenced in this document which is manufactured by Graco and bearing its name to be free from defects in material and workmanship on the date of sale to the original purchaser for use. With the exception of any s...
Page 42 - Graco Information
Graco Limited Warranty 42 3A4803D Graco Information For the latest information about Graco products, visit www.graco.com . For patent information, see www.graco.com/patents . TO PLACE AN ORDER, contact your Graco distributor or call 1-888-541-9788 to identify the nearest distributor.