Genie G3T-R - User Manual
Genie G3T-R Remote Control – User Manual, read for free online in PDF format. We hope this helps you resolve any issues you may have. If you have further questions, please contact us through the contact form.

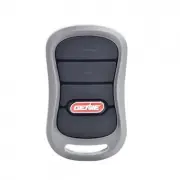
3 Button Remote
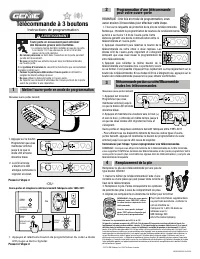
Programming Instructions
WARNING
Moving Door can cause serious injury
or death.
• Wall Console must be mounted in sight
of door, at least 5 feet above fl oor and
clear of moving door parts.
• Keep people clear of opening while door is moving.
• Do NOT allow children to play with the Remote or
door opener.
If safety reverse does not work properly:
• Close door then disconnect opener using the
manual release handle.
• Do NOT use Remote or door opener.
• Refer to Door and Door Opener Owner’s Manuals
before attempting any repairs.
1
Putting Opener into Programming Mode
RADIO
SIGNAL
LEARN
CODE
CODE
LEARN
SET
SET
OPEN
FORCE
CLOSE
CODE
LEARN
LIMIT
MANUAL
or
New Genie® Openers
Genie® Openers and External Receivers Manufactured between 1995 to 2011
PU
LL
RADIO
SIGNAL
LEARN
CODE
RADIO
SIGNAL
LEARN
CODE
-OR-
NOTE: Once in programming mode, you will have
approximately 30 seconds to perform this step.
©2014 GMI Holdings, Inc. DBA The Genie Company
FCC and IC CERTIFIED
This device complies with FCC Part 15 and Industry Canada license exempt RSS standard(s)
.
Operation is subject to the
following two conditions
:
(1) this device may not cause interference
,
and (2) this device must accept any interference
,
including interference that may cause undesired operation of the device
. This equipment generates, uses and can radiate
radio frequency energy and, if not installed and used in accordance with the instructions, may cause harmful interference
to radio communications. However, there is no guarantee that interference will not occur in a particular situation. If this
equipment does cause harmful interference to radio or television reception, which may be determined by turning the
equipment OFF and ON, the user is encouraged to try and correct the interference by one or more of the following
measures: (a) Re-orient or relocate the receiver antenna, (b) Increase the separation between the opener and receiver,
could void the users authority to operate the equipment.
1. Press and hold the
program button until
the round LED turns
blue, then release.
2
Programming a Remote to your Opener
Lost or Stolen Remote/Erasing all Remotes
3
Battery Replacement
4
NOTE:
For openers
manufactured between
1995-1999,
use the two upper
buttons on the remote
Replace remote battery with
CR2032
coin cell battery.
1. Open the remote case using a washer or
coin that fits into the slot at the top of the
remote.
2. Replace battery. Match battery polarity
symbols inside battery housing.
3. Align components and snap case closed.
For additional information or help
contact customer service:
Call 1-800-35-Genie or write:
GMI Holdings INC.
d/b/a The Genie Company
1 Door Drive
Mount Hope Ohio 44660
New Genie® Openers
PROGRAM
SET
–
+
38382502359 02/2014
PROGRAM
SET
–
+
PROGRAM
SET
–
+
PROGRAM
SET
–
+
PROGRAM
SET
–
+
2. The round LED will
go out and the long
LED will begin flash-
ing purple.
Proceed to step 2.
1. Pull protective battery tab from remote.
PROGRAM
SET
–
+
PROGRAM
SET
–
+
PROGRAM
SET
–
+
PROGRAM
SET
–
+
1. Press and hold the
program button until the
round LED turns blue,
then release.
2. Press and hold the Up(+) Down (-) buttons at
the same time, until the both LEDs flash blue
and go OFF.
•
To erase all remote devices from all other types of Genie® openers,
Press and hold the Learn Code Button until the LED stops blinking.
Start at step 1 to reprogram your remotes.
NOTE: Clearing remote control memory from the power head will clear ALL pro-
grammed remotes and keypads. Your opener will no longer recognize any signal
from any remote device, including a missing remote device.
Genie® Openers and External Receivers Manufactured between 1995 to 2011
1. Press & Release Learn Code button once. The red LED will begin to
flash.
Proceed to step 2.
Note: While programing remote buttons, stand
at least 5 feet away from the opener. This ensures
you have proper communication between the
remote and the opener.
2. Slowly press and release the remote button
of your choice two times. The opener LEDs will
flash and go off, indicating you have successfully
programmed your remote.
3. Press and release the same button a third time and door will open or
close. It is possible to press the remote button too quickly or lightly. If
the LEDs do not go OFF, press the remote button several more times to
achieve confirmation.
NOTE: For openers
manufactured between
1995-1997,
use the two upper
buttons on the remote.
Made after 1997? Use any
button for programming.
"Loading the manual" means you need to wait until the file loads and becomes available for online reading. Some manuals are very large, and the time they take to appear depends on your internet speed.