Frigidaire FPEW3077RFA - Installation Manual

An installation manual for wall-mounted and built-in electric ovens covers critical safety, dimensional specifications, and electrical requirements. The guide emphasizes proper clearance, grounding, and secure mounting–including anti-tip devices–to prevent accidents. It details precise cutout measurements, cabinet dimensions, and wiring diagrams (e.g., 3- or 4-wire connections), along with warnings about electrical hazards and cold-weather operation. Key topics include circuit breaker sizing based on appliance wattage, proper oven height adjustment, and step-by-step installation procedures for both wall-mounted and built-in models.


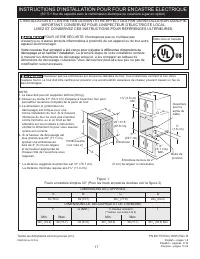
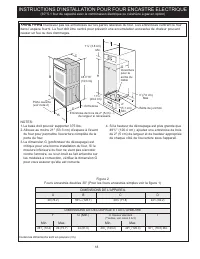
Table of Contents:
- Page 1 – Wall Oven Installation Dimensions and Safety
- Page 2 – 30-inch Double Oven Installation Details
- Page 3 – Electrical Safety and Carpentry Setup
- Page 4 – Electrical Wiring and Grounding Procedures
- Page 5 – Cabinet Installation and Model Identification
- Page 6 – Securing Oven Mounting and Trim Installation
- Page 7 – Under-Counter Oven Installation with Cooktop
- Page 8 – Built-in Oven Installation with Gas Cooktop
- Page 9 – Wall-Mounted Oven Dimensional Layout
- Page 10 – 5.1 cu. ft. Wall-Mounted Oven Installation Specs
- Page 11 – Electrical Installation Requirements and Safety Precautions
- Page 12 – Grounding and Electrical Code Compliance
- Page 13 – Wiring and Cabinet Installation Steps
- Page 14 – Safety Guard and Mounting Screw Installation
- Page 15 – Countertop Installation with Cooktop Cutouts
- Page 16 – Installation Above Gas Stove and Functionality Check
- Page 17 – Built-in Oven Mounting Dimensions
- Page 18 – 5.1 cu. ft. Built-in Oven Dimensional Specifications
- Page 19 – Installation Guidelines for Installers and Consumers
- Page 20 – Built-in Range Electrical Wiring and Safety
- Page 21 – Wiring and Cabinet Installation Procedures
- Page 22 – Anti-Tip Device and Trim Installation
- Page 23 – Under-Counter Oven Mounting Specifications
- Page 24 – Operational Guidance and Final Installation Checks
1
ELECTRIC WALL OVEN INSTALLATION INSTRUCTIONS
(30" 5.1 Capacity Ovens with Optional Electric or Gas Cooktop Combination)
B
A
D
C
H
F
I
G
26 11/16”
(67.8 cm)
2”
(5.1 cm)
Min.
31”*
(78.7 cm)
3”
(7.6 cm)
1½” (3.8 cm)
Min.
2" (5 cm) Wide Wood
Spacer if Needed
Door Open
(see note 2)
Spacer
Electrical
Junction Box
Hole for
Cord
Figure 1
30" Single Wall Ovens (Double ovens see Figure 2)
PN 807153704 Rev. B (16/05)
English – pages 1-8
Español – páginas 9-16
Français -pages 17-24
All dimensions are in inches (cm).
Printed in U.S.A.
Do not remove spacers (if equipped) on the side walls of the built-in oven. These spacers
center the oven in the space provided. The oven must be centered to prevent excess heat buildup that may
result in heat damage or fire.
NOTES:
1. Base must be capable of supporting 200 pounds (90 kg).
2. Allow at least 21" (53.3 cm) clearance in front of oven for door
depth when it is open.
* Suggested distance from floor is 31" (78.7cm).
Minimum required distance is 4 ½" (11.4cm).
3. Dimension G (cutout depth) is critical to
the proper installation of the built-in oven.
If the oven decorative trim does not butt
against the cabinet, or if noise is heard
on convection models, verify dimension
G to assure it is the required depth.
4. For a cutout height greater than 28"
(71.1 cm) add one 2"(5 cm)
wide wood shim of appropriate
height to each side of the
opening under the appliance
side rails.
PRODUCT DIMENSIONS
A
B
C
D
30 (76.2)
29 (73.7)
28
1
/
4
(71.8)
24
3
/
4
(62.9)
CUTOUT DIMENSIONS AND CABINET WIDTH
F
G (Min.)
H. Standard Height
(**Others, see notes 4 & 5)
I
Min.
Max.
Min.
Max
.
28
1
/
2
(72.4)
29 (73.7)
24 (61.0)
26
3
/
4
(67.9)
28 (71.1)
30
1
/
8
(76.5) Min
INSTALLATION AND SERVICE MUST BE PERFORMED BY A QUALIFIED INSTALLER.
IMPORTANT: SAVE FOR LOCAL ELECTRICAL INSPECTOR'S USE.
READ AND SAVE THESE INSTRUCTIONS FOR FUTURE REFERENCE.
FOR YOUR SAFETY: Do not store or use gasoline or other flammable vapors
and liquids in the vicinity of this or any other appliance.
United States
and Canada
Your new wall oven has been designed to fit a limited variety of cutout sizes to make the job of installing easier.
The first step of your installation should be to measure your current cutout dimensions and compare them to the
cutout dimensions chart below for your model. You may find little or no cabinet work being necessary.
"Loading the manual" means you need to wait until the file loads and becomes available for online reading. Some manuals are very large, and the time they take to appear depends on your internet speed.
Was this manual helpful?
Helpful for 3 of 3 readers
About this manual
- Brand
- Frigidaire
- Model
- FPEW3077RFA
- Document type
- Installation Manual
- Language(s)
- English, Spanish, French
- Pages
- 24
- File size
- 1.1 MB
- Format
Summary
Installation instructions and dimensional specifications for 30-inch electric wall ovens, including cutout size requirements, clearance guidelines, and product/cabinet dimensions.
Installation instructions and dimensional specifications for a 30-inch double electric wall oven, including warnings against removing oven spacers and diagrams for cutout measurements.
Safety guidelines, electrical requirements, carpentry setup, oven height adjustment, and critical safety warnings, including a table for determining circuit breaker or fuse ratings based on wattage.
Ask a question
Related manuals
Popular Frigidaire Other
 Frigidaire GRBN2012AF Installation Manual
 Frigidaire FFHB2750TD8 Installation Manual
 Frigidaire LFSS2612TE4 Installation Manual
 Frigidaire FG4H2272UF Installation Manual
 Frigidaire GRFC2353AF0 User Manual
 Frigidaire GMBS3068BD Installation Manual
 Frigidaire FWC342GB User Manual
 Frigidaire FGID2466QF5A Installation Manual
More Frigidaire Other models
 Frigidaire FPBM3077RFC Installation Manual
 Frigidaire FPDC12D7MS User Manual
 Frigidaire FPES3085KFG Installation Manual
 Frigidaire FPES3085PF User Manual
 Frigidaire FPET3085KF Manual
 Frigidaire FPET3085KFA Installation Manual
 Frigidaire FPEW3085KFB Installation Manual
 Frigidaire FPFU19F8RF User Manual
 Frigidaire FPFU19F8WF2 User Manual
 Frigidaire FPGC3085KS Manual
 Frigidaire FPGC3677RSA Installation Manual
 Frigidaire FPGC3685KS Manual