Frigidaire FHWC3050RS - User Manual

Frigidaire FHWC3050RS Range Hood – User Manual, read for free online in PDF format. We hope this helps you resolve any issues you may have. If you have further questions, please contact us through the contact form.


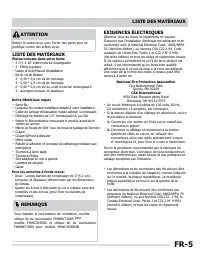
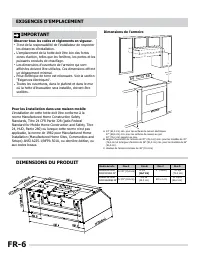
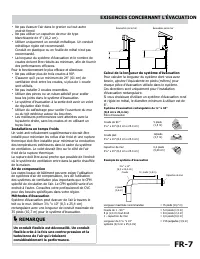
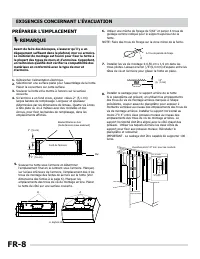
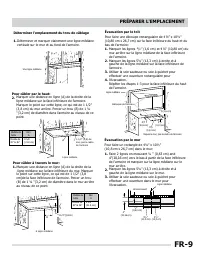

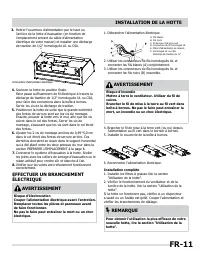
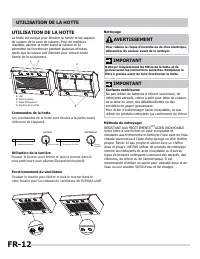
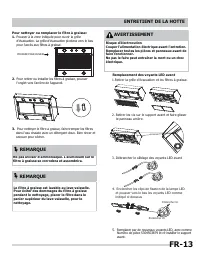
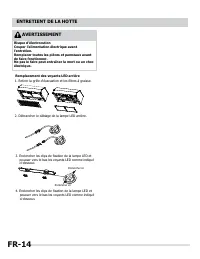


Table of Contents:
- Page 2 – WELCOME & CONGRATULATIONS; Electrolux Home Products,; PLEASE CAREFULLY READ AND SAVE THESE INSTRUCTIONS; Please attach sales receipt; Serial Plate; The serial plate is located on the left inside of the range hood
- Page 3 – By Qualified Person(s) In Accordance With all; To reduce risk of fire and to properly exhaust; Sufficient air is needed for proper combustion and
- Page 4 – Always leave safety grills and filters in place.Without; IMPORTANT SAFETY INSTRUCTIONS; Not Use This Hood With Any External Solid State; WARNING
- Page 5 – Tools/Materials required; Four flat head wood screws or machine screws; ELECTRICAL REQUIREMENTS; recommended that a qualified electrician determine that; National Fire Protection Association; the rating of the appliance as specified on the; LIST OF MATERIALS; Parts included in your hood; CAUTION; - plastic wall anchores; /64” drill bit for cabinet pilot holes; NOTE; If configuring for recirculation venting, range hood
- Page 6 – IMPORTANT; Observe all governing codes and ordinances.; installation clearances; For Mobile Home Installations; The installation of this range hood must conform to the; Cabinet Dimensions; LOCATION REQUIREMENTS
- Page 7 – Flexible vent is not recommended. Flexible vent; VENTING REQUIREMENTS
- Page 8 – Before making cutouts, make sure there is; Select a flat surface for assembling the range hood.; Fitting material is provided to secure; wide filler strips. Length and; Use
- Page 9 – To wire through wall:; PREPARE THE LOCATION; Mark a line distance (A) from the right of the; Determine Wiring Hole Location; cutout on the underside of cabinet top and bottom:; Wall Venting
- Page 10 – Install Vent System; Use caulking to seal exterior wall or roof opening; INSTALL RANGE HOOD; Vent Damper Installation; Attach to range hood using the indicated screws; Power Supply Cable Installation; Do not reconnect power until the installation is; Remove terminal box cover
- Page 11 – terminal box. Failure to do so can result in death,; to green wire in terminal box .; To get the most efficient use from your new; the terminal box. Tighten the strain relief screws.; MAKE ELECTRICAL CONNECTION; Lift the hood into final position.; Install
- Page 12 – Clean the hood and grease filters frequently; Exterior Surfaces; RANGE HOOD USE; PROOFTM STAINLESS STEEL
- Page 13 – Do not use ammonia. The aluminum on the; Remove the vent grille and grease filters.; Replacing the Front LED lights; and re-install the front support; To clean or replace grease filter:; and slide the panel back.; Electrical Shock Haxzard; The grease filter is dishwasher safe.
- Page 14 – RANGE HOOD CARE; Replacing the Rear LED lights; Disconnect the rear LED lamp wiring; down the LED lights as shown below.
- Page 15 – the outside wind flow.; TROUBLESHOOTING; terminal box connector.; . Make sure the lamp is seated properly.
- Page 16 – Warranty
- Page 17 – Hotte; et
- Page 18 – BIENVENUE ET FÉLICITATIONS; Emplacement de la plaque de série; pour plus d'informations; VEUILLEZ LIRE ATTENTIVEMENT ET CONSERVER CES INSTRUCTIONS; Electrolux Home Products; Merci
- Page 21 – Outils/Matériaux requis; EXIGENCES ÉLECTRIQUES; LISTE DES MATÉRIAUX; Pièces incluses dans votre hotte; ATTENTION; - ancrages muraux en plastique; REMARQUE; modèle FHWC3050RS et utilisee kit de recirculation
- Page 22 – Observer tous les codes et règlements en vigueur.; EXIGENCES D'EMPLACEMENT
- Page 23 – EXIGENCES CONCERNANT L'ÉVACUATION
- Page 24 – dégagement suffisant dans le plafond, mur ou armoire.
- Page 25 – Pour câbler à travers le mur:; PRÉPARER L'EMPLACEMENT; Pour câbler par le haut:; Pour faire un rectangle de 4
- Page 26 – Installer le système d'évacuation; INSTALLER LA HOTTE; Installation du volet motorisé; Installation du câble d'alimentation électrique; Ne pas rebrancher l'alimentation jusqu'à ce que
- Page 28 – UTILISATION DE LA HOTTE; AVERTISSEMENT; Les commandes de la hotte sont situées à la partie avant
- Page 29 – Retirer les vis sur le support avant et faire glisser; Remplacement des voyants LED avant; Enclencher les clips de fixation de la lampe LED; Pousser à la zone indiquée pour ouvrir la grille
- Page 30 – ENTRETIENT DE LA HOTTE; Débrancher le câblage de la lampe LED arrière.; Enclencher les clips de fixation de la lampe LED et
- Page 31 – DÉPANNAGE; ou filtre à graisse
- Page 32 – Garantie; Cette garantie ne couvre pas ce qui suit:; conformément aux instructions fournies.
- Page 33 – Campana de Cocina; Uso
- Page 34 – INTRODUCCIÓN; Si tiene preguntas; Ubicación de la placa con el número de serie; para obtener información adicional.; Visite el sitio de Frigidaire; LEA Y GUARDE ESTAS INSTRUCCIONES CUIDADOSAMENTE
- Page 37 – Herramientas/Materiales requeridos; REQUERIMIENTOS ELÉCTRICOS; LISTA DE MATERIALES; Piezas incluidas en su campana de cocina; PRECAUCIÓN
- Page 38 – IMPORTANTE; Cumpla con todos los códigos y ordenanzas locales.; REQUERIMIENTOS DE UBICACIÓN
- Page 39 – Para una operación más silenciosa y eficiente:; OBSERVACIÓN; REQUERIMIENTOS DE VENTILACIÓN
- Page 41 – Cableado a través de la pared:; PREPARACIÓN DE LA UBICACIÓN; Cableado desde la parte superior:; Ventilación de la habitación; Para hacer un corte rectangular de 4 ” x 101⁄2” (10,80 cm x; Apertura de pared
- Page 43 – INSTALACIÓN DE LA CAMPANA
- Page 44 – Controles de la campana de cocina; Cleaning; ADVERTENCIA; Superficies exteriores; USO DE LA CAMPANA DE COCINA; Los controles de la campana están ubicados en la parte
- Page 45 – Retire la rejilla de ventilación y los filtros de grasa.; Remplazo de las luces LED frontales; Apriete los clips de montaje de las lámparas LED
- Page 46 – CUIDADO DE LA CAMPANA DE COCINA; Remplazo de las luces LED traseras; Desconecte los cables de las luces LED traseras.; y empújelas tal y como se exhibe a continuación.; Peligro de golpe eléctrico
- Page 47 – SOLUCIÓN DE PROBLEMAS
- Page 48 – Información de la garantía
USA 1-800-374-4432
www.frigidaire.com
Canada 1-800-265-8352
www.frigidaire.ca
316495194
Important Safety Instructions ............................... 3
List of materials ................................................... 5
Electrical requirements ......................................... 5
Location requirements .......................................... 6
Product dimensions .............................................. 6
Venting Requirements .......................................... 7
Prepare the location ............................................. 8
Install Range Hood (Ducted version) ..................... 10
Make Electrical Connection .................................... 11
Range Hood Use .................................................. 12
Range Hood Care ................................................. 13
Troubleshooting ................................................... 15
Warranty Information ........................................... 16
August 2016
"Loading the manual" means you need to wait until the file loads and becomes available for online reading. Some manuals are very large, and the time they take to appear depends on your internet speed.
Was this manual helpful?
About this manual
- Brand
- Frigidaire
- Model
- FHWC3050RS
- Document type
- User Manual
- Category
- Range Hood
- Language(s)
- English, Spanish, French
- Pages
- 48
- File size
- 4.6 MB
- Format
Summary
WELCOME & CONGRATULATIONS Before you call for service, there are a few things you can do to help us serve you better. Read this manual. It contains instructions to help you use and maintain your range hood properly. If you received a damaged range hood... immediately contact the dealer (or build...
Save these instructions for future references Approved for residential appliances For residential use only Do not attempt to install or operate your appliance until you have read the safety precautions in this manual. Safety items throughout this manual are labeled with a WARNING or CAUTION based on...
EN-4 WARNING TO REDUCE THE RISK OF INJURY TO PERSONS, IN THE EVENT OF A RANGE TOP GREASE FIRE, OBSERVE THE FOLLOWING: SMOTHER FLAMES with a close - fitting lid, cookie sheet, or other metal tray, then turn off the gas burner or the electric element. PREVENT BURNS. If the flames do not go out immedia...
Ask a question
Related manuals
More Frigidaire Range Hoods models
 Frigidaire FCVW3052AS User Manual
 Frigidaire FCVW3062AD User Manual
 Frigidaire FHPC4260LS User Manual
 Frigidaire FHWC3025MB User Manual
 Frigidaire FHWC3025MS User Manual
 Frigidaire FHWC3040MS User Manual
 Frigidaire FHWC3055LS User Manual
 Frigidaire FHWC3060LS User Manual
 Frigidaire FHWC3625MS User Manual
 Frigidaire FHWC3640MS User Manual
 Frigidaire FHWC3655LS User Manual
 Frigidaire FHWC3660LS User Manual