Frigidaire FCWS2727AW - Installation Manual
Frigidaire FCWS2727AW Oven – Installation Manual, read for free online in PDF format. We hope this helps you resolve any issues you may have. If you have further questions, please contact us through the contact form.


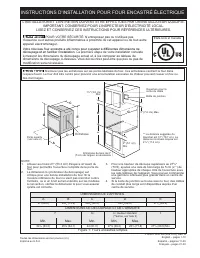
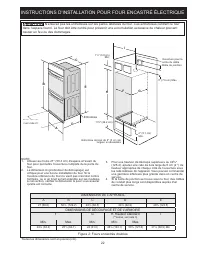
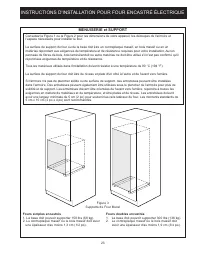
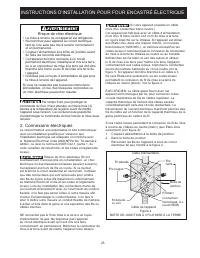
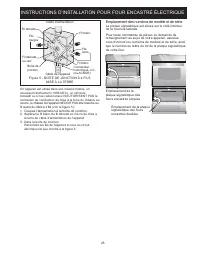
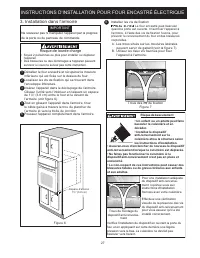
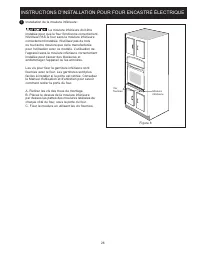

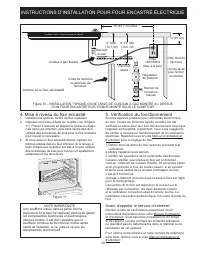
Table of Contents:
- Page 2 – ELECTRIC WALL OVEN INSTALLATION INSTRUCTIONS; Figure 2: Double Wall Ovens; PRODUCT DIMENSIONS
- Page 3 – DOUBLE WALL OVEN INSTALLATION; Single Wall Ovens; Base must be capable of supporting 150 pounds; Double Wall Ovens; Base must be capable of supporting 300 pounds; CARPENTRY and SUPPORT; Figure 3: Wall Oven Braces
- Page 4 – Important Notes to the Installer; IMPORTANT SAFETY; Electrical Requirements
- Page 5 – Electrical connection; Electrical Shock Hazard
- Page 6 – Model and Serial Number Location; When ordering parts for or making inquires about your
- Page 7 – wall oven and injury to persons.; Tip Over Hazard; Heavy Weight Hazard; Cabinet Installation; Unpack the wall oven. Remove the bottom trim
- Page 8 – cause personal injury and may damage cabinetry or
- Page 9 – OVEN WITH AN ELECTRIC COOKTOP MOUNTED ABOVE; tipping of the wall; TYPICAL UNDER-COUNTER INSTALLATION
- Page 10 – Wall Oven Cabinet; Checking Operation; Before You Call for Service; IMPORTANT NOTE; Leveling the Wall Oven
- Page 12 – INSTRUCCIONES DE INSTALACIÓN PARA EL HORNO ELÉCTRICO DE PARED
- Page 13 – Figura 2: Hornos de doble pared; DIMENSIONES DEL APARATO
- Page 14 – Hornos de pared simple; Hornos de pared doble; La madera contrachapada o la madera maciza; ESPACIO y ESTRUCTURAS DE APOYO; espacio necesario para colocar el horno.
- Page 15 – Notas importantes para el instalador; INSTRUCCIONES IMPORTANTES DE; Requerimientos Eléctricos
- Page 16 – Conexión eléctrica; de utilizar un instalador calificado, para asegurar que la; Riesgo de choque eléctrico
- Page 17 – Ubicación del número de modelo y de serie; La placa con el número de serie está ubicada en la; Si el horno se usa en una instalación de circuito de
- Page 18 – Empujar el cable blindado a través del orificio del; Peligro de Peso Pesado; Instalación del Gabinete; Riesgo de volcamiento
- Page 19 – Instalación de la Guarnición Inferior:; que no sea el especificado. La guarda de seguridad; Figura 8
- Page 20 – ón; INSTALACIÓN TÍPICA DE BAJO CONTADOR
- Page 21 – Verificación del funcionamiento; verificar el funcionamiento de los controles electrónicos; Antes de llamar al servicio; su Manual del Usuario para obtener el número de; Asegúrese de que el horno de pared está a; Conector flexible para artefactos; Gabinete del horno de pared; ESTUFA DE GAS
- Page 23 – INSTRUCTIONS D'INSTALLATION POUR FOUR ENCASTRÉ ÉLECTRIQUE; IMPORTANT: CONSERVEZ POUR L’INSPECTEUR D’ÉLECTRICITÉ LOCAL.; découpage et en faciliter l’installation.
- Page 24 – Figure 2: Fours encastrés doubles; DIMENSIONS DE L'APPAREIL
- Page 25 – Fours simples encastrés; MENUISERIE et SUPPORT
- Page 26 – Installateur; DIRECTIVES IMPORTANTES; Exigences électriques
- Page 27 – Connexions électriques; Risque de choc électrique; branché à la borne ou au fil de mise à la terre de
- Page 28 – Séparez le fil blanc du fil dénudé en cuivre de mise à; Emplacement des numéros de modèle et de série
- Page 29 – Risque de lourde charge; • Soyez 2 personnes ou plus pour installer ou déplacer; IMPORTANT; inférieure qui est fixée sur le dessus du four.; Le four encastré peut basculer; B. Utilisez les deux vis fournies pour fixer
- Page 30 – Les vis pour fixer la garniture inférieure sont
- Page 31 – AVEC UNE TABLE DE CUISSON ÉLECTRIQUE OU À GAZ INSTALLÉE PAR-DESSUS; de fixation pour retenir; INSTALLATION TYPIQUE SOUS LE COMPTOIR; DIMENSIONS DE L'OUVERTURE
- Page 32 – D'UN FOUR ENCASTRÉ ÉLECTRIQUE MONTÉ SOUS LE COMPTOIR; TABLE DE CUISSON À GAZ; Mise à niveau du four encastré; NOTE IMPORTANTE; Vérification du fonctionnement
1
ELECTRIC WALL OVEN INSTALLATION INSTRUCTIONS
Figure 1: Single Wall Ovens
PN 807153709 Rev. A (2021/09)
English – pages 1-10
Español – páginas 11-20
Français – pages 21-30
All dimensions are in inches (cm).
Do not remove spacers (if equipped) on the side walls of the built-in oven. These spacers
center the oven in the space provided. The oven must be centered to prevent excess heat buildup that may
result in heat damage or fire.
NOTES:
1. Allow at least 21" (53.3 cm) clearance in front of oven
for door depth when it is open.
2. Dimension G (cutout depth) is critical to the proper
installation of the built-in oven. If the oven trim does not
butt against the cabinet, or if noise is heard on convection
models, verify dimension G to assure it is the required
depth.
Printed in U.S.A.
INSTALLATION AND SERVICE MUST BE PERFORMED BY A QUALIFIED INSTALLER.
IMPORTANT: SAVE FOR LOCAL ELECTRICAL INSPECTOR'S USE.
READ AND SAVE THESE INSTRUCTIONS FOR FUTURE REFERENCE.
FOR YOUR SAFETY: Do not store or use gasoline or other
flammable vapors and liquids in the vicinity of this or any other appliance.
Your new wall oven has been designed to fit a variety of cutout sizes to make the job of installing easier. The first
step of your installation should be to measure your current cutout dimensions and compare them to the cutout
dimensions chart below for your model. You may find little or no cabinet work being necessary.
United States
and Canada
PRODUCT DIMENSIONS
A
B
C
D
E
27 (68.6)
29
1
/
2
(74.9)
24
5
/
8
(62.5)
24
3
/
4
(62.9)
27
1
/
4
(69.2)
CUTOUT DIMENSIONS AND CABINET WIDTH
F
G
H. Standard Height
(**Others, see note 3)
I
Min.
Max.
Min.
Min.
Max.
24
7
/
8
(63.2)
25¼ (64.1)
24 (61.0)
27¼ (69.2)
28
1
/
4
(71.8)
27
1
/
8
(68.9) Min
**Suggested distance from
floor is 31" (78.7cm). Minimum
required distance is 4 ½"
(11.4cm).
3. For a cutout height greater than 27
3
/
4
" (70.5) add 2"
(5 cm) wide wood shims of appropriate height to each
side of the opening under the appliance side rails. You
can order a larger bottom trim through a service center.
4.
If the junction box is below the oven, longer conduit
cables are available through a service center.
Spacer
Door Open
(see note 2)
C
E
D
A
B
2" (5 cm) Wide Wood
Spacer if Needed
Electrical
Junction Box
Hole for Cord
H
I
G
F
1
1
/
2
" (3.8 cm)
Min.
2" (5.1 cm)
Min.
**
3" (7.6 cm) Max.
"Loading the manual" means you need to wait until the file loads and becomes available for online reading. Some manuals are very large, and the time they take to appear depends on your internet speed.
Other Manuals for Frigidaire FCWS2727AW
Summary
2 ELECTRIC WALL OVEN INSTALLATION INSTRUCTIONS Figure 2: Double Wall Ovens Do not remove spacers (if equipped) on the side walls of the built-in oven. These spacers center the oven in the space provided. The oven must be centered to prevent excess heat buildup that may result in heat damage or fire....
3 ELECTRIC WALL OVEN INSTALLATION INSTRUCTIONS DOUBLE WALL OVEN INSTALLATION Single Wall Ovens 1. Base must be capable of supporting 150 pounds (68 kg). 2. Solid plywood or solid wood must be at least ½” (1.3 cm) thick. Double Wall Ovens 1. Base must be capable of supporting 300 pounds (136 kg). 2. ...
4 ELECTRIC WALL OVEN INSTALLATION INSTRUCTIONS Important Notes to the Installer 1. Read all instructions contained in these installation instructions before installing the wall oven. 2. Remove all packing material from the oven compartments before connecting the electrical supply to the wall oven. 3...