Page 3 - Contents
i Professional+ FX 100 Dual Fuel Contents 1. Before You Start... 1 Important! 1 Installation and Maintenance 1 Peculiar Smells 1 If you smell gas 1 Ventilation 1 Personal Safety 1 Cooker Care 2 Cleaning 2 2. Cooker Overview 3 Hotplate Burners 3 Wok Burner 4 The Wok Cradle 4 The Griddle 5 The Multifu...
Page 4 - ii
Page 5 - Ventilation; If you smell gas
1 Your cooker should give you many years of trouble-free cooking if installed and operated correctly. It is important that you read this section before you start, particularly if you have not used a dual fuel cooker before. Important! n This appliance is designed for domestic cooking only. Using it ...
Page 6 - Take care that no water seeps into the appliance.; This appliance is heavy so take care when moving it.; Cooker Care; Clean only the parts listed in this guide.
2 Always be certain that the controls are in the OFF position when the oven is not in use, and before attempting to clean the cooker. n When the ovens are on, DO NOT open oven doors for longer than necessary to insert and remove contents. The control knobs will become hot and may cause cosmetic fail...
Page 7 - Hotplate Burners
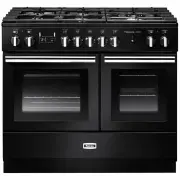
3 ArtNo.270-0001 Proplus control to high The 100 dual fuel cooker (Fig. 2.1) has the following features: A. 5 hotplate burners including a wok burner B. A control panel incorporating a timer C. Main multifunction oven D. Multifunction oven E. Storage drawer Hotplate Burners The drawing by each of th...
Page 8 - Wok Burner; The use of aluminium pans may cause metallic marking; The Wok Cradle
4 ArtNo.311-0005 Wok burner & pan support ArtNo.311-0004 Tipping wok ArtNo.311-0007 Wok stand close-up ArtNo.311-0006 Correct wok sizes ArtNo.311-0002 Pan with rim The igniter should spark and light the gas. Keep holding the knob pressed in to let the gas through to the burner for about ten seco...
Page 9 - The Griddle; a maximum of 5 minutes
5 The Griddle The griddle fits the left-hand pan support, front to back (Fig. 2.11) . It is designed for cooking food on directly. DO NOT use pans of any kind on it. The griddle surface is non-stick and metal cooking utensils (e.g. spatulas) will damage the surface. Use heat resistant plastic or woo...
Page 10 - The Multifunction Ovens; Left-hand Multifunction Oven Modes; Function
6 The Multifunction Ovens Both ovens are multifunction ovens. In addition to the element around the fan, it is fitted with extra heating elements, in the top of the oven and under the oven base. Take care to avoid touching the top elements when placing or removing items from the oven. The left-hand ...
Page 11 - Right-hand Multifunction Oven Modes
7 Fanned Grilling This function operates the fan while the top element is on. It produces a more even, less fierce heat than a conventional grill. For best results place the food to be grilled on the pan provided. Thick pieces of meat or fish are ideal for cooking in this way, as the circulated air ...
Page 12 - The Ovens; ‘The; for instructions on setting the time of day. The; Operating the Ovens; The Clock; Setting the Clock; ‘Bell’; ‘cook period’
8 The Ovens The clock must be set to the time of day before the left-hand oven will work. See the following section on ‘The Clock’ for instructions on setting the time of day. The clock only controls the left-hand oven. References to ‘left-hand’ and ‘right-hand’ ovens apply as viewed from the front ...
Page 13 - TOP TIP
9 To Stop the Multifunction Oven at a Specific Time of Day You have set the required temperature and function mode for the Multifunction Oven and you would like the Multifunction Oven to automatically stop. 1. Turn the Timer (A) knob to the Stop Time (G) setting (Fig. 2.21) . 2. Turn the Adjusting (B...
Page 14 - To Start and Stop the Multifunction Oven; ‘AUTO’; Reset to Manual Cooking
10 ArtNo.301-0010 2 Setting the coo ing time A B F ArtNo.301-000 2 Stopping the o en 2 G A B ArtNo.301-000 2 Stopping the o en 2 H A B Fig. 2.25 Fig. 2.26 Fig. 2.27 ArtNo.301-0007 2 Stopping the o en 1 D A B E C ArtNo.301-0007 2 Stopping the o en 1 A B C To Start and Stop the Multifunction Oven The ...
Page 15 - Key Lock; Reset to Manual; ‘OF‘; Accessories; Oven Shelves – Right-hand Oven; Oven Lights; ‘Troubleshooting’
11 Art No. 301-0011 2 Acti ating the e loc 1 A B C ArtNo.301-0012 2 Acti ating the e loc 2 A B C Key Lock The Key Lock will activate and deactivate the Multifunction Oven. 1. Cancel any active programs. Refer to ‘ Reset to Manual Cooking ’. 2. Turn the Timer (A) knob to the Clock (C) setting and hol...
Page 16 - Storage; To Remove the Storage Drawer
12 Make sure the inner rail is pulled forwards Make sure the inner rail is forwards Fig. 2.40 Fig. 2.41 Fig. 2.42 Storage The bottom drawer is for storing oven trays and other cooking utensils. It can get very warm, so do not store anything in it that may melt or catch fire. Never store flammable ma...
Page 17 - DO NOT place warm food in the oven to be timed.; General Oven Tips
13 Cooking with a Multifunction Oven Remember: not all modes are suitable for all food types. The oven cooking times given are intended for a guide only. Tips on Cooking with the Timer If you want to cook more than one dish, choose dishes that require approximately the same cooking time. However, di...
Page 18 - AS
14 4. Cooking Table ArtNo.050-0007 Oven shelf positions Oven Shelf Positions Top (T) Centre (C) Base (B) The oven control settings and cooking times given in the table below are intended to be used AS A GUIDE ONLY . Individual tastes may require the temperature to be altered to provide a preferred r...
Page 19 - Essential Information; but take care that no surplus water seeps into the; DO NOT put the burner heads in a dishwasher.; The Single Ring Burners; Cleaning Your Cooker
15 ArtNo.311-0032 Burner layout FSD A B C D E ArtNo.311-0033 Wok burner details FSD A B C D E A B A – Cap, B – Head, C – Notch, D – Base , E – Electrode A – Inner burner cap, B – Outer burner cap, C – Inner burner head, D – Outer burner head, E – Wok burner base A – Electrode notch, B – Ignition ele...
Page 20 - Control Panel and Doors; Removing the Glass Fronted Door Panels; . Then lift the 2 glass panels; Removing the Left-hand Main Oven Linings
16 Control Panel and Doors Avoid using any abrasive cleaners including cream cleaners. For best results, use a liquid detergent. The same cleaner can be used on the doors, or alternatively, using a soft cloth wrung out in clean hot soapy water – but take care that no surplus water seeps into the app...
Page 21 - Removing the Right-hand Oven Shelf Supports; , prior to hooking the top into position.
17 Removing the Right-hand Oven Shelf Supports To clean the oven sides, slide out the shelves, unhook the shelf supports from the oven sides (Fig. 5.9) , and lift out. Refit in reverse, making sure that the bottom of the shelf supports are inserted into the holes at the bottom of the oven (Fig. 5.10...
Page 22 - Cleaning Table; Cleaners listed; Hotplate
18 Cleaning Table Cleaners listed (Table 5.1) are available from supermarkets or electrical retailers as stated. For enamelled surfaces use a cleaner that is approved for use on vitreous enamel. Regular cleaning is recommended. For easier cleaning, wipe up any spillages immediately. Hotplate Part Fi...
Page 24 - Turn off the power at the circuit breaker.
20 The timed oven is not coming on when automatic cooking Has the oven knob been left in the OFF position by mistake? Is the oven locked (see above)? Oven temperature getting hotter as the cooker gets older If turning the temperature down using the oven control knob has not worked, or has only worke...
Page 25 - INSTALLATION; Service and Spares; * This information is on the appliance data badge.; If You Have a Problem; Dual Fuel
INSTALLATION Check the appliance is electrically safe and gas sound when you have finished. 21 Service and Spares Firstly, please complete the appliance details below and keep them safe for future reference – this information will enable us to accurately identify the particular appliance and help us...
Page 26 - Safety Requirements and Regulations; Please read the; The regulations and standards are as follows:; AS/NZS 5601 – ‘Gas Installations’; Provision of Ventilation; An appliance for use on Propane must not be installed; Conversion
INSTALLATION Check the appliance is electrically safe and gas sound when you have finished. 22 Safety Requirements and Regulations n Please read the Before you start... chapter, before you begin any installation and maintenance work on this appliance. You must be aware of the following safety requir...
Page 27 - You will also need the following tools:
INSTALLATION Check the appliance is electrically safe and gas sound when you have finished. 23 Checking the Parts: 3 pan supports Griddle ArtNo.000-0001 90 Pan supports Wok cradle Deluxe oven tray and trivet ArtNo.000-0009 Wok ring, cast 2 standard shelves 2 flat shelves ArtNo.324-0009 Tall oven she...
Page 28 - Positioning the Cooker; Overhead – Measurement A; Moving the Cooker; The cooker is very heavy, so take great care.
INSTALLATION Check the appliance is electrically safe and gas sound when you have finished. 24 ArtNo.091-0004 - 90DF - cooker clearances (AUS) Professional + 100 FX B C D E A * Positioning the Cooker The diagram (Fig. 7.1) shows the minimum recommended distance from the cooker to nearby surfaces as ...
Page 29 - front and remove the front half of the polystyrene base.; Lowering the Two Rear Rollers; . Rotate the nut – clockwise to raise – counter-; Completing the Move; Unfold the rear edge of the pack base tray.; Levelling the Cooker; To set the front turn the feet bases to raise or lower.; Fitting the Stability Bracket and Chain; The cooker must be set to the correct height
INSTALLATION Check the appliance is electrically safe and gas sound when you have finished. 25 ArtNo.010-0004 Moving the cooker To help you, there are two levelling rollers at the back and two screw-down levelling feet at the front. From the back tilt the cooker forward and remove the rear half of t...
Page 30 - Fitting a Stability Bracket; Gas Connection; Natural Gas; Conversion to Propane Gas
INSTALLATION Check the appliance is electrically safe and gas sound when you have finished. 26 Cooker Outer stability bracket Floor Wall 3 mm min Typical wall mounting 680 450 750 A 500 All dimensions in millimetres Gas inlet ArtNo.011-0007 - Restraining chain (AUS) 3FTUSBJOJOH DIBJO Fitting a Stabi...
Page 31 - Pressure Testing; Current Operated Earth Leakage Breakers
INSTALLATION Check the appliance is electrically safe and gas sound when you have finished. 27 ArtNo.132-0005 - Fixed wiring connection 2 (AUS) Mains terminal Fixing bracket for conduit connection Conduit Cable clamp A N ArtNo.132-0001 - 1 phase 240Vac 50Hz 1-phase 220-240 V AC 50 Hz Fig. 7.10 Fig. ...
Page 32 - Fixed Wiring; Final Checks; Hotplate Check; Fitting the Plinth
INSTALLATION Check the appliance is electrically safe and gas sound when you have finished. 28 ArtNo.3 0-0012 - Securing the plinth Fixed Wiring For connection to fixed wiring, i.e. flexible conduit, remove the electrical terminal cover on the back panel. Fix the conduit-to-conduit mounting bracket ...
Page 33 - WARNING – SERVICING TO BE CARRIED OUT ONLY BY AN AUTHORISED PERSON; Injectors; ‘Technical Data’; Tap Adjustment; Removing the Control Panel; . Lift the control panel; Bypass Screw Adjustment; Turn the bypass screw on each control clockwise to the stop; Conversion to Propane Gas
WARNING – SERVICING TO BE CARRIED OUT ONLY BY AN AUTHORISED PERSON Disconnect from electricity and gas before servicing. Check appliance is safe when you have finished. 29 Professional + 100 FX Conversion from Natural Gas (1.0 kPa) to LPG X Propane (2.54 kPa) n This conversion must be performed by a...
Page 34 - Set the Governor; For Propane X cookers the pressure should be 2.54 kPa.; Make sure that the appliance is gas sound.; Affix Label
WARNING – SERVICING TO BE CARRIED OUT ONLY BY AN AUTHORISED PERSON Disconnect from electricity and gas before servicing. Check appliance is safe when you have finished. 30 Set the Governor Unscrew the governor’s brass top. In the base of the brass top is a plastic snap-in converter device (Fig.8.4) ...
Page 35 - Panels; Pull off all the control knobs.; Hotplate
WARNING – SERVICING TO BE CARRIED OUT ONLY BY AN AUTHORISED PERSON Disconnect from electricity before servicing. Check appliance is safe when you have finished. 31 ArtNo.090-0021 Hotplate removal Professional + 100 FX 9. Servicing n BEFORE SERVICING ANY GAS CARRYING COMPONENTS TURN OFF THE GAS SUPPL...
Page 36 - Make sure you replace the rear earthing; Wok; Control
WARNING – SERVICING TO BE CARRIED OUT ONLY BY AN AUTHORISED PERSON Disconnect from electricity before servicing. Check appliance is safe when you have finished. 32 Reassemble in reverse order, making sure that you reconnect the leads. Take care not to damage the burner ignition electrodes. IMPORTANT...
Page 37 - Ovens; and remove through the slot in the range back
WARNING – SERVICING TO BE CARRIED OUT ONLY BY AN AUTHORISED PERSON Disconnect from electricity before servicing. Check appliance is safe when you have finished. 33 A B A B C ArtNo.311-0010 n ectors 4 Ovens 4.1 To Remove the Oven Inner Back Main Oven Only Open the main oven door. Remove the 4 screws ...
Page 39 - To Replace an Oven Thermostat
WARNING – SERVICING TO BE CARRIED OUT ONLY BY AN AUTHORISED PERSON Disconnect from electricity before servicing. Check appliance is safe when you have finished. 35 A B A – Thermostat capillary, B – Earthing plate Fig. 9.9 4.7 To Replace an Oven Thermostat n DISCONNECT FROM THE ELECTRICITY SUPPLY. Re...
Page 40 - Doors; To Replace an Oven Door
WARNING – SERVICING TO BE CARRIED OUT ONLY BY AN AUTHORISED PERSON Disconnect from electricity before servicing. Check appliance is safe when you have finished. 36 Top strip Rubber strip 5 Doors 5.1 To Replace an Oven Door Open the oven door fully and place the supplied holding pins in the drop down...
Page 41 - Key
37 10. Circuit Diagram E P057681 6 P6 5 P5 4 P4 7 P7 8 P8 2 P2 1 P1 3 P3 P028728 6 P6 5 P5 4 P4 7 P7 8 P8 2 P2 1 P1 3 P3 a b e f c d 1 2 b br g/y w bk r or w g/y bk gr y w y y bk b bk b b b b b b b b b b b b w gr y r or br br br bk bk bk bk w w bk g/y bk bk bk br br w w w b w w gy r bk w w b b w bk ...
Page 42 - Ratings; Ovens
38 11. Technical Data This cooker is designed for use on Natural Gas, although a conversion for LP (LPG X Propane (2.54 kPa) gas is packed with the cooker. INSTALLER: Please leave these instructions with the user. DATA BADGE LOCATION: Cooker back. The serial number is repeated on the badge below the...
Page 43 - Notes