Page 3 - IT; INHALTSVERZEICHNIS; DE; KAZALO
INDICE STEAM OFF SYSTEM........................................................................................................................................................... 3 CARATTERISTICHE...........................................................................................................
Page 5 - STEAM OFF SYSTEM; ante e basi dei pensili. Con Steam Off System tutto questo viene; STEAM OFF; COMFORT ESCLUSIVO; convogliamento e la captazione del vapore.
IT 3 3 STEAM OFF SYSTEM • Nei piani a induzione, il differenziale termico che si crea tra la parte calda adiacente alla cottura e l’aria più fredda sotto la parte aspirante della cappa provoca un effetto condensa e gocciolamento che fino ad oggi nessuno era riuscito a risolvere. La dispersione del v...
Page 6 - CONSIGLI E SUGGERIMENTI; INSTALLAZIONE
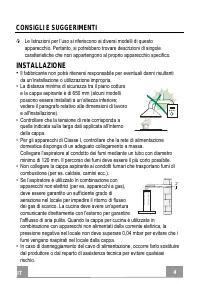
IT CONSIGLI E SUGGERIMENTI Le Istruzioni per l’uso si riferiscono ai diversi modelli di questo apparecchio. Pertanto, si potrebbero trovare descrizioni di singole caratteristiche che non appartengono al proprio apparecchio specifico. INSTALLAZIONE • Il fabbricante non potrà ritenersi responsabile pe...
Page 7 - USO
IT • Se le istruzioni di installazione del piano cottura a gas specificano una distanza maggiore di quella sopra indicata, è necessario tenerne conto. Devono essere rispettate tutte le normative riguardanti lo scarico dell'aria. • Usare solo viti e minuteria di tipo idoneo per la cappa. Avvertenza :...
Page 8 - : le parti accessibili possono diventare molto calde durante; MANUTENZIONE; qualunque operazione di pulizia o manutenzione.
IT • “ ATTENZIONE : le parti accessibili possono diventare molto calde durante l’uso degli apparecchi di cottura ”. MANUTENZIONE • Spegnere o scollegare l’apparecchio dalla rete di alimentazione prima di qualunque operazione di pulizia o manutenzione. • Pulire e/o sostituire i filtri dopo il periodo...
Page 9 - CARATTERISTICHE; Ingombro
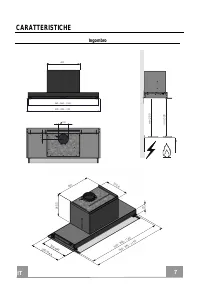
IT CARATTERISTICHE Ingombro 7 400 560 - 860 - 1160 595 - 895 -1195 120 66 min.500 min. 5 00 73 560 - 860 -1160 - 895 - 595 1195 309 MIN. 360 MAX. 265,5 400 275,6
Page 10 - MONTAGGIO; pensile da; A B
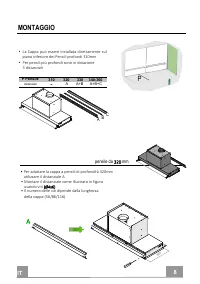
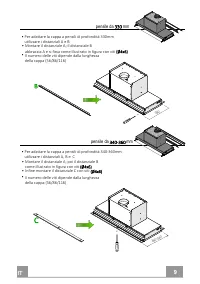
IT MONTAGGIO pensile da 3 2 0 mm • Per adattare la cappa a pensili di profondità 3 2 0mm utilizzare il distanziale A P • La Cappa può essere installata direttamente sul piano inferiore dei Pensili profondi 310 mm • Per pensili più profondi sono in dotazione 3 distanziali P Pensile 310 320 3 3 0 3 40...
Page 12 - MONTAGGIO DISTANZIALI X, Y
IT MONTAGGIO DISTANZIALI X, Y • Montare i distanziali come illustrato in figura usando viti (Ø4x6) 10 X Y
Page 13 - MONTAGGIO NEL PENSILE
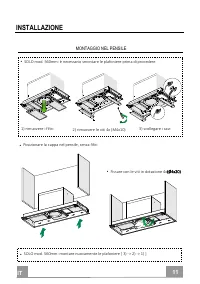
IT INSTALLAZIONE 11 MONTAGGIO NEL PENSILE • Posizionare la cappa nel pensile , senza filtri • Fissare con le viti in dotazione 4x(Ø4x20) • SOLO mod. 560mm: è necessario smontare le plafoniere prima di procedere. • SOLO mod. 560mm: montare nuovam en te le plafoniere [ 3) -> 2) -> 1) ] 1) rimuov...
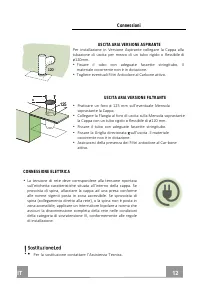
Page 14 - CONNESSIONE ELETTRICA; Sostituzione Led; Connessioni; USCITA ARIA VERSIONE ASPIRANTE; USCITA ARIA VERSIONE FILTRANTE
IT CONNESSIONE ELETTRICA • La tensione di rete deve corrispondere alla tensione riportata sull’etichetta caratteristiche situata all’interno della cappa. Se provvista di spina, allacciare la cappa ad una presa conforme alle norme vigenti posta in zona accessibile. Se sprovvista di spina (collegament...
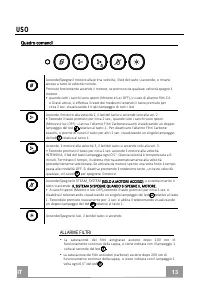
Page 15 - Quadro comandi; ALLARME FILTRI
IT USO Quadro comandi 13 Accende/Spegne il motore alla prima velocità, il led del tasto si accende, e rimane acceso a tutte le velocità motore. Premuto brevemente accende il motore, se premuto da qualsiasi velocità spegne il motore. • Accende il motore alla velocità 2, il led del tasto si accende so...
Page 16 - OPZIONALE
IT Telecomando ( OPZIONALE ) Questo apparecchio può essere comandato per mezzo di un telecomando, alimentato con pile alcaline zinco-carbone da 1,5 V del tipo standard LR03-AAA (non incluse). • Non riporre il telecomando in prossimità di fonti di calore. • Non disperdere le pile nell’ambiente, depos...
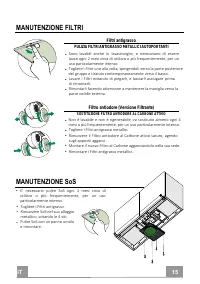
Page 17 - MANUTENZIONE FILTRI; Filtri antigrasso; PULIZIA FILTRI ANTIGRASSO METALLICI AUTOPORTANTI; MANUTENZIONE SoS
IT MANUTENZIONE FILTRI Filtri antigrasso PULIZIA FILTRI ANTIGRASSO METALLICI AUTOPORTANTI • Sono lavabili anche in lavastoviglie, e necessitano di essere lavati ogni 2 mesi circa di utilizzo o più frequentemente, per un uso particolarmente intenso. • Togliere i Filtri uno alla volta, spingendoli ver...
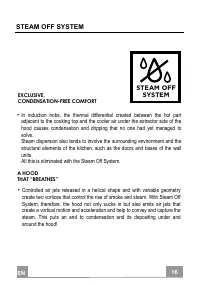
Page 18 - All this is eliminated with the Steam Off System.; CONDENSATION-FREE COMFORT
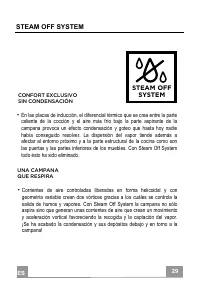
EN STEAM OFF SYSTEM • In induction hobs, the thermal differential created between the hot part adjacent to the cooking top and the cooler air under the extractor side of the hood causes condensation and dripping that no one had yet managed to solve. Steam dispersion also tends to involve the surroun...
Page 19 - EN; RECOMMENDATIONS AND SUGGESTIONS; INSTALLATION
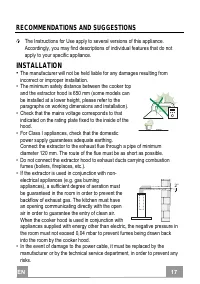
EN RECOMMENDATIONS AND SUGGESTIONS The Instructions for Use apply to several versions of this appliance. Accordingly, you may find descriptions of individual features that do not apply to your specific appliance. INSTALLATION • The manufacturer will not be held liable for any damages resulting from ...
Page 20 - USE
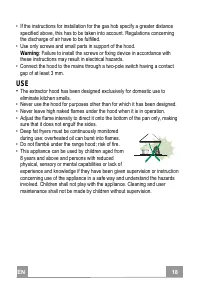
EN • If the instructions for installation for the gas hob specify a greater distance specified above, this has to be taken into account. Regulations concerning the discharge of air have to be fulfilled. • Use only screws and small parts in support of the hood. Warning : Failure to install the screws...
Page 21 - : Accessible parts may become hot when used with cooking; MAINTENANCE; any maintenance work.
EN • “ CAUTION : Accessible parts may become hot when used with cooking appliances.” MAINTENANCE • Switch off or unplug the appliance from the mains supply before carrying out any maintenance work. • Clean and/or replace the Filters after the specified time period (Fire hazard). • The Grease filters...
Page 22 - CHARACTERISTICS; Dimensions
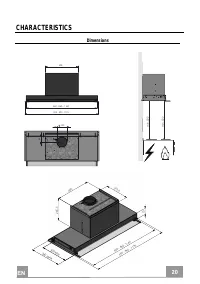
EN CHARACTERISTICS Dimensions 20 400 560 - 860 - 1160 595 - 895 -1195 120 66 min.500 min. 5 00 73 560 - 860 -1160 - 895 - 595 1195 309 MIN. 360 MAX. 265,5 400 275,6
Page 23 - ASSEMBLY; Wall Unit
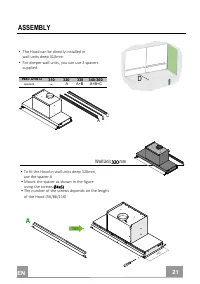
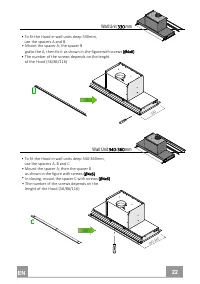
EN ASSEMBLY Wall Unit 3 2 0 mm • To fit the Hood in wall units deep 320mm, use the spacer A D • The Hood can be directly installed in wall units deep 310mm • For deeper w all u nits, you can use 3 spacers supplied Wall Unit D 310 320 3 3 0 340-360 - A A+ B A+B+C spacers • Mount the spacer as shown i...
Page 25 - SPACERS ASSEMBLY X, Y
EN SPACERS ASSEMBLY X, Y • Mount the spacers as shown in the figure using the screws (Ø4x6) 23 X Y
Page 26 - FIXING IN WALL UNIT
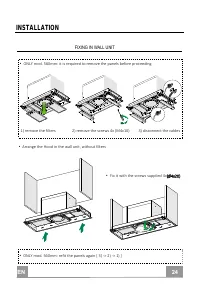
EN INSTALLATION 24 FIXING IN WALL UNIT Arrange the Hood in the wall unit, without filters F ix it with the screws supplied 4x(Ø4x20) • • • ONLY mod. 560mm: it i s required to remove the panels before proceeding. • ONLY mod. 560mm: refit the panels again [ 3) -> 2) -> 1) ] 1) remove the filters...
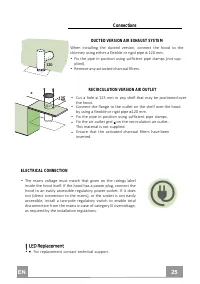
Page 27 - ELECTRICAL CONNECTION; LED Replacement; Connections; DUCTED VERSION AIR EXHAUST SYSTEM
EN 25 ELECTRICAL CONNECTION • The mains voltage must match that given on the ratings label inside the hood itself. If the hood has a power plug, connect the hood to an easily accessible regulatory power socket. If it does not (direct connection to the mains), or the socket is not easily accessible, ...
Page 28 - Control panel; FILTERS ALARM
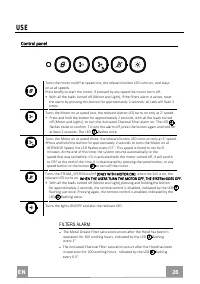
EN USE 26 Control panel Turns the motor on/off at speed one , the rel evant button LED turns on, and stays on at all speeds. Press briefly to start the motor, if pressed by any speed the motor turns off. • Turns the Motor on at speed two , the rel evant button LED turns on only at 2° speed. • Press ...
Page 29 - OPTIONAL
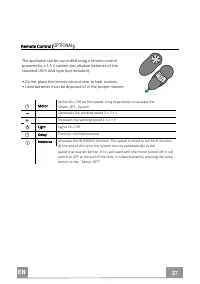
EN 27 Remote Control ( OPTIONAL ) The appliance can be controlled using a remote control powered by a 1.5 V carbon-zinc alkaline batteries of the standard LR03-AAA type (not included). • Do not place the remote control near to heat sources. • Used batteries must be disposed of in the proper manner. ...
Page 30 - FILTERS MAINTENANCE; Grease filters; Activated charcoal filter (Recirculation version); REPLACING THE ACTIVATED CHARCOAL FILTER; SoS MAINTENANCE
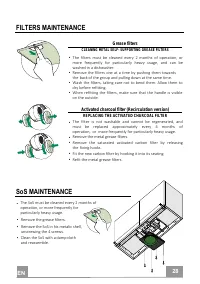
EN FILTERS MAINTENANCE Grease filters CLEANING METAL SELF- SUPPORTING GREASE FILTERS • The filters must be cleaned every 2 months of operation, or more frequently for particularly heavy usage, and can be washed in a dishwasher. • Remove the filters one at a time by pushing them towards the back of t...
Page 31 - todo ésto ha sido eliminado.; salida de humos y vapores. Con Steam Off System la campana no sólo; CONFORT EXCLUSIVO
ES STEAM OFF SYSTEM • En las placas de inducción, el diferencial térmico que se crea entre la parte caliente de la cocción y el aire más frío bajo la parte aspirante de la campana provoca un efecto condensación y goteo que hasta hoy nadie había conseguido resolver. La dispersión del vapor tiende ade...
Page 32 - ES; CONSEJOS Y SUGERENCIAS; INSTALACIÓN
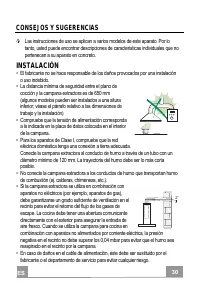
ES CONSEJOS Y SUGERENCIAS Las instrucciones de uso se aplican a varios modelos de este aparato. Por lo tanto, usted puede encontrar descripciones de características individuales que no pertenecen a su aparato en concreto. INSTALACIÓN • El fabricante no se hace responsable de los daños provocados por...
Page 34 - : las partes accesibles pueden calentarse mucho durante el uso de; MANTENIMIENTO; limpieza o mantenimiento.
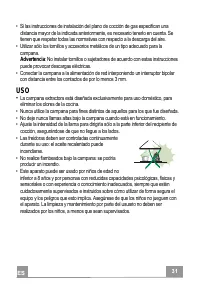
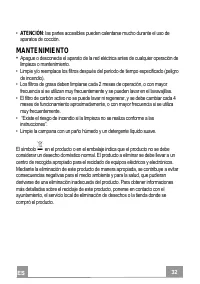
ES • ATENCIÓN : las partes accesibles pueden calentarse mucho durante el uso de aparatos de cocción. MANTENIMIENTO • Apague o desconecte el aparato de la red eléctrica antes de cualquier operación de limpieza o mantenimiento. • Limpie y/o reemplace los filtros después del período de tiempo especific...
Page 35 - CARACTERÍSTICAS; Dimensiones
ES CARACTERÍSTICAS Dimensiones 33 400 560 - 860 - 1160 595 - 895 -1195 120 66 min.500 min. 5 00 73 560 - 860 -1160 - 895 - 595 1195 309 MIN. 360 MAX. 265,5 400 275,6
Page 36 - MONTAJE; mueble de
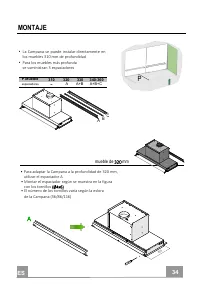
ES MONTAJE mueble de 3 2 0 mm • Para adaptar la Campana a la profundidad de 320 mm, utilizar el espaciador A P • La Ca mpana se puede instalar direc tamente en los muebles 310 mm de profundidad • P ara los muebles más profunda se suministran 3 espaciadores P Mueble 310 320 330 340- 360 - A A+ B A+B+...
Page 38 - MONTAJE ESPACIADORES X,Y
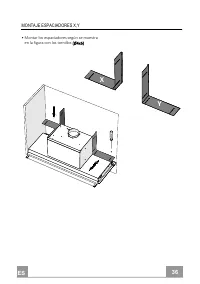
ES MONTAJE ESPACIADORES X,Y 36 • Montar los espaciadores según se muestra en la figura con los tornillos (Ø4x6) X Y
Page 39 - FIJACIÓN EN EL MUEBLE
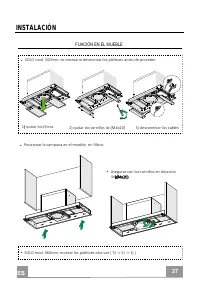
ES INSTALACIÓN 37 FIJACIÓN EN EL MUEBLE • Posicionar la campana en el mueble, sin filtros • Asegurar con los tornillos en dotación 4x(Ø4x20) • SOLO mod. 560mm: es necesario desmontar los plafònes antes de proceder. • SOLO mod. 560mm: montar los plafònes otra vez [ 3) -> 2) -> 1) ] 1)) quitar l...
Page 40 - CONEXIÓN ELÉCTRICA; Reemplazo LED; Conexiones; SALIDA DEL AIRE VERSIÓN ASPIRANTE; SALIDA DEL AIRE VERSIÓN FILTRANTE
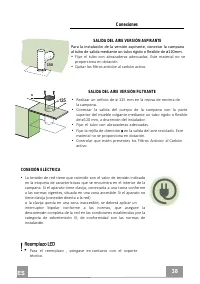
ES 38 CONEXIÓN ELÉCTRICA • La tensi ó n de red tiene que coincidir con el valor de tensi ó n indicado en la etiqueta de características que se encuentra en el interior de la campana. Si el aparato tiene clavija, conectarla a una toma conforme a las normas vigentes, situada en una zona accesible. Si ...
Page 41 - Panel de mandos; ALARMA FILTROS
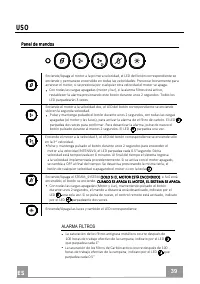
ES USO 39 Panel de mandos Enciende/Apaga el motor a la primera velocidad , el LED del botón correspondiente se enciende y permanece encendido en todas las velocidades. Presionar brevemente para arrancar el motor, si se presiona por cualquier otra velocidad el motor se apaga. • Enciende el motor a la...
Page 42 - OPCIONAL
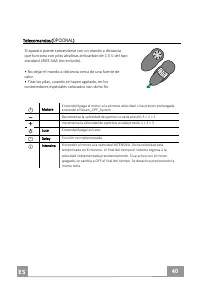
El aparato puede comandarse con un mando a distancia que funciona con pilas alcalinas zinkcarbón de 1,5 V del tipo standard LR03-AAA (no incluido). • No dejar el mando a distancia cerca de una fuente de calor. • Tirar las pilas, cuando se hayan agotado, en los contenedores especiales colocados con d...
Page 43 - MANTENIMIENTO FILTROS; Filtros antigrasa; LIMPIEZA DE LOS FILTROS ANTIGRASA METÁLICOS; MANTENIMIENTO SoS
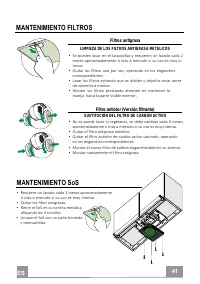
ES MANTENIMIENTO FILTROS Filtros antigrasa LIMPIEZA DE LOS FILTROS ANTIGRASA METÁLICOS • Se pueden lavar en el lavavajillas y requieren un lavado cada 2 meses aproximadamente o más a menudo si su uso es muy in- tenso. • Quitar los filtros uno por vez, operando en los enganches correspondientes. • La...
Page 44 - kann. Mit dem Steam Off System saugt die Haube nicht nur ab, sondern
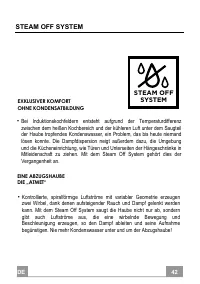
• Bei Induktionskochfeldern entsteht aufgrund der Temperaturdifferenz zwischen dem heißen Kochbereich und der kühleren Luft unter dem Saugteil der Haube tropfendes Kondenswasser, ein Problem, das bis heute niemand lösen konnte. Die Dampfdispersion neigt außerdem dazu, die Umgebung und die Kücheneinr...
Page 45 - EMPFEHLUNGEN UND HINWEISE
DE EMPFEHLUNGEN UND HINWEISE Diese Gebrauchsanleitungen beziehen sich auf die verschiedenen Modelle der Abzugshaube. Darum kann es möglich sein, dass die Beschreibung bestimmter Merkmale für das vorliegende Gerät nicht zutrifft. INSTALLATION • Der Hersteller haftet nicht für etwaige Schäden, die dur...
Page 46 - GEBRAUCH; Achtung! Große Flammen bei eingeschalteter Haube niemals
DE • Falls die Montageanweisungen für die gasbetriebene Kochmulde einen größeren Abstand vorschreiben, als der oben angegebene, muss diese Vorgabe befolgt werden. Es sind sämtliche Abluftvorschriften zu beachten. • Nur für die Abzugshaube geeignete Schrauben und Kleinteile verwenden. Achtung: Werden...
Page 47 - WARTUNG
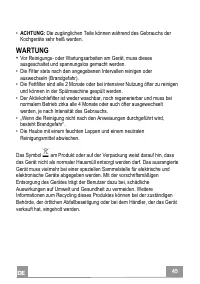
DE • ACHTUNG: Die zugänglichen Teile können während des Gebrauchs der Kochgeräte sehr heiß werden. WARTUNG • Vor Reinigungs- oder Wartungsarbeiten am Gerät, muss dieses ausgeschaltet und spannungslos gemacht werden. • Die Filter stets nach den angegebenen Intervallen reinigen oder auswechseln (Brand...
Page 48 - CHARAKTERISTIKEN; Raumbedarf
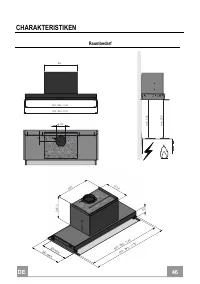
CHARAKTERISTIKEN Raumbedarf DE 46 400 560 - 860 - 1160 595 - 895 -1195 120 66 min.500 min. 5 00 73 560 - 860 -1160 - 895 - 595 1195 309 MIN. 360 MAX. 265,5 400 275,6
Page 49 - MONTAGE; Hängeschrank mit Tiefe
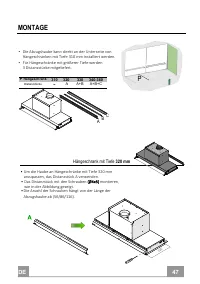
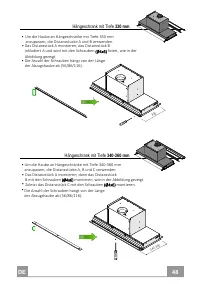
MONTAGE Hängeschrank mit Tiefe 320 mm • Um die Haube an Hängeschränke mit Tiefe 320 mm anzupassen, das Distanzstück A verwenden. P • Die Abzugshaube kann direkt an der Unterseite von Hängeschränken mit Tiefe 310 mm installiert werden. • Für Hängeschränke mit größerer Tiefe werden 3 Distanzstücke mit...
Page 51 - MONTAGE DISTANZSTÜCK X, Y
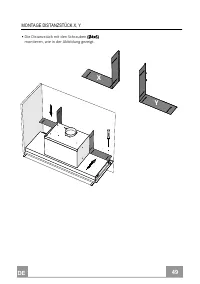
DE MONTAGE DISTANZSTÜCK X, Y • D ie Distanzstück mit den Schrauben (Ø4x6) montieren, wie in der Abbildung gezeigt. 49 X Y
Page 52 - MONTAGE IM HÄNGESCHRANK
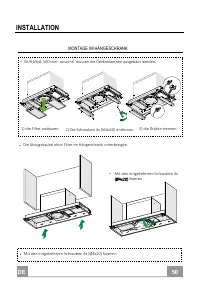
INSTALLA TION MONTAGE IM HÄNGESCHRANK • Die Abzugshaube ohne Filter im Hängeschrank unterbringen. Mit den mitgelieferten Schrauben 4x (Ø4x20) fixieren. • NUR Mod. 560 mm: zunächst müssen die Deckenlampen ausgebaut werden. • Mit den mitgelieferten Schrauben 4x (Ø4x20) fixieren. 1) die Filter ausbauen...
Page 53 - ELEKTROANSCHLUSS; Anschluss im Abluftbetrieb; LUFTAUSLASS BEI DER ABLUFTVERSION; Beleuchtung
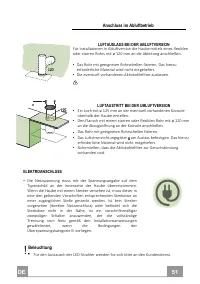
ELEKTROANSCHLUSS • Die Netzspannung muss mit der Spannungsangabe auf dem Typenschild an der Innenseite der Haube übereinstimmen. Wenn die Haube mit einem Stecker versehen ist, muss dieser in eine den geltenden Vorschriften entsprechenden Steckdose an einer zugänglichen Stelle gesteckt werden. Ist ke...
Page 54 - BEDIENUNG; Bedienfeld; FILTERALARM
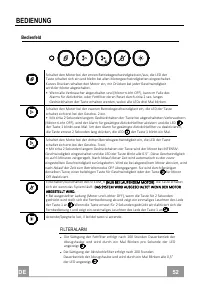
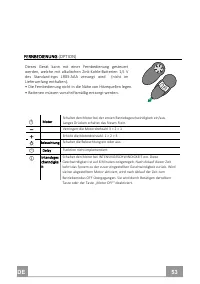
BEDIENUNG Bedienfeld DE 52 Schaltet den Motor bei der ersten Betriebsgeschwindigkeit ein/aus, die LED der Taste schaltet sich ein und bleibt bei allen Motorgeschwindigkeiten eingeschaltet. Kurzes Drücken schaltet den Motor ein, mit Drücken bei jeder Geschwindigkeit wird der Motor abgeschaltet. • Wen...
Page 56 - WARTUNG FILTER; Fettfilter; SELBSTTRAGENDER METALLFETTFILTER REINIGUNG
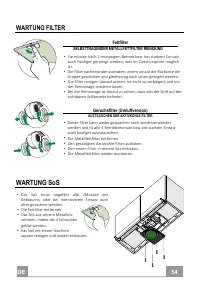
WARTUNG FILTER WARTUNG SoS Fettfilter SELBSTTRAGENDER METALLFETTFILTER REINIGUNG • Sie müssen nach 2-monatigem Betrieb bzw. bei starkem Ein-satz auch häufiger gereinigt werden, was im Geschirrspüler möglich ist. • Die Filter nacheinander aushaken, indem sie auf die Rückseite der Gruppe geschoben und...
Page 57 - EKSKLUZIVNA UGODNOST; Dakle, sa Steam Off sustavom, napa ne samo da usisava, nego također
HR STEAM OFF SYSTEM • Kod indukcijskih ploča, razlika u temperaturi koja se stvara između vrućeg zraka uz ploču i hladnijeg zraka ispod nape uzrokuje problem kondenzacije i kapanja, koji dosad još nitko nije uspio riješiti. Osim toga, para se često nakuplja na strukturalnim kuhinjskim elementima, ka...
Page 58 - SAVJETI I PREPORUKE; UGRADNJA
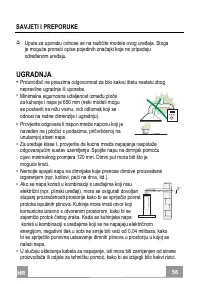
HR SAVJETI I PREPORUKE Upute za uporabu odnose se na različite modele ovog uređaja. Stoga je moguće pronaći opise pojedinih značajki koje ne pripadaju određenom uređaju. UGRADNJA • Proizvođač ne preuzima odgovornost za bilo kakvu štetu nastalu zbog nepravilne ugradnje ili uporabe. • Minimalna sigurn...
Page 59 - UPORABA
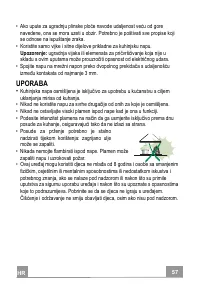
HR • Ako upute za ugradnju plinske ploče navode udaljenost veću od gore navedene, ona se mora uzeti u obzir. Potrebno je poštivati sve propise koji se odnose na ispuštanje zraka. • Koristite samo vijke i sitne dijelove prikladne za kuhinjsku napu. Upozorenje: ugradnja vijaka ili elemenata za pričvrš...
Page 60 - ODRŽAVANJE
HR • UPOZORENJE: Dostupni dijelovi mogu postati jako vrući tijekom korištenja uređaja za kuhanje. ODRŽAVANJE • Prije bilo koje operacije čišćenja ili održavanja, isključite ili odspojite uređaj s mreže napajanja. • Očistite i/ili zamijenite filtre nakon naznačenog razdoblja (opasnost od požara). • F...
Page 61 - ZNAČAJKE; Dimenzije
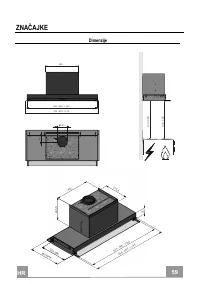
HR ZNAČAJKE Dimenzije 59 400 560 - 860 - 1160 595 - 895 -1195 120 66 min.500 min. 5 00 73 560 - 860 -1160 - 895 - 595 1195 309 MIN. 360 MAX. 265,5 400 275,6
Page 62 - Viseća zidna jedinica od
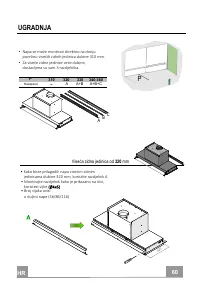
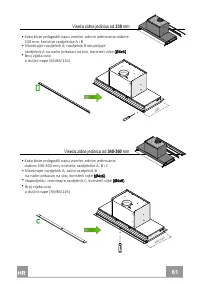
HR UGRADNJA Viseća zidna jedinica od 320 mm • Kako biste prilagodili napu visećim zidnim jedinicama dubine 320 mm, koristite razdjelnik A P • Napa se može montirati direktno na donju površinu visećih zidnih jedinica dubine 310 mm. • Za viseće zidne jedinice veće dubine, dostavljena su vam 3 razdjeln...
Page 64 - MONTAŽA RAZDJELNIKE X, Y
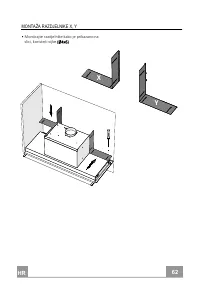
HR MONTAŽA RAZDJELNIKE X, Y • Montirajte razdjelnike kako je prikazano na slici, koristeći vijke (Ø4x6) 62 X Y
Page 65 - INSTALACIJA; MONTIRANJE NA VISEĆE ZIDNE JEDINICE
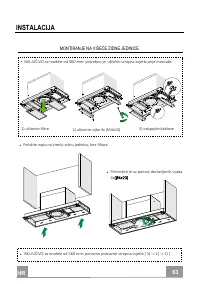
HR INSTALACIJA 63 MONTIRANJE NA VISEĆE ZIDNE JEDINICE • Položite napu na viseću zidnu jedinicu, bez filtara • Pričvrstite je uz pomoć dostavljenih vijaka 4x(Ø4x20) • ISKLJUČIVO za modele od 560 mm: potrebno je ukloniti stropna svjetla prije montaže. • ISKLJUČIVO za modele od 560 mm: ponovno postavit...
Page 66 - SPAJANJE NA ELEKTRIČNU MREŽU; Zamjena Led žarulja; Priključci; IZLAZ ZRAKA NA USISNOJ VERZIJI
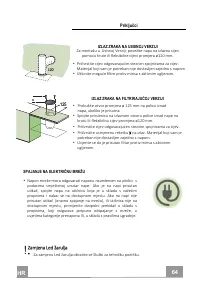
HR SPAJANJE NA ELEKTRIČNU MREŽU • Napon mreže mora odgovarati naponu navedenom na pločici s podacima smještenoj unutar nape. Ako je na napi prisutan utikač, spojite napu na utičnicu koja je u skladu s važećim propisima i nalazi se na dostupnom mjestu. Ako na napi nije prisutan utikač (izravno spajan...
Page 67 - Kontrolna ploča; ALARM FILTARA
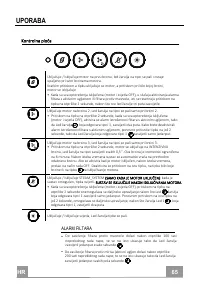
HR UPORABA Kontrolna ploča Uključuje / isključuje motor na prvu brzinu, led žarulja na tipci se pali i ostaje upaljeno pri svim brzinama motora. Kratkim pritiskom a tipku uključuje se motor, a pritiskom pri bilo kojoj brzini, motor se isključuje. • Kada su sva opterećenja isključena (motor i svjetla...
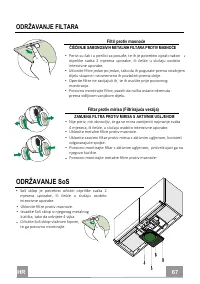
Page 69 - ODRŽAVANJE FILTARA; Filtri protiv masnoće; ČIŠĆENJE SAMONOSIVIH METALNIH FILTARA PROTIV MASNOĆE; Filtar protiv mirisa (Filtrirajuća verzija); ZAMJENA FILTRA PROTIV MIRISA S AKTIVNIM UGLJENOM
HR ODRŽAVANJE FILTARA 67 ODRŽAVANJE SoS • Uklonite filtre protiv masnoće. • Izvadite SoS sklop iz njegovog metalnog kućišta, tako da odvijete 4 vijka. • Očistite SoS sklop vlažnom krpom, te ga ponovno montirajte. • SoS sklop je potrebno očistiti otprilike svaka 2 mjeseca uporabe, ili češće u slučaju...
Page 70 - et son dépôt sous la hotte et tout autour!; CONFORT EXCLUSIF
FR STEAM OFF SYSTEM • Dans les tables de cuisson à induction, le différentiel de température qui se crée entre la partie chaude adjacente à la cuisson et l’air plus froid sous la partie aspirante de la hotte provoque un effet de condensation et de formation de gouttes que personne n’avait réussi à r...
Page 71 - CONSEILS ET SUGGESTIONS
Les instructions pour l’utilisation se réfèrent aux différents modèles de cet appareil. Par conséquent, certaines descriptions de caractéristiques particulières pourraient ne pas appartenir spécifiquement à cet appareil. • En aucun cas le fabricant ne peut être tenu pour responsable d’éventuels domm...
Page 72 - UTILISATION
• Si les instructions d’installation du plan de cuisson à gaz spécifient une distance supérieure à celle indiquée ci-dessus, veuillez impérativement en tenir compte. Toutes les normes concernant l’évacuation de l’air doivent être respectées. • Utiliser exclusivement des vis et des petites pièces du ...
Page 73 - ENTRETIEN
• "ATTENTION : les parties accessibles peuvent devenir très chaudes durant l’utilisation des appareils de cuisson ” . • Avant d’effectuer toute opération de nettoyage et d’entretien, éteindre ou débrancher l’appareil du secteur. • Nettoyer et/ou remplacer les filtres après le délai indiqué (dang...
Page 74 - CARACTÉRISTIQUES; Encombrement
CARACTÉRISTIQUES Encombrement FR 72 400 560 - 860 - 1160 595 - 895 -1195 120 66 min.500 min. 5 00 73 560 - 860 -1160 - 895 - 595 1195 309 MIN. 360 MAX. 265,5 400 275,6
Page 75 - armoire murale de 320 mm
MONTAGE armoire murale de 320 mm • Pour adapter la hotte aux armoires murales de 320mm de profondeur utiliser l’entretoise A P • La hotte peut être installée directement sur le plan inférieur des armoires murales de 310mm de profondeur • Pour des armoires murales plus profondes, 3 entretoises sont f...
Page 76 - armoire murale de; armoire murale de 3
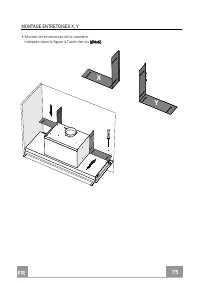
armoire murale de 3 40-3 60 mm armoire murale de 3 3 0 mm • Pour adapter la hotte aux armoires murales de 330mm de profondeur utiliser les entretoises A et B • Monter l’entretoise A; l’entretoise B enlace A et elle se fixe de la manière illustrée dans la figure avec les vis (Ø4x6) • Le nombre de vis...
Page 78 - MONTAGE DANS L’ARMOIRE MURALE
INSTALLATION MONTAGE DANS L’ARMOIRE MURALE • Mettre en place la hotte dans l’armoire, sans les filtres • Fixer avec les vis fournies 4x(Ø4x20) • SEULEMENT pour le modèle 560mm : il est nécessaire de démonter d’abord les plafonniers. • SEULEMENT pour le modèle 560mm : remonter les plafonniers [ 3) -&...
Page 79 - BRANCHEMENT ELECTRIQUE; Branchements; SORTIE AIR VERSION ASPIRANTE; Éclairage Led
BRANCHEMENT ELECTRIQUE • La tension du secteur doit correspondre à celle indiquée sur l’étiquette des caractéristiques située à l’intérieur de la hotte. Si la hotte est dotée d’une fiche, brancher la hotte à une prise conforme aux normes en vigueur située dans un endroit accessible. Si la hotte ne p...
Page 80 - Bandeau de commande
UTILISATION Bandeau de commande FR 78 Branche/Débranche le moteur à la première vitesse, la led sur la touche s’allume et elle reste allumée à toutes les vitesses du moteur. Appuyer brièvement pour démarrer le moteur, appuyer depuis n’importe quelle vitesse pour couper le moteur. • Lorsque toutes le...
Page 81 - Telecommande; FOURNIE SUR DEMANDE
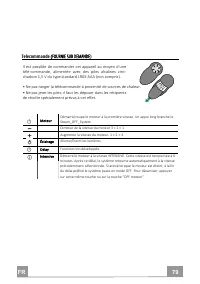
FR 79 Telecommande ( FOURNIE SUR DEMANDE ) Il est possible de commander cet appareil au moyen d’une télé-commande, alimentée avec des piles alcalines zinc- charbon 1,5 V du type standard LR03-AAA (non compris). • Ne pas ranger la télécommande à proximité de sources de chaleur. • Ne pas jeter les pil...
Page 82 - Filtres anti-graisse; NETTOYAGE FILTRES ANTI-GRAISSE METALLIQUES AUTOPORTEURS
ENTRETIEN FILTRES ENTRETIEN S oS Filtres anti-graisse NETTOYAGE FILTRES ANTI-GRAISSE METALLIQUES AUTOPORTEURS • Lavables au lave-vaisselle, ils doivent être lavés environ tous les 2 mois d’emploi ou plus fréquemment en cas d’emploi par- ticulièrement intense. • Retirer les filtres l’un aprés l’autre...