Page 3 - EN; SAFETY INFORMATION; The wire connection has to be done by specialized technician.
EN 3 3 SAFETY INFORMATION For your safety and correct operation of the appliance, read this manual carefully before installation and use. Always keep these instructions with the appliance even if you move or sell it. Users must fully know the operation and safety features of the appliance. The wire ...
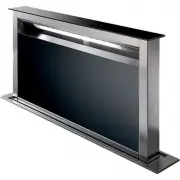
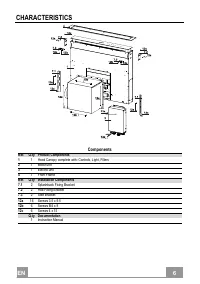
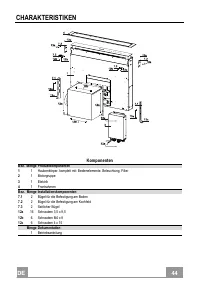
Page 6 - CHARACTERISTICS; Components
EN 6 6 CHARACTERISTICS Components Ref. Q.ty Product Components 1 1 Hood Canopy complete with: Controls, Light, Filters 2 1 Motor unit 3 1 Electric unit 4 1 Front Frame Ref. Q.ty Installation Components 7.1 2 Splashback Fixing Bracket 7.2 2 Hob Fixing Bracket 7.3 2 Side Bracket 12a 16 Screws 3.5 x 9....
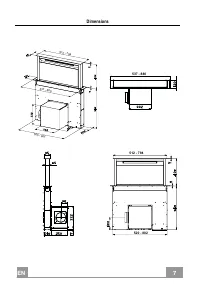
Page 7 - Dimensions
EN 7 7 Dimensions 512 - 794 520 - 80 2 537 - 880 537 - 880 512 - 794 520 - 802
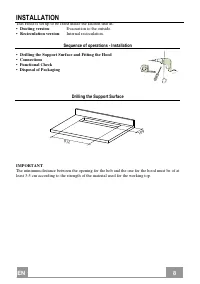
Page 8 - INSTALLATION; Ducting version; Evacuation to the outside.; Recirculation version; Internal recirculation.; Sequence of operations - Installation; IMPORTANT
EN 8 8 INSTALLATION This Hood is set up to be fitted inside the kitchen unit in: • Ducting version : Evacuation to the outside. • Recirculation version : Internal recirculation. Sequence of operations - Installation • Drilling the Support Surface and Fitting the Hood• Connections• Functional Check• ...
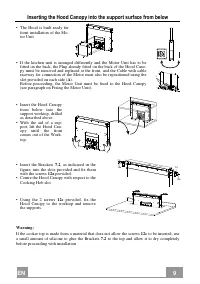
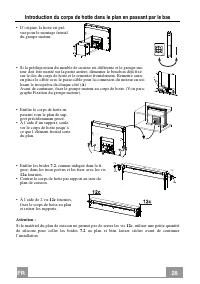
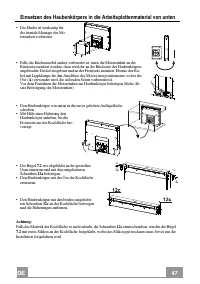
Page 9 - Inserting the Hood Canopy into the support surface from below
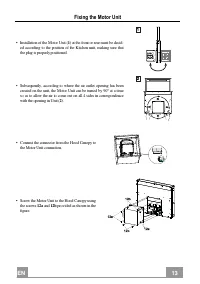
EN 9 9 7.2 12a 7.2 12a A Inserting the Hood Canopy into the support surface from below • The Hood is built ready for front installation of the Mo- tor Unit. • If the kitchen unit is arranged differently and the Motor Unit has to be fitted on the back, the Plug already fitted on the back of the Hood ...
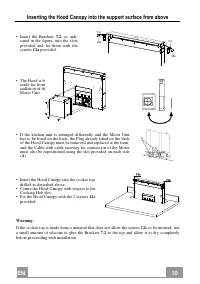
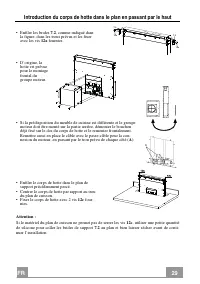
Page 10 - Inserting the Hood Canopy into the support surface from above
EN 1 0 10 Inserting the Hood Canopy into the support surface from above • Insert the Brackets 7.2 , as indi- cated in the figure, into the slots provided and fix them with the screws 12a provided. • The Hood is built ready for front in- stallation of the Motor Unit. • If the kitchen unit is arranged...
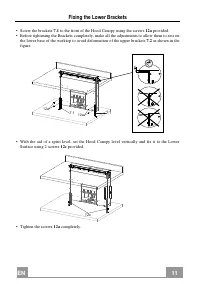
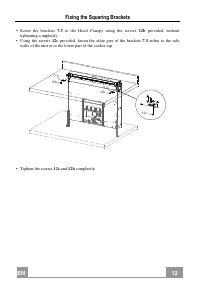
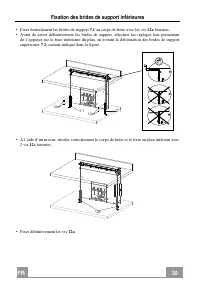
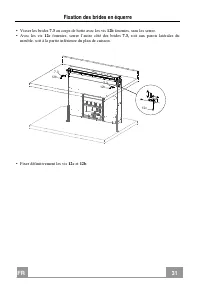
Page 12 - Fixing the Squaring Brackets
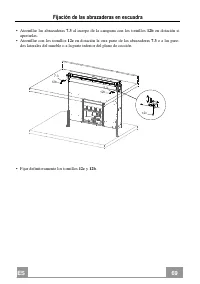
EN 1 2 12 Fixing the Squaring Brackets • Screw the brackets 7.3 to the Hood Canopy using the screws 12b provided, without tightening completely. • Using the screws 12c provided, fasten the other part of the brackets 7.3 either to the side walls of the unit or to the lower part of the cooker top. 12b...
Page 15 - Connections; DUCTED VERSION AIR EXHAUST SYSTEM
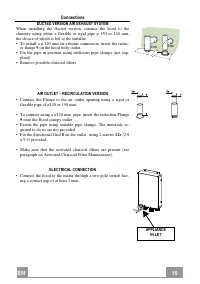
EN 1 5 15 Connections DUCTED VERSION AIR EXHAUST SYSTEM When installing the ducted version, connect the hood to the chimney using either a flexible or rigid pipe ø 150 or 120 mm, the choice of which is left to the installer. • To install a ø 120 mm air exhaust connection, insert the reduc- er flange...
Page 16 - Handle; Fitting the Front element; Warning
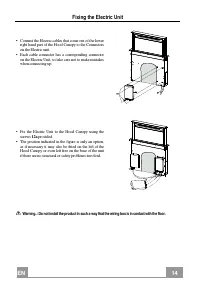
EN 1 6 16 Warning..: Handle with care Fitting the Front element • Lift the mobile hood canopy (see paragraph on Use) by just a few centimetres. • To stop movement, simply press down on the mobile canopy as it lifts up. Warning: Never block the sliding door when it is opening or closing, except durin...
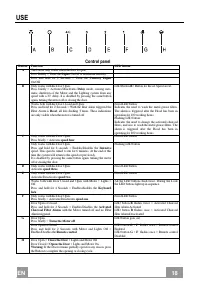
Page 18 - USE; Control panel
EN 1 8 18 USE Control panel Button Function LED button A The button only works when the door is open. Press Briefly = Turns the Lights On/Off at maximum intensity. Press and hold for 2 Seconds = Turns the Courtesy Lights On/Off. B Only works with the Door Open. Press briefly = Activates/Deactivates ...
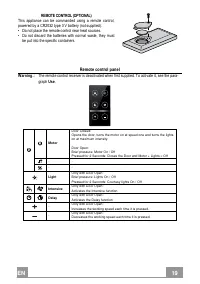
Page 19 - be put into the specific containers.; Remote control panel; graph; Use
EN 1 9 19 REMOTE CONTROL (OPTIONAL) This appliance can be commanded using a remote control, powered by a CR2032 type 3 V battery (not supplied). • Do not place the remote control near heat sources.• Do not discard the batteries with normal waste, they must be put into the specific containers. Remote...
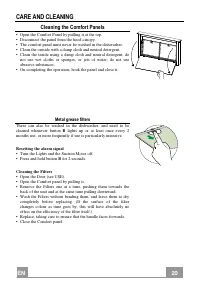
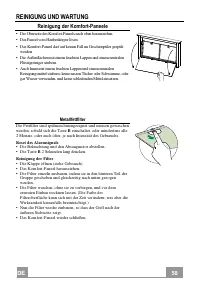
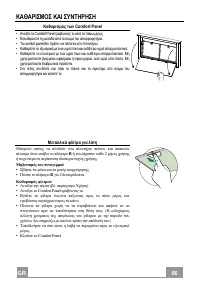
Page 20 - CARE AND CLEANING; Cleaning the Comfort Panels; • On completing the operation, hook the panel and close it.; Metal grease filters; lights up or at least once every 2; Resetting the alarm signal; back of the unit and at the same time pulling downward.
EN 2 0 20 CARE AND CLEANING Cleaning the Comfort Panels • Open the Comfort Panel by pulling it at the top.• Disconnect the panel from the hood canopy.• The comfort panel must never be washed in the dishwasher.• Clean the outside with a damp cloth and neutral detergent.• Clean the inside using a damp...
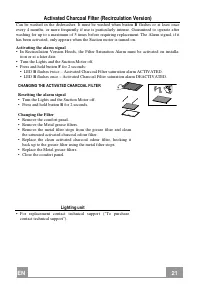
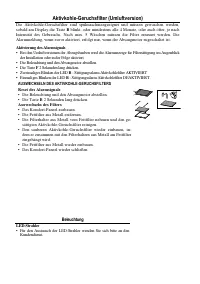
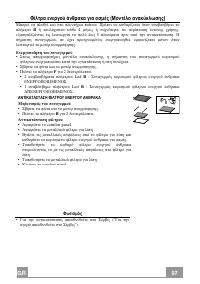
Page 21 - Activated Charcoal Filter (Recirculation Version); Activating the alarm signal; Lighting unit
EN 2 1 21 Activated Charcoal Filter (Recirculation Version) Can be washed in the dishwasher. It must be washed when button B flashes or at least once every 4 months, or more frequently if use is particularly intense. Guaranteed to operate after washing for up to a maximum of 5 times before requiring...
Page 22 - FR; CONSIGNES DE SÉCURITÉ; Respecter toutes les normes concernant l’évacuation de l’air.
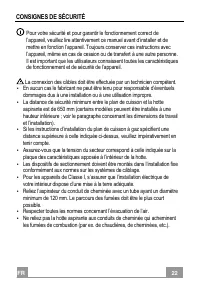
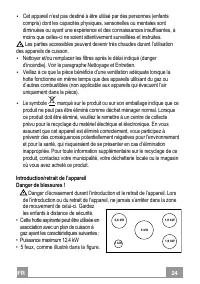
FR 2 2 22 CONSIGNES DE SÉCURITÉ Pour votre sécurité et pour garantir le fonctionnement correct de l’appareil, veuillez lire attentivement ce manuel avant d’installer et de mettre en fonction l’appareil. Toujours conserver ces instructions avec l’appareil, même en cas de cession ou de transfert à une...
Page 23 - AVERTISSEMENT; toute installation de vis et de dispositifs de fixation non
FR 2 3 23 • Si vous utilisez l’aspirateur en même temps que des appareils non électriques(par ex. fonctionnant au gaz), veillez à ce que la pièce soit adéquatementventilée, afin d’empêcher le retour du flux des gaz d’évacuation. Si vous utilisez lahotte de cuisine en même temps que des appareils non...
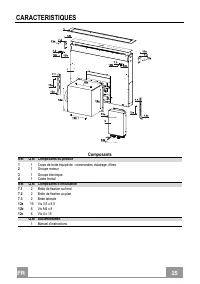
Page 25 - CARACTERISTIQUES; Composants
FR 2 5 25 CARACTERISTIQUES Composants Réf. Q.té Composants du produit 1 1 Corps de hotte équipé de : commandes, éclairage, filtres 2 1 Groupe moteur 3 1 Groupe électrique 4 1 Cadre frontal Réf. Q.té Composants d’installation 7.1 2 Bride de fixation au fond 7.2 2 Bride de fixation au plan 7.3 2 Bride...
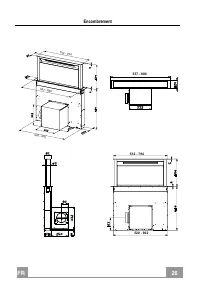
Page 26 - Encombrement
FR 2 6 26 Encombrement 512 - 794 520 - 80 2 537 - 880 537 - 880 512 - 794 520 - 802
Page 27 - Séquence des opérations d’installation; Important
FR 2 7 27 INSTALLATION Cette hotte est prévue pour être installée à l’intérieur du meuble de cuisine en : • Version aspirante : évacuation à l’extérieur. • Version filtrante : recirculation intérieure. Séquence des opérations d’installation • Perçage du plan de support et montage de la hotte • Conne...
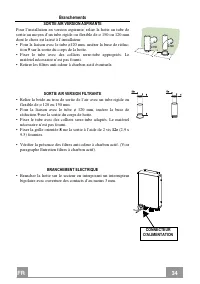
Page 34 - Branchements; SORTIE AIR VERSION ASPIRANTE
FR 3 4 34 Branchements SORTIE AIR VERSION ASPIRANTE Pour l’installation en version aspirante, relier la hotte au tube de sortie au moyen d’un tube rigide ou flexible de ø 150 ou 120 mm dont le choix est laissé à l’installateur. • Pour la liaison avec le tube ø120 mm, insérer la buse de réduc- tion 9...
Page 35 - manier avec; Montage frontal
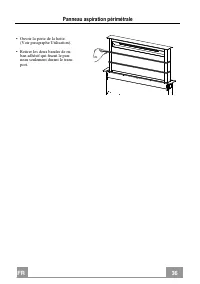
FR 3 5 35 Attention : manier avec soin Montage frontal • Soulever le corps mobile de la hotte de quelques centimètres seulement. (Voir paragraphe Utilisation). • Pour bloquer le mouvement, il suffit de faire pression vers le bas sur le corps mobile qui est en train de se soulever. Attention : ne jam...
Page 37 - UTILISATION; Tableau des commandes
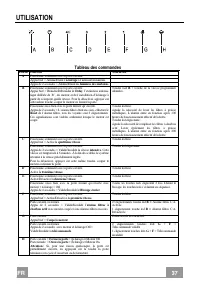
FR 3 7 37 UTILISATION Tableau des commandes Touche Fonction Touche led A Fonctionne seulement avec la porte ouverte. Appui bref = Allume/Éteint l’ éclairage à l’intensité maximum. Appui de 2 secondes = Allume/Éteint les lumières de courtoisie. B Fonctionne seulement avec la porte ouverte. Appui bref...
Page 38 - Tableau des commandes - Télécommande; Utilisation
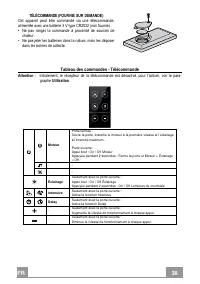
FR 3 8 38 TÉLÉCOMMANDE (FOURNIE SUR DEMANDE) Cet appareil peut être commandé via une télécommande, alimentée avec une batterie 3 V type CR2032 (non fournie). • Ne pas ranger la commande à proximité de sources de chaleur. • Ne pas jeter les batteries dans la nature, mais les déposer dans les bornes d...
Page 39 - NETTOYAGE ET ENTRETIEN; Nettoyage des Comfort Panels; Filtres à graisse métalliques; Reset du signal d'alarme
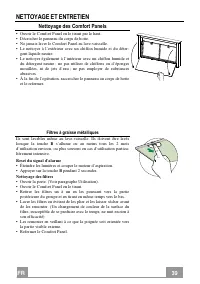
FR 3 9 39 NETTOYAGE ET ENTRETIEN Nettoyage des Comfort Panels • Ouvrir le Comfort Panel en le tirant par le haut. • Décrocher le panneau du corps de hotte. • Ne jamais laver le Comfort Panel au lave-vaisselle. • Le nettoyer à l’extérieur avec un chiffon humide et du déter- gent liquide neutre. • Le ...
Page 40 - Activation du signal d’alarme; Éclairage
FR 4 0 40 Filtres anti-odeur à charbon actif (version filtrante) Également lavable au lave-vaisselle, le nettoyer lorsque la touche B clignote ou au moins tous les 4 mois ou plus fréquemment en cas d’utilisation particulièrement intense, en garantissant le fonctionnement jusqu’à un maximum de 5 lava...
Page 41 - DE; SICHERHEITSINFORMATIONEN; Alle gesetzlichen Vorschriften im Bereich Abluft einhalten.
DE 4 1 41 SICHERHEITSINFORMATIONEN Zu Ihrer eigenen Sicherheit und für die korrekte Funktion des Gerätes lesen Sie bitte diese Betriebsanleitung aufmerksam durch, bevor Sie das Gerät installieren und benutzen. Verwahren Sie die Bedienungsanleitung stets zusammen mit dem Gerät, auch wenn Sie dieses a...
Page 44 - CHARAKTERISTIKEN; Komponenten
DE 4 4 44 CHARAKTERISTIKEN Komponenten Bez. Menge Produktkomponenten 1 1 Haubenkörper, komplett mit: Bedienelemente, Beleuchtung, Filter 2 1 Motorgruppe 3 1 Elektrik 4 1 Frontrahmen Bez. Menge Installationskomponenten 7.1 2 Bügel für die Befestigung am Boden 7.2 2 Bügel für die Befestigung am Kochfe...
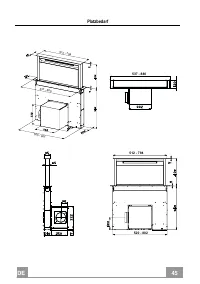
Page 45 - Platzbedarf
DE 4 5 45 Platzbedarf 512 - 794 520 - 802 537 - 880 537 - 880 512 - 794 520 - 802
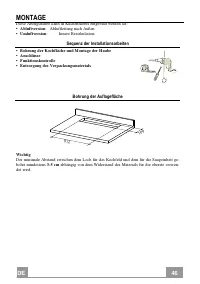
Page 46 - MONTAGE; Abluftversion; Sequenz der Installationsarbeiten; Wichtig
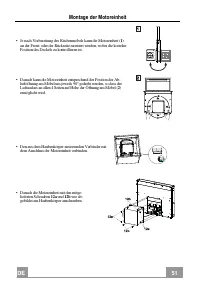
DE 4 6 46 MONTAGE Diese Abzugshaube kann in Küchenmöbel eingebaut werden als: • Abluftversion : Abluftleitung nach Außen. • Umluftversion : Innere Rezirkulation. Sequenz der Installationsarbeiten • Bohrung der Kochfläche und Montage der Haube • Anschlüsse • Funktionskontrolle • Entsorgung des Verpac...
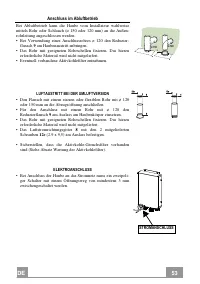
Page 53 - Anschluss im Abluftbetrieb; LUFTAUSTRITT BEI DER UMLUFTVERSION
DE 5 3 53 Anschluss im Abluftbetrieb Bei Abluftbetrieb kann die Haube vom Installateur wahlweise mittels Rohr oder Schlauch (ø 150 oder 120 mm) an die Außen-rohrleitung angeschlossen werden. • Bei Verwendung eines Anschlussrohres ø 120 den Reduzier- flansch 9 am Haubenaustritt anbringen. • Das Rohr ...
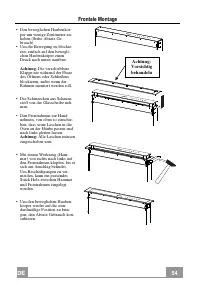
Page 54 - Achtung
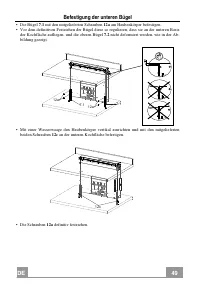
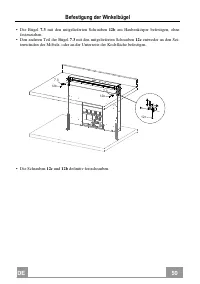
DE 5 4 54 Achtung: Vorsichtig behandeln Frontale Montage • Den beweglichen Haubenkör- per um wenige Zentimeter an- heben (Siehe Absatz Ge- brauch). • Um die Bewegung zu blockie- ren, einfach auf den bewegli- chen Haubenkörper einen Druck nach unten ausüben. Achtung : Die verschiebbare Klappe nie wäh...
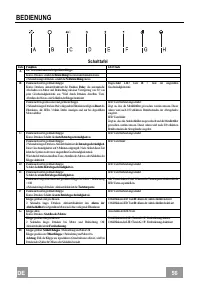
Page 56 - BEDIENUNG; Schalttafel
DE 5 6 56 BEDIENUNG Schalttafel Taste Funktion LED Taste A Die Taste funktioniert nur bei geöffneter Klappe. Kurzes Drücken: schaltet die Beleuchtung bei maximaler Intensität ein/aus. 2 Sekunden langes Drücken: schaltet die Notbeleuchtung ein/aus. B Funktioniert nur bei geöffneter Klappe. Kurzes Drü...
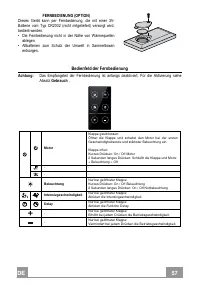
Page 57 - Bedienfeld der Fernbedienung; Gebrauch
DE 5 7 57 FERNBEDIENUNG (OPTION) Dieses Gerät kann per Fernbedienung, die mit einer 3V-Batterie vom Typ CR2032 (nicht mitgeliefert) versorgt wird, bedient werden. • Die Fernbedienung nicht in der Nähe von Wärmequellen ablegen. • Altbatterien zum Schutz der Umwelt in Sammelboxen entsorgen. Bedienfeld...
Page 58 - REINIGUNG UND WARTUNG; Reinigung der Komfort-Paneele; Metallfettfilter; Reset des Alarmsignals
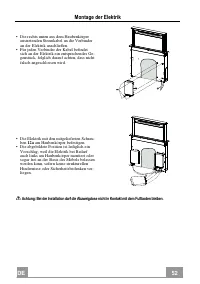
DE 5 8 58 REINIGUNG UND WARTUNG Reinigung der Komfort-Paneele • Die Oberseite des Komfort-Paneels nach oben herausziehen. • Das Paneel vom Haubenkörper lösen. • Das Komfort-Paneel darf auf keinen Fall im Geschirrspüler gespült werden. • Die Außenflächen mit einem feuchten Lappen und einem neutralen ...
Page 59 - Beleuchtung
Aktivkohle-Geruchsfilter (Umluftversion) Die Aktivkohle-Geruchsfilter sind spülmaschinengeeignet und müssen gewaschen werden, sobald am Display die Taste B blinkt, oder mindestens alle 4 Monate, oder auch öfter, je nach Intensität des Gebrauchs. Nach max. 5 Wäschen müssen die Filter erneuert werden....
Page 60 - ES; INFORMACIÓN DE SEGURIDAD
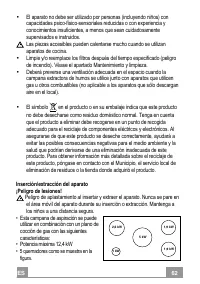
ES 6 0 60 INFORMACIÓN DE SEGURIDAD Por su propia seguridad y para el correcto funcionamiento del aparato, lea atentamente este manual antes de la instalación y puesta en marcha. Guarde siempre estas instrucciones con el aparato, incluso si se cede o transfiere a un tercero. Es importante que los usu...
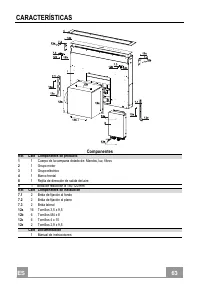
Page 63 - CARACTERÍSTICAS; Componentes
ES 6 3 63 CARACTERÍSTICAS Componentes Ref. Cant Componentes de producto 1 1 Cuerpo de la campana dotado de: Mandos, luz, filtros 2 1 Grupo motor 3 1 Grupo eléctrico 4 1 Marco frontal 8 1 Rejilla de dirección de salida del aire 9 1 Brida de reducción ø 150-120 mm Ref. Cant Componentes de instalación ...
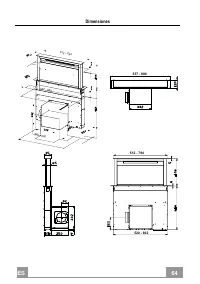
Page 64 - Dimensiones
ES 6 4 64 Dimensiones 512 - 794 520 - 802 537 - 880 537 - 880 512 - 794 520 - 802
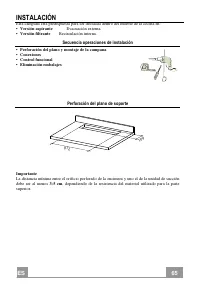
Page 65 - INSTALACIÓN; Versión aspirante; Secuencia operaciones de instalación; Importante
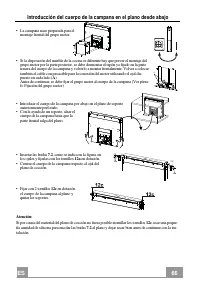
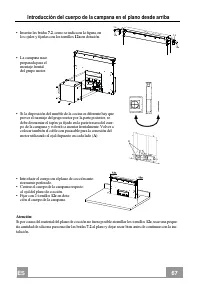
ES 6 5 65 INSTALACIÓN Esta campana está predispuesta para ser instalada dentro del mueble de la cocina en: • Versión aspirante Evacuación externa. • Versión filtrante Recirculación interna. Secuencia operaciones de instalación • Perforación del plano y montaje de la campana • Conexiones • Control fu...
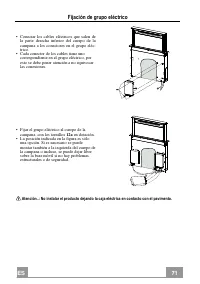
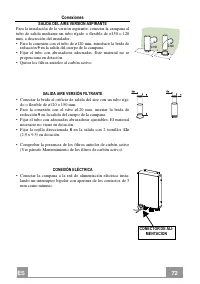
Page 72 - Conexiones; SALIDA DEL AIRE VERSIÓN ASPIRANTE
ES 7 2 72 Conexiones SALIDA DEL AIRE VERSIÓN ASPIRANTE Para la instalación de la versión aspirante, conectar la campana al tubo de salida mediante un tubo rígido o flexible de ø150 o 120 mm, a discreción del instalador. • Para la conexión con el tubo de ø120 mm, introducir la brida de reducción 9 en...
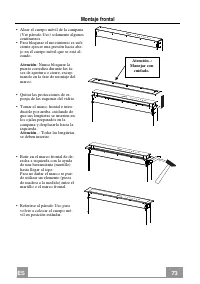
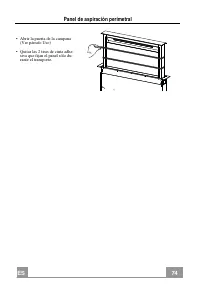
Page 73 - Manejar con; Montaje frontal; Atención
ES 7 3 73 Atención..: Manejar con cuidado. Montaje frontal • Alzar el cuerpo móvil de la campana (Ver párrafo Uso) solamente algunos centímetros. • Para bloquear el movimiento es sufi- ciente ejercer una presión hacia aba- jo en el cuerpo móvil que se está al- zando. Atención : Nunca bloquear la pue...
Page 75 - USO; Tablero de mandos
ES 7 5 75 USO Tablero de mandos Tecla Función Tecla Led A La tecla funciona sólo con la puerta abierta. Breve presión = enciende/apaga las luces a la máxima luminosidad. Presión de 2 segundos = enciende/apaga las luces de cortesía . B Funciona sólo con la puerta abierta. Presión breve = activa/desac...
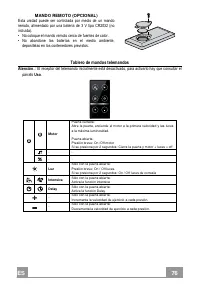
Page 76 - Tablero de mandos telemandos; Uso
ES 7 6 76 MANDO REMOTO (OPCIONAL) Esta unidad puede ser controlada por medio de un mando remoto, alimentado por una batería de 3 V tipo CR2032 (no incluida). • No coloque el mando remoto cerca de fuentes de calor. • No abandone las baterías en el medio ambiente, deposítelas en los contenedores previ...
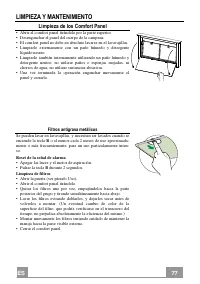
Page 77 - LIMPIEZA Y MANTENIMIENTO; Limpieza de los Comfort Panel; Filtros antigrasa metálicos; Reset de la señal de alarma
ES 7 7 77 LIMPIEZA Y MANTENIMIENTO Limpieza de los Comfort Panel • Abrir el comfort panel tirándolo por la parte superior. • Desenganchar el panel del cuerpo de la campana. • El comfort panel no debe en absoluto lavarse en el lavavajillas. • Limpiarlo externamente con un paño húmedo y detergente líq...
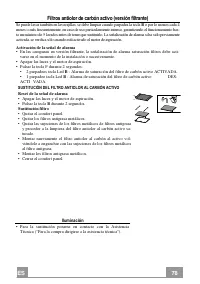
Page 78 - Activación de la señal de alarma; Iluminación
ES 7 8 78 Filtros antiolor de carbón activo (versión filtrante) Se puede lavar también en lavavajillas, se debe limpiar cuando parpadea la tecla B o por lo menos cada 4 meses o más frecuentemente, en caso de uso particularmente intenso, garantizando el funcionamiento has-ta un máximo de 5 lavados an...
Page 79 - GR; ΣΥΜΒΟΥΛΕΣ ΚΑΙ ΣΥΣΤΑΣΕΙΣ; Για τη δική σας ασφάλεια και για τη σωστή λειτουργία της συσκευής,
GR 7 9 79 ΣΥΜΒΟΥΛΕΣ ΚΑΙ ΣΥΣΤΑΣΕΙΣ Για τη δική σας ασφάλεια και για τη σωστή λειτουργία της συσκευής, παρακαλούµε να διαβάσετε µε προσοχή τις παρούσες οδηγίες πριν την εγκατάσταση και τη θέση σε λειτουργία. Φυλάσσετε αυτές τις οδηγίες πάντα µαζί µε τη συσκευή, ακόµα και σε περίπτωση µεταβίβασης σε τρ...
Page 81 - Κίνδυνος τραυματισμού!; • Αυτός ο απορροφητήρας μπορεί να
GR 8 1 81 • Η συσκευή δεν πρέπει να χρησιµοποιείται από άτοµα (συµπεριλαµβανοµένων των παιδιών) µε µειωµένες ψυχικές ή διανοητικές ικανότητες, ή από άτοµα χωρίς πείρα και επαρκή γνώση, εκτός εάν ελέγχονται και εκπαιδεύονται. Τα προσβάσιµα µέρη µπορεί να έχουν υψηλή θερµοκρασία κατά τη χρήση των συσκ...
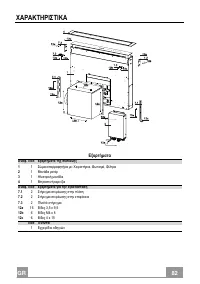
Page 82 - ΧΑΡΑΚΤΗΡΙΣΤΙΚΑ; Εξαρτήματα
GR 8 2 82 ΧΑΡΑΚΤΗΡΙΣΤΙΚΑ Εξαρτήµατα Αναφ. Ποσ. Εξαρτήµατα της συσκευής 1 1 Σώµα απορροφητήρα µε: Χειριστήρια, Φωτισµό, Φίλτρα 2 1 Μονάδα µοτέρ 3 1 Ηλεκτρική µονάδα 4 1 Μπροστινή κορνίζα Αναφ. Ποσ. Εξαρτήµατα για την εγκατάσταση 7.1 2 Στήριγµα στερέωσης στην πλάτη 7.2 2 Στήριγµα στερέωσης στην επιφάν...
Page 83 - ∆ιαστάσεις
GR 8 3 83 ∆ιαστάσεις 512 - 794 520 - 80 2 537 - 880 537 - 880 512 - 794 520 - 802
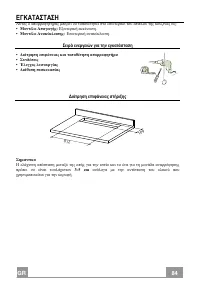
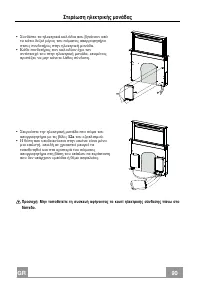
Page 84 - ΕΓΚΑΤΑΣΤΑΣΗ; Σειρά ενεργειών για την εγκατάσταση
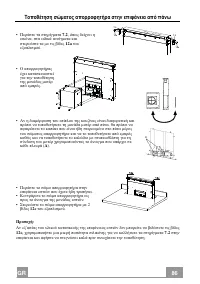
GR 8 4 84 ΕΓΚΑΤΑΣΤΑΣΗ Αυτός ο απορροφητήρας µπορεί να τοποθετηθεί στο εσωτερικό του επίπλου της κουζίνας ως : • Μοντέλο Απαγωγής : Εξωτερική εκκένωση . • Μοντέλο Ανακύκλωσης : Εσωτερική ανακύκλωση . Σειρά ενεργειών για την εγκατάσταση • ∆ιάτρηση επιφάνειας και τοποθέτηση απορροφητήρα • Συνδέσεις • Έ...
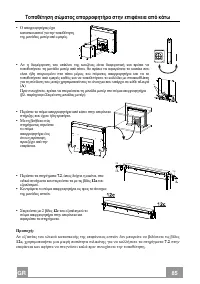
Page 85 - Προσοχή
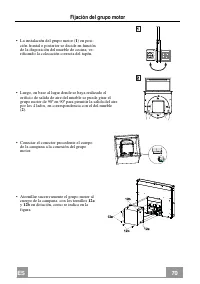
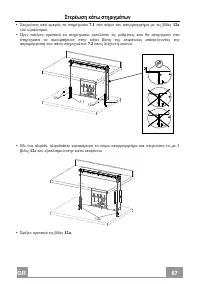
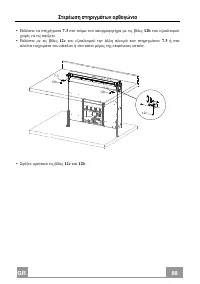
GR 8 5 85 7.2 12a 7.2 12a A Τοποθέτηση σώµατος απορροφητήρα στην επιφάνεια από κάτω • Ο απορροφητήρας έχει κατασκευαστεί για την τοποθέτηση της µονάδας µοτέρ από εµπρός . • Αν η διαµόρφωση του επίπλου της κουζίνας είναι διαφορετική και πρέπει να τοποθετήσετε τη µονάδα µοτέρ από πίσω , θα πρέπει να α...
Page 91 - Συνδέσεις; ΕΞΟ∆ΟΣ ΑΕΡΑ ΜΟΝΤΕΛΟΥ ΑΠΑΓΩΓΗΣ; ΡΕΎΜΑΤΟΣ
GR 9 1 91 Συνδέσεις ΕΞΟ∆ΟΣ ΑΕΡΑ ΜΟΝΤΕΛΟΥ ΑΠΑΓΩΓΗΣ Για την εγκατάσταση του µοντέλου απαγωγής , συνδέστε τον απορροφητήρα στο σωλήνα εξόδου µε έναν άκαµπτο ή εύκαµπτο σωλήνα o150 ή 120 mm, η επιλογή του οποίου επαφίεται στον εγκαταστάτη . • Για σύνδεση µε σωλήνα o120 mm, τοποθετήστε τη φλάντζα συστολή...
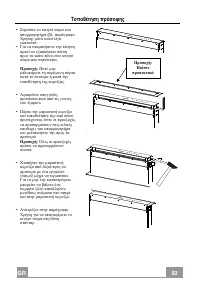
Page 92 - Τοποθέτηση πρόσοψης
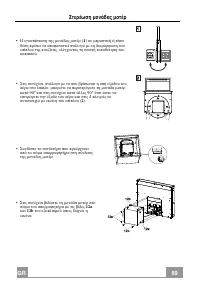
GR 9 2 92 Προσοχή : Πιάστε προσεκτικά Τοποθέτηση πρόσοψης • Σηκώστε το κινητό σώµα του απορροφητήρα ( βλ . παράγραφο Χρήση ) µόνο κατά λίγα εκατοστά . • Για να σταµατήσετε την κίνηση αρκεί να εξασκήσετε πίεση προς τα κάτω πάνω στο κινητό σώµα που σηκώνεται . Προσοχή : Ποτέ µην µπλοκάρετε τη συρόµενη...
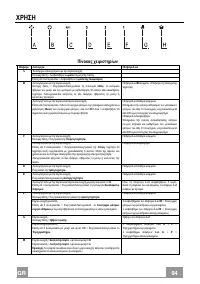
Page 94 - ΧΡΗΣΗ; Πίνακας χειριστηρίων
GR 9 4 94 ΧΡΗΣΗ Πίνακας χειριστηρίων Πλήκτρο Λειτουργία Πλήκτρο Led A Το πλήκτρο λειτουργεί µόνο µε την πόρτα ανοιχτή . Σύντοµη πίεση = Ανάβει / Σβήνει τα φώτα στη µέγιστη ένταση . Πίεση επί 2 δευτερόλεπτα = Ανάβει / Σβήνει τα φώτα της πλαφονιέρας . B Λειτουργεί µόνο µε την πόρτα ανοιχτή . Σύντοµη π...
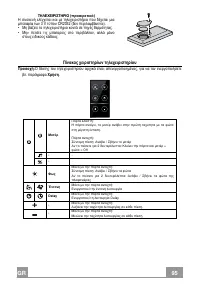
Page 95 - Πίνακας χειριστηρίων τηλεχειριστηρίου; Χρήση
GR 9 5 95 ΤΗΛΕΧΕΙΡΙΣΤΗΡΙΟ ( προαιρετικό ) Η συσκευή ελέγχεται και µε τηλεχειριστήριο που δέχεται µια µπαταρία των 3 V τύπου CR2032 (δεν περιλαµβάνεται). • Μη βάζετε το τηλεχειριστήριο κοντά σε πηγές θερµότητας. • Μην πετάτε τις µπαταρίες στο περιβάλλον, αλλά µόνο στους ειδικούς κάδους. Πίνακας χειρι...
Page 96 - ΚΑΘΑΡΙΣΜΟΣ ΚΑΙ ΣΥΝΤΗΡΗΣΗ; Καθαρισμός των Comfort Panel; Μεταλλικά φίλτρα για λίπη; Μηδενισμός
GR 9 6 96 ΚΑΘΑΡΙΣΜΟΣ ΚΑΙ ΣΥΝΤΗΡΗΣΗ Καθαρισµός των Comfort Panel • Ανοίξτε το Comfort Panel τραβώντας το από το πάνω µέρος. • Ελευθερώστε τη µονάδα από το σώµα του απορροφητήρα. • Το comfort panel δεν πρέπει να πλένεται στο πλυντήριο. • Καθαρίστε το εξωτερικά µε ένα υγρό πανί και ουδέτερο υγρό απορρυ...
Page 97 - ΑΝΤΙΚΑΤΑΣΤΑΣΗ ΦΙΛΤΡΟΥ ΕΝΕΡΓΟΥ ΑΝΘΡΑΚΑ; Φωτισμός
GR 9 7 97 Φίλτρα ενεργού άνθρακα για οσµές (Μοντέλο ανακύκλωσης) Μπορεί να πλυθεί και στο πλυντήριο πιάτων . Πρέπει να καθαρίζεται όταν αναβοσβήνει το πλήκτρο Β ή τουλάχιστον κάθε 4 µήνες ή συχνότερα , σε περίπτωση έντονης χρήσης , εξασφαλίζοντας τη λειτουργία το πολύ έως 5 πλυσίµατα πριν από την αν...
Page 98 - RU; ИНФОРМАЦИЯ ПО БЕЗОПАСНОСТИ; Подключение электрических проводов должно выполняться
RU 9 8 98 ИНФОРМАЦИЯ ПО БЕЗОПАСНОСТИ В целях собственной безопасности и для правильной работы прибора рекомендуется внимательно прочитать руководство, прежде чем приступать к его установке и вводу в действие. Храните руководство всегда вместе с прибором также в случае передачи его третьим лицам. Зна...
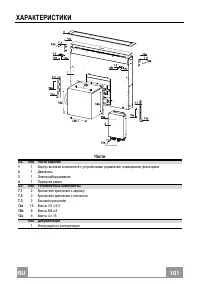
Page 101 - ХАРАКТЕРИСТИКИ; Части
RU 1 0 101 ХАРАКТЕРИСТИКИ Части Об. Кол. Части изделия 1 1 Корпус вытяжки в комплекте с устройствами управления, освещением, фильтрами 2 1 Двигатель 3 1 Электрооборудование 4 1 Передняя рамка Об. Кол. Установочные компоненты 7.1 2 Кронштейн крепления к заднику 7.2 2 Кронштейн крепления к плоскости 7...
Page 102 - Габариты
RU 1 0 102 Габариты 512 - 794 520 - 80 2 537 - 880 537 - 880 512 - 794 520 - 802
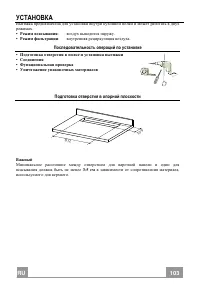
Page 103 - УСТАНОВКА; Последовательность операций по установке
RU 1 0 103 УСТАНОВКА Вытяжка предназначена для установки внутри кухонной полки и может работать в двух режимах . • Режим всасывания : воздух выводится наружу . • Режим фильтрации : внутренняя рециркуляция воздуха . Последовательность операций по установке • Подготовка отверстия в полке и установка в...
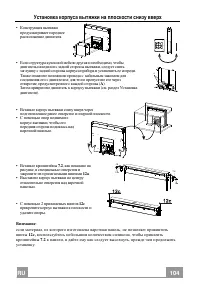
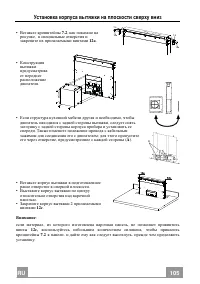
Page 104 - Внимание
RU 1 0 104 7.2 12a 7.2 12a A Установка корпуса вытяжки на плоскости снизу вверх • Конструкция вытяжки предусматривает переднее расположение двигателя . • Если структура кухонной мебели другая и необходимо , чтобы двигатель находился с задней стороны вытяжки , следует снять заглушку с задней стороны ...
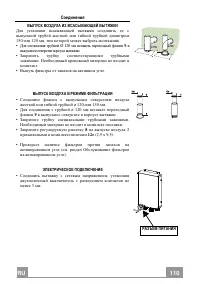
Page 110 - Соединения; ВЫПУСК ВОЗДУХА ИЗ ВСАСЫВАЮЩЕЙ ВЫТЯЖКИ
RU 1 1 110 Соединения ВЫПУСК ВОЗДУХА ИЗ ВСАСЫВАЮЩЕЙ ВЫТЯЖКИ Для установки всасывающей вытяжки соединить ее с выпускной трубой жесткой или гибкой трубкой диаметром 150 или 120 мм , тип которой может выбрать монтажник . • Для соединения трубкой Ø 120 мм вставить переходный фланец 9 в выпускное отверст...
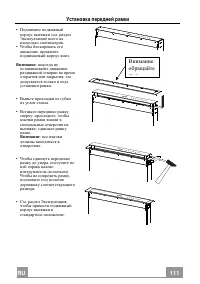
Page 111 - Установка передней рамки
RU 1 1 111 Внимание : обращайтесь с Установка передней рамки • Поднимите подвижный корпус вытяжки ( см . раздел Эксплуатация ) всего на несколько сантиметров . • Чтобы блокировать его движение , прижмите поднимаемый корпус вниз . Внимание : никогда не останавливайте движение раздвижной створки во вр...
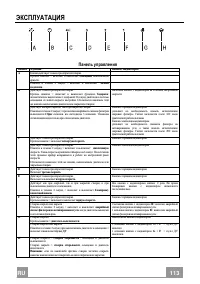
Page 113 - ЭКСПЛУАТАЦИЯ; Панель управления
RU 1 1 113 ЭКСПЛУАТАЦИЯ Панель управления Кнопка Функция Кнопка с индикатором A Кнопка действует только при открытой створке . Краткое нажатие = включает и выключает освещение максимальной яркости . Нажатие в течение 2 секунд = включает и выключает лампы подсветки . B Действует только при открытой с...
Page 114 - Панель пульта ДУ; Использование
RU 1 1 114 ПУЛЬТ ДИСТАНЦИОННОГО УПРАВЛЕНИЯ ( ДОПОЛНИТЕЛЬНО ) Работой прибора можно управлять пультом дистанционного управления, который работает на батарейке 3 В типа CR2032 (не входит в комплект поставки). • Не оставляйте пульт дистанционного управления около источников тепла. • Не выбрасывайте бат...
Page 115 - ОЧИСТКА И ОБСЛУЖИВАНИЕ; Очистка передней панели; Металлические жировые фильтры; Сброс
RU 1 1 115 ОЧИСТКА И ОБСЛУЖИВАНИЕ Очистка передней панели • Чтобы открыть , потяните на себя верхнюю часть передней панели . • Отсоедините панель от корпуса вытяжки . • Ни в коем случае не мойте переднюю панель в посудомоечной машине . • Очистите панель снаружи влажной тряпкой , смоченной в нейтраль...
Page 116 - ЗАМЕНА ФИЛЬТРА ПРОТИВ ЗАПАХОВ НА АКТИВИРОВАННОМ УГЛЕ; Освещение
Угольные фильтры, предотвращающие появление запахов (исполнение с рециркуляцией) Эти фильтры допускают мойку в посудомоечной машине . Чистку фильтров необходимо выполнять , когда мигает кнопка B или не реже одного раза в 4 месяца или чаще в случае очень интенсивного пользования вытяжкой . Эффективно...