Page 3 - LT
3 3 TURINYS PATARIMAI IR NUORODOS ............................................................................................................................................... 82 PRIETAISO APRAŠYMAS ......................................................................................................
Page 4 - EN; RECOMMENDATIONS AND SUGGESTIONS; INSTALLATION
EN 4 4 RECOMMENDATIONS AND SUGGESTIONS The Instructions for Use apply to several versions of this appliance. Accordingly, you may find descriptions of individual features that do not apply to your specific appliance. INSTALLATION • The manufacturer will not be held liable for any damages resulting f...
Page 5 - USE
EN 5 5 • If the instructions for installation for the gas hob specify a greater distance specified above, this has to be taken into account. Regulations concerning the discharge of air have to be fulfilled. • Use only screws and small parts in support of the hood. Warning : Failure to install the sc...
Page 6 - : Accessible parts may become hot when used with cooking; MAINTENANCE; any maintenance work.
EN 6 6 • “ CAUTION : Accessible parts may become hot when used with cooking appliances.” MAINTENANCE • Switch off or unplug the appliance from the mains supply before carrying out any maintenance work. • Clean and/or replace the Filters after the specified time period (Fire hazard). • The Grease fil...
Page 7 - CHARACTERISTICS; Dimensions
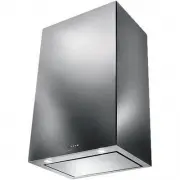
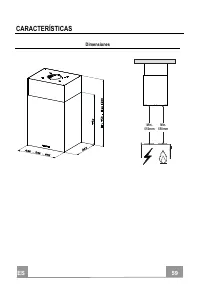
EN 7 7 CHARACTERISTICS Dimensions Min. 550mm Min. 550mm
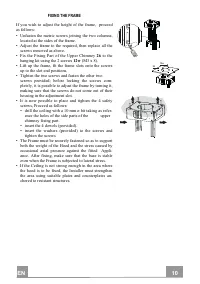
Page 9 - Drilling the Ceiling/shelf and fixing the frame
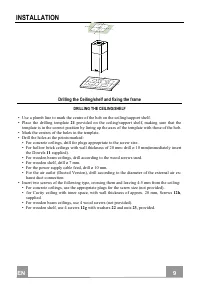
EN 9 9 INSTALLATION Drilling the Ceiling/shelf and fixing the frame DRILLING THE CEILING/SHELF • Use a plumb line to mark the centre of the hob on the ceiling/support shelf. • Place the drilling template 21 provided on the ceiling/support shelf, making sure that the template is in the correct positi...
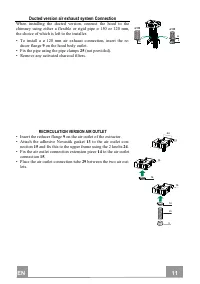
Page 11 - Ducted version air exhaust system Connection
EN 1 11 Ducted version air exhaust system Connection When installing the ducted version, connect the hood to the chimney using either a flexible or rigid pipe ø 150 or 120 mm, the choice of which is left to the installer. • To install a ø 120 mm air exhaust connection, insert the re- ducer flange 9 ...
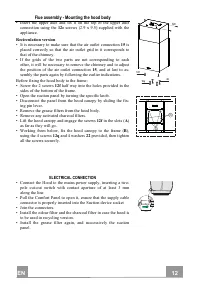
Page 12 - Flue assembly - Mounting the hood body
EN 1 12 Flue assembly - Mounting the hood body • Insert the upper duct and fix it on the top of the upper duct connection using the 12c screws (2.9 x 9.5) supplied with the appliance. Recirculation version • It is necessary to make sure that the air outlet connection 15 is placed correctly so that t...
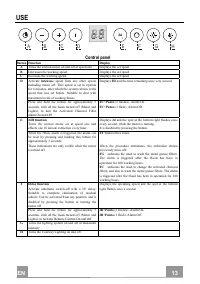
Page 13 - Control panel
EN 1 13 USE A B C D E F G H Control panel Button Function Display A Turns the suction motor on and off at speed one. Displays the set speed B Decreases the working speed. Displays the set speed C Increases the working speed. Displays the set speed D Activate intensive speed from any other speed, inc...
Page 14 - Cleaning the Comfort Panels
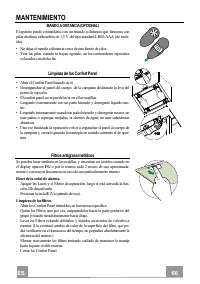
EN 1 14 MAINTENANCE REMOTE CONTROL (OPTIONAL) The appliance can be controlled using a remote control powered by a 1.5 V carbon-zinc alkaline batteries of the standard LR03-AAA type (not in-cluded). • Do not place the remote control near to heat sources. • Used batteries must be disposed of in the pr...
Page 16 - Lighting
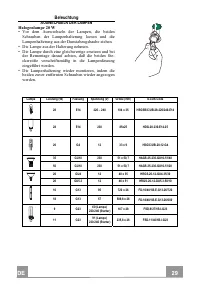
EN 1 16 Lighting LIGHT REPLACEMENT 20 W halogen light. • Remove the 2 screws fixing the Lighting support, and pull it out of from the Hood. • Extract the lamp from the Support. • Replace with another of the same type, making sure that the two pins are properly inserted in the lamp holder socket hole...
Page 17 - DE; EMPFEHLUNGEN UND HINWEISE
DE 1 17 EMPFEHLUNGEN UND HINWEISE Diese Gebrauchsanleitungen beziehen sich auf die verschiedenen Modelle der Abzugshaube. Darum kann es möglich sein, dass die Beschreibung bestimmter Merkmale für das vorliegende Gerät nicht zutrifft. INSTALLATION • Der Hersteller haftet nicht für etwaige Schäden, di...
Page 18 - von mindestens 3 mm an das Netz anschließen.; GEBRAUCH; • Fritteusen müssen während des Gebrauchs ständig
DE 1 18 • Falls die Montageanweisungen für die gasbetriebene Kochmulde einen größeren Abstand vorschreiben, als der oben angegebene, muss diese Vorgabe befolgt werden. Es sind sämtliche Abluftvorschriften zu beachten. • Nur für die Abzugshaube geeignete Schrauben und Kleinteile verwenden. Achtung : ...
Page 19 - WARTUNG
DE 1 19 • ACHTUNG: Die zugänglichen Teile können während des Gebrauchs der Kochgeräte sehr heiß werden. WARTUNG • Vor Reinigungs- oder Wartungsarbeiten am Gerät, muss dieses ausgeschaltet und spannungslos gemacht werden. • Die Filter stets nach den angegebenen Intervallen reinigen oder auswechseln (...
Page 20 - CHARAKTERISTIKEN; Platzbedarf
DE 2 20 CHARAKTERISTIKEN Platzbedarf Min. 550mm Min. 550mm
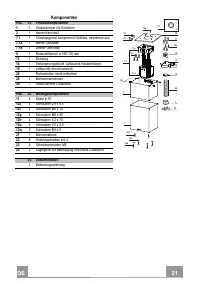
Page 21 - Komponenten
DE 2 21 Komponenten Pos. St. Produktkomponenten 1 1 Haubenkörper mit Schaltern, 2 1 oberer Kaminteil 7.1 1 Teleskopgerüst komplett mit Gebläse, bestehend aus: 7.1a 1 oberer Gerüstteil 7.1b 1 unterer Gerüstteil 9 1 Reduzierflansch ø 150-120 mm 13 1 Dichtung 14 1 Verlängerungsstückf. Luftaustritt Haub...
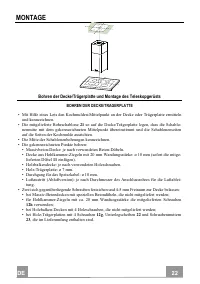
Page 22 - MONTAGE; Bohren der Decke/Trägerplatte und Montage des Teleskopgerüsts
DE 2 22 MONTAGE Bohren der Decke/Trägerplatte und Montage des Teleskopgerüsts BOHREN DER DECKE/TRAGERPLATTE • Mit Hilfe eines Lots den Kochmulden-Mittelpunkt an der Decke oder Trägerplatte ermitteln und kennzeichnen. • Die mitgelieferte Bohrschablone 21 so auf die Decke/Trägerplatte legen, dass die ...
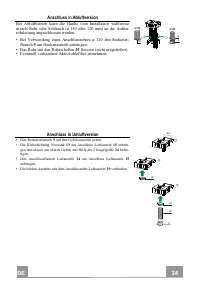
Page 24 - Anschluss in Abluftversion; Anschluss in Umluftversion
DE 2 24 Anschluss in Abluftversion Bei Abluftbetrieb kann die Haube vom Installateur wahlweise mittels Rohr oder Schlauch (ø 150 oder 120 mm) an die Außen- rohrleitung angeschlossen werden. • Bei Verwendung eines Anschlussrohres ø 120 den Reduzier- flansch 9 am Haubenaustritt anbringen. • Das Rohr m...
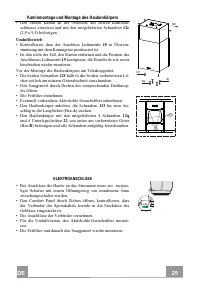
Page 25 - Kaminmontage und Montage des Haubenkörpers
DE 2 25 Kaminmontage und Montage des Haubenkörpers • Den oberen Kamin an der Oberseite des oberen Kaminan- schlusses einsetzen und mit den mitgelieferten Schrauben 12c (2,9 x 9,5) befestigen. Umluftbetrieb • Kontrollieren, dass der Anschluss Luftaustritt 15 in Überein- stimmung mit dem Kamingitter p...
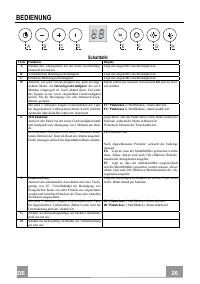
Page 26 - BEDIENUNG; Schalttafel
DE 2 26 BEDIENUNG A B C D E F G H Schalttafel Taste Funktion Display A Schaltet den Absaugmotor bei der ersten Geschwindig-keitsstufe ein und aus. Zeigt die eingestellte Geschwindigkeit an B Vermindert die Betriebsgeschwindigkeit. Zeigt die eingestellte Geschwindigkeit an C Erhöht die Betriebsgeschw...
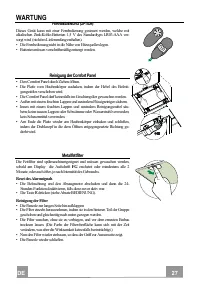
Page 27 - Reinigung der Comfort Panel
DE 2 27 WARTUNG FERNBEDIENUNG (OPTION) Dieses Gerät kann mit einer Fernbedienung gesteuert werden, welche mit alkalischen Zink-Kohle-Batterien 1,5 V des Standardtyps LR03-AAA ver- sorgt wird (nicht im Lieferumfang enthalten). • Die Fernbedienung nicht in die Nähe von Hitzequellen legen. • Batterien ...
Page 29 - Beleuchtung
DE 2 29 Beleuchtung AUSWECHSELN DER LAMPEN Halogenlampe 20 W • Vor dem Auswechseln der Lampen, die beiden Schrauben der Lampenhalterung loesen und die Lampenhalterung aus der Dunstabzugshaube ziehen. • Die Lampe aus der Halterung nehmen. • Die Lampe durch eine gleichwertige ersetzen und bei der Remo...
Page 30 - RU; СОВЕТЫ; УСТАНОВКА
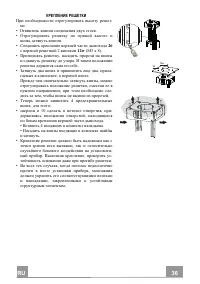
RU 3 30 СОВЕТЫ И РЕКОМЕНДАЦИИ В Инструкциях по эксплуатации описаны различные модели прибора . Поэтому вы можете встретить описание некоторых характеристик , не относящихся к приобретенному вами прибору . УСТАНОВКА • Изготовитель не несет ответственность за убытки , возникающие в результате неправил...
Page 31 - ЭКСПЛУАТАЦИЯ
RU 3 31 • Если в инструкциях по установке газовой плиты сказано , что расстояние до вытяжки должно быть больше указанного выше , следует придерживаться предписанных размеров . Соблюдайте все нормативные требования по отведению отработанного воздуха . • Используйте только винты и метизы , пригодные д...
Page 32 - УХОД
RU 3 32 • “ ВНИМАНИЕ : доступные части вытяжки могут сильно нагреваться во время работы газовых приборов . УХОД • Перед выполнением любой операции по очистке и уходу выключите или отсоедините прибор от электрической сети . • Очищайте и / или заменяйте фильтры по истечении указанного периода времени ...
Page 33 - ХАРАКТЕРИСТИКИ; Габариты
RU 3 33 ХАРАКТЕРИСТИКИ Габариты Min. 550mm Min. 550mm
Page 34 - Части
RU 3 34 Части Об . Кол . Части изделия 1 1 Корпус вытяжки в комплекте с устройствами управ - ления , освещением , вентилятором , фильтрами , нижней частью дымохода 2 1 Верхняя часть дымохода 7.1 1 Телескопическая решетка с воздухоочистителем , состоящим из : 7.1a 1 Верхней решетки 7.1b 1 Нижней реше...
Page 35 - Отверстия
RU 3 35 УСТАНОВКА Отверстия в потолке / полке и крепление решетки ОТВЕРСТИЯ В ПОТОЛКЕ / ПОЛКЕ • При помощи отвеса отметьте на потолке / полке крепления центр плиты . • Приложите к потолку / полке входящий в комплект калибр сверления 21 , совместите его центр с обозначенным ранее центром и совместите...
Page 38 - Установка
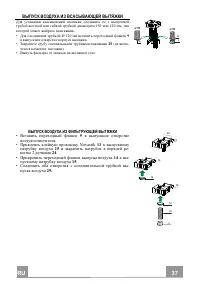
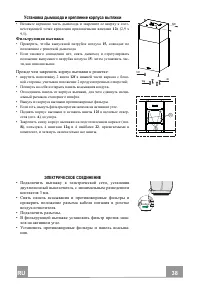
RU 3 38 Установка дымохода и крепление корпуса вытяжки • Вставьте верхнюю часть дымохода и закрепите ее вверху к соот - ветствующей точке крепления прилагаемыми винтами 12c (2,9 x 9,5). Фильтрующая вытяжка • Проверить , чтобы выпускной патрубок воздуха 15, совпадал по положению с решеткой дымохода ....
Page 39 - Панель
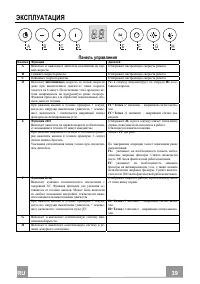
RU 3 39 ЭКСПЛУАТАЦИЯ A B C D E F G H Панель управления Кнопка Функция Дисплей A Включает и выключает двигатель всасывания на пер - вой скорости . Отображает настроенную скорость работы . B Снижает скорость работы . Отображает настроенную скорость работы . C Повышает скорость работы . Отображает наст...
Page 42 - Освещение
RU 4 42 Освещение ЗАМЕНА ЛАМП Галогенные лампы 20 Вт . • Снять 2 винта крепления патрона и вынуть его из вытяжки . • Вынуть из патрона лампу . • Заменить ее на новую с такими же характеристи - ками ; правильно вставить два штыревых контакта в гнездо лампового патрона . • Вновь установить ламповый па...
Page 43 - NL; ADVIEZEN EN SUGGESTIES; INSTALLATIE
NL 4 43 ADVIEZEN EN SUGGESTIES De gebruiksaanwijzingen hebben betrekking op verschillende modellen van dit apparaat. Mogelijk vindt u dan ook beschrijvingen van aparte kenmerken die niet over uw specifieke apparaat gaan. INSTALLATIE • De fabrikant is niet aansprakelijk voor eventuele schade als gevo...
Page 44 - GEBRUIK
NL 4 44 • Als de installatievoorschriften van de gaskookplaat bepalen dat een grotere afstand in acht moet worden genomen dan hierboven is aangegeven, dan moet daar rekening mee worden gehouden. Alle regels voor de luchtafvoer moeten in acht worden genomen. • Gebruik alleen schroeven en kleine onder...
Page 45 - delen erg heet worden ”.; ONDERHOUD; reinigings- of onderhoudswerkzaamheden uit te voeren.
NL 4 45 • “ LET OP : tijdens het gebruik van de kooktoestellen kunnen de toegankelijke delen erg heet worden ”. ONDERHOUD • Schakel het apparaat uit of koppel het los van het elektriciteitsnet alvorens reinigings- of onderhoudswerkzaamheden uit te voeren. • De filters reinigen en/vervangen na de aan...
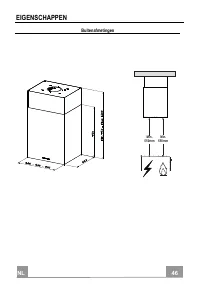
Page 46 - EIGENSCHAPPEN; Buitenafmetingen
NL 4 46 EIGENSCHAPPEN Buitenafmetingen Min. 550mm Min. 550mm
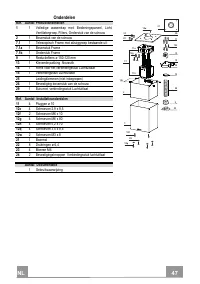
Page 47 - Onderdelen
NL 4 47 Onderdelen Ref. Aantal Productonderdelen 1 1 Volledige wasemkap met: Bedieningspaneel, Licht, Ventilatorgroep, Filters, Onderstuk van de schouw 2 1 Bovenstuk van de schouw 7.1 1 Telescopisch Frame met afzuiggroep bestaande uit : 7.1a 1 Bovenstuk Frame 7.1b 1 Onderstuk Frame 9 1 Reductieflens...
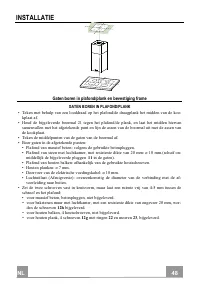
Page 48 - Gaten boren in plafond/plank en bevestiging frame
NL 4 48 INSTALLATIE Gaten boren in plafond/plank en bevestiging frame GATEN BOREN IN PLAFOND/PLANK • Teken met behulp van een looddraad op het plafond/de draagplank het midden van de koo- kplaat af. • Houd de bijgeleverde boormal 21 tegen het plafond/de plank, en laat het midden hiervan samenvallen ...
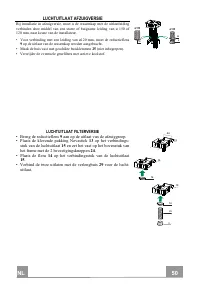
Page 50 - LUCHTUITLAAT AFZUIGVERSIE
NL 5 50 LUCHTUITLAAT AFZUIGVERSIE Bij installatie in afzuigversie, moet u de wasemkap met de uitlaatleiding verbinden door middel van een starre of buigzame leiding van ø 150 of 120 mm, naar keuze van de installateur. • Voor verbinding met een leiding van ø120 mm, moet de reductieflens 9 op de uitla...
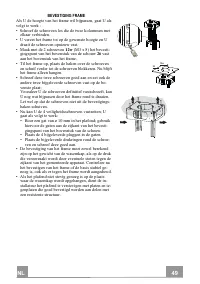
Page 51 - Montage van de Schouw en Bevestiging van de Wasemkap
NL 5 51 Montage van de Schouw en Bevestiging van de Wasemkap • Plaats de bovenste schouw en bevestig hem aan de bovenkant met de bijgeleverde schroeven 12c (2,9 x 9,5) aan de koppeling van de bovenste schouw. Filterversie • Verzeker U ervan dat het verbindingsstuk van de luchtuitlaat 15 overeenstemt...
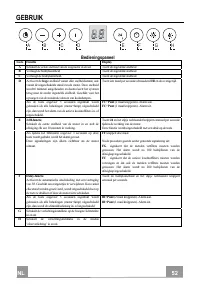
Page 52 - Bedieningspaneel
NL 5 52 GEBRUIK A B C D E F G H Bedieningspaneel Toets Functie Display A Schakelt de eerste snelheid van de zuigmotor in en uit. Toont de ingestelde snelheid B Verlaagt de bedrijfssnelheid. Toont de ingestelde snelheid C Verhoogt de bedrijfssnelheid. Toont de ingestelde snelheid D Activeert de hoge ...
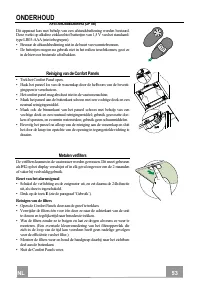
Page 53 - Reiniging van de Confort Panels
NL 5 53 ONDERHOUD AFSTANDSBEDIENING (OPTIE) Dit apparaat kan met behulp van een afstandsbediening worden bestuurd. Deze werkt op alkaline zinkkoolstof batterijen van 1,5 V van het standaard- type LR03-AAA (niet inbegrepen). • Bewaar de afstandsbediening niet in de buurt van warmtebronnen. • De batte...
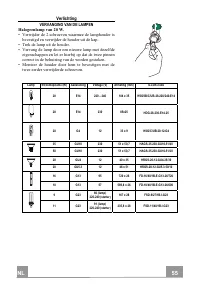
Page 55 - Verlichting
NL 5 55 Verlichting VERVANGING VAN DE LAMPEN Halogeenlamp van 20 W. • Verwijder de 2 schroeven waarmee de lamphouder is bevestigd en verwijder de houder uit de kap. • Trek de lamp uit de houder. • Vervang de lamp door een nieuwe lamp met dezelfde eigenschappen en let er hierbij op dat de twee pinnen...
Page 56 - ES; CONSEJOS Y SUGERENCIAS; INSTALACIÓN; • La distancia mínima de seguridad entre el plano de cocción y
ES 5 56 CONSEJOS Y SUGERENCIAS Las instrucciones de uso se aplican a varios modelos de este aparato. Por lo tanto, usted puede encontrar descripciones de características individuales que no pertenecen a su aparato en concreto. INSTALACIÓN • El fabricante no se hace responsable de los daños provocado...
Page 57 - USO
ES 5 57 • Si las instrucciones de instalación del plano de cocción de gas especifican una distancia mayor de la indicada anteriormente, es necesario tenerlo en cuenta. Se tienen que respetar todas las normativas con respecto a la descarga del aire. • Utilizar sólo los tornillos y accesorios metálico...
Page 58 - : las partes accesibles pueden calentarse mucho durante el uso de; MANTENIMIENTO; limpieza o mantenimiento.
ES 5 58 • ATENCIÓN : las partes accesibles pueden calentarse mucho durante el uso de aparatos de cocción. MANTENIMIENTO • Apague o desconecte el aparato de la red eléctrica antes de cualquier operación de limpieza o mantenimiento. • Limpie y/o reemplace los filtros después del período de tiempo espe...
Page 59 - CARACTERÍSTICAS; Dimensiones
ES 5 59 CARACTERÍSTICAS Dimensiones Min. 550mm Min. 550mm
Page 60 - Componentes
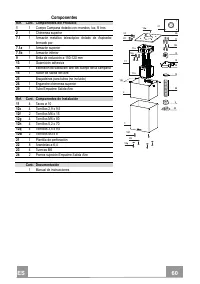
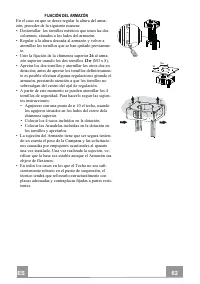
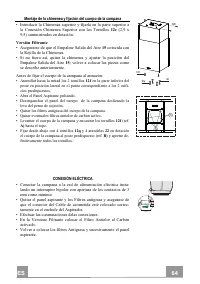
ES 6 60 Componentes Ref. Cant. Componentes del Producto 1 1 Cuerpo Campana dotado con: mandos, luz, fil tros 2 1 Chimenea superior 7.1 1 Armazón metálico telescópico dotado de Aspirador, formado por: 7.1a 1 Armazón superior 7.1b 1 Armazón inferior 9 1 Brida de reducción ø 150-120 mm 13 1 Guarnición ...
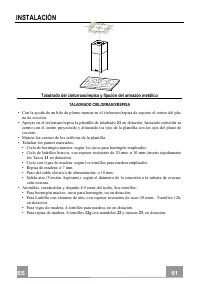
Page 61 - Taladrado del cielorraso/repisa y fijación del armazón metálico
ES 6 61 INSTALACIÓN Taladrado del cielorraso/repisa y fijación del armazón metálico TALADRADO CIELORRASO/REPISA • Con la ayuda de un hilo de plomo marcar en el cielorraso/repisa de soporte el centro del pla- no de cocción. • Apoyar en el cielorraso/repisa la plantilla de taladrado 21 en dotación, ha...
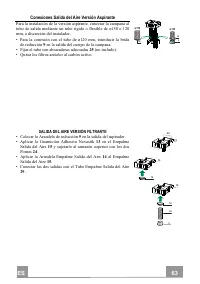
Page 63 - Conexiones Salida del Aire Versión Aspirante
ES 6 63 Conexiones Salida del Aire Versión Aspirante Para la instalación de la versión aspirante, conectar la campana al tubo de salida mediante un tubo rígido o flexible de ø150 o 120 mm, a discreción del instalador. • Para la conexión con el tubo de ø120 mm, introducir la brida de reducción 9 en l...
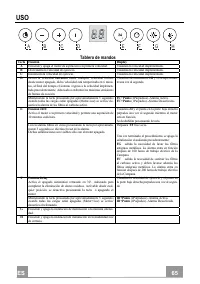
Page 65 - Tablero de mandos
ES 6 65 USO A B C D E F G H Tablero de mandos Tecla Función Display A Enciende y apaga el motor de aspiración a la primera velocidad. Visualiza la velocidad implementada. B Decrementa la velocidad de ejercicio. Visualiza la velocidad implementada. C Incrementa la velocidad de ejercicio. Visualiza la...
Page 66 - Limpieza de los Confort Panel
ES 6 66 MANTENIMIENTO MANDO A DISTANCIA (OPCIONAL) El aparato puede comandarse con un mando a distancia que funciona con pilas alcalinas zinkcarbón de 1,5 V del tipo standard LR03-AAA (no inclu-ido). • No dejar el mando a distancia cerca de una fuente de calor. • Tirar las pilas, cuando se hayan ago...
Page 68 - Iluminación
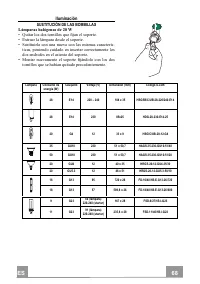
ES 6 68 Iluminación SUSTITUCIÓN DE LAS BOMBILLAS Lámparas halógenas de 20 W • Quitar los dos tornillos que fijan el soporte. • Extraer la lámpara desde el soporte. • Sustituirla con una nueva con las mismas caracterís- ticas, poniendo cuidado en insertar correctamente los dos enchufes en el asiento ...
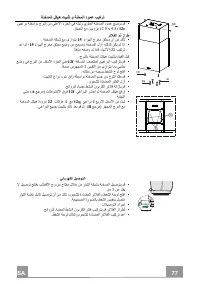
Page 69 - SA; تاحارتقا; بيآرتلا
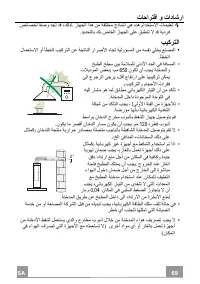
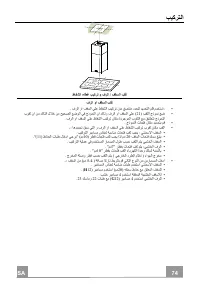
SA 6 69 تﺎﺣاﺮﺘﻗا و تادﺎﺷرا تﺎﻤﻴﻠﻌﺗ ماﺪﺨﺘﺳﻻا ﻩﺬه ﻲه جذﺎﻤﻨﻟ ﺔﻔﻠﺘﺨﻣ ﻦﻣ اﺬه زﺎﻬﺠﻟا . ،ﻚﻟﺬﻟ ﺪﻗ ﺪﺠﺗ ﺎﻔﺻو ﺺﺋﺎﺼﺨﻟ ﺔﻳدﺮﻓ ﺪﻗ ﻻ ﻖﺒﻄﻨﺗ ﻰﻠﻋ زﺎﻬﺠﻟا صﺎﺨﻟا ﻚﺑ ﺪﻳﺪﺤﺘﻟﺎﺑ . ﺐﻴآﺮﺘﻟا • ﻊﻨﺼﻤﻟا ﻲﻠﺨﻳ ﻪﺴﻔﻧ ﻦﻣ ﺔﻴﻟوﺆﺴﻤﻟا ﻩﺎﺠﺗ راﺮﺿﻷا ﺔﺠﺗﺎﻨﻟا ﻦﻋ ﺐﻴآﺮﺘﻟا ﺄﻄﺨﻟا وأ لﺎﻤﻌﺘﺳﻻا ﺄﻄﺨﻟا . • ﺔﻓﺎﺴﻤﻟا ﻲﻓ ﺪﺤﻟا ﻰﻧدﻷا ﺔﻣﻼﺴﻠﻟ ﻦﻴﺑ ﺢﻄﺳ ﺦﺒﻄﻟا ﺔﻨﺧﺪ...
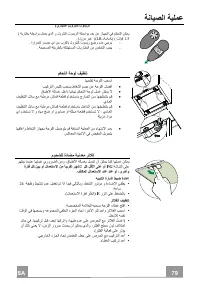
Page 71 - ةنايصلا
SA 7 71 • “ ﺮﻳﺬﺤﺗ : ءاﺰﺟﻷا ﻲﺘﻟا ﻦﻜﻤﻳ ﺎﻬﺴﻤﻟ لﻮﺻﻮﻟاو ﺎﻬﻴﻟا ﻦﻜﻤﻳ نأ ﻦﺨﺴﺗ ةّﺪﺸﺑ ﻊﻣ تاﺪﻌﻣ ﺦﺒﻄﻟا . ﺔﻧﺎﻴﺼﻟا • ﺊﻔﻃأ زﺎﻬﺠﻟا وأ ﻞﺼﻓا ﻪﻨﻋ رﺎﻴﺘﻟا ﺑﺮﻬﻜﻟا ﻲﺋﺎ ﻞﺒﻗ مﺎﻴﻘﻟا يﺄﺑ ﺔﻴﻠﻤﻋ ﻒﻴﻈﻨﺗ ﺔﻧﺎﻴﺻوأ . • ﻒّﻈﻧ و / وأ لّﺪﺑ ﺮﺗﻼﻔﻟا ﺪﻌﺑ ةﺪﻤﻟا ةدﺪﺤﻤﻟا ﺔﺤﺿﻮﻤﻟاو ) ﺮﻄﺧ ثوﺪﺣ ﻖﻳﺮﺣ ( . • ﺮﺗﻼﻔﻟا ةدﺎﻀﻤﻟا مﻮﺤﺸﻠﻟ ﺐﺠﻳ نأ ﻒﻈﻨﺗ ﻞآ 2 ﻦﻳﺮﻬ...
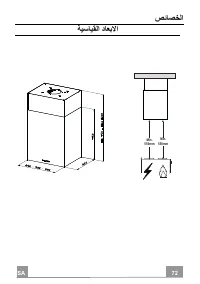
Page 72 - خلا
SA 7 72 ﺨﻟا ﺺﺋﺎﺼ ﺔﻴﺳﺎﻴﻘﻟا دﺎﻌﺑﻻا Min. 550mm Min. 550mm
Page 73 - تانوكملا
SA 7 73 تﺎﻧﻮﻜﻤﻟا ﻊﺟﺮﻣ ﺔﻴﻤﻜﻟا تﺎﻧﻮﻜﻣ ﺞﺘﻨﻤﻟا 1 1 ﻞﻜﻴه ﺔﻨﺧﺪﻤﻟا ﻞﻣﺎآ : ،ةءﺎﺿإ ﺔﻋﻮﻤﺠﻣ ،ﺔﻳﻮﻬﺘﻟا ،ﺮﺗﻼﻓ بﻮﺒﻧأ ﺔﻨﺧﺪﻣ ﻲﻠﻔُﺳ 2 1 دﻮﻤﻋ ﺔﻨﺧﺪﻣ يﻮﻠُﻋ 7.1 1 جﺮﺑ ﻲﺑﻮﻜﺴﻴﻠﺗ ﻞﻣﺎآ ﻊﻣ ،طﺎﻔﺷ ﻒﻟﺆﻣ ﻦﻣ : 7.1a 1 جﺮﺑ يﻮﻠُﻋ 7.1b 1 جﺮﺑ ﻞﻔﺳأ 9 1 ﺔﻓﺎﺣ ﻒﻴﻔﺨﺗ ﺮﻄﻘﺑ 150-120 ﻢﻣ . 13 1 ةﻮﺸﺣ ﺔﻘﺻﻻ ﻚﻴﺘﺳﺎﻓﻮﻧ Novastik 14 1 ﺔﻠﺻو ﺔﺒﻌﺸﺘﻣ جﺮﺨﻤﻟ ...
Page 78 - مادختسلاا
SA 7 78 ماﺪﺨﺘﺳﻻا A B C D E F G H ﻢﻜﺤﺘﻟا ﺔﺣﻮﻟ ﺔﺷﺎﺷ ﺔﻔﻴﻇو رز رﺎﻬﻇإ ﺔﻋﺮﺴﻟا ﻲﺘﻟا ﻢﺗ ﺎﻬﻄﺒﺿ لﺎﻌﺷإ و ءﺎﻔﻃا رﻮﺗﻮﻣ ﻂﻔﺸﻟا ﻰﻠﻋ ﺔﻋﺮﺴﻟا ﻰﻟوﻷا A رﺎﻬﻇإ ﺔﻋﺮﺴﻟا ﻲﺘﻟا ﻢﺗ ﺎﻬﻄﺒﺿ صﺎﻘﻧإ ﺔﻋﺮﺳ ﻞﻴﻐﺸﺘﻟا . B رﺎﻬﻇإ ﺔﻋﺮﺴﻟا ﻲﺘﻟا ﻢﺗ ﺎﻬﻄﺒﺿ ةدﺎﻳز ﺔﻋﺮﺳ ﻞﻴﻐﺸﺘﻟا . C رﺎﻬﻇإ HI بوﺎﻨﺘﻟﺎﺑ ًﺎﻀﻳأو ﺖﻗﻮﻟا ﻲﻘﺒﺘﻤﻟا ﻲﻧاﻮﺜﻟﺎﺑ . ﻂﺸﻨﻳ ﺔﻋﺮﺴﻟا ﺔﻔﺜﻜﻤﻟا...
Page 81 - ـلا
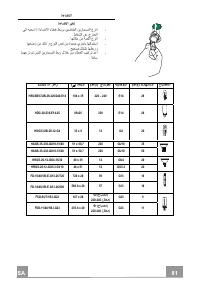
SA 8 81 ةءﺎﺿﻻا ةءﺎﺿﻻا ﺮﻴﻐﺗ - ﻲﻟا ﻪﺒﺤﺳا ة ةءﺎﺿﻻا ءﺎﻄﻏ ﻂﺑﺮﺑ ﻦﻴﺿﺎﺨﻟا ﻦﻳرﺎﻤﺴﻤﻟا عﺰﻧا ﻟا ﻦﻋ جرﺎﺨﻟا طﺎﻔﺸ . - ﺎﻬﻧﺎﻜﻣ ﻦﻣ ﺔﺒﻤﻠﻟا عﺰﻧا . - ﺎﻬﻌﺿو ﻦﻣ ﺪآﺎﺗ و عﻮﻨﻟا ﺲﻔﻧ ﻦﻣ ةﺪﻳﺪﺟ يﺮﺧﺎﺑ ﺎﻬﻟاﺪﺒﺘﺳا ﺢﻴﺤﺻ ﻞﻜﺸﺑ ﺎﻬﻄﺑرو . - ﺎﻤﻬﻋﺰﻧ ﻢﺗ ﻦﻳﺬﻟا ﻦﻳرﺎﻤﺴﻤﻟا ﻂﺑر لﻼﺧ ﻦﻣ ءﺎﻄﻐﻟا ﺐﻴآﺮﺗ ﺪﻋا ﺎﻘﺑﺎﺳ . ـﻟا ﺰﻣر ILCOS دﺎﻌﺑﻷا ) مﻣ ( جﺎﺘﻟﻮﻔﻟا ...
Page 82 - PATARIMAI IR NUORODOS; MONTAVIMAS
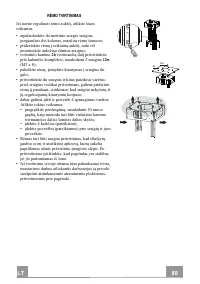
LT 8 82 PATARIMAI IR NUORODOS Naudojimo instrukcijos taikomos keliems šio prietaiso variantams. Taigi galite rasti aprašytas tokias savybes, kurios neb ū dingos konkre č iam j ū s ų prietaisui. MONTAVIMAS • Gamintojas nebus atsakingas už joki ą žal ą , atsiradusi ą netaisyklingai arba netinkamai sum...
Page 84 - PRIEŽI
LT 8 84 • ATSARGIAI! Jei virykl ė s naudojamos, rankomis palie č iamos dalys gali b ū ti karštos. PRIEŽI Ū RA • Prieš atlikdami bet kokius prieži ū ros darbus, prietais ą išjunkite arba ištraukite kištuk ą iš elektros tinklo. • Po nurodyto laiko išvalykite ir (arba) pakeiskite filtrus (d ė l gaisro ...
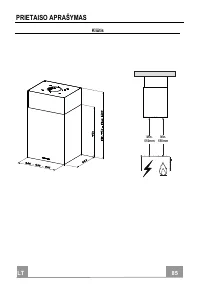
Page 85 - PRIETAISO APRAŠYMAS; Kli
LT 8 85 PRIETAISO APRAŠYMAS Kli ū tis Min. 550mm Min. 550mm
Page 87 - Perdang
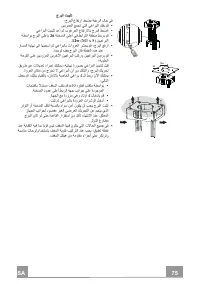
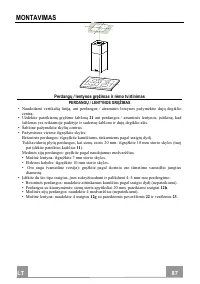
LT 8 87 MONTAVIMAS Perdang ų / lentynos gr ę žimas ir r ė mo tvirtinimas PERDANG Ų / LENTYNOS GR Ę ŽIMAS • Naudodami vertikali ą linij ą , ant perdangos / atramin ė s lentynos pažym ė kite duj ų degiklio centr ą . • Užd ė kite pateikiam ą gr ę žimo šablon ą 21 ant perdangos / atramin ė s lentynos, į...
Page 89 - Oro išmetimo sistemos vamzdin
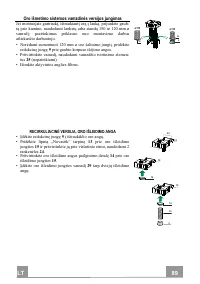
LT 8 89 Oro išmetimo sistemos vamzdin ė s versijos jungimas Jei montuojate gartrauk į , ištraukiant į or ą į lauk ą , prijunkite gaub- t ą prie kamino, naudodami lankst ų arba stand ų 150 ar 120 mm ø vamzd į ; pasirinkimas priklauso nuo montavimo darbus atliekan č io darbuotojo. • Nor ė dami sumontu...
Page 90 - mtakio surinkimas. Gaubto korpuso montavimas
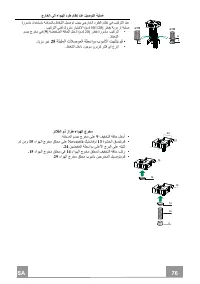
LT 9 90 D ū mtakio surinkimas. Gaubto korpuso montavimas • Į d ė kite viršutin į vamzd į ir pritvirtinkite j į viršutinio vamzdžio jungties viršuje, naudodami 12c sraigtus (2,9 x 9,5), pateiktus su į renginiu. Recirkuliacin ė versija • B ū tina į sitinkinti, kad oro angos jungtis 15 yra nustatyta ti...
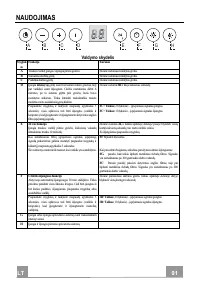
Page 91 - NAUDOJIMAS; Valdymo skydelis
LT 9 91 NAUDOJIMAS A B C D E F G H Valdymo skydelis Mygtuk as Funkcija Ekranas A Traukos varikl į į jungia / išjungia pirmu grei č iu. Ekrane rodomas nustatytas greitis. B Sumažina darbin į greit į . Ekrane rodomas nustatytas greitis. C Padidina darbin į greit į . Ekrane rodomas nustatytas greitis. ...
Page 92 - VALYMAS IR PRIEŽI; „Comfort“ skydelio valymas
LT 9 92 VALYMAS IR PRIEŽI Ū RA VALDYMAS NUOTOLINIU PULTU (JEI YRA) Prietais ą galima valdyti nuotoliniu pultu, kuriam reikia standartini ų AAA tipo 1,5 V anglies cinko šarmini ų element ų (ne į skai č iuotos). • Nelaikykite valdymo pulto netoli šilumos šaltini ų . • Panaudotus elementus reikia išmes...
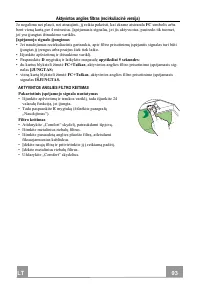
Page 93 - Aktyvintos anglies filtras (recirkuliacin
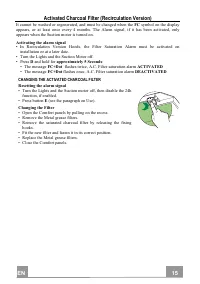
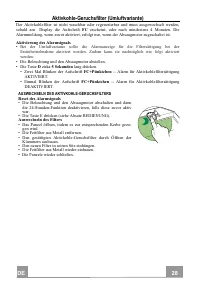
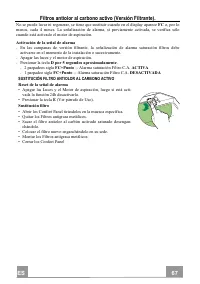
LT 9 93 Aktyvintos anglies filtras (recirkuliacin ė versija) Jo negalima nei plauti, nei atnaujinti, j į reikia pakeisti, kai ekrane atsiranda FC simbolis arba bent vien ą kart ą per 4 m ė nesius. Į sp ė jamasis signalas, jei jis aktyvuotas, pasirodo tik tuomet, jei yra į jungtas ištraukimo variklis...
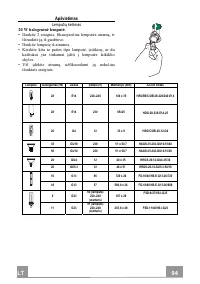
Page 94 - Apšvietimas
LT 9 94 Apšvietimas Lempu č i ų keitimas 20 W halogenin ė lemput ė . • Išsukite 2 sraigtus, fiksuojan č ius lemput ė s atram ą , ir ištraukite j ą iš gaubtuvo. • Išsukite lemput ę iš atramos. • Keiskite kita to paties tipo lempute, į sitikin ę , ar du kaištukai yra tinkamai į d ė ti į lemput ė s lai...
Page 95 - LV; IETEIKUMI UN PRIEKŠLIKUMI; UZST
LV 9 95 IETEIKUMI UN PRIEKŠLIKUMI Lietošanas nor ā d ī jumi attiecas uz vair ā k ā m š ī s ier ī ces versij ā m. T ā d ē j ā di iesp ē jams, ka atrad ī sit atseviš ķ as funkcijas, kas nepiem ī t konkr ē tajai ier ī cei. UZST Ā D Ī ŠANA • Izgatavot ā js neuz ņ emas atbild ī bu par boj ā jumiem, kas r...
Page 96 - āņ; Br; IZMANTOŠANA; ļā
LV 9 96 • Ja g ā zes pl ī ts uzst ā d ī šanas instrukcij ā s nor ā d ī ts liel ā ks att ā lums, nek ā noteikts iepriekš, tad tas ir j āņ em v ē r ā . J ā izpilda noteikumi, kas saist ī ti ar gaisa atbr ī vošanu. • Tvaika nos ū c ē ja atbalstam izmantot tikai skr ū ves un maz ā s sast ā vda ļ as. Br ...
Page 97 - ļū; APKOPE
LV 9 97 • “ UZMAN Ī BU : Atkl ā t ā s deta ļ as gatavošanas iek ā rtu izmantošanas laik ā var k ļū t karstas. ” APKOPE • Pirms jebk ā du apkopes darbu veikšanas atsl ē dziet ier ī ci no elektrot ī kla. • T ī riet un/vai mainiet filtrus p ē c noteikta laika perioda (aizdegšan ā s briesmas). • Tauku f...
Page 98 - TEHNISKIE DATI; Izm
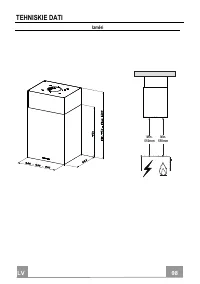
LV 9 98 TEHNISKIE DATI Izm ē ri Min. 550mm Min. 550mm
Page 99 - Sast
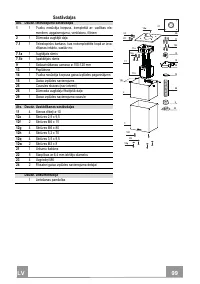
LV 9 99 Sast ā vda ļ as Ats. Daudz. Izstr ā d ā juma sast ā vda ļ as 1 1 Tvaiku nos ū c ē ja korpuss, komplekt ā ar: vad ī bas ele- mentiem, apgaismojumu, ventilatoru, filtriem 2 1 D ū mvada augš ē j ā da ļ a 7.1 1 Teleskopisks karkass, kas nokomplekt ē ts kop ā ar izva- d ī šanas iek ā rtu, sast ā ...
Page 100 - Urbumi griestos / plaukt
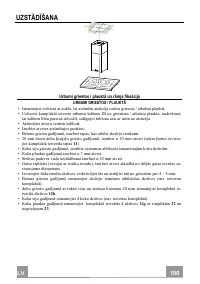
LV 1 100 UZST Ā D Ī ŠANA Urbumi griestos / plaukt ā un r ā mja fiks ā cija URBUMI GRIESTOS / PLAUKT Ā • Izmantojiet sv ē rteni ar auklu, lai atz ī m ē tu ats ū c ē ja centru griestos / atbalsta plaukt ā . • Uzlieciet komplekt ā ietverto urbumu šablonu 21 uz griestiem / atbalsta plaukta, nodrošinot, ...
Page 102 - Cauru
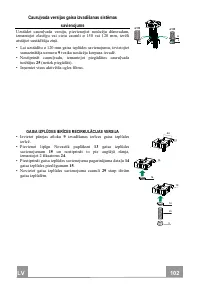
LV 1 102 Cauru ļ vada versijas gaisa izvad ī šanas sist ē mas savienojums Uzst ā dot cauru ļ vada versiju, pievienojiet nos ū c ē ju d ū mvadam, izmantojot elast ī gu vai cietu cauruli ø 150 vai 120 mm, izv ē li atst ā jiet uzst ā d ī t ā ja zi ņā . • Lai uzst ā d ī tu ø 120 mm gaisa izpl ū des savi...
Page 103 - mvada mezgls - tvaika nos
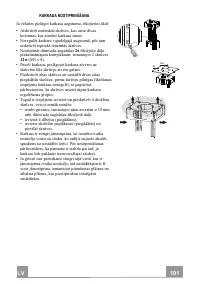
LV 1 103 D ū mvada mezgls - tvaika nos ū c ē ja korpusa mont ā ža • Ievietot d ū mvada augšda ļ u un nostiprin ā t to d ū mvada augšda ļ as savienojuma augšda ļā , izmantojot skr ū ves 12c (2,9 x 9,5), kas pieg ā d ā tas kop ā ar ier ī ci. Recirkul ā cijas versija • Nepieciešams p ā rliecin ā ties, ...
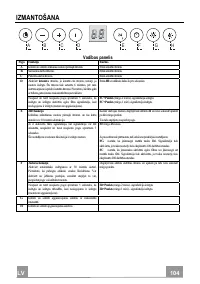
Page 104 - Vad
LV 1 104 IZMANTOŠANA A B C D E F G H Vad ī bas panelis Poga Funkcija Ekr ā ns A Iesl ē dz un izsl ē dz s ū kšanas motoru pirmaj ā ā trum ā . R ā da iestat ī to ā trumu B Samazina darba ā trumu. R ā da iestat ī to ā trumu C Palielina darba ā trumu. R ā da iestat ī to ā trumu D Aktiviz ē intens ī vo ā...
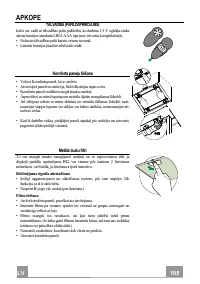
Page 105 - Komforta pane; Met
LV 1 105 APKOPE T Ā LVAD Ī BA (PAPILDAPR Ī KOJUMS) Ier ī ci var vad ī t ar t ā lvad ī bas pults pal ī dz ī bu, ko darbina 1,5 V oglek ļ a-cinka s ā rma baterijas standarta LR03-AAA tipa (nav ietvertas komplekt ā cij ā ). • Nelieciet t ā lvad ī bas pulti karstu virsmu tuvum ā . • Lietot ā s baterijas...
Page 106 - Aktiv
LV 1 106 Aktiv ē t ā s ogles filtrs (Recirkul ā cijas versija) To nedr ī kst mazg ā t un nevar atjaunot, tas j ā nomaina, ja ekr ā n ā par ā d ā s simbols FC , vai vismaz reizi 4 m ē nešos. Ja ir aktiviz ē ts signaliz ā cijas sign ā ls, tas funkcion ē tikai tad, ja ir iesl ē gts s ū kn ē šanas motor...
Page 107 - Apgaismojums
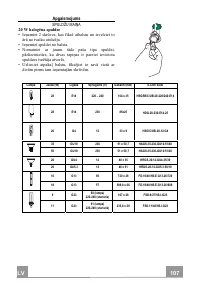
LV 1 107 Apgaismojums SPULDŽU MAI Ņ A 20 W halog ē na spuldze • Iz ņ emiet 2 skr ū ves, kas fiks ē atbalstu un izvelciet to ā r ā no tvaiku ats ū c ē ja. • Iz ņ emiet spuldzi no balsta. • Nomainiet ar jaunu t ā da paša tipa spuldzi, p ā rliecinieties, ka divas tapi ņ as ir pareizi ievietota spuldzes...
Page 108 - EE; SOOVITUSED JA ETTEPANEKUD; PAIGALDAMINE
EE 1 108 SOOVITUSED JA ETTEPANEKUD Kasutusjuhised kehtivad selle seadme mitmele versioonile. Seetõttu võite siit leida individuaalsete funktsioonide kirjeldusi, mis ei kehti teie spetsiifilisele seadmele. PAIGALDAMINE • Tootja ei vastuta mingite kahjustuste eest, mille põhjuseks on ebaõige paigaldam...
Page 110 - : Ligipääsetavad osad võivad koos; HOOLDUS; kasutuskoormusel sagedamini, ning pesta nõudepesumasinas.
EE 1 110 • “ ETTEVAATUST : Ligipääsetavad osad võivad koos toiduvalmistusseadmetega kasutamisel kuumaks minna.”. HOOLDUS • Enne hooldustööde teostamist lülitage seade välja või ühendage see võrgutoitest lahti. • Määratud perioodi möödumisel puhastage või vahetage filtrid (tuleoht). • Rasvafiltrid tu...
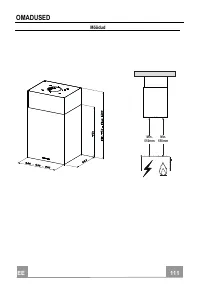
Page 111 - OMADUSED; Mõõdud
Page 112 - Komponendid
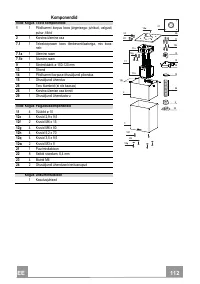
EE 1 112 Komponendid Viide Kogus Toote komponendid 1 1 Pliidikummi korpus koos järgmisega: juhikud, valgusti, puhur, filtrid 2 1 Korstna ülemine osa 7.1 1 Teleskoopraam koos tõmbeventilaatoriga, mis koos- neb: 7.1a 1 Ülemine raam 7.1b 1 Alumine raam 9 1 Siirdmikäärik ø 150-120 mm 13 1 Tihend 14 1 Pl...
Page 113 - Lae/riiuli puurimine ja raami kinnitamine
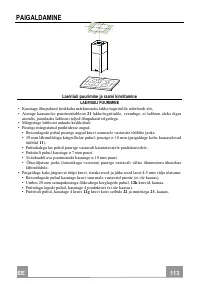
EE 1 113 PAIGALDAMINE Lae/riiuli puurimine ja raami kinnitamine LAE/RIIULI PUURIMINE • Kasutage õhupuhasti keskkoha märkimiseks lakke/tugiriiulile nöörloodi abi, • Asetage kaasasolev puurimisšabloon 21 lakke/tugiriiulile, veenduge, et šabloon oleks õiges asendis, joondades šablooni teljed õhupuhasti...
Page 115 - Torustikuga versiooni õhuimusüsteemi ühendamine
EE 1 115 Torustikuga versiooni õhuimusüsteemi ühendamine Torustikuga versiooni paigaldamisel ühendage pliidikumm korstnaga painduva või jäiga ø 150 või 120 mm toru abil, selle valik jääb paigalda-jale. • ø 120 mm õhuimuühenduse paigaldamiseks sisestage pliidikummi kor- puse väljundile siirdmikäärik ...
Page 116 - Lõõri monteerimine - pliidikummi korpuse paigaldamine
EE 1 116 Lõõri monteerimine - pliidikummi korpuse paigaldamine • Paigaldage ülemine toru ja kinnitage ülemise toru ühendusele seadmele lisatud 12c kruvidega (2,9 x 9,5). Retsirkulatsiooniga versioon • Veenduge kindlasti, et õhuväljundi ühendus 15 oleks õigesti asetatud, et õhuväljundi võre selle see...
Page 117 - KASUTAMINE; Juhtpaneel
EE 1 117 KASUTAMINE A B C D E F G H Juhtpaneel Nupp Funktsioon Displei A Lülitab imemismootori sisse ja välja esimesel kiirusel. Kuvab määratud kiiruse B Vähendab töökiirust. Kuvab määratud kiiruse C Suurendab töökiirust. Kuvab määratud kiiruse D Aktiveerib intensiivse kiiruse kõigilt teistelt kiiru...
Page 118 - Paneelide puhastamine
EE 1 118 HOOLDUS KAUGJUHTIMINE (VALIKULINE) Seadet saab juhtida kaugjuhtimispuldiga, mis kasutab 1,5 V standardseid LR03-AAA tüüpi süsinik-tsink leelispatareisid (ei ole kaasas). • Ärge asetage kaugjuhtimispulti soojusallikate lähedusse. • Kasutatud patareid tuleb õigesti käidelda. Paneelide puhasta...
Page 119 - Aktiivsöefilter (retsirkulatsiooniga versioon)
EE 1 119 Aktiivsöefilter (retsirkulatsiooniga versioon) Seda ei saa pesta ega regenereerida ning see tuleb vahetada, kui displeile ilmub sümbol FC või hiljemalt iga 4 kuu järel. Aktiveeritud häiresignaal ilmub ainult juhul, kui imemismootor on sisse lülitatud. Häiresignaali aktiveerimine • Retsirkul...
Page 120 - Valgustus
EE 1 120 Valgustus VALGUSTUSE VAHETAMINE 20 W halogeenpirn. • Eemaldage valgustuse tuge paigal hoidvad 2 kruvi ja tõmmake see pliidikummist välja. • Eemaldage lamp toest. • Asendage see teise sama tüüpi lambiga veendudes, et mõlemad tihvtid on õigesti lambihoidiku pesa ava-desse sisestatud. • Paigal...