Elite EDF-3500 - User Manual
Elite EDF-3500 Deep Fryer – User Manual, read for free online in PDF format. We hope this helps you resolve any issues you may have. If you have further questions, please contact us through the contact form.


Table of Contents:
- Page 2 – polarized plug
- Page 3 – IMPORTANT SAFEGUARDS; SAVE THESE INTRUCTIONS; THIS PRODUCT IS FOR HOUSEHOLD USE ONLY!
- Page 4 – ADDITIONAL SAFEGUARDS
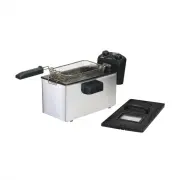
- Page 5 – PARTS & FEATURES
- Page 6 – SETTING UP THE DEEP FRYER:
- Page 7 – FRYING GUIDE
- Page 8 – CLEANING THE DEEP FRYER
- Page 9 – RECIPES; BATTER
- Page 10 – FRIED CHICKEN WITH CREAMY GRAVY
- Page 12 – GOLDEN FRIED ONION RINGS:
- Page 13 – BEER BATTER FISH FILLETS; GREEN
- Page 17 – IMPORTANTES MEDIDAS DE SEGURIDAD; GUARDE ESTAS INSTRUCCIONES
- Page 18 – PARTES Y CARACTERÍSTICAS
- Page 19 – RECOMMENDACIONES; Nunca trate de mover la freidora durante su uso.; COMO PREPARAR SU FREIDORA; ANTES DE UTILIZAR POR PRIMERA VEZ:
- Page 21 – GUIA DE COMO FREIR
- Page 22 – COMO LIMPIAR LA FREIDORA; PRECAUCIÓN: No sumerja el elemento térmico en agua para limpiar.; COMO REMPLAZAR LOS FILTROS:
- Page 23 – Este aparato es de uso domestico unicamente
3.5Qt. Stainless Steel
Deep Fryer
Model EDF-3500
INSTRUCTION MANUAL
Before operating your new appliance, please read all instructions
carefully and keep for future reference.
"Loading the manual" means you need to wait until the file loads and becomes available for online reading. Some manuals are very large, and the time they take to appear depends on your internet speed.
Summary
1 .. TABLE OF CONTENTS . IMPORTANT SAFEGUARDS___________________________________ 2 PARTS & FEATURES ________________________________________ 4 PREPARING YOUR DEEP FRYER _________________________________ 5 OPERATING INSTRUCTIONS __________________________________ 6 FRYING GUIDE __________________...
2 IMPORTANT SAFEGUARDS .. When using electrical appliances, basic safety precautions should always be followed, including the following: 1. Read all instructions before operating. 2. Do not touch hot surfaces. Use handles or knobs if applicable. 3. This appliance produces heat. Do not use appliance ...
3 .. ADDITIONAL SAFEGUARDS . 21. Always place the deep fryer on a stable surface and keep all flammable materials away from the unit during operation. 22. Make sure that the deep fryer is never near or on a switched-on stove or cooking surface. 23. Before you use the deep fryer it must be filled wit...