Page 2 - WE’RE THINKING OF YOU; Visit our website to:
2 www.electrolux.com CONTENTS 1.1 Conditions Of Use 1.2 Child Safety 1.3 General Safety 1.4 Installation 1.5 Use 1. SAFETY INFORMATION ........................................................................................................ 4 .............................................................
Page 4 - SAFETY INFORMATION; Conditions Of Use; This washing machine is not intended for use by
4 www.electrolux.com SAFETY INFORMATION In the interest of your safety and to ensure the correct use, before installing and first using the appliance, read this user manual carefully, including its hints and warnings. This appliance is intended to be used in household and similar applications such a...
Page 6 - PRODUCT DESCRIPTION
6 www.electrolux.com Never use the washing machine if the power supply cable, the control panel, the working surface or the base are damaged so that the inside of the washing machine is accessi- ble. This appliance is heavy. Care should be taken when moving it.When unpacking the appliance, check tha...
Page 9 - Load Sensor
ENGLISH 9 2.3 Load Sensor This machine has “Load Sensing Device” which shows how much load you put in the machine and maximum load recommended for selected wash program. The display will show “ ” when max limit is reached for selected program.On the display, the weight of the laundry updates by 0.5 ...
Page 10 - CONTROL PANEL; Control Panel Description
10 www.electrolux.com 3. CONTROL PANEL 3.1 Control Panel Description Control Panel 2s 2s A B C D O P E F G H I J K L M N A Program knob I Temp touchpad B On/Off button J Display C SensorWash touchapd K Delay End touchpad D Stain touchpad L Time Manager touchpad E Hygienic Care touchpad M Pause to ad...
Page 13 - Program Options Compatibility
13 The door stays locked with the water in the drum. To continue the cycle, you must press (Start/Pause). Temperature Touchpad Press this touchpad repeatedly to increase or decrease the wash temperature if you want your laundry to be washed at a temperature different from the one proposed by the was...
Page 14 - Time Manager
14 www.electrolux.com Delay End ( ) Touchpad Time Manager This option allows you to adjust the wash time. Press this touchpad repeatedly to decrease or increase the wash time according to the soil level of your wash. Use the table below as a guide. Before you start the program, this option makes it ...
Page 15 - Stain Touchpad
15 Prewash ( ) Touchpad Select this option if you wish your laundry to be pre-washed before the main wash. Use this option for heavy soil. The indicator of this option will be on. Stain Touchpad Press this touchpad to add the stain phase to a program. The indicator of this option comes on.Use this f...
Page 16 - Buzzer; BEFORE FIRST USE
16 www.electrolux.com Save Favourite ( ) Program 3.5 Settings Child Safety Lock ( ) Option Your appliance is provided with CHILD SAFETY LOCK which permits you to leave the appliance unsupervised with the door closed without having to worry that children might be injured by or cause damage to the app...
Page 18 - DAILY USE; Loading The Laundry
18 www.electrolux.com DAILY USE 5. Press the On/Off button to turn on the washing machine. Turn the knob to set a program. The washing machine will propose a temperature and automatically select the spin value provided for the program you have chosen. Check and remove objects (if there are any) that...
Page 22 - WASHING HINTS; Sorting The Laundry; Quantity of detergent to be
22 www.electrolux.com WASHING HINTS 6. Follow the wash code symbols on each garment label and the manufacturer’s washing instructions. Sort the laundry as follows: whites, coloureds, synthetics, delicates, woollens. 6.1 Sorting The Laundry 6.2 Temperatures 90°C Temp Soil level 60°C 50°C 40°C 30°C Co...
Page 24 - INTERNATIONAL WASH CODE SYMBOLS; CARE AND CLEANING; External Cleaning
24 www.electrolux.com the washload to turn grey, greasy clothes. inadequate rinsing. reduced washing effect, you are washing a small load, large amounts of foam during washing. the laundry is lightly soiled, Use less detergent if: INTERNATIONAL WASH CODE SYMBOLS 7. These symbols appear on fabric lab...
Page 28 - Emergency Drain; Frost Precautions
28 www.electrolux.com 8. Put the filter back into the housing with exposed section facing up. Make sure that you correctly tighten the filter to prevent leakages. 9. Close the drain pump door. Remove the water inlet hose from the water tap. Clean the filter in the inlet hose with a stiff brush. If y...
Page 30 - TROUBLESHOOTING; Possible Failures
30 www.electrolux.com TROUBLESHOOTING 9. The door has not been closed. (Error code: ) Close the door firmly. The plug is not properly inserted into the power socket. Insert the plug into the power socket. There is no power at the socket. Please check your domestic electrical installation. The Start/...
Page 33 - Emergency Door Opening
33 In case of power failure or appliance failure, the appliance door remains locked. The wash program continues when power is restored. If the door remains locked in case of failure, it is possible to open it using the emergency unlock feature. Before opening the door: 9.2 Emergency Door Opening Mak...
Page 34 - INSTALLATION; TECHNICAL DATA
34 www.electrolux.com INSTALLATION 11. 11.1 Unpacking Use gloves. Cut and remove four cut out straps as shown. 1. You are advised to keep all transit devices so that they can be refitted if the machine ever has to be transported again. All transit bolts and packing must be removed before using the a...
Page 38 - Packaging Materials; ENVIRONMENT CONCERNS; Electrical Connection
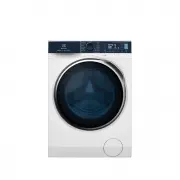
38 www.electrolux.com Fitting Hose Guide bend hose 2. Adjust length to suit trough. Pull apart to insert hose. pull hose 1. 450 approx . Hose Guide Push the drain hose onto the spigot and secure with a clamp, ensure a loop is formed in the drain hose to prevent waste from the sink entering the appli...