Dell Brocade 6510 - Quick Guide
Dell Brocade 6510 – Quick Guide, read for free online in PDF format. We hope this helps you resolve any issues you may have. If you have further questions, please contact us through the contact form.


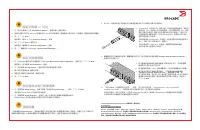
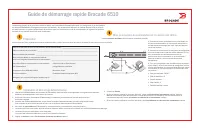
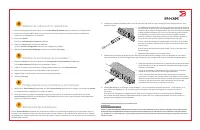


Table of Contents:
- Page 2 – Setting the switch IP address; Set the switch password
- Page 3 – QuickStart 指南; 准备工作
- Page 4 – 设置交换机密码
- Page 5 – 快速入門指南; 準備開始
- Page 6 – 設定交換機密碼
- Page 7 – Guide de démarrage rapide Brocade 6510; Préparation
- Page 8 – Définition de l'adresse IP du commutateur; Définition du mot de passe du commutateur
- Page 9 – Brocade 6510-Schnellstarthandbuch; Vor dem Start
- Page 10 – Festlegen der IP-Adresse für einen Switch; Festlegen des Switch-Kennworts
- Page 11 – Panduan Mulai Cepat Brocade 6510; Persiapan
- Page 12 – Mengatur alamat IP saklar; Atur kata sandi saklar
- Page 13 – クイックスタートガイド; 準備; EZSwitchSetup; のインストールと起動
- Page 14 – スイッチの; IP; アドレスの設定
- Page 15 – 빠른 시작 안내서; 준비하기
- Page 16 – 스위치 암호 설정
- Page 17 – Guia de Início Rápido do Brocade 6510; Preparação
- Page 18 – Definir o endereço IP do comutador; Definir a senha do comutador
- Page 19 – Guía de inicio rápido de Brocade 6510; Introducción
- Page 20 – Configuración de la dirección IP del conmutador; Establezca la contraseña del conmutador
- Page 21 – Brocade 6510 QuickStart Guide; Hazırlık Aşaması
- Page 22 – Anahtar IP adresini ayarlama; Anahtar parolasını belirleme; Bölgeleri yapılandırın ve aygıt seçimi yapın
- Page 24 – Brocade 6510-ל הריהמ הלחתה ךירדמ; הנכה
Brocade 6510 QuickStart Guide
Complete the steps in this guide to install and set up your Brocade 6510 switch in a single-switch configuration using
EZSwitchSetup. See the
Brocade 6510 Hardware Reference Manual
and the
Fabric OS Administrator’s Guide
(located on the
Brocade Family Documentation CD
)
if you want to choose a different setup.
Ensure that you have the items listed below. Write down the IP network values in the space provided.
Getting Ready
Fixed IP address (IPv4 or IPv6) for the switch (no DHCP server): __________________________________________________
Subnet mask value: ______________________________________________________________________________________
Default Gateway value: ___________________________________________________________________________________
Brocade switch World Wide Name (WWN): located on the switch ID pullout: ________________________________________
Ethernet connection (hub or switch)
Ethernet and Fibre Channel Cables
EZSwitchSetup CD
Setup computer
Host computer with an installed HBA
Disk array
Standard screw driver
Optical transceivers (SFPs)
Browser that allows pop-up windows
1
Powering up and connecting cables to the switch
3
Installing and starting EZSwitchSetup
2
1. Insert the EZSwitchSetup CD into the CD-ROM drive of your setup computer. The installer will autostart in about a minute.
2. Follow the EZSwitchSetup directions for installation. Installation will take a few minutes after you click
OK.
3. Wait for EZSwitchSetup to start, which should happen automatically after it is installed.
For Windows and Linux instructions, refer to the
EZSwitchSetup Administrator’s Guide.
4. On the EZSwitchSetup
Introduction
screen, choose the option that matches your setup configuration:
•
Ethernet connection. This option uses the Ethernet LAN connection you will use for running EZSwitchSetup Manager.
•
Direct connection to the switch with a serial cable.
Most users will find it more convenient to use the Ethernet connection.
5. Click
Next.
The
Connect Cables
screen is displayed.
4. Click
Next.
•
If you chose to use the Ethernet connection, the
Discover Switch
screen is displayed. Enter the switch WWN, following
the instructions on the
Discover Switch
screen. After completing switch discovery, the
Set Switch IP Address
screen
is displayed.
•
If you chose to use the serial port connection, the
Set Switch IP Address
screen is immediately displayed.
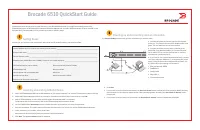
The
Connect Cables
screen shows you the connections you need to make.
1. Connect the power cord to the switch and to a power
source (1). The power and status LEDs display amber then
green. This can take from one to three minutes.
2. Connect the switch and the setup computer to the
same LAN, using Ethernet cables (3, 5) and an Ethernet
hub or switch (2). Be sure the Ethernet hub or switch is
connected to a power source (6).
3. If you want to use a serial connection for setup, connect
your setup computer COM port (7) to the serial port on the
switch, using the serial cable shipped with the switch (4).
The serial connection settings are as follows:
•
Bits per second: 9600
•
Databits: 8
•
Parity: none
•
Stop bits: 1
•
Flow control: none
®
1
2
7
5
3
6
4
"Loading the manual" means you need to wait until the file loads and becomes available for online reading. Some manuals are very large, and the time they take to appear depends on your internet speed.
Was this manual helpful?
About this manual
- Brand
- Dell
- Model
- Brocade 6510
- Document type
- Quick Guide
- Language(s)
- German, English, Spanish, French
- Pages
- 24
- File size
- 14.4 MB
- Format
Summary
Setting the switch IP address 4 1. Enter the required information on the Set Switch IP Address screen. 2. If prompted to install Active X or a version of the Java runtime environment, do so. Reboot the setup computer, if required.3. Click Next. The Confirm IP Address screen is displayed. 4. Click Ne...
Brocade 6510 QuickStart 指南 完成本指南中的步骤,使用 EZSwitchSetup 在单交换机配置中安装和设置 Brocade 6510 交换机。如果您想要选择不同的 设置,请参阅 Brocade 6510 Hardware Reference Manual ( Brocade 6510 硬件参考手册)和 Fabric OS Administrator’s Guide ( Fabric OS 管理员指南)(位于 Brocade 系列说明文件光盘上)。 确保您拥有下列项目。在提供的空白处记下 IP 网络值。 准备工作 交换机的固定 IP 地址( IPv4 或 IPv6 )...
设置交换机 IP 地址 4 1. 在 Set Switch IP Address (设置交换机 IP 地址)屏幕中输入需要的信息。 2. 如果提示您安装 Active X 或某个版本的 Java 运行时间环境,请安装。如果要求,重新引导安装计算机。 3. 单击 Next (下一步)。 显示 Confirm IP Address (确认 IP 地址)屏幕。 4. 单击 Next (下一步)确认地址。 显示 Continue Configuration (继续配置)屏幕。 5. 单击 Continue with EZManager (继续 EZManager )。 1. 在交换机的光纤信道端口中安...