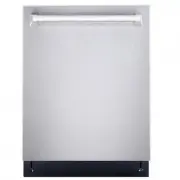
Cosmo COS-DIS6502 Dishwasher – User Manual, read for free online in PDF format. We hope this helps you resolve any issues you may have. If you have further questions, please contact us through the contact form.
1
2
3
4
5
6
7
8
9
10
11
Table of Contents:
Page 2 – THANK YOU FOR YOUR PURCHASE; product in the safest and most effective manner .; Contents
Page 3 – Top Control Dishwasher; Introduction; IMPORTANT SAFETY INSTRUCTIONS; WARNING; Basic precautions before use:; SAVE THESE INSTRUCTIONS; Features; Upper rack in upper position
Page 4 – Interior; Setting up your dishwasher; Finding a suitable location
Page 5 – Using your dishwasher; Using the control panel; Using the child lock
Page 6 – Loading the upper rack; Loading the bottom rack; Adding a dish; Filling the detergent dispenser; Filling the rinse aid dispenser
Page 7 – Factors affecting performance; Maintaining your dishwasher; Cleaning the stainless steel panel
Page 8 – Take out the fabric filter.; Cleaning the air gap; Protecting your dishwasher for long periods of non-use; Flush the filters by holding; Replace the fabric filter.; Cleaning the door and tub gaskets
Page 9 – Troubleshooting; Error codes
Page 10 – Specifications; WARRANTY AND SERVICE; For full warranty details on this product please visit:; Correct Disposal of this product:; IMPORTANT
Loading the manual
COS-DIS
6
5
02
INSTALLATION GUIDE
I N S P I R I N G T H E W O R L D ’ S K I T C H E N
IMPORTANT SAFETY INSTRUCTIONS Carefully read the following Important information redarding installation safety and maintenance. Keep these instruction for future reference.
COS-DIS6502
INSTALLATION GUIDE
TOP CONTROL DISHWASHER
"Loading the manual" means you need to wait until the file loads and becomes available for online reading. Some manuals are very large, and the time they take to appear depends on your internet speed.
Summary
Page 2 - THANK YOU FOR YOUR PURCHASE; product in the safest and most effective manner .; Contents
2 3 THANK YOU FOR YOUR PURCHASE Thank you for your purchase. We know that you have many brands andproducts to choose from and we are honored to know that you have decidedto take one of our products into your home and hope that you enjoy it. COSMO appliances are designed according to the strictest sa...
Page 3 - Top Control Dishwasher; Introduction; IMPORTANT SAFETY INSTRUCTIONS; WARNING; Basic precautions before use:; SAVE THESE INSTRUCTIONS; Features; Upper rack in upper position
4 5 Top Control Dishwasher Introduction IMPORTANT SAFETY INSTRUCTIONS WARNING When using your dishwasher, follow basic safety precautions, including the following: 1 Read these instructions. 2 Keep these instructions. 3 Heed all warnings. 4 Follow all instructions. 5 Clean only with a damp cloth. 6 ...
Page 4 - Interior; Setting up your dishwasher; Finding a suitable location
6 7 Package contents • Dishwasher• Hose• Hose clamp• Top mounting clips (2)• Wood screws (4) • User Guide• Installation Guide Interior Control panel Note: You need to purchase the installation kit in order to install your dishwasher. # ITEM DESCRIPTION 1 Cycles Select a cycle based on the type of di...
Page 5 - Using your dishwasher; Using the control panel; Using the child lock
8 9 Using your dishwasher Using the control panel Your dishwasher’s control panel is located on the top edge of the door. The door must be opened to make settings andoperate the dishwasher. Cycles Select a cycle based on the type of dishes to be washed and the level of soil on the dishes. Cycle time...
Page 6 - Loading the upper rack; Loading the bottom rack; Adding a dish; Filling the detergent dispenser; Filling the rinse aid dispenser
10 11 Loading the upper rack The upper rack is designed for cups, glasses, small plates, bowls, and plastic items marked dishwasher-safe . For best results, place the items with the soiled sur face facing down or toward the center . Tilt them slightly for better drainage. Loading the bottom rack The...
Page 7 - Factors affecting performance; Maintaining your dishwasher; Cleaning the stainless steel panel
12 13 2 Add rinse aid until the liquid touches the indicated fill level. Do not overfill since this can cause over-sudsing. Wipe up any spills with a damp cloth. The dispenser holds enough for 35 to 140 washes, depending on the dial setting. 3 Replace the cap and turn it 1/4 turn clockwise. Factors ...
Page 8 - Take out the fabric filter.; Cleaning the air gap; Protecting your dishwasher for long periods of non-use; Flush the filters by holding; Replace the fabric filter.; Cleaning the door and tub gaskets
14 15 4 Take out the fabric filter. The inside of the dishwasher is self-cleaning under normal use. If needed, the tub gasket can be cleaned with a damp cloth. Use a brush to clean the opening in the end of the gasket. Cleaning the air gap If there is an air gap installed with your dishwasher, make ...
Page 9 - Troubleshooting; Error codes
16 17 Troubleshooting Refer to this table to correct minor issues before calling for service. Error codes t CODE MEANING POSSIBLE CAUSE E1 Longer inlet time • The water faucet is not opened• Water intake is restricted• Water pressure is too low• Drain hose was plugged. E4 Overflow A leak in the dish...
Page 10 - Specifications; WARRANTY AND SERVICE; For full warranty details on this product please visit:; Correct Disposal of this product:; IMPORTANT
18 19 Capacity Max 14 place settings Dimensions ( W × D × H) 23.9 × 26.5 × 33.7 in. (606 × 674 × 857 mm) Weight 86.6 lbs. (39.3 kg) Power requirements 120 V~60 Hz Current 8.4 A Water pressure Between 20 and 120 psi (138 and 827 kPa) Noise (dB) 51 dB Specifications WARRANTY AND SERVICE For full warra...