Canon MAXIFY MB2755 - User Manual

Canon MAXIFY MB2755 – User Manual, read for free online in PDF format. We hope this helps you resolve any issues you may have. If you have further questions, please contact us through the contact form.
XXXXXXXX
© CANON INC. 2015
2
FRANÇAIS
1. Download setup file.
2. Select connection method.
Select a printer connection method and click
Next
.
Follow the on-screen instructions to proceed the
setting.
When the screen below appears, the printer is
ready to use.
Click
Next
to continue installing the software.
3. Install software.
When the screen below appears, select the
software you want to install and click
Next
.
Follow the on-screen instructions to proceed the
setting.
Now your computer is connected to
printer.
a
Access the following URL in your web browser.
Windows PC users: you can also
open the file from the setup CD-
ROM.
The screen in
h
will appear when
you open the file from the CD-
ROM. Perform the remaining steps
in the same way as on the website.
b
Click
Set Up
.
c
Select the region where you purchased the product.
d
Select your product.
e
Click
Connecting to Computer, Smartphone or Tablet
.
f
Select your operating system.
g
Click
Download
to download the setup file.
* If a download security warning appears, allow your web
browser to continue downloading.
h
Open the downloaded file and click
Start Setup
.
i
Follow the on-screen instructions to proceed the setup.
You can connect the printer to a PC/smartphone/tablet and install software.
Have you finished all the steps in the
Getting Started 1
?
Please read this manual after completing the printer setup in the
Getting Started 1
.
N O T E
ENGLISH
Using wireless router
Not using/having wireless router
Proceed to connect printer to
•
Did you select wireless LAN connection in
Getting Started 1
?
• Using wireless router
Turn on Wi-Fi on your smartphone or tablet before you start.
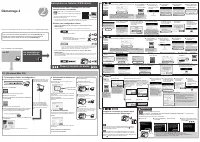
2. Check your network configuration.
1. Install Canon PRINT Inkjet/SELPHY to your
smartphone/tablet.
Proceed to right side.
Smartphone or
Tablet
PC
* This procedure is described based on Canon PRINT Inkjet/SELPHY 2.2.0. In other versions, follow
the application instructions to complete the setup.
: Search "Canon PRINT" in App Store.
: Search "Canon PRINT" in Google Play.
Or access the website by scanning the code on the right.
Getting Started 2
a
Tap
Settings
on the home
screen.
a
Tap
Settings
on the home
screen.
c
Tap
which
was installed.
c
Tap
which
was installed.
b
Tap
Canon_ij_XXXX
on the Wi-Fi setting.
b
Tap
Canon_ij_XXXX
on the Wi-Fi setting.
If
Canon_ij_XXXX
does not appear on the list, see NOTE
to setup the printer and wait until
Canon_ij_XXXX
appears.
XXXX varies depending on your printer.
The extended
survey screen
appears on the
first startup.
The extended
survey screen
appears on the
first startup.
If
Canon_ij_XXXX
does not appear on the list, see NOTE
to setup the printer and wait until
Canon_ij_XXXX
appears.
XXXX varies depending on your printer.
The license
agreement screen
appears on the
first startup.
If the screen in
b
does
not appear, see NOTE
to setup the printer and
wait until the screen
appears.
If none of these screens appears, see "If
Select Router
screen appears".
If the printer is not
detected and an error
message appears on the
printer, tap
OK
and start
over from
a
.
If the printer is not detected and
an error message appears on
the printer, tap
OK
and start over
from
a
.
d
Tap the printer icon
on the top left of the
screen.
d
Tap the printer icon
on the top left of the
screen.
h
Tap
OK
.
i
Select the SSID of your
wireless router connected
to your device.
j
When a password entry
screen appears, enter
the password for your
wireless router and tap
OK
.
k
Wait for a while until the
printer is detected.
l
When the printer is
detected, tap your
printer's model name.
m
Enter the printer name
as needed and tap
OK
.
n
When the printer
information appears
on the screen, the
setup is complete.
e
Tap
Register Printer
.
e
Tap
Register Printer
.
f
Tap
Printer Setup
.
f
Tap
Printer Setup
.
g
Tap
Connect via
wireless router
(recommended)
.
g
Tap
Direct
Connection
.
j
Tap
Settings
on
the home screen.
m
Tap
.
h
Tap
OK
.
i
Check the SSID and password
and tap
Copy Password
.
o
Wait for a while until the
printer is detected.
n
Tap
Done
.
k
Tap the same SSID as
checked in
i
.
l
Paste the password
and tap
Join
.
p
When the printer is detected, tap
your printer's model name.
q
Enter the printer name as
needed and tap
OK
.
r
When the printer information
appears on the screen, the
setup is complete.
If
Canon_ij_XXXX
does not appear:
If a message saying "
Printer is not registered. Perform printer setup?
" does not appear at Canon PRINT
Inkjet/SELPHY startup:
Do the following on the printer.
a
Tap
OK
.
c
Tap
OK
.
d
Go back to Canon PRINT
Inkjet/SELPHY and start
over from
a
in / / .
b
Tap
Cableless setup
.
When you start up Canon PRINT Inkjet/SELPHY, the printer is detected
automatically. See -
l
to perform the remaining steps.
When you start up Canon PRINT Inkjet/SELPHY, a dialog asking you to
setup a printer appears.
The printer will be detected by following the on-screen instructions. See
-
e
to perform the remaining steps.
a
Tap
which was
installed.
b
Tap
Yes
.
Make sure the SSID
of the desired wireless
router appears and tap
Yes
.
Enter the password of
the wireless router and
tap
OK
.
Tap
Yes
.
Tap
OK
.
Do the following if this screen appears.
•
When the SSID of the desired wireless router
appears, tap it.
Make sure your device is connected to the
same SSID.
•
If the SSID of the desired wireless router does
not appear or you are not sure, tap
If no target
wireless router
.
If Select Router screen appears:
c
Follow the on-screen instruction.
d
Wait for a while
until the printer is
detected.
e
When the printer is
detected, tap your
printer's model name.
f
Enter the printer
name as needed and
tap
OK
.
g
When the printer
information appears
on the screen, the
setup is complete.
PC (Windows/Mac OS)
Smartphone/Tablet (iOS/Android)
•
Did you select wired LAN connection in
Getting Started 1
?
• Not using/having wireless router
(Connecting printer to device via wireless LAN
connection directly)
* If you connect your device to the printer via wireless LAN connection directly, you
may be unable to access the Internet with your device or may be charged for an
Internet connection.
This procedure is for when the printer has been connected to a wireless router with an Ethernet
cable in
Getting Started 1
. Your smartphone or tablet must be connected to a wireless router via
Wi-Fi.
Select the same method as you did in
Getting Started 1
.
Wireless LAN Connection
Connect the printer to a network without any
cables.
Wired LAN Connection
Connect the printer to a network with an
Ethernet cable.
USB Connection
Connect the printer to your computer with a
USB cable. This is the easiest way. You only
can connect one printer.
/
When wired LAN connection is selected
in Getting Started 1:
Do the following if the screen in
a
does not appear.
1. Press the
HOME
button to display the HOME screen.
2. Flick the HOME screen and tap
LAN settings
,
Wireless LAN setup
and
Cableless setup
, and
then proceed to
c
above.
QT6-1201-V01
PRINTED IN XXXXXXXX
IMPRIMÉ XX XXXXXXXX
"Loading the manual" means you need to wait until the file loads and becomes available for online reading. Some manuals are very large, and the time they take to appear depends on your internet speed.
Was this manual helpful?
About this manual
- Brand
- Canon
- Model
- MAXIFY MB2755
- Document type
- User Manual
- Language(s)
- English, French
- Pages
- 2
- File size
- 4.2 MB
- Format
Other Manuals for Canon MAXIFY MB2755
Ask a question
Related manuals
Popular Canon Other
More Canon Other models
 Canon MAXIFY MB2155 User Manual
 Canon MAXIFY MB2320 User Manual
 Canon MAXIFY MB2340 User Manual
 Canon MAXIFY MB2350 User Manual
 Canon MAXIFY MB2740 User Manual
 Canon MAXIFY MB2750 User Manual
 Canon MAXIFY MB5020 User Manual
 Canon MAXIFY MB5050 User Manual
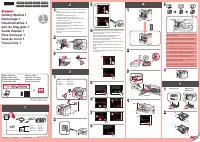 Canon MAXIFY MB5140 Manual
 Canon MAXIFY MB5150 User Manual
 Canon MAXIFY MB5155 User Manual
 Canon MAXIFY MB5320 User Manual