Page 2 - Indicazioni ambientali
2 Grazie per aver scelto questo prodotto. Siamo orgogliosi di offrirti un prodotto ideale per te e la miglior gamma completa di elettrodomestici per la vita di tutti i giorni. La lettura completa di questo libretto permetterà un utilizzo corretto e sicuro dell’apparecchiatura e darà anche utili co...
Page 6 - IN ALCUNI MODELLI; Collegamento idraulico
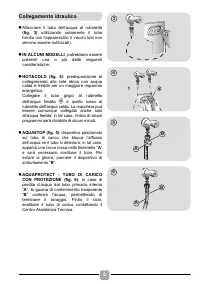
6 l Allacciare il tubo dell’acqua al rubinetto (fig. 3) utilizzando solamente il tubo fornito con l'apparecchio (i vecchi tubi non devono essere riutilizzati). l IN ALCUNI MODELLI , potrebbero essere presenti una o più delle seguenti caratteristiche: l HOT&COLD (fig. 4) : predisposizione al...
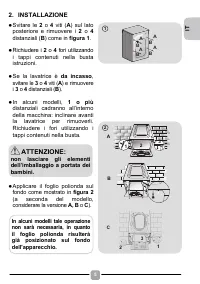
Page 7 - figura 8; .girare in senso orario il dado per; Posizionamento
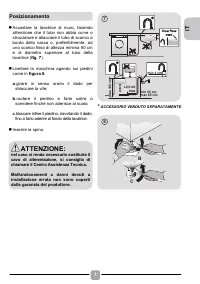
IT 7 l Accostare la lavatrice al muro, facendo attenzione che il tubo non abbia curve o strozzature e allacciare il tubo di scarico a bordo della vasca o, preferibilmente, ad uno scarico fisso di altezza minima 50 cm e di diametro superiore al tubo della lavatrice ( fig. 7 ). l Livellare la macc...
Page 8 - CASSETTO DETERSIVO; : per il detersivo del
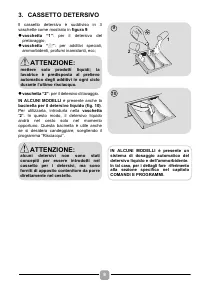
8 3. CASSETTO DETERSIVO Il cassetto detersivo è suddiviso in 3 vaschette come mostrato in figura 9 : l vaschetta “1” : per il detersivo del prelavaggio; l vaschetta “ ” : per additivi speciali, ammorbidenti, profumi inamidanti, ecc; l vaschetta “2” : per il detersivo di lavaggio. IN ALCUNI MODE...
Page 9 - CONSIGLI PRATICI; Indicazioni sul carico
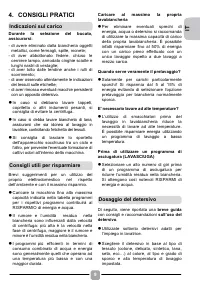
IT 9 4. CONSIGLI PRATICI Durante la selezione del bucato, assicurarsi: - di avere eliminato dalla biancheria oggetti metallici, come fermagli, spille, monete; - di aver abbottonato federe, chiuso le cerniere lampo, annodato cinghie sciolte e lunghi nastri di vestaglie; - di aver tolto dalle tendin...
Page 11 - EVITANDO; intervalli; PER I MODELLI CON SISTEMA DI; Riempire il cassetto con acqua calda.; Pulizia esterna dell'apparecchio
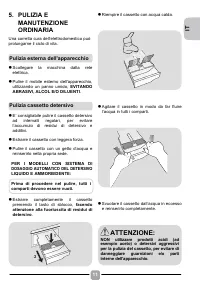
IT 11 5. PULIZIA E MANUTENZIONE ORDINARIA Una corretta cura dell’elettrodomestico può prolungarne il ciclo di vita. l Scollegare la macchina dalla rete elettrica. l Pulire il mobile esterno dell'apparecchio, utilizzando un panno umido, EVITANDO ABRASIVI, ALCOL E/O DILUENTI . l E’ consigliabile ...
Page 12 - L'apparecchio è dotato di uno speciale; Suggerimenti; estrarre
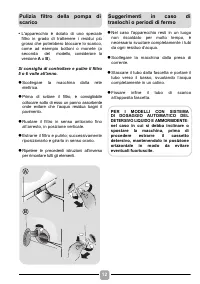
12 • L'apparecchio è dotato di uno speciale filtro in grado di trattenere i residui più grossi che potrebbero bloccare lo scarico, come ad esempio bottoni o monete (a seconda del modello, considerare la versione A o B ). Si consiglia di controllare e pulire il filtro 5 o 6 volte all'anno. l Scoll...
Page 14 - Premere il tasto di avvio programma.; Pressione dell’impianto idraulico:; vedere targhetta dati.; PROGRAMMI; la fine del ciclo di lavaggio
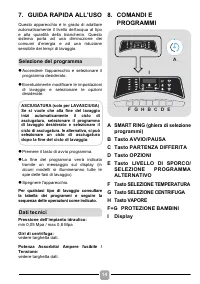
14 7. GUIDA RAPIDA ALL'USO Questo apparecchio è in grado di adattare automaticamente il livello dell’acqua al tipo e alla quantità della biancheria. Questo sistema porta ad una diminuzione dei consumi d’energia e ad una riduzione sensibile dei tempi di lavaggio. l Accendere l'apparecchio e selezi...
Page 15 - Prima accensione
IT 15 l Ruotando lo SMART RING l'apparecchio si accenderà e il display visualizzerà la descrizione e i parametri del programma selezionato. l A fine ciclo ricordarsi di spegnere l'apparecchio ruotando lo SMART RING sulla posizione OFF , togliere la spina e chiudere il rubinetto dell’acqua. - Imp...
Page 18 - (attiva solo in alcuni; Tasto VAPORE
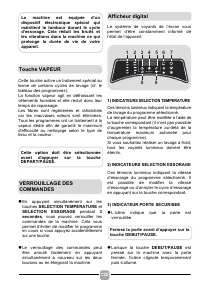
18 Questo tasto permette di accodare ad alcuni cicli di lavaggio uno specifico trattamento vapore (vedi tabella programmi). La funzione vapore agisce sui capi bagnati rilassando le pieghe, riducendo quindi i tempi di stiratura. Le fibre vengono rigenerate e rinfrescate eliminando i cattivi odori d...
Page 21 - Note da considerare; INFORMAZIONI PER I; PROGRAMMI DI PROVA SECONDO
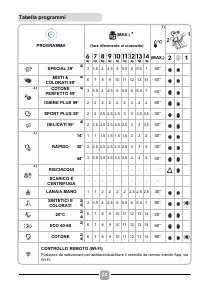
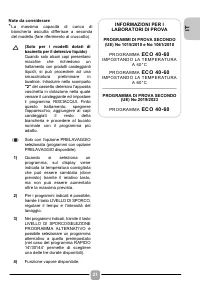
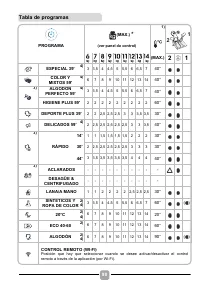
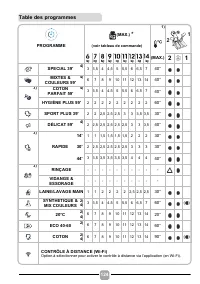
IT 21 Note da considerare * La massima capacità di carico di biancheria asciutta differisce a seconda del modello (fare riferimento al cruscotto). (Solo per i modelli dotati di bacinella per il detersivo liquido) Quando solo alcuni capi presentano macchie che richiedono un trattamento con prodotti...
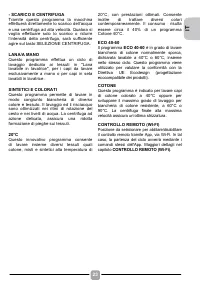
Page 22 - RISCIACQUI/SCARICO E CENTRIFUGA; Descrizione programmi; deve
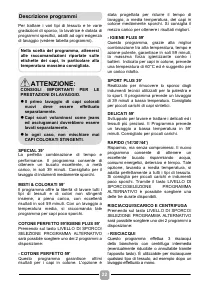
22 Per trattare i vari tipi di tessuto e le varie gradazioni di sporco, la lavatrice è dotata di programmi specifici, adatti ad ogni esigenza di lavaggio (vedere tabella programmi). SPECIAL 39' La perfetta combinazione di tempo e performance. Il programma consente di ottenere un bucato eccellente,...
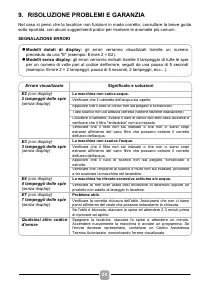
Page 24 - RISOLUZIONE PROBLEMI E GARANZIA; SEGNALAZIONE ERRORI; Errore visualizzato; Significato e soluzioni; lampeggìi delle spie; lampeggìi delle spie; lampeggìi delle spie; Modelli dotati di display:; gli errori verranno visualizzati tramite un numero; Modelli senza display:
24 9. RISOLUZIONE PROBLEMI E GARANZIA Nel caso si pensi che la lavatrice non funzioni in modo corretto, consultare la breve guida sotto riportata, con alcuni suggerimenti pratici per risolvere le anomalie più comuni. SEGNALAZIONE ERRORI Errore visualizzato Significato e soluzioni E2 (con display) ...
Page 28 - Inhalt
28 Vielen Dank, dass Sie sich für dieses Produkt entschieden haben. Wir freuen uns, Ihnen das ideale Produkt und das bestmögliche, vollständige Sortiment an Haushaltsgeräten für Ihren Alltag bieten zu können. Bitte nehmen Sie sich vor der Installation und vor dem ersten Gebrauch unbedingt ausreich...
Page 29 - SICHERHEITSHINWEISE
DE 29 1. GENERELLE SICHERHEITSHINWEISE l Dieses Gerät ist ausschließlich für den Haushaltsgebrauch konzipiert bzw. für den haushaltsnahen Gebrauch, wie z.B: - Teeküchen für das Personal von Büros, Geschäften oder ähnlichen Arbeitsbereichen; - Ferienhäuser; - Gäste von Hotels, Motels und anderen W...
Page 32 - Wasseranschluss
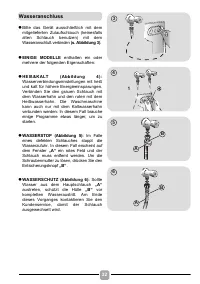
32 l Bitte das Gerät ausschließlich mit dem mitgelieferten Zulaufschlauch (keinesfalls alten Schlauch benutzen) mit dem Wasseranschluß verbinden (s. Abbildung 3) . l EINIGE MODELLE enthalten ein oder mehrere der folgenden Eigenschaften: l H E I ß & K A L T ( A b b i l d u n g 4 ) : Wasserve...
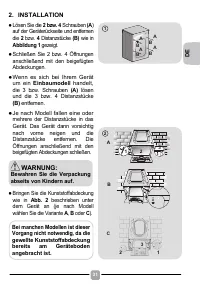
Page 33 - Abbildung 8; Drehen Sie die Schraubenmuttern im; selber
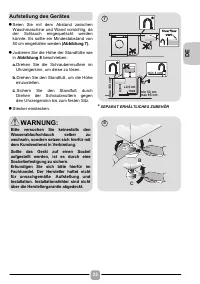
DE 33 l Seien Sie mit dem Abstand zwischen Waschmaschine und Wand vorsichtig, da der Schlauch eingequetscht werden könnte. Es sollte ein Mindestabstand von 50 cm eingehalten werden (Abbildung 7). l Justieren Sie die Höhe der Standfüße wie in Abbildung 8 beschrieben: a. Drehen Sie die Schraubenmu...
Page 34 - WASCHMITTELSCHUBLADE; JE NACH MODELL
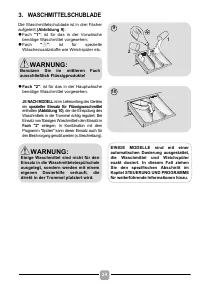
34 3. WASCHMITTELSCHUBLADE Die Waschmittelschublade ist in drei Fächer aufgeteilt (Abbildung 9) : l Fach "1" : ist für das in der Vorwäsche benötige Waschmittel vorgesehen; l Fach " " : ist für spezielle Wäschezusatzstoffe wie Weichspüler etc. l Fach "2" : ist für das in...
Page 35 - PRAKTISCHE TIPPS; Beladungstipps
DE 35 4. PRAKTISCHE TIPPS Beim Sortieren der Wäsche, beachten Sie folgende Punkte: - Wurden metallische Objekte aus der Wäsche entfernt; - Reißverschlüsse geschlossen; - Kissen auf links gezogen; - Clips von Vorhängen entfernt; - Waschanweisungen auf Schildchen in der Kleidung gelesen. l Wir empf...
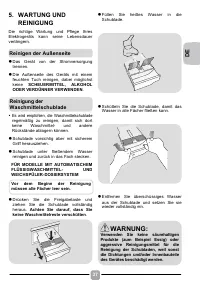
Page 37 - REINIGUNG; Es wird empfohlen, die Waschmittelschublade; Reinigen der Außenseite
DE 37 5. WARTUNG UND REINIGUNG Die richtige Wartung und Pflege Ihres Elektrogeräts kann seine Lebensdauer verlängern. l Das Gerät von der Stromversorgung trennen. l Die Außenseite des Geräts mit einem feuchten Tuch reinigen, dabei möglichst keine SCHEUERMITTEL, ALKOHOL ODER VERDÜNNER VERWENDEN ....
Page 38 - Reinigen des Pumpenfilters; UND
38 • Das Gerät hat einen besonderen Filter, der größere Rückstände wie Knöpfe oder Geldstücke zurückhält, die das Ablaufsystem verstopfen könnten (befolgen Sie je nach Modell die Version A oder B ). Es wird empfohlen, den Filter fünf- oder sechsmal im Jahr zu reinigen. l Das Gerät von der Stromve...
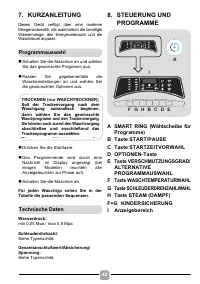
Page 40 - PROGRAMME; A SMART RING (Wählscheibe für
40 7. KURZANLEITUNG Dieses Gerät verfügt über eine moderne Mengenautomatik, die automatisch die benötigte Wassermenge, den Energieverbrauch und die Waschdauer anpasst. l Schalten Sie die Maschine an und wählen Sie das gewünschte Programm aus. l Passen Sie gegebenenfalls die Wascheinstellungen an...
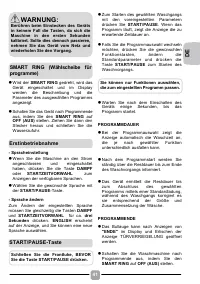
Page 41 - Erstinbetriebnahme
DE 41 l Wird der SMART RING gedreht, wird das Gerät eingeschaltet und im Display werden die Beschreibung und die Parameter des ausgewählten Programms angezeigt. l Schalten Sie das Gerät nach Programmende aus, indem Sie den SMART RING auf OFF (AUS) stellen. Ziehen Sie dann den Stecker heraus und ...
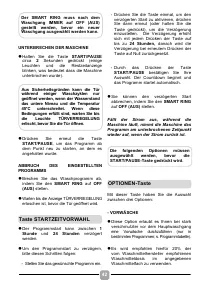
Page 42 - Taste STARTZEITVORWAHL
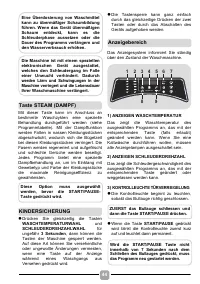
42 UNTERBRECHEN DER MASCHINE l Halten Sie die Taste START/PAUSE circa 2 Sekunden gedrückt (einige Leuchten und die Restzeitanzeige blinken, was bedeutet dass die Maschine unterbrochen wurde). l Drücken Sie erneut die Taste START/PAUSE , um das Programm ab dem Punkt neu zu starten, an dem es ange...
Page 43 - Taste WASCHTEMPERATURWAHL
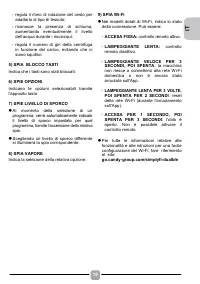
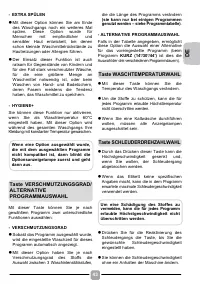
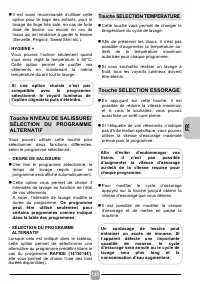
DE 43 - EXTRA SPÜLEN l Mit dieser Option können Sie am Ende des Waschgangs noch ein weiteres Mal spülen. Diese Option wurde für Menschen mit empfindlicher und sensibler Haut entwickelt, bei denen schon kleinste Waschmittelrückstände zu Hautreizungen oder Allergien führen. l Der Einsatz dieser Fu...
Page 44 - KINDERSICHERUNG
44 Mit dieser Taste kann im Anschluss an bestimmte Waschzyklen eine spezielle Behandlung durchgeführt werden (siehe Programmtabelle). Mit der Dampffunktion werden Falten in nassen Kleidungsstücken abgeschwächt, wodurch sich die Bügelzeit bei diesen Kleidungsstücken verringert. Die Fasern werden re...
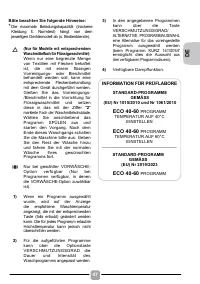
Page 47 - Bitte beachten Sie folgende Hinweise:; INFORMATION FÜR PRÜFLABORE; GEMÄSS
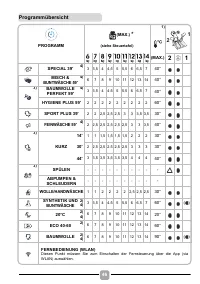
DE 47 Bitte beachten Sie folgende Hinweise: * Die maximale Beladungskapazität (trockene Kleidung lt. Normtest) hängt von dem jeweiligen Gerätemodell ab (s. Bedienblende). (Nur für Modelle mit entsprechendem Waschmittelfach für Flüssigwaschmittel) Wenn nur eine begrenzte Menge von Textilien mit Fle...
Page 48 - Programmbeschreibungen; WICHTIGER
48 Zur Reinigung unterschiedlicher Gewebesorten und Verschmutzungen bietet die Waschmaschine eigene programme an, die allen Anforderungen gerecht werden (siehe Programmtabelle). SPECIAL 39’ Die perfekte Kombination aus Zeitersparnis und Leistung. Dieses Programm wäscht halbe Waschladungen in nur 3...
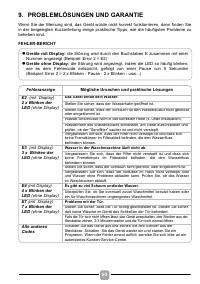
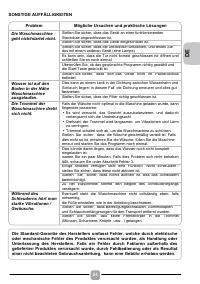
Page 50 - PROBLEMLÖSUNGEN UND GARANTIE; Fehleranzeige; Mögliche Ursachen und praktische Lösungen; Geräte mit Display:; die Störung wird durch den Buchstaben E zusammen mit einer; Geräte ohne Display:; die Störung wird angezeigt, indem die LED so häufig blinken,
50 9. PROBLEMLÖSUNGEN UND GARANTIE Wenn Sie der Meinung sind, das Gerät würde nicht korrekt funktionieren, dann finden Sie in der beigelegten Kurzanleitung einige praktische Tipps, wie die häufigsten Probleme zu beheben sind. FEHLER-BERICHT Fehleranzeige Mögliche Ursachen und praktische Lösungen E...
Page 52 - Wir schließen die Haftung für alle evtl.; Garantie; Garantiebedingungen
52 Es empfiehlt sich immer Originalersatzteile zu benutzen, die in unseren autorisierten Kundendienstzentren erhältlich sind. Mit der Anbringung des -Zeichens am Gerät zeigen wir an, dass wir sämtliche für dieses Produkt geltenden und notwendigen europäischen Sicherheits-, Gesundheits- und Umwelts...
Page 54 - Only use the washing machine after; Contents
54 Thank you for choosing this product. We are proud to offer the ideal product for you and the best complete range of home appliances for your daily routine. Carefully read this manual for correct and safe appliance use and for helpful tips on efficient maintenance. Only use the washing machine a...
Page 55 - RULES
EN 55 1. GENERAL SAFETY RULES l This appliance is intended to be used in household and similar applications such as: - Staff kitchen areas in shops, offices and other working environments; - Farm houses; - By clients in hotels, motels and other residential type environments; - Bed and breakfast t...
Page 58 - SOME MODELS; Hydraulic connections
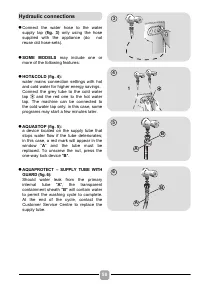
58 l Connect the water hose to the water supply tap (fig. 3) only using the hose supplied with the appliance (do not reuse old hose-sets). l SOME MODELS may include one or more of the following features: l HOT&COLD (fig. 4): water mains connection settings with hot and cold water for higher...
Page 59 - figure 8; turn the nut clockwise to release the; the
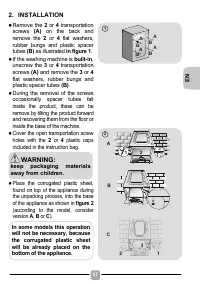
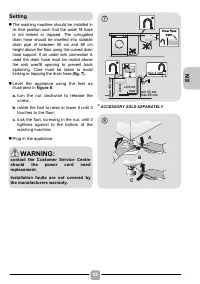
EN 59 l The washing machine should be installed in its final position such that the water fill hose is not kinked or trapped. The corrugated drain hose should be inserted into suitable drain pipe of between 50 cm and 85 cm height above the floor using the curved drain hose support. If an under si...
Page 60 - DETERGENT DRAWER; for
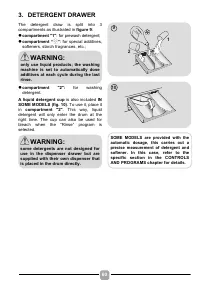
60 3. DETERGENT DRAWER The detergent draw is split into 3 compartments as illustrated in figure 9 : l compartment "1" : for prewash detergent; l compartment “ ” : for special additives, softeners, starch fragrances, etc.; l compartment "2": for washing detergent. A liquid deterg...
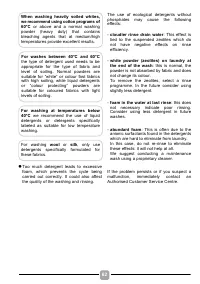
Page 61 - Useful advice for saving
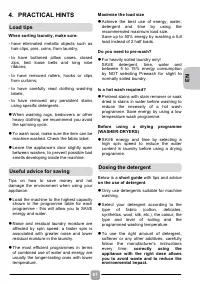
EN 61 4. PRACTICAL HINTS When sorting laundry, make sure: - have eliminated metallic objects such as hair clips, pins, coins, from laundry; - to have buttoned pillow cases, closed zips, tied loose belts and long robe ribbons; - to have removed rollers, hooks or clips from curtains; - to have caref...
Page 63 - MAINTENANCE; AVOIDING; Cleaning the appliance’s exterior
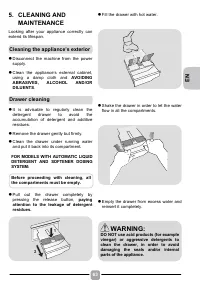
EN 63 5. CLEANING AND MAINTENANCE Looking after your appliance correctly can extend its lifespan. l Disconnect the machine from the power supply. l Clean the appliance’s external cabinet, using a damp cloth and AVOIDING ABRASIVES, ALCOHOL AND/OR DILUENTS . l It is advisable to regularly clean t...
Page 64 - Cleaning the pump filter; keeping
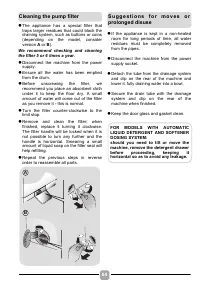
64 l The appliance has a special filter that traps larger residues that could block the draining system, such as buttons or coins (depending on the model, consider version A or B ). We recommend checking and cleaning the filter 5 or 6 times a year. l Disconnect the machine from the power supply....
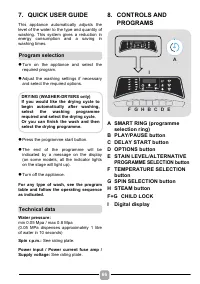
Page 66 - QUICK USER GUIDE; Press the programme start button.; PROGRAMS; A SMART RING (programme; Technical data
66 7. QUICK USER GUIDE This appliance automatically adjusts the level of the water to the type and quantity of washing. This system gives a reduction in energy consumption and a saving in washing times. l Turn on the appliance and select the required program. l Adjust the washing settings if nec...
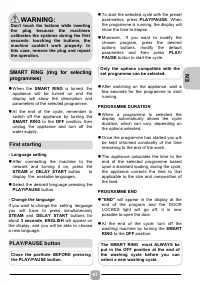
Page 67 - First starting
EN 67 l When the SMART RING is turned, the appliance will be turned on and the display will show the description and parameters of the selected programme. l At the end of the cycle, remember to switch off the appliance by turning the SMART RING to the OFF position, then unplug the appliance and ...
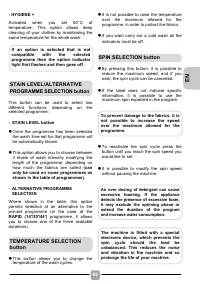
Page 69 - SPIN SELECTION button
EN 69 - HYGIENE + Activated when you set 60°C of temperature. This option allows deep cleaning of your clothes by maintaining the same temperature for the whole wash. This button can be used to select two different functions, depending on the selected programme: - STAIN LEVEL button l Once the pr...
Page 70 - (function active only on; STEAM button
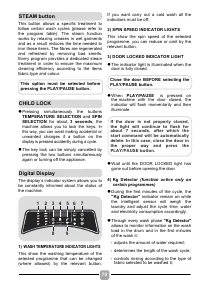
70 This button allows a specific treatment to follow certain wash cycles (please refer to the program table). The steam function works by relaxing creases in wet garments and as a result reduces the time needed to iron these items. The fibres are regenerated and refreshed by removing bad smells. E...
Page 73 - Please read these notes:; INFORMATION FOR THE TEST; STANDARD PROGRAMMES
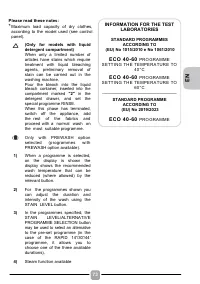
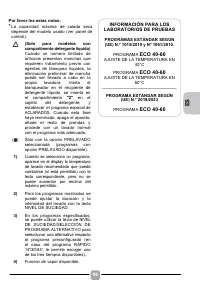
EN 73 Please read these notes: * Maximum load capacity of dry clothes, according to the model used (see control panel). (Only for models with liquid detergent compartment) When only a limited number of articles have stains which require treatment with liquid bleaching agents, preliminary removal o...
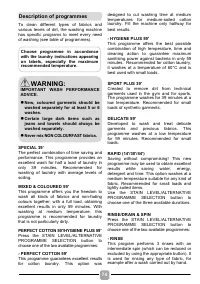
Page 74 - designed to cut washing time at medium; Description of programmes; Never mix NON COLOURFAST fabrics.
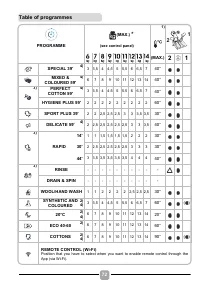
74 To clean different types of fabrics and various levels of dirt, the washing machine has specific programs to meet every need of washing (see table of programmes). SPECIAL 39’ The perfect combination of time saving and performance. This programme provides an excellent wash for half a load of lau...
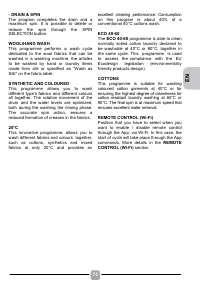
Page 75 - COTTONS
EN 75 - DRAIN & SPIN The program completes the drain and a maximum spin. It is possible to delete or reduce the spin through the SPIN SELECTION button. WOOL/HAND WASH This programme performs a wash cycle dedicated to the wool fabrics that can be washed in a washing machine, the articles to be ...
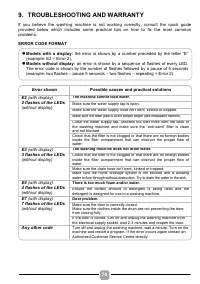
Page 76 - TROUBLESHOOTING AND WARRANTY; ERROR CODE FORMAT; Models with a display:; the error is shown by a number preceded by the letter “E”; Models without display:; an error is shown by a sequence of flashes of every LED.
76 9. TROUBLESHOOTING AND WARRANTY If you believe the washing machine is not working correctly, consult the quick guide provided below which includes some practical tips on how to fix the most common problems. ERROR CODE FORMAT Error shown Possible causes and practical solutions E2 (with display) ...
Page 80 - Índice
80 Gracias por haber elegido este producto. Estamos orgullosos de ofrecer el producto ideal para ti y la mejor gama completa de electrodomésticos para tu rutina diaria. Lea atentamente este manual de instrucciones para aprender a usar la lavadora de manera correcta y segura y para obtener consejos...
Page 81 - SEGURIDAD
ES 81 1. NORMAS DE SEGURIDAD l Este producto es exclusivamente para uso doméstico o similar: − zona de cocina para el personal de tiendas, oficinas y otros entornos laborales; − granjas; − pasajeros de hoteles, moteles u otros entornos residenciales; − hostales (B&B). No se recomienda el uso ...
Page 82 - Conexiones
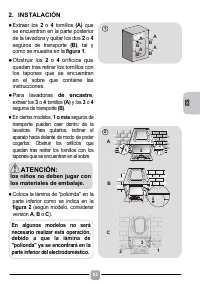
82 l La capacidad máxima de colada seca depende del modelo usado (ver panel de control). l Para consultar la ficha del producto, visitar la web del fabricante. l Los detalles técnicos (suministro de corriente y entrada de alimentación) están indicados en la placa de características del producto...
Page 84 - ALGUNOS MODELOS; Conexión a la red de agua
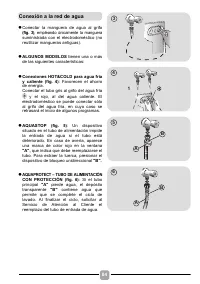
84 l Conectar la manguera de agua al grifo (fig. 3) , empleando únicamente la manguera suministrada con el electrodoméstico (no reutilizar mangueras antiguas). l ALGUNOS MODELOS tienen una o más de las siguientes características: l Conexiones HOT&COLD para agua fría y caliente (fig. 4) : Fa...
Page 85 - por
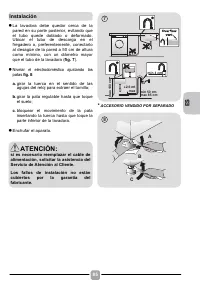
ES 85 l La lavadora debe quedar cerca de la pared en su parte posterior, evitando que el tubo quede doblado o deformado. Ubicar el tubo de descarga en el fregadero o, preferentemente, conectarlo al desagüe de la pared a 50 cm de altura como mínimo, con un diámetro mayor que el tubo de la lavadora...
Page 86 - DETERGENTE; CON ALGUNOS MODELOS
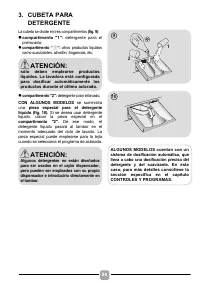
86 3. CUBETA PARA DETERGENTE La cubeta se divide en tres compartimentos (fig. 9) : l compartimento "1": detergente para el prelavado; l compartimento “ ”: otros productos líquidos como suavizantes, almidón, fragancias, etc; l compartimento "2": detergente para el lavado. CON ALG...
Page 87 - CONSEJOS PRÁCTICOS
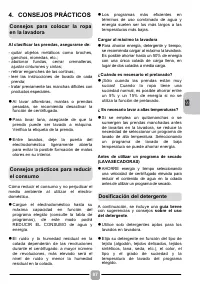
ES 87 4. CONSEJOS PRÁCTICOS Al clasificar las prendas, asegurarse de: - quitar objetos metálicos como broches, ganchos, monedas, etc.; - abotonar fundas, cerrar cremalleras, ajustar cinturones y cintas; - retirar enganches de las cortinas; - leer las instrucciones de lavado de cada prenda; - trata...
Page 89 - MANTENIMIENTO; Se recomienda limpiar periódicamente el; PARA LOS MODELOS CON SISTEMA; Llene el cajetín con agua caliente.; Limpieza; ni
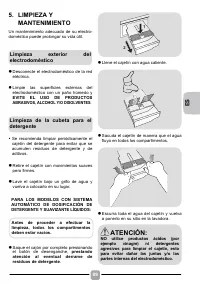
ES 89 5. LIMPIEZA Y MANTENIMIENTO Un mantenimiento adecuado de su electro-doméstico puede prolongar su vida útil. l Desconecte el electrodoméstico de la red eléctrica. l Limpie las superficies externas del electrodoméstico con un paño húmedo y EVITE EL USO DE PRODUCTOS ABRASIVOS, ALCOHOL Y/O DIS...
Page 90 - Limpie el filtro de la bomba.; SUAVIZANTE
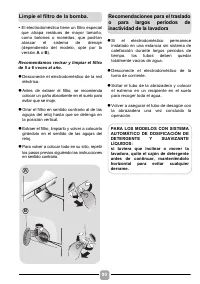
90 • El electrodoméstico tiene un filtro especial que atrapa residuos de mayor tamaño, como botones o monedas, que podrían atascar el sistema de drenaje (dependiendo del modelo, opte por la versión A o B ). Recomendamos revisar y limpiar el filtro de 5 a 6 veces al año. l Desconecte el electrodom...
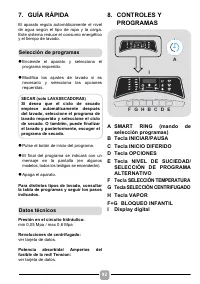
Page 92 - Pulse el botón de inicio del programa.; Presión en el circuito hidráulico:; ver tarjeta de datos.; PROGRAMAS; A SMART RING (mando de
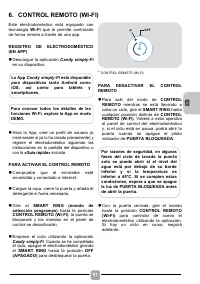
92 7. GUÍA RÁPIDA El aparato regula automáticamente el nivel de agua según el tipo de ropa y la carga. Este sistema reduce el consumo energético y el tiempo de lavado. l Enciende el aparato y selecciona el programa requerido. l Modifica los ajustes de lavado si es necesario y selecciona las opci...
Page 95 - Tecla SELECCIÓN TEMPERATURA
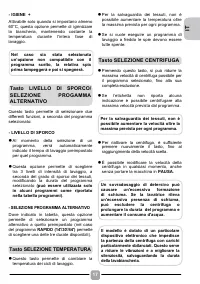
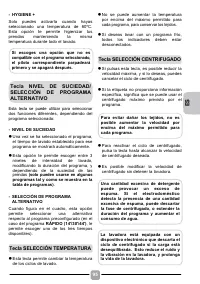
ES 95 - HYGIENE + Solo puedes activarla cuando hayas seleccionado una temperatura de 60ºC. Esta opción te permite higienizar tus prendas manteniendo la misma temperatura durante todo el lavado. Esta tecla se puede utilizar para seleccionar dos funciones diferentes, dependiendo del programa selecci...
Page 96 - ) INDICADOR PUERTA BLOQUEADA; (esta función solo se; Tecla VAPOR
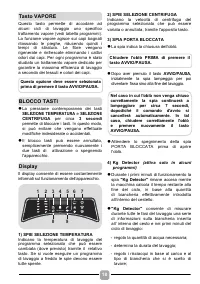
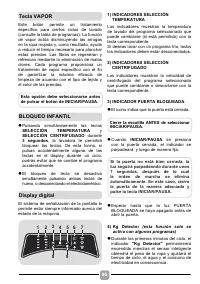
96 Este botón permite un tratamiento específico para ciertos ciclos de lavado (consulte la tabla de programas). La función de vapor actúa disminuyendo las arrugas en la ropa mojada y, como resultado, ayuda a reducir el tiempo necesario para planchar estas prendas. Las fibras se regeneran y refresc...
Page 100 - COLOR Y MIXTOS; Descripción de los programas
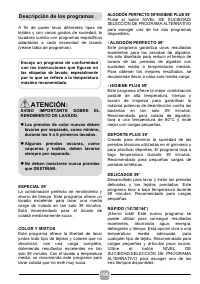
100 A fin de poder lavar diferentes tipos de tejidos y con varios grados de suciedad, la lavadora cuenta con programas específicos adaptados a cada necesidad de lavado (véase tabla de programas). ESPECIAL 39’ La combinación perfecta de rendimiento y ahorro de tiempo. Este programa ofrece un lavado...
Page 101 - SINTÉTICOS Y ROPA DE COLOR; El programa; ALGODÓN
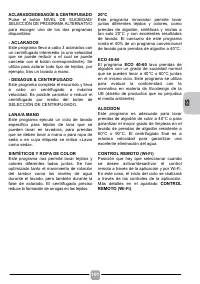
ES 101 ACLARADOS/DESAGÜE & CENTRIFUGADO Pulse el botón NIVEL DE SUCIEDAD/ SELECCIÓN DE PROGRAMA ALTERNATIVO para escoger uno de los dos programas disponibles: - ACLARADOS Este programa lleva a cabo 3 aclarados con un centrifugado intermedio (a una velocidad que se puede reducir o el cual se pu...
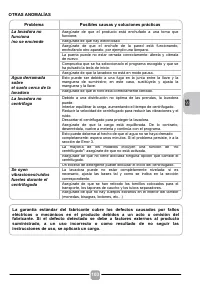
Page 102 - DIAGNÓSTICO DE AVERÍAS Y GARANTÍA; INFORME DE ERROR; Tipo de error; Posibles causas y soluciones prácticas; Cualquier otro código; Modelos con display:; el error se muestra como un número precedido por la letra; Modelos sin display:; El error se muestra con el parpadeo de cada LED tantas
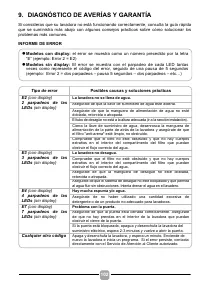
102 9. DIAGNÓSTICO DE AVERÍAS Y GARANTÍA Si consideras que su lavadora no está funcionando correctamente, consulta la guía rápida que se suministra más abajo con algunos consejos prácticos sobre cómo solucionar los problemas más comunes. INFORME DE ERROR Tipo de error Posibles causas y soluciones ...
Page 104 - Al mostrar el logo
104 Se recomienda siempre utilizar las piezas de recambio originales, que están disponibles en el Servicio de Atención al Cliente autorizado. Al mostrar el logo marcado en este producto, declaramos, bajo nuestra propia responsabilidad, el cumplimiento de todos los requisitos europeos en términos d...
Page 106 - Index
106 Merci d'avoir choisi ce produit. Nous sommes fiers d’offrir le produit idéal pour vous et la meilleure gamme complète d’électroménagers pour votre routine quotidienne. Lisez attentivement ce manuel pour une utilisation de votre produit en toute sécurité et bénéficier de conseils pratiques pour...
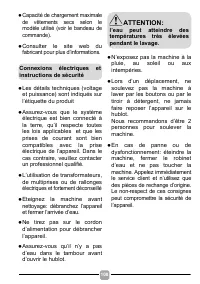
Page 110 - CERTAINS MODELES; Raccordement à l’eau
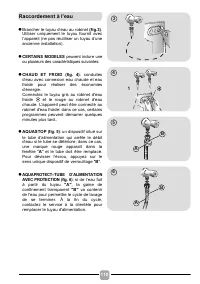
110 l Brancher le tuyau d’eau au robinet (fig.3) . Utiliser uniquement le tuyau fournit avec l’appareil (ne pas réutiliser un tuyau d’une ancienne installation). l CERTAINS MODELES peuvent inclure une ou plusieurs des caractéristiques suivantes: l CHAUD ET FROID (fig. 4) : conduites d’eau avec ...
Page 111 - Utilisez les pieds comme en; figure 8; pour régler la hauteur de l’appareil:; Positionnement
FR 111 l Au niveau du mur, faîtes attention à ce que le tuyau ne soit pas plié ou écrasé. Connectez-le de préférence à une évacuation murale d’au moins 50 cm de haut avec un diamètre plus grand que le tuyau de la machine à laver (fig. 7) . l Utilisez les pieds comme en figure 8 pour régler la ha...
Page 112 - TIROIR A DETERGENT
112 3. TIROIR A DETERGENT Le tiroir est divisé en 3 compartiments comme illustré en figure 9 : l compartiment « 1 » : pour la lessive destinée au prélavage; l compartiment « » : des additifs spéciaux: adoucisseurs, parfums, etc … ; l compartiment « 2 » sert pour la lessive destinée au lavage.. ...
Page 113 - CONSEILS PRATIQUES; Conseils de chargement
FR 113 4. CONSEILS PRATIQUES Lorsque vous triez le linge, assurez-vous: - avoir éliminé objets métalliques tels que barrettes, épingles, pièces de monnaie; - avoir boutonné les taies d’oreiller, fermez les fermetures éclair, accrochez les œillets et crochets, nouez les ceintures et les cordes des ...
Page 115 - NETTOYAGE; Nettoyage des bacs
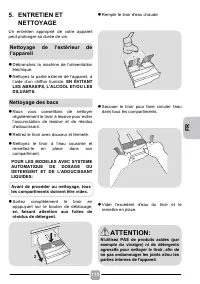
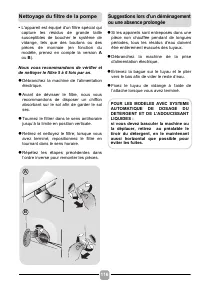
FR 115 5. ENTRETIEN ET NETTOYAGE Un entretien approprié de votre appareil peut prolonger sa durée de vie. l Débranchez la machine de l’alimentation électrique. l Nettoyez la partie externe de l’appareil, à l’aide d’un chiffon humide, EN ÉVITANT LES ABRASIFS, L’ALCOOL ET/OU LES DILUANTS. l Nous ...
Page 116 - Nettoyage du filtre de la pompe
116 • L'appareil est équipé d'un filtre spécial qui capture les résidus de grande taille susceptibles de boucher le système de vidange, tels que des boutons ou des pièces de monnaie (en fonction du modèle, prenez en compte la version A ou B ). Nous vous recommandons de vérifier et de nettoyer le f...
Page 118 - RAPIDE; Appuyez sur le bouton de départ.; PROGRAMMES
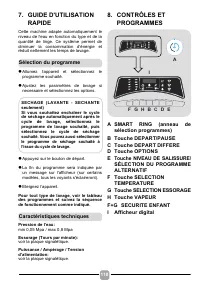
118 7. GUIDE D'UTILISATION RAPIDE Cette machine adapte automatiquement le niveau de l'eau en fonction du type et de la quantité de linge. Ce système permet de diminuer la consommation d'énergie et réduit nettement les temps de lavage. l Allumez l’appareil et sélectionnez le programme souhaité. l...
Page 119 - Premier démarrage
FR 119 l Lorsque le SMART RING est tourné, l’appareil sera allumé et l’afficheur indiquera la description et les paramètres du programme sélectionné. l À la fin du cycle, n’oubliez pas d’éteindre l’appareil en tournant le SMART RING sur la position OFF (ARRÊT) , puis débranchez l’appareil et cou...
Page 120 - Touche DEPART DIFFERE
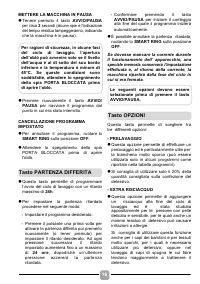
120 METTRE LA MACHINE EN PAUSE l Maintenez la touche DEPART/PAUSE enfoncée pendant 2 secondes environ (certains voyants et l’affichage du temps restant se mettront à clignoter, montrant ainsi que la machine est en pause). l Appuyez à nouveau sur la touche DEPART/PAUSE avant de redémarrer le prog...
Page 122 - Lorsque la touche; Touche VAPEUR
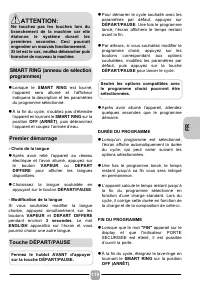
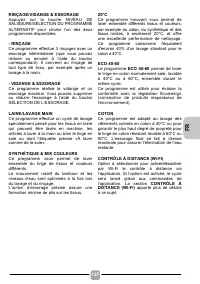
122 Cette touche active un traitement spécial au terme de certains cycles de lavage (cf. le tableau des programmes). La fonction vapeur agit en défroissant les vêtements humides et elle réduit donc leur temps de repassage. Les fibres sont régénérées et rafraîchies car les mauvaises odeurs sont éli...
Page 123 - (cette fonction est
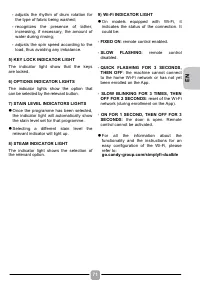
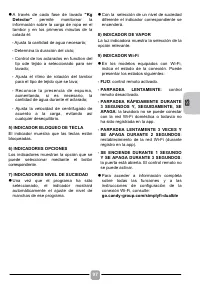
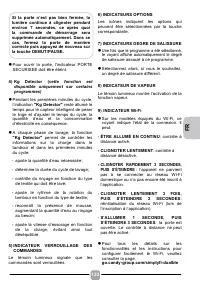
FR 123 l Pour ouvrir la porte, l'indicateur PORTE SECURISEE doit être éteint. 4) Kg Detector (cette fonction est disponible uniquement sur certains programmes) l Pendant les premières minutes du cycle, l’indication "Kg Detector" reste allumé le temps pour le capteur intelligent de peser ...
Page 126 - Description des programmes
126 Pour nettoyer différents types de tissu et niveaux de salissure, le lave-linge dispose de programmes spécifiques qui satisfont tous les besoins de lavage (voir tableau des programmes). SPECIAL 39’ La combinaison parfaite de gain de temps et de performance. Ce programme fournit un excellent lav...
Page 127 - SYNTHÉTIQUE & MIX COULEURS; Le programme; COTON; apporte plus de détails
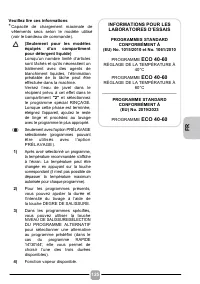
FR 127 RINÇAGE/VIDANGE & ESSORAGE Appuyez sur la touche NIVEAU DE SALISSURE/SÉLECTION DU PROGRAMME ALTERNATIF pour choisir l’un des deux programmes disponibles: - RINÇAGE Ce programme effectue 3 rinçages avec un essorage intermédiaire (que vous pouvez réduire ou annuler à l’aide du bouton corr...
Page 128 - DÉPANNAGE ET GARANTIES; RAPPORTS D’ERREURS; (pour l’affichage; (pour l’affichage
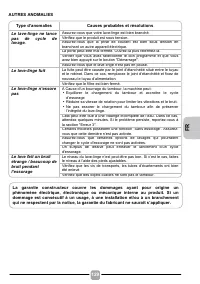
128 9. DÉPANNAGE ET GARANTIES Si vous constatez que votre lave-linge fonctionne mal, consultez le mini-guide ci-dessous qui vous indiquera commun les résoudre les problèmes communs. RAPPORTS D’ERREURS Type d’erreur Causes probables et résolutions E2 (pour l’affichage digital) 2 clignotements (affi...
Page 131 - fk hldsk