Page 2 - THANK YOU FOR MAKING CAFÉ A PART OF YOUR HOME.
2 49-1000211 Rev. 2 THANK YOU FOR MAKING CAFÉ A PART OF YOUR HOME. We take pride in the craftsmanship, innovation and design that goes into every Café product, and we think you will too. Among other things, registration of your appliance ensures that we can deliver important product information and ...
Page 3 - READ ALL INSTRUCTIONS BEFORE USING THE APPLIANCE; CAUTION; READ AND SAVE THESE INSTRUCTIONS; INSTALLATION; WARNING; EXPLOSION HAZARD
49-1000211 Rev. 2 3 SAFETY INFORMA TION IMPORTANT SAFETY INFORMATION READ ALL INSTRUCTIONS BEFORE USING THE APPLIANCE CAUTION To reduce the risk of injury when using your refrigerator, follow these basic safety precautions. Ŷ 'RQRWFOHDQJODVVVKHOYHVRUFRYHUVZLWKZDUP water when they are cold. Glass she...
Page 4 - PROPER DISPOSAL OF YOUR OLD REFRIGERATOR; ELECTRICAL SHOCK HAZARD; SUFFOCATION AND ENTRAPMENT HAZARD; Before You Throw Away Your Old Appliance; Refrigerant and Foam Disposal:
4 49-1000211 Rev. 2 SAFETY INFORMA T ION IMPORTANT SAFETY INFORMATION READ ALL INSTRUCTIONS BEFORE USING THE APPLIANCE READ AND SAVE THESE INSTRUCTIONS PROPER DISPOSAL OF YOUR OLD REFRIGERATOR Do not, under any circumstances, cut or remove the third (ground) prong from the power cord. For personal s...
Page 5 - Features; LED lighting; Removable/adjustable door bins; Water filter
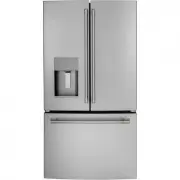
49-1000211 Rev. 2 5 Features USING THE REFRIGERA T O R: Features Space-saving icemaker (on some models) Icemaker and bin are located on the door creating more usable storage space. LED lighting LED lights in the fresh food compartment are located at the top center and on the left and right sides of ...
Page 6 - USING THE REFRIGERA; Controls
6 49-1000211 Rev. 2 USING THE REFRIGERA T O R: Controls Controls Freezer Compartment Temperature Control Adjust freezer compartment temperature. The freezer temperature is preset in the factory at 0°F (-17.8°C) . Allow 24 hours for temperature to stabilize to the preset recommended setting. Fresh Fo...
Page 10 - Models; Model
10 49-1000211 Rev. 2 USING THE REFRIGERA T O R : Sabbath Modes Sabbath Modes (on some models) Activate Sabbath Mode to turn off the temperature control and advanced features (ex. door alarm). Depending on the model, the interior lights will be off, or on low brightness regardless of whether the door...
Page 11 - Water & Ice Dispenser; To remove Dispenser Tray; Door Ice Bin; Dispenser
49-1000211 Rev. 2 11 Water & Ice Dispenser (See Controls) Press the glass gently against the dispenser cradle. The spill shelf is not self-draining. To reduce water spotting, the shelf should be cleaned regularly. If no water is dispensed when the refrigerator is first installed, there may be ai...
Page 12 - ter Filter Cartridge - XWFE; WATER FILTER CARTRIDGE; FILTER BYPASS PLUG; RESET WATER FILTER; Application Guidelines/Water Supply
12 49-1000211 Rev. 2 Water Filter Cartridge - XWFE (on some models) USING THE REFRIGERA T O R: W a ter Filter Cartridge - XWFE WATER FILTER CARTRIDGE The water filter cartridge holder is located in the back upper-right corner of the fresh food refrigerator compartment. Select models use radio freque...
Page 13 - ter Filter Cartridge / Shelves and Bins; Shelves and Bins; Rearranging the Refrigerator Shelves; To remove the shelves:; Adjustable Door Bins; Quick Space Shelf; Water Filter Cartridge - XWFE
49-1000211 Rev. 2 13 USING THE REFRIGERA T O R: W a ter Filter Cartridge / Shelves and Bins Shelves and Bins Rearranging the Refrigerator Shelves Shelves in the refrigerator compartment are adjustable. To remove the shelves: 1. Remove all items from the shelf. 2. Tilt the shelf up at the front. 3. L...
Page 14 - Climate Zone Pans; How to Remove and Replace Drawer Divider; Pans
14 49-1000211 Rev. 2 Pans Climate Zone Pans Keep fruits and vegetables organized in separate compartments for easy access. Excess water that may accumulate in the bottom of the drawers or under the drawers should be wiped dry. To remove pan: Slide the pan out to the stop position, lift the pan up an...
Page 15 - Freezer Drawer; FREEZER BASKETS; When replacing the basket,; Bottom Basket Removal; When replacing the bottom full-width basket,
49-1000211 Rev. 2 15 USING THE REFRIGERA T O R: Freezer Drawer Freezer Drawer (on some models) FREEZER BASKETS 1. An ice bucket in the top basket (on some models). 2. A top full-width basket. 3. A bottom full-width basket (with divider - in some models). NOTE: Do not fill baskets higher than the rim...
Page 16 - Automatic Icemaker; OFF; For Refrigerator Models with Icemaker in the Door; Ice Bucket and Dispenser; Automatic
16 49-1000211 Rev. 2 Automatic Icemaker A newly installed refrigerator may take 12 to 24 hours to begin making ice. Automatic Icemaker (on some models) The icemaker will produce seven cubes per cycle approximately 100–130 cubes in a 24-hour period, depending on freezer compartment temperature, room ...
Page 17 - Care and Cleaning; Cleaning the Inside; Unplug the refrigerator before cleaning.; CARE AND; DO NOT use Stainless Steel cleaners on the door surfaces.; DO USE
49-1000211 Rev. 2 17 Care and Cleaning Cleaning the Inside Cleaning the Outside Unplug the refrigerator before cleaning. If this is not practical, wring excess moisture out of sponge or cloth when cleaning around switches, lights or controls. Use an appliance wax polish on the inside surface between...
Page 18 - Preparing for Vacation; Replacing the Lights; Behind the Refrigerator
18 49-1000211 Rev. 2 For long vacations or absences, remove food and unplug the refrigerator. Clean the interior with a baking soda solution of one tablespoon (15 ml) of baking soda to one quart (1 liter) of water. Leave the doors open. If the temperature can drop below freezing, have a qualified se...
Page 19 - Refrigerator; TOOLS YOU MAY NEED; IMPORTANT; Note to Installer –; PREPARATION; MOVING THE REFRIGERATOR INDOORS; INST
49-1000211 Rev. 2 19 InstallationInstructions Refrigerator TOOLS YOU MAY NEED BEFORE YOU BEGIN Read these instructions completely and carefully. • IMPORTANT — Observe all governing codes and ordinances. Save these instructions for local inspector’s use. • Note to Installer – Be sure to leave these i...
Page 20 - Installation Instructions; APPLIANCE DIMENSIONS; A B C
20 49-1000211 Rev. 2 Installation Instructions MEASURE THE CABINET OPENING ACCORDING TO THE WIDTH OF THE REFRIGERATOR Measure width of cabinet opening where refrigerator will be placed, B. Be sure to account for any countertop overhang, baseboard thickness DQGDQ\FOHDUDQFHGHVLUHG:LGWK%VKRXOGQRWEHOHVV...
Page 21 - INSTALLING THE REFRIGERATOR; NOT
49-1000211 Rev. 2 21 INST ALLA TION INSTRUCTIONS REFRIGERATOR LOCATION Ŷ Do not install the refrigerator where the temperature will go below 60°F (16°C) because it will not run often enough to maintain proper temperatures. Ŷ Do not install the refrigerator where the temperature will go above 100°F (...
Page 22 - REMOVING FRENCH DOORS; IMPORTANT NOTES; Tape the doors shut with adhesive tape.; REMOVING; REMOVING LEFT DOOR
22 49-1000211 Rev. 2 Installation Instructions REMOVING FRENCH DOORS INSTALLING THE REFRIGERATOR (Cont.) IMPORTANT NOTES When removing french doors: • Read the instructions all the way through before starting. • Handles are included inside the refrigerator. • Place the screws by their related parts ...
Page 23 - For Ice and Water Models Only:; For NON Ice and Water Models Only:; For Ice and Water
49-1000211 Rev. 2 23 INST ALLA TION INSTRUCTIONS Installation Instructions 3 REMOVING CENTER HINGES AND BRACKETS A. 8VLQJD´$OOHQZUHQFKUHPRYHWKHKLQJH pins from the hinge brackets. B. 8VLQJD´VRFNHWUDWFKHWGULYHUUHPRYHWKH bolts securing the center hinge brackets to the cabinet. 2 REMOVING LEFT DOOR (con...
Page 24 - REINSTALLING FRENCH DOORS; REINSTALLING; REHANGING THE; REHANGING THE LEFT DOOR
24 49-1000211 Rev. 2 REINSTALLING FRENCH DOORS Installation Instructions IMPORTANT NOTES When replacing the french doors: • Read the instructions all the way through before starting. CAUTION Lifting Hazard. Single person lift can cause injury. Use assistance when handling, moving or lifting the refr...
Page 26 - REMOVING FREEZER DRAWER
26 49-1000211 Rev. 2 REMOVING FREEZER DRAWER Installation Instructions IMPORTANT NOTES When removing freezer drawer: • Read the instructions all the way through before starting. • Provide a non-scratching work surface for the doors. 1 REMOVE THE BASKETS A. Open the freezer drawer until it stops. B. ...
Page 27 - REINSTALL FREEZER DRAWER FRONT
49-1000211 Rev. 2 27 INST ALLA TION INSTRUCTIONS Installation Instructions 3 REINSTALL FREEZER DRAWER FRONT A. Pull the rail assemblies to the maximum extension. B. Locate the slots on the inside of each slide. C. I nsert the hooks on the ends of the drawer assembly extensions into the slots near th...
Page 28 - CONNECTING TO THE HOUSE WATER LINE; If you are using the Universal tubing,; ELECTRIC SHOCK HAZARD
28 49-1000211 Rev. 2 Installation Instructions INSTALLING THE REFRIGERATOR (Cont.) CONNECTING TO THE HOUSE WATER LINE (Icemaker models only) A cold water supply is required for automatic icemaker operation. If there is not a cold water supply, you will need to provide one. See Installing the Water L...
Page 29 - TURN ON THE WATER SUPPLY; LEVEL THE REFRIGERATOR; Adjustable legs; To adjust the leveling legs,; clockwise to raise
49-1000211 Rev. 2 29 INST ALLA TION INSTRUCTIONS TURN ON THE WATER SUPPLY (Icemaker models only) Turn the water on at the shutoff valve (house water supply) and check for any leaks. PLUG IN THE REFRIGERATOR On models with an icemaker, before plugging in the refrigerator, make sure the icemaker power...
Page 30 - Refrigerator suggested assembly; Shelves shown in the location for best energy efficiency.
30 49-1000211 Rev. 2 Installation Instructions Refrigerator suggested assembly Shelves shown in the location for best energy efficiency. NOTE: Do not block air outlet by placing food items directly against it. Erratic temperatures may result. CWE19S 19 cuft. Models French Door with Freezer Drawer CF...
Page 31 - INSTALLING THE WATER LINE; BEFORE YOU BEGIN
49-1000211 Rev. 2 31 INST ALLA TION INSTRUCTIONS Installation Instructions INSTALLING THE WATER LINE BEFORE YOU BEGIN If the water supply to the refrigerator is from a Reverse Osmosis Water Filtration System (RO)AND the refrigerator also has a water filter, use the refrigerator’s filter bypass plug....
Page 32 - WHAT YOU WILL NEED; CHOOSE THE VALVE LOCATION
32 49-1000211 Rev. 2 INSTALLING THE WATER LINE (Cont.) WHAT YOU WILL NEED (Cont.) NOTE: The only Crosley approved plastic tubing is that supplied in Universal Water Line Refrigerator Tubing Kits. Do not use any other plastic water supply line because the line is under pressure at all times. Certain ...
Page 33 - TIGHTEN THE PIPE CLAMP; FLUSH OUT THE TUBING
49-1000211 Rev. 2 33 INST ALLA TION INSTRUCTIONS Installation Instructions INSTALLING THE WATER LINE (Cont.) 4 FASTEN THE SHUTOFF VALVE Fasten the shutoff valve to the cold water pipe with the pipe clamp. NOTE: Commonwealth of Massachusetts Plumbing Codes 248CMR shall be adhered to. Saddle valves ar...
Page 34 - Normal Operating Conditions.; Before you call for service; Problem; TROUBLESHOOTING TIPS:; Normal Operating Conditions
34 49-1000211 Rev. 2 Newer refrigerators sound different from older refrigerators. Modern refrigerators have more features and use newer technology. HUMMM... WHOOSH... Ŷ The new high efficiency compressor may run faster and longer than your old refrigerator and you may hear a high-pitched hum or pul...
Page 35 - TROUBLESHOOTING TIPS
49-1000211 Rev. 2 35 TROUBLESHOOTING TIPS Troubleshooting Tips... Before you call for service Save time and money! Review the charts on the following pages first and you may not need to call for service. Problem Possible Causes What to Do Motor operates for long periods or cycles on and off frequent...
Page 38 - What Café Will Not Cover:; Café Refrigerator Limited Warranty; LIMITED W
38 49-1000211 Rev. 2 Ŷ Service trips to your home to teach you how to use the product. Ŷ,PSURSHULQVWDOODWLRQGHOLYHU\RUPDLQWHQDQFHŶ)DLOXUHRIWKHSURGXFWLILWLVDEXVHGPLVXVHGRU used for other than the intended purpose or used commercially. Ŷ/RVVRIIRRGGXHWRVSRLODJHŶ5HSODFHPHQWRIKRXVHIXVHVRUUHVHWWLQJRIFLUFX...
Page 39 - What GE Appliances will not cover:; For Purchases Made In Iowa:; For the period of; Contact us at; EXCLUSION OF IMPLIED WARRANTIES; Water Filter Cartridge XWFE Limited Warranty
49-1000211 Rev. 2 39 W A TER FIL TER LIMITED W ARRANTY Staple your receipt here. Proof of the original purchase date is needed to obtain service under the warranty . * If your GE Appliances par t fails because of a manufacturing defect within thir ty days from the date of original purchase for use, ...
Page 41 - GE WiFi Connect Optional*; GE WiFi Connect; ConnectPlus; Appliance Communication
49-1000211 Rev. 2 41 REGULATORY INFORMATIONFCC/IC Compliance Statement: This device complies with Part 15 of the FCC Rules. This device contains license-exempt transmitter(s)/receiver(s) that comply with Innovation, Science and Economic Development, Canada’s license-exempt RSS(s). Operation is subje...
Page 42 - CONSUMER SUPPORT
42 49-1000211 Rev. 2 Printed in United States CONSUMER SUPPORT Consumer Support Café Website Have a question or need assistance with your appliance? Try the Café website 24 hours a day, any day of the year! You can also shop for more great Café products and take advantage of all our on-line support ...
Page 43 - Réfrigérateur à congélateur inférieur; Contenu; Garantie limitée; Manuel d’utilisation et d’installation; FRANÇAIS
49-1000211 Rev. 2 07-20 GEA Transcrivez les numéros de modèle et de série ici : Numéro de modèle : _____________________ Numéro de série : _______________________ Vous trouverez ces numéros sur l’étiquette apposée sur le côté gauche à mi-hauteur du compartiment de réfrigération. Réfrigérateur à cong...
Page 44 - NOUS VOUS REMERCIONS D’ACCUEILLIR CAFÉ CHEZ VOUS; garantie pré-imprimée incluse dans l’emballage.
2 49-1000211 Rev. 2 NOUS VOUS REMERCIONS D’ACCUEILLIR CAFÉ CHEZ VOUS Nous sommes fiers du savoir-faire, de l’innovation et de l’esthétique qui composent chaque appareil Café, et nous pensons que vous le serez aussi. Dans cette optique, nous vous rappelons que l’enregistrement de votre électroménager...
Page 45 - LIRE ET CONSERVER CES INSTRUCTIONS; INFORMA; LISEZ TOUTES LES DIRECTIVES AVANT D'UTILISER L'APPAREIL; ATTENTION
49-1000211 Rev. 2 3 LIRE ET CONSERVER CES INSTRUCTIONS INSTALLATION AVERTISSEMENT RISQUE D’EXPLOSION. Conservez les matériaux et vapeurs inflammables tels que l’essence à l’écart de votre réfrigérateur. Une explosion, un incendie voire la mort pourrait en résulter. INFORMA TION DE SÉCURITÉ INFORMATI...
Page 46 - BRANCHEMENTS ÉLECTRIQUES; RISQUE DE CHOC ÉLECTRIQUE; MISE AU REBUT APPROPRIÉE DE VOTRE ANCIEN RÉFRIGÉRATEUR; INFORMATION DE SÉCURITÉ IMPORTANTES; RISQUE DE SUFFOQUER OU D’Y ÊTRE EMPRISONNÉ; Mise au rebut des produits réfrigérants et en mousse
4 49-1000211 Rev. 2 LIRE ET CONSERVER CES INSTRUCTIONS Ne coupez pas ou n’enlevez pas, sous aucun prétexte, la troisième broche de mise à la terre du cordon d’alimentation. Pour des raisons de sécurité, cet appareil doit être correctement mis à la terre. Le cordon d’alimentation de cet appareil est ...
Page 47 - Caractéristiques
49-1000211 Rev. 2 5 Caractéristiques UTILISA TION DU RÉFRIGÉRA TEUR: Caractéristiques Machine à glaçons à faible encombrement (certains modèles) La machine à glaçons et le balconnet sont situés sur la porte pour offrir plus d’espace de rangement. Éclairage DEL Les lampes DEL du compartiment réfrigér...
Page 48 - Panneau de commande supérieur; UTILISA; Commandes
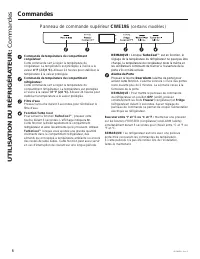
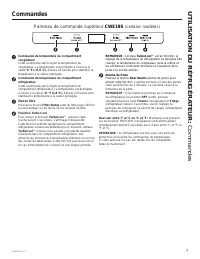
6 49-1000211 Rev. 2 Commandes Commande de température du compartiment congélateur Cette commande sert à régler la température du congélateur. La température est préréglée à l’usine à la valeur 0 °F (-17,8 °C). Allouez 24 heures pour stabiliser la température à la valeur préréglée. Commande de tempér...
Page 50 - Panneau de commande extérieur
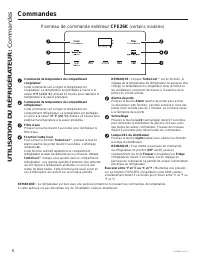
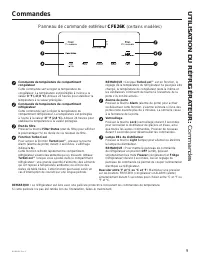
8 49-1000211 Rev. 2 Commandes Panneau de commande extérieur CFE26K (certains modèles) Commande de température du compartiment congélateur Cette commande sert à régler la température du congélateur. La température est préréglée à l’usine à la valeur 0 °F (-17,8 °C) . Allouez 24 heures pour stabiliser...
Page 52 - Modes Sabbath
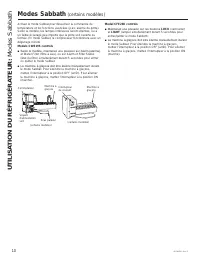
10 49-1000211 Rev. 2 UTILISA TION DU RÉFRIGÉRA TEUR: Modes Sabbath Modes Sabbath (certains modèles) Activez le mode Sabbat pour désactiver la commande de température et les fonctions avancées (p.ex. alarme de porte). Selon le modèle, les lampes intérieures seront éteintes, ou à un faible éclairage p...
Page 53 - Distributeur d’eau et de glaçons; Bac à glace dans la porte; Distributeur
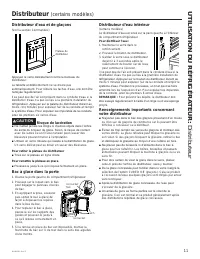
49-1000211 Rev. 2 11 Distributeur (certains modèles) Distributeur d’eau et de glaçons (Voir la section Commandes) $SSX\H]OHYHUUHGpOLFDWHPHQWFRQWUHOHEHUFHDXGX distributeur. La tablette antidébordement ne se draine pas automatiquement. Pour réduire les taches d’eau, elle doit être QHWWR\pHUpJXOLqUHPHQ...
Page 54 - Filtre d’eau à cartouche - XWFE; FILTRE D’EAU À CARTOUCHE; RETRAIT DU FILTRE À CARTOUCHE; BOUCHON DE DÉRIVATION DU FILTRE
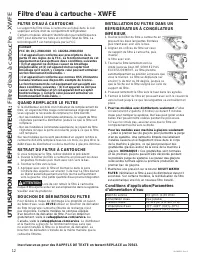
12 49-1000211 Rev. 2 UTILISA TION DU RÉFRIGÉRA TEUR: Filtre d’eau à cartouche - XWFE Filtre d’eau à cartouche - XWFE FILTRE D’EAU À CARTOUCHE Le support du filtre d’eau à cartouche est situé dans le coin supérieur arrière droit du compartiment réfrigérateur.Certains modèles utilisent l’identificatio...
Page 55 - ablettes et balconnets; Tablettes et balconnets; Disposition des tablettes du réfrigérateur; Balconnets réglables; Tablette Quick Space
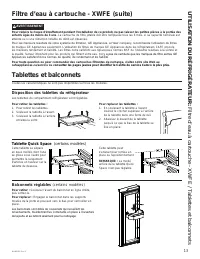
49-1000211 Rev. 2 13 UTILISA T ION DU RÉFRIGÉRA TEUR: Filtre d’eau à cartouche - XWFE / T ablettes et balconnets Tablettes et balconnets Disposition des tablettes du réfrigérateur Les tablettes du compartiment réfrigérateur sont réglables. Pour retirer les tablettes : 1. Pour retirer les tablettes :...
Page 56 - Tiroir du congélateur; Bacs climatisés; Bac pleine largeur; Retirer et remplacer le séparateur de tiroir; iroir du congélateur
14 49-1000211 Rev. 2 Tiroir du congélateur Bacs climatisés Conservez les fruits et les légumes dans des compartiments VpSDUpVSRXUIDFLOLWHUO¶DFFqV2QGRLWHVVX\HUO¶H[FpGHQW d’humidité pouvant s’accumuler dans le fond ou le dessous des tiroirs. Pour retirer un bac : Glissez le bac vers l’extérieur jusqu’...
Page 57 - PANIERS DU CONGÉLATEUR; Retrait du panier inférieur
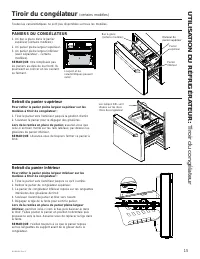
49-1000211 Rev. 2 15 UTILISA TION DU RÉFRIGÉRA TEUR: T iroir du congélateur Tiroir du congélateur (certains modèles) PANIERS DU CONGÉLATEUR 1. Un bac à glace dans le panier supérieur (certains modèles). 2. Un panier pleine largeur supérieur. 3. Un panier pleine largeur inférieur (avec séparateur – c...
Page 58 - Machine à glaçons automatique; Bac à glace et distributeur; Machine à glaçons automatique
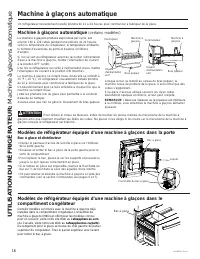
16 49-1000211 Rev. 2 Machine à glaçons automatique Un réfrigérateur nouvellement installé prendra de 12 à 24 heures pour commencer à fabriquer de la glace. Machine à glaçons automatique (certains modèles) /DPDFKLQHjJODoRQVSURGXLUDVHSWFXEHVSDUF\FOHVRLW environ 100 à 130 cubes pendant une période de 2...
Page 59 - Entretien et nettoyage; Nettoyage de l’intérieur; Nettoyage de l’extérieur; ENTRETIEN ET NETT
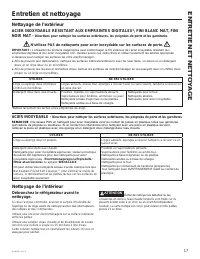
49-1000211 Rev. 2 17 Entretien et nettoyage Nettoyage de l’intérieur Débranchez le réfrigérateur avant le nettoyage. Si cela n’est pas commode, essorez le surplus d’humidité de O¶pSRQJHRXGXOLQJHDYDQWGHQHWWR\HUDXWRXUGHVLQWHUUXSWHXUV des lampes et des commandes. Utilisez une cire pour électroménagers ...
Page 60 - Déménagement; Remplacement des lampes; Départ en vacances; Derrière le réfrigérateur
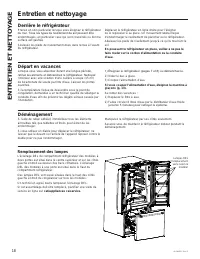
18 49-1000211 Rev. 2 Déménagement À l’aide de ruban adhésif, immobilisez tous les éléments amovibles tels que tablettes et tiroirs pour éviter de les endommager. Si vous utilisez un diable pour déplacer le réfrigérateur, ne laissez pas le devant ou l’arrière de l’appareil reposer contre le diable po...
Page 61 - Réfrigérateur; Des Questions ? Consultez notre site internet : cafeappliances.ca; AVANT DE COMMENCER; Veuillez lire toutes les directives attentivement; PRÉPARATION; INSTRUCTIONS D’INST
49-1000211 Rev. 2 19 Instructionsd’installation Réfrigérateur Des Questions ? Consultez notre site internet : cafeappliances.ca OUTILS DONT VOUS POUVEZ AVOIR BESOIN AVANT DE COMMENCER Veuillez lire toutes les directives attentivement • IMPORTANT — Conservez ces instructions pour l’inspecteur local. ...
Page 62 - Instructions d’installation; DIMENSIONS DE L’ÉLECTROMÉNAGER
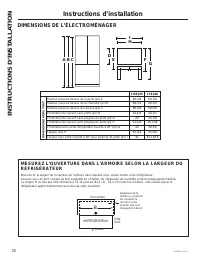
20 49-1000211 Rev. 2 Instructions d’installation Back Wall Front Right Side REFRIGERATOR B eSDLVVHXUGHOD plinthe ou surplomb du comptoir (la mesure la plus grande) plus tout dégagement désiré DIMENSIONS DE L’ÉLECTROMÉNAGER 5e)5,*e5$7(85 Côté droit Mur arrière Devant MESUREZ L’OUVERTURE DANS L’ARMOIR...
Page 63 - DÉGAGEMENTS; INSTALLATION DU RÉFRIGÉRATEUR; REMARQUES IMPORTANTES; FIXATION DES POIGNÉES DU
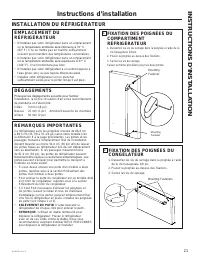
49-1000211 Rev. 2 21 INSTRUCTIONS D’INST ALLA TION EMPLACEMENT DU RÉFRIGÉRATEUR • N’installez pas votre réfrigérateur dans un emplacement RODWHPSpUDWXUHDPELDQWHVHUDLQIpULHXUHj& (60° F). Il ne se mettra pas en marche suffisamment souvent pour maintenir des températures convenables. • N’installe...
Page 64 - ENLÈVEMENT DES PORTES D’UN MODÈLE À DEUX PORTES; Soulèvement de poids lourd.; ENLÈVEMENT DE LA PORTE DROITE
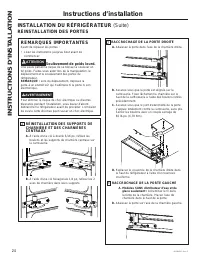
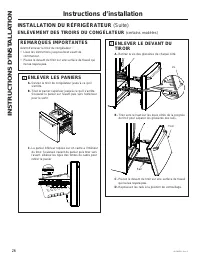
22 49-1000211 Rev. 2 Instructions d’installation ENLÈVEMENT DES PORTES D’UN MODÈLE À DEUX PORTES INSTALLATION DU RÉFRIGÉRATEUR (Suite) REMARQUES IMPORTANTES Avant d’enlever les portes : • Lisez les instructions jusqu’au bout avant de commencer. • Les poignées sont incluses à l’intérieur du réfrigéra...
Page 66 - RÉINSTALLATION DES PORTES; RACCROCHAGE DE LA PORTE DROITE
24 49-1000211 Rev. 2 RÉINSTALLATION DES PORTES Instructions d’installation REMARQUES IMPORTANTES Avant de replacer les portes : • Lisez les instructions jusqu’au bout avant de commencer. ATTENTION Soulèvement de poids lourd. Une seule personne risque de se blesser à soulever un tel poids. Faites-vou...
Page 67 - RACCROCHAGE DE LA PORTE GAUCHE
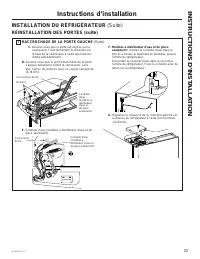
49-1000211 Rev. 2 25 INSTRUCTIONS D’INST ALLA TION 3 RACCROCHAGE DE LA PORTE GAUCHE (Suite) C. Assurez-vous que la porte est alignée sur la carrosserie. Fixez lâchement la charnière sur le haut de la carrosserie à l’aide des boulons retirés précédemment. D. Assurez-vous que le joint d’étanchéité de ...
Page 69 - ENLÈVEMENT DES TIROIRS DU CONGÉLATEUR
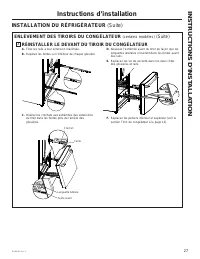
49-1000211 Rev. 2 27 INSTRUCTIONS D’INST ALLA TION ENLÈVEMENT DES TIROIRS DU CONGÉLATEUR (certains modèles) (Suite) 3 RÉINSTALLER LE DEVANT DU TIROIR DU CONGÉLATEUR A. Tirez les rails à leur extension maximale. B. Repérez les fentes sur l’intérieur de chaque glissière C. Insérez les crochets aux ext...
Page 70 - (modèles avec machine à glaçons seulement); Modèles pouvant recevoir une machine à glaçons
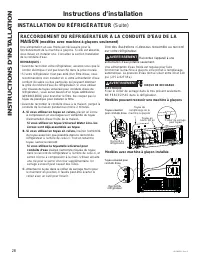
28 49-1000211 Rev. 2 RACCORDEMENT DU RÉFRIGÉRATEUR À LA CONDUITE D’EAU DE LA MAISON (modèles avec machine à glaçons seulement) Une alimentation en eau froide est nécessaire pour le fonctionnement de la machine à glaçons. Si elle est absente, vous devez en installer une. Consultez la section Installa...
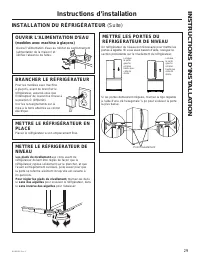
Page 71 - OUVRIR L’ALIMENTATION D’EAU
49-1000211 Rev. 2 29 INSTRUCTIONS D’INST ALLA TION METTRE LE RÉFRIGÉRATEUR EN PLACE Placez le réfrigérateur à son emplacement final. METTRE LE RÉFRIGÉRATEUR DE NIVEAU Les pieds de nivellement aux coins avant du réfrigérateur doivent être réglés de façon que le réfrigérateur repose solidement sur le ...
Page 72 - à deux portes avec tiroir de
30 49-1000211 Rev. 2 Montage du réfrigérateur suggéré (suite) Tablettes dans la position de meilleure efficacité énergétique. Instructions d’installation CFE26K 26 cuft. Modèles à deux portes avec tiroir de congélateur CWE19S 19 cuft. Modèles à deux portes avec tiroir de congélateur INSTRUCTIONS D’I...
Page 73 - INSTALLATION DE LA CONDUITE D’EAU; CE DONT VOUS AUREZ BESOIN
49-1000211 Rev. 2 31 INSTRUCTIONS D’INST ALLA TION INSTALLATION DE LA CONDUITE D’EAU AVANT DE COMMENCER Si l’alimentation d’eau à votre réfrigérateur vient d’un V\VWqPHGHILOWUDWLRQSDURVPRVHLQYHUVH(7VLYRWUH réfrigérateur a également un filtre d’eau, utilisez le bouchon de dérivation du filtre de votr...
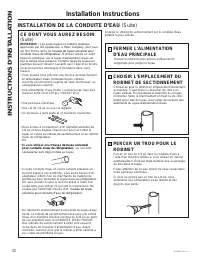
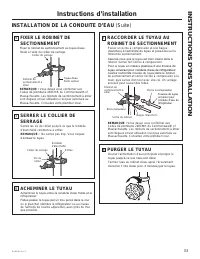
Page 75 - PURGER LE TUYAU; ACHEMINER LE TUYAU
49-1000211 Rev. 2 33 INSTRUCTIONS D’INST ALLA TION INSTALLATION DE LA CONDUITE D’EAU (Suite) 4 FIXER LE ROBINET DE SECTIONNEMENT )L[H]OHURELQHWGHVHFWLRQQHPHQWDXWX\DXG¶HDX froide à l’aide du collier de serrage. REMARQUE : Vous devez vous conformer aux Codes de plomberie 248CMR du Commonwealth of Mass...
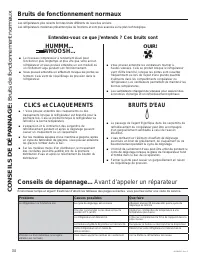
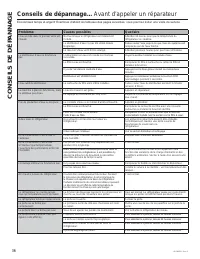
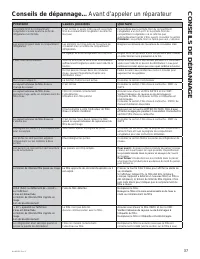
Page 76 - Entendez-vous ce que j’entends ? Ces bruits sont; CLICS et CLAQUEMENTS; BRUITS D’EAU; Avant d’appeler un réparateur; Problème; CONSEILS DE DÉP; Bruits de fonctionnement normaux
34 49-1000211 Rev. 2 Les réfrigérateurs plus récents font des bruits différents de ceux des anciens. Les réfrigérateurs modernes présentent plus de fonctions et sont plus avancés sur le plan technologique. Entendez-vous ce que j’entends ? Ces bruits sont Bruits de fonctionnement normaux HUMMM... WHO...
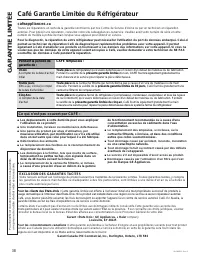
Page 80 - Café Garantie Limitée du Réfrigérateur; Ce qui n’est pas couvert par CAFÉ :; cafeappliances; EXCLUSION DES GARANTIES TACITES; GARANTIE LIMITÉE
38 49-1000211 Rev. 2 Café Garantie Limitée du Réfrigérateur Ŷ Les déplacements à votre domicile pour vous expliquer l’utilisation de ce produit Ŷ 8QHLQVWDOODWLRQOLYUDLVRQRXPDLQWHQDQFHGpIHFWXHXVHŶ 8QHSDQQHGXSURGXLWSDUDEXVG¶XWLOLVDWLRQSDU mauvaise utilisation, par modification ou s’il a été utilisé da...
Page 81 - Ce qui n’est pas couvert :; Garantie limitée de la cartouche filtrante - XWFE; EXCLUSION DES GARANTIES TACITES :
49-1000211 Rev. 2 39 GARANTIE LIMITÉE Pour bénéficier du service de réparation sous garantie, une preuve de la date d’achat initial est nécessaire. * Si votre pièce GE Appliances s’avère défectueuse en raison d'un défaut de fabrication dans les trente jours à compter de la date d'achat LQLWLDOHQRXVY...
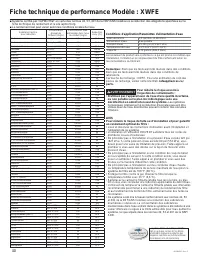
Page 82 - Fiche technique de performance Modèle : XWFE
40 49-1000211 Rev. 2 Ŷ6\VWqPHFHUWLILpSDUO¶,$3025 7HQYHUWXGHVQRUPHVGHOD16)$16,UHODWLYHVjODUpGXFWLRQGHVDOOpJDWLRQVVSpFLILpHVVXUOD fiche technique de rendement et le site iapmort.org. Ŷ/HUHQGHPHQWUpHOSHXWYDULHUVHORQOHVFRQGLWLRQVORFDOHVGHO¶HDX Le rendement du produit sera conforme à ce qui est promis à ...
Page 83 - GE WiFi Connect en option*; Communications des électroménagers
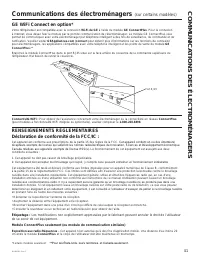
49-1000211 Rev. 2 41 *Certains modèles seulement ** 3RXUOHVeWDWV8QLVOHXUVWHUULWRLUHVHW&DQDGDVHXOHPHQW RENSEIGNEMENTS RÉGLEMENTAIRESDéclaration de conformité de la FCC/IC : Cet appareil est conforme aux prescriptions de la partie 15 des règles de la FCC. Cet appareil contient un ou des émetteurs/...
Page 85 - Congelador Inferior Refrigeradores; CFE26K (Modelos con Profundidad Estándar); Contenido; Manual del propietario e instrucciones de instalación; ESPAÑOL
Escriba los números de modelo y de serie aquí: Nº de Modelo ___________________________ Nº de Serie ____________________________ Busque estos números en una etiqueta del lado izquierdo, cerca de la parte intermedia del compartimiento del refrigerador. Congelador Inferior Refrigeradores Modelos: CWE1...
Page 86 - GRACIAS POR HACER QUE CAFÉ SEA PARTE DE SU HOGAR.; incluye conel material embalado.
2 49-1000211 Rev. 2 GRACIAS POR HACER QUE CAFÉ SEA PARTE DE SU HOGAR. Sentimos orgullo por el nivel de arte, innovación y diseño de cada uno de los electrodomésticos de Café, y creemos que usted también. Entre otras cosas, el registro de su electrodoméstico asegura que podamos entregarle información...
Page 87 - PRECAUCIÓN; INFORMACIÓN DE SEGURIDAD; LEA TODAS LAS INSTRUCCIONES ANTES DE USAR; INSTALACIÓN; RIESGO DE EXPLOSIÓN; ADVERTENCIA
49-1000211 Rev. 2 3 PRECAUCIÓN A fin de reducir el riesgo de lesiones al usar el refrigerador, siga estas precauciones básicas. Ŷ 1ROLPSLHHVWDQWHVGHYLGULRQLWDSDVFRQDJXDFDOLHQWH cuando estén fríos. Los estantes de vidrio y las tapas se pueden romper si son expuestos a cambios de temperatura repentino...
Page 88 - LEA Y GUARDE ESTAS INSTRUCCIONES; CONEXIÓN DE LA ELECTRICIDAD; RIESGO DE DESCARGA ELÉCTRICA; PELIGRO DE ATRAPADOS Y ASFIXIA; Cómo Eliminar Refrigerantes y Espuma Aislante:
4 49-1000211 Rev. 2 INFORMACIÓN DE SEGURIDAD INFORMACIÓN IMPORTANTE DE SEGURIDAD LEA TODAS LAS INSTRUCCIONES ANTES DE USAR LEA Y GUARDE ESTAS INSTRUCCIONES CONEXIÓN DE LA ELECTRICIDAD Nunca, bajo ninguna circunstancia, corte o elimine el tercer cable (tierra) del cable de corriente. Para su segurida...
Page 89 - Funciones; Modelos de Puerta Francesa
49-1000211 Rev. 2 5 Funciones USO DEL REFRIGERADOR: Funciones Modelos de Puerta Francesa Máquina de hielos con ahorro de espacio (en algunos modelos) La máquina de hielos y el anaquel están ubicados en la puerta, creando un espacio de almacenamiento con mayor uso. Iluminación LED Las luces LED del c...
Page 90 - Controles; Control Superior de
6 49-1000211 Rev. 2 Controles OPERACIÓN DEL REFRIGERADOR: Controles Control Superior de CWE19S (en algunos modelos) Control de Temperatura del Compartimiento del Congelador Ajuste la temperatura del compartimiento del congelador. La temperatura del congelador está preconfigurada de fábrica en 0º F (...
Page 91 - Control Superior para Modelos
49-1000211 Rev. 2 7 Controles OPERACIÓN DEL REFRIGERADOR: Controles Control Superior para Modelos CWE19S (en algunos modelos) Control de Temperatura del Compartimiento del Congelador Ajuste la temperatura del compartimiento del congelador. La temperatura del congelador está preconfigurada de fábrica...
Page 92 - Control Externo de; OPERACIÓN DEL
8 49-1000211 Rev. 2 Controles NOTA: El refrigerador se envía con una envoltura que protege los controles de temperatura. Si esta envoltura no fue retirada durante la instalación, retire la misma ahora. Control Externo de CFE26K (en algunos modelos) Control de Temperatura del Compartimiento del Conge...
Page 93 - Control Externo para Modelos
49-1000211 Rev. 2 9 Controles OPERACIÓN DEL REFRIGERADOR: Controles NOTA: El refrigerador se envía con una envoltura que protege los controles de temperatura. Si esta envoltura no fue retirada durante la instalación, retire la misma ahora. Control Externo para Modelos CFE26K (en algunos modelos) Con...
Page 94 - Modos Sabáticos; Para modelos CWE19S con Control Superior
10 49-1000211 Rev. 2 Modos Sabáticos (en algunos modelos) OPERACIÓN DEL REFRIGERADOR: Modos Sabáticos Active Sabbath Mode (Modo Sabático) para apagar el control de temperatura y las funciones avanzadas (por ejemplo: alarma de la puerta). Dependiendo del modelo, las luces interiores estarán apagadas ...
Page 95 - Dispensador de Agua y Hielo; Riesgo de Laceración; Para retirar el estante antiderrame del Dispensador; Recipiente de hielo en la puerta; Dispensador
49-1000211 Rev. 2 11 Dispensador (en algunos modelos) Dispensador de Agua y Hielo (Consulte la sección Controles) Presione el vaso de forma suave contra el soporte del dispensador. El estante antiderrame no se vacía de forma automática. Para reducir las manchas de agua, el estante se deberá limpiar ...
Page 96 - Acerca del cartucho del filtro de agua XWFE; CARTUCHO DEL FILTRO DE AGUA; TAPÓN DE BYPASS DEL FILTRO; Pautas de Aplicación/ Suministro de Agua
12 49-1000211 Rev. 2 Acerca del cartucho del filtro de agua XWFE (en algunos modelos) OPERACIÓN DEL REFRIGERADORE: Acerca del cartucho del filtro de agua XWFE CARTUCHO DEL FILTRO DE AGUA El cartucho del filtro de agua está ubicado en el extremo superior trasero derecho del compartimiento de comida f...
Page 97 - Reorganización de Los Estantes del Refrigerador; Para retirar los estantes:; Anaqueles de Puertas Ajustables; Estante Quick Shelf; Filtro de agua XWFE / Estantes y Recipientes
49-1000211 Rev. 2 13 Acerca del cartucho del filtro de agua XWFE (en algunos modelos) Estantes y Recipientes Reorganización de Los Estantes del Refrigerador Los estantes del compartimiento del refrigerador son ajustables. Para retirar los estantes: 1. Retire todos los productos del estante. 2. Incli...
Page 98 - Cajones con Clima Regulado; Cajón de Ancho Completo; Retiro y Reinstalacion del Divisor del Cajón; Cajones
14 49-1000211 Rev. 2 Cajones Cajones con Clima Regulado Mantenga las frutas y verduras organizadas en compartimientos separados para un fácil acceso. El exceso de agua que se puede acumular en la parte inferior de los cajones o debajo de los mismos se deberá limpiar. Para retirar el cajón: Deslice e...
Page 99 - Cajón del congelador; CANASTAS DEL CONGELADOR; Retiro de la Canasta Superior; Retiro de la Canasta Inferior
49-1000211 Rev. 2 15 OPERACIÓN DEL REFRIGERADOR: Cajón del congelador Cajón del congelador (en algunos modelos) CANASTAS DEL CONGELADOR 8QDFXEHWDHQODFDQDVWDVXSHULRU (en algunos modelos) 8QDFDQDVWDVXSHULRU8QDFDQDVWDLQIHULRUFRQGLYLVRU± en algunos modelos) NOTA: No supere el borde al llenar las canasta...
Page 100 - Fabrica de Hielos Automática; Fabrica de hielos automática; Hielera y Dispensador; Fabrica de Hielos
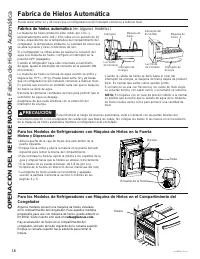
16 49-1000211 Rev. 2 Fabrica de Hielos Automática Puede llevar entre 12 y 24 horas que un refrigerador recién instalado comience a fabricar hielo. Fabrica de hielos automática (en algunos modelos) La máquina de hielos producirá siete cubos por ciclo, y aproximadamente entre 100 y 130 cubos en un per...
Page 101 - Cuidado y limpieza; Limpieza de la Parte Interna; Limpieza de la Parte Exterior; Desenchufe el refrigerador antes de limpiar.; CUIDADO Y
49-1000211 Rev. 2 17 Cuidado y limpieza Limpieza de la Parte Interna Limpieza de la Parte Exterior Desenchufe el refrigerador antes de limpiar. Si esto no resulta práctico, exprima el exceso de humedad para eliminarlo de la esponja o tela al limpiar alrededor de los interruptores, luces o controles....
Page 102 - Preparación para la Mudanza; Reemplazo de las Luces; Preparación para las Vacaciones
18 49-1000211 Rev. 2 Preparación para la Mudanza Asegure todos los artículos tales como estantes y cajones, pegando los mismos de forma segura en sus respectivos lugares a fin de evitar daños. Al usar un carro manual para mover el refrigerador, no deje que la parte frontal ni la parte trasera descan...
Page 103 - Refrigerador; ANTES DE COMENZAR; IMPORTANTE; PREPARACIÓN; En Canadá, visite nuestro sitio web en: cafeappliances.ca; INSTRUCCIONES DE INST
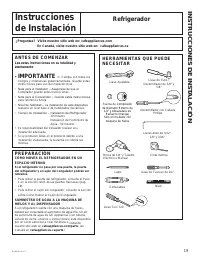
49-1000211 Rev. 2 19 Instruccionesde Instalación Refrigerador HERRAMIENTAS QUE PUEDE NECESITAR ANTES DE COMENZAR Lea estas instrucciones en su totalidad y atentamente • IMPORTANTE — Cumpla con todos los códigos y ordenanzas gubernamentales. Guarde estas instrucciones para uso del inspector local. ...
Page 104 - Instrucciones de Instalación; DIMENSIONES DEL ELECTRODOMÉSTICO; A B
20 49-1000211 Rev. 2 Instrucciones de Instalación MIDA LA ABERTURA DEL GABINETE DE ACUERDO CON EL ANCHO DEL REFRIGERADOR Mida el ancho de la abertura del gabinete donde el refrigerador será FRORFDGR³%´$VHJ~UHVHGHWHQHUHQFXHQWDFXDOTXLHUSDUWHVDOLHQWH de la mesada, el grosor del rodapié y cualquier clar...
Page 105 - INSTALACIÓN DEL REFRIGERADOR
49-1000211 Rev. 2 21 INSTRUCCIONES DE INST ALACIÓN UBICACIÓN DEL REFRIGERADOR • No instale el refrigerador donde la temperatura llegue a ser inferior a los 60ºF (16ºC), ya que no se activará con la frecuencia necesaria para mantener las temperaturas apropiadas. • No instale el refrigerador donde la ...
Page 106 - NOTAS IMPORTANTES; Riesgo al levantar la; RETIRO DE LA PUERTA DERECHA; RETIRO DE LA PUERTA IZQUIERDA
22 49-1000211 Rev. 2 Instrucciones de Instalación RETIRO DE LAS PUERTAS FRANCESAS INSTALACIÓN DEL REFRIGERADOR (Cont.) NOTAS IMPORTANTES Al retirar las puertas francesas: • Lea las instrucciones completamente antes de comenzar. • Las manijas están incluidas dentro del refrigerador. • Coloque los tor...
Page 108 - REINSTALACIÓN DE LA PUERTA DERECHA
24 49-1000211 Rev. 2 REINSTALACIÓN DE LAS PUERTAS FRANCESAS (en algunos modelos) 1 REINSTALACIÓN DE LOS SOPORTES DE LA BISAGRA CENTRAL Y LOS PERNOS DE LA BISAGRA A. 8VDQGRXQDOODYHGHWXERGHVWRUQLOODGRUGH´ retire los tornillos que aseguran los soportes de la bisagra central al gabinete. B. 8VDQGRXQDOOD...
Page 111 - RETIRO DEL CAJÓN DEL CONGELADOR
49-1000211 Rev. 2 27 INSTRUCCIONES DE INST ALACIÓN RETIRO DEL CAJÓN DEL CONGELADOR (en algunos modelos) (Cont.) 3 REINSTALACIÓN DEL FRENTE DEL CAJÓN DEL CONGELADOR A. Halar los ensambles de los rieles hasta la extensión máxima. B. 8ELTXHODVUDQXUDVHQODSDUWHLQWHUQDGHFDGDULHO C. Inserte los ganchos sob...
Page 112 - CONEXIÓN DEL REFRIGERADOR AL SUMINISTRO DE AGUA DEL HOGAR; (Modelos con máquina de hielo únicamente); Modelos Preparados para Máquina de Hielos
28 49-1000211 Rev. 2 CONEXIÓN DEL REFRIGERADOR AL SUMINISTRO DE AGUA DEL HOGAR (Modelos con máquina de hielo únicamente) Se requiere un suministro de agua fría para el funcionamiento de la máquina de hielos automática. Si no se cuenta con un suministro de agua fría, se deberá proveer uno. Consulte l...
Page 113 - ABRA EL SUMINISTRO DE AGUA; NIVELE EL REFRIGERADOR
49-1000211 Rev. 2 29 INSTRUCCIONES DE INST ALACIÓN ABRA EL SUMINISTRO DE AGUA (Modelos con máquina de hielo) Abra el suministro de agua usando la válvula de cierre (suministro de agua del hogar) y controle que no haya pérdidas. ENCHUFE EL REFRIGERADOR En modelos con máquina de hielos, antes de enchu...
Page 114 - Puerta Francesa con Cajón del
30 49-1000211 Rev. 2 Ensamble sugerido del refrigerador (cont.) Se muestran los estantes en la ubicación para una mayor eficiencia energética. Instrucciones de Instalación Modelos CWE19S 19 cuft. Puerta Francesa con Cajón del Congelador Modelos CFE26K 26 cuft. Puerta Francesa con Cajón del Congelado...
Page 115 - INSTALACIÓN DE LA TUBERÍA DE AGUA; LO QUE NECESITARÁ
49-1000211 Rev. 2 31 INSTRUCCIONES DE INST ALACIÓN INSTALACIÓN DE LA TUBERÍA DE AGUA ANTES DE COMENZAR Si el suministro de agua al refrigerador es de un Sistema GH)LOWUDFLyQGH$JXDSRUÏVPRVLV,QYHUVD52<HO refrigerador también cuenta con un filtro de agua, use el tapon del bypass del filtro del refri...
Page 117 - LIMPIEZA DE LA TUBERÍA
49-1000211 Rev. 2 33 INSTRUCCIONES DE INST ALACIÓN INSTALACIÓN DE LA TUBERÍA DE AGUA (Cont.) 4 AJUSTE LA VÁLVULA DE CIERRE Ajuste la válvula de cierre de la tubería de agua fría con la abrazadera de la tubería NOTA: Las válvulas de montura son ilegales y su uso no está permitido en Massachusetts. Co...
Page 118 - CRUJIDOS y CHASQUIDOS; SONIDOS DEL AGUA; Antes de solicitar el servicio técnico; CONSEJOS P; Condiciones de funcionamiento normal
34 49-1000211 Rev. 2 El sonido de los refrigeradores nuevos es diferente al de aquellos más antiguos. Los refrigeradores modernos cuentan con más funciones y utilizan una tecnología más nueva. HUMMM... WHOOSH... Ŷ Es posible que el nuevo compresor de alta efectividad funcione más rápido y por más ti...
Page 122 - Qué No Está Cubierto:; Café Garantía Limitada del Refrigerador
38 49-1000211 Rev. 2 Ŷ Viajes del técnico del servicio a su hogar para enseñarle sobre cómo usar el producto. Ŷ ,QVWDODFLyQHQWUHJDRPDQWHQLPLHQWRLQDGHFXDGRVŶ )DOODVGHOSURGXFWRHQFDVRGHDEXVRPDOXVRRXVR para propósitos diferentes al original o uso comercial. Ŷ 3pUGLGDGHDOLPHQWRVSRUPDOHVWDGRŶ 5HHPSOD]RGHI...
Page 123 - Garantía Limitada del Cartucho del Filtro de Agua XWFE; Comuníquese con nosotros en; EXCLUSIÓN DE GARANTÍAS IMPLÍCITAS:; GARANTÍA
49-1000211 Rev. 2 39 * Si su pieza de GE Appliances falla debido a un defecto en la fabricación dentro de los treinta días desde la fecha de compra original, le entregaremos una pieza nueva o, a su elección, una pieza reconstruida sin cargo. Devuelva la pieza defectuosa al proveedor de piezas a quie...
Page 124 - Ficha Técnica de Funcionamiento del Modelo: XWFE
40 49-1000211 Rev. 2 Ficha Técnica de Funcionamiento del Modelo: XWFE Ŷ6LVWHPDFHUWLILFDGRSRU,$3025 7FRQWUDORV(VWiQGDUHV\3GH16)$16,SDUDODUHGXFFLyQGHGHPDQGDVHVSHFLILFDGDVHQODILFKD técnica de rendimiento y en iapmort.org. Ŷ(OUHQGLPLHQWRUHDOSRGUiYDULDUHQUHODFLyQDODVFRQGLFLRQHVORFDOHVGHODJXD Es esencial ...
Page 125 - Comunicación del Electrodoméstico
49-1000211 Rev. 2 41 INFORMACIÓN REGULATORIA Declaración de Cumplimiento con FCC/IC: Este dispositivo cumple con la Parte 15 de la Normativa de la FCC. Este dispositivo cuenta con un transmisor(es) /receptor(es) exentos de licencia que cumplen con la Innovación, Ciencia y Desarrollo Económico, exent...
Page 126 - Notas