ZOSI 2IPC-1828A-W-C-A2 - Manuals
User Manual ZOSI 2IPC-1828A-W-C-A2


Summary
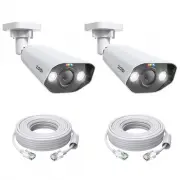
01 1/ What’s in the Box NOTE: • The number of accessories varies with the camera model you purchased. Waterproof Lid×1 Quick Start Guide×1 Ethernet Cable×1 Mounting Screws×1 Camera×1 or Mounting Templates×1 or
02 2/ Camera Introduction NOTE: Actual appearance and accessories are subject to the model you purchased. Built-in Speaker Microphone Lens Spotlights*2 Power Port Network Port Infrared LEDs*4 Reset Button *Press and hold for 5 seconds to reset the camera to factory settings. Reset Button *Press and ...
03 3/ Connection Diagram NOTE: The cameras in the kit do not support connection via Method A.The PoE cameras are fully compatible only with our company's PoE NVR. 1. Connect the camera to the PoE switch or injector. Before initial setup, follow the steps below to connect the camera. A 1. Connect the...
ZOSI Security Cameras Manuals
-
 ZOSI 16CK-211B16S-20-US
User Manual
ZOSI 16CK-211B16S-20-US
User Manual
-
 ZOSI 16CK-211B16S-40-US
User Manual
ZOSI 16CK-211B16S-40-US
User Manual
-
 ZOSI 16CK-261W12S-20
User Manual
ZOSI 16CK-261W12S-20
User Manual
-
 ZOSI 16CK-261W16-40
User Manual
ZOSI 16CK-261W16-40
User Manual
-
 ZOSI 16CK-261W16S-20A
User Manual
ZOSI 16CK-261W16S-20A
User Manual
-
 ZOSI 16CK-418B12S-20-US
User Manual
ZOSI 16CK-418B12S-20-US
User Manual
-
 ZOSI 16CK-418B12S-40-US
User Manual
ZOSI 16CK-418B12S-40-US
User Manual
-
 ZOSI 16CK-418W8S-20-US
User Manual
ZOSI 16CK-418W8S-20-US
User Manual
-
 ZOSI 16DK-1058W10-30-US-A2
User Manual
ZOSI 16DK-1058W10-30-US-A2
User Manual
-
 ZOSI 16DK-1828W10-40-US-A2
User Manual
ZOSI 16DK-1828W10-40-US-A2
User Manual
-
 ZOSI 16DK-1828W16-40-US
User Manual
ZOSI 16DK-1828W16-40-US
User Manual
-
 ZOSI 16DK-2255AW16-40-US-A2
User Manual
ZOSI 16DK-2255AW16-40-US-A2
User Manual
-
 ZOSI 16DK-2615W10-30-US-A2
User Manual
ZOSI 16DK-2615W10-30-US-A2
User Manual
-
 ZOSI 16DK-2615W8-30-US-A2
User Manual
ZOSI 16DK-2615W8-30-US-A2
User Manual
-
 ZOSI 16DK-2615W8-40-A2
User Manual
ZOSI 16DK-2615W8-40-A2
User Manual
-
 ZOSI 16DK-4285W10-30-US-A2
User Manual
ZOSI 16DK-4285W10-30-US-A2
User Manual
-
 ZOSI 16DK-4285W8-30-US-A2
User Manual
ZOSI 16DK-4285W8-30-US-A2
User Manual
-
 ZOSI 16DK-4295W16-40-US-A2
User Manual
ZOSI 16DK-4295W16-40-US-A2
User Manual
-
 ZOSI 16DK-4295W8-40-US-A2
User Manual
ZOSI 16DK-4295W8-40-US-A2
User Manual
-
 ZOSI 16FK-106W4X419W8S-20-US
User Manual
ZOSI 16FK-106W4X419W8S-20-US
User Manual