Page 2 - WARNING; WARNING; CAUTION; ENVIRONMENTAL TIPS; ENVIRONMENT; Conditions of use; CONTENTS
2 CONTENTS Please read the user manual carefully and store in a handy place for later reference. The symbols you will see in this booklet have these meanings: WARNING WARNING This symbol indicates information concerning your personal safety. WARNING CAUTION This symbol indicates information on how t...
Page 3 - IMPORTANT SAFETY INSTRUCTIONS; IMPORTANT; Check for any damage or marks; Information on disposal for users
3 IMPORTANT SAFETY INSTRUCTIONS IMPORTANT SAFETY INSTRUCTIONS TIPS & INFORMATION IMPORTANT Check for any damage or marks If you find the appliance is damaged or marked, you must report it within 7 days if you wish to claim for damage/ marks under the manufacturer’s warranty. This does not affect...
Page 5 - GENERAL APPLIANCE DESCRIPTION – ELECTRIC ELEVATED; PRODUCT DESCRIPTION
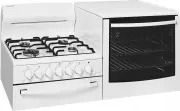
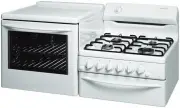
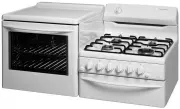
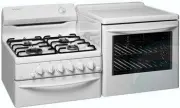
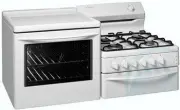
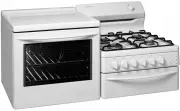
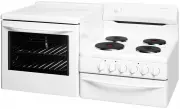
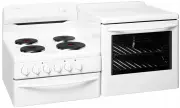
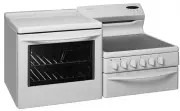
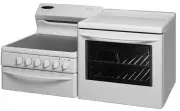
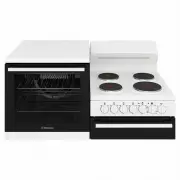
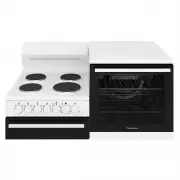
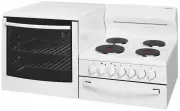
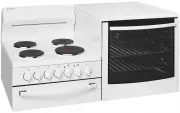
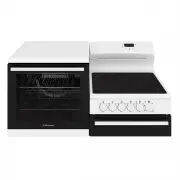
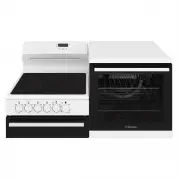
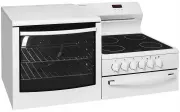
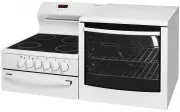
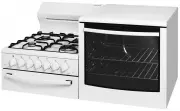
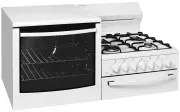
5 GENERAL APPLIANCE DESCRIPTION – ELECTRIC ELEVATED (R.H VARIANT SHOWN) PRODUCT DESCRIPTION 1 Grill Door 2 Removable Grill Dish 3 Control Panel 4 Hotplate 5 Grill Reflector 6 Grill Element 7 Grill Vent 8 3 Button Programmable Clock 9 Oven Vent 10 Fan and Element Cover 11 Oven Element 12 Anti-tilt Pl...
Page 6 - GENERAL APPLIANCE DESCRIPTION – GAS ELEVATED
6 GENERAL APPLIANCE DESCRIPTION – GAS ELEVATED (R.H VARIANT SHOWN) 1 Grill Door 2 Removable Grill Dish 3 Grill Burner Reflector 4 Removable Hotplate Burner 5 Removable Trivet 6 Grill Vent 7 Grill Burner 8 Oven Vent 9 Fan Cover 10 Anti-tilt Plate 11 Oven Fan 12 Oven Burner Cover 13 Removable Shelf 14...
Page 7 - OPERATING FOR THE FIRST TIME; Installation and Service Warning; Before operating first time
7 OPERATING FOR THE FIRST TIME OPERATING FOR THE FIRST TIME Installation and Service Warning WARNING WARNING • Only an authorised person must install and service this appliance (Certificate of Compliance to be retained). • In order to avoid a hazard, the installation instructions MUST be followed. •...
Page 8 - INSTALLING YOUR OVEN ACCESSORIES; Fitting oven shelves; Assembling the grill dish handle
8 INSTALLING YOUR OVEN ACCESSORIES INSTALLING YOUR OVEN ACCESSORIES Fitting oven shelves 1. Ensure shelf orientation is correct (refer to diagram). 2. Slide oven shelves onto oven supports (side runners) at an angle until raised back of shelf is past the stop on oven supports (side runners). 3. Lowe...
Page 9 - USING THE ELECTRIC ELEVATED COOKER; Electric oven features and descriptions
9 USING THE ELECTRIC ELEVATED COOKER USING THE ELECTRIC ELEVATED COOKER 1 Radiant/Solid/Ceramic Hotplate Control Knob – sets hotplate temperature. 2 Grill Control Knob – sets grilling temperature. 3 Oven Control Knob – sets oven temperature. 4 Grill/Oven Indicator Light – comes on when grill/oven te...
Page 10 - Ceramic Hotplates; Solid hotplates; Electric oven fan forced baking; Cookware; Button Programmable Clock
10 USING THE ELECTRIC ELEVATED COOKER USING THE ELECTRIC ELEVATED COOKER Ceramic Hotplates WARNING WARNING If the surface is cracked, switch off the appliance to avoid the possibility of electric shock. • The ceramic cooktop is made from ceramic glass, a tough, durable material that withstands heati...
Page 12 - USING THE GAS ELEVATED COOKER; Gas oven features and Descriptions
12 USING THE GAS ELEVATED COOKER USING THE GAS ELEVATED COOKER 1 Burner Control Knob – sets burner temperature. 2 Grill Control Knob – sets grilling temperature. 3 Oven Control Knob – sets oven temperature. 4 Timer 60 Minute – sets reminder time. When timer returns to zero, timer gives a short ring....
Page 14 - GENERAL HINTS AND TIPS; Using the Conventional Oven; Condensation and Steam; Using the Grill; Using the Fan Forced Oven
14 GENERAL HINTS AND TIPS GENERAL HINTS AND TIPS Using the Conventional Oven • The shelf position is critical. The temperature in centre of the oven is the temperature shown on the oven control knob. Single shelf baking gives optimal cooking results. • DO NOT place baking trays, oven dishes or foil ...
Page 15 - GETTING TO KNOW YOUR OVEN; Getting to know your new oven with this simple
15 GETTING TO KNOW YOUR OVEN GETTING TO KNOW YOUR OVEN Method: 1. Butter base and sides of two, 20cm straight-sided round or square cake pans. Then line the base with grease proof paper or baking paper. 2. Preheat oven to moderate 180ºC (170ºC fan forced) for 30 minutes and ensure oven shelf is in p...
Page 16 - OVEN GUIDE
16 OVEN GUIDE OVEN GUIDE The following is intended as a guide. Cooking variation is natural and to be expected. You should experiment with times, temperatures and recipes to obtain the best results to your own taste. Get to know your oven before making a service call. Where the gas models vary from ...
Page 17 - CLEANING THE ELEVATED COOKER
17 CLEANING THE ELEVATED COOKER CLEANING THE ELEVATED COOKER Ovens and hotplates are made from steel and enamel. Do not use abrasives and harsh scourers as they may scratch the surface. Enamel • Keep enamel clean by wiping it with a soft cloth dipped in warm soapy water. • Rub difficult stains with ...
Page 18 - Re-Assembling the oven door inner glass; SAFETY WARNINGS ABOUT CLEANING; Cleaning the Oven Door
18 CLEANING THE ELEVATED COOKER CLEANING THE ELEVATED COOKER • Using both hands, gently remove the inner glass by sliding out and lifting away from the door. • Hand wash only with a soft cloth and warm soapy water. When dry, polish with a soft cloth and ensure the glass is dry before re-assembly. • ...
Page 19 - TROUBLE SHOOTING
19 TROUBLE SHOOTING TROUBLE SHOOTING PROBLEM CAUSES WHAT TO DO Uneven cooking Incorrect shelf position Select shelf that puts food in centre of oven Oven tray too large Try other trays or dishes Trays not in centre Put trays in centre Air flow in oven uneven Rotate food during cooking Grill tray aff...
Page 20 - TIPS AND INFORMATION
20 TROUBLE SHOOTING If you have a problem with your appliance check the following before you ring the service line. PROBLEM WHAT TO DO Operational problems i.e. Oven, grill or hob not working Check the electricity is turned onCheck your fuses. If the fuse continues to blow, call the Service CentreCh...
Page 21 - INSTALLING THE ELECTRIC ELEVATED COOKER; Safety Warnings about installation; Locating the cooker
21 INSTALLING THE ELECTRIC ELEVATED COOKER INSTALLING THE ELECTRIC ELEVATED COOKER Safety Warnings about installation WARNING WARNING • The cooker MUST be installed and serviced by a qualified technician. • A Certificate of Compliance MUST be supplied to be kept by the customer. • The packing materi...
Page 22 - Hard wiring; Electric wiring requirements; Rated power input
22 INSTALLING THE ELECTRIC ELEVATED COOKER Hard wiring 1. To gain access to the terminal block, remove the small rear panel by unscrewing the two screws. 2. Fit wires through the hole in the base using the appropriate gland to protect insulation of wires from the hole edge. 3. Set the length of wiri...
Page 23 - INSTALLING THE GAS ELEVATED COOKER
23 INSTALLING THE GAS ELEVATED COOKER • In order to avoid overheating of the cooker, the cooker must not be installed behind a decorative door. • The appliance MUST be installed using the flexible hose supplied. • The vents, openings and air spaces MUST NOT be blocked. • You MUST NOT pull the cooker...
Page 24 - Gas requirements; Configuration; Wiring connection for gas cooker (if applicable)
24 INSTALLING THE GAS ELEVATED COOKER The cooker also comes supplied with a LPG gas conversion kit, should you need to convert the gas from NG to LPG. Alternatively, you can obtain these by contacting the Customer Care Centre. Before installation check that the cooker is suitable for the gas supply....
Page 25 - Operation on SNG; Restraining Device; Testing the gas cooker; Gas connection
25 INSTALLING THE GAS ELEVATED COOKER INSTALLING THE GAS ELEVATED COOKER Operation on SNG • If the cooker is to be used with SNG, then the grill burner MUST be modified by the replacement of the shutter, which fits into the throat of the grill burner. • A conversion kit can be obtained by contacting...
Page 26 - Testing Burner Performance; Disconnect electric power.; Checking regulator function
26 INSTALLING THE GAS ELEVATED COOKER Testing Burner Performance • Observe the flame appearance on each burner when set to max. If it is smaller or larger than expected, then the injector size needs checking (refer to table). • When maximum flame appearance is correct, check the turn down setting on...
Page 27 - GAS CONVERSION PROCEDURE
GAS CONVERSION PROCEDURE 10. Re-fit oven supply pipe to burner and replace the backpanel. 11. Place gas sticker supplied onto rear panel over existing sticker. 12. Remove the regulator and replace with test point adaptor supplied for ULP or propane. For NG remove test point adaptor and replace with ...
Page 31 - WARRANTY; Warranty; Important Notice
31 WARRANTY This document sets out the terms and conditions of the product warranties for Electrolux Appliances. It is an important document. Please keep it with your proof of purchase documents in a safe place for future reference should you require service for your Appliance. 1. In this warranty: ...
Page 32 - TOP SERVICE
AUSTRALIA phone: 1300 363 640fax: 1800 350 067 email: [email protected]web: westinghouse.com.au NEW ZEALAND phone: 0800 436 245fax: 0800 225 088 email: [email protected]web: westinghouse.co.nz For more information on all Westinghouse appliances, or for dimension and installation information, call in...