Westinghouse GEK1385LWLPG - User Manual
Westinghouse GEK1385LWLPG Range – User Manual, read for free online in PDF format. We hope this helps you resolve any issues you may have. If you have further questions, please contact us through the contact form.


Table of Contents:
- Page 2 – CONTENTS
- Page 3 – SAFETY
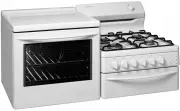
- Page 5 – DESCRIPTION
- Page 7 – OPERATION
- Page 8 – PARTS
- Page 10 – USAGE
- Page 12 – KNOW YOUR OVEN
- Page 13 – COOKING GUIDE
- Page 14 – HANDLING BAKING
- Page 20 – CLEANING
- Page 23 – INSTALLING
- Page 26 – TESTING
ELEVATED COOKING APPLIANCES
USER MANUAL
PEK1370W, PEK1350W,
GEK1235W, GEK1385W
"Loading the manual" means you need to wait until the file loads and becomes available for online reading. Some manuals are very large, and the time they take to appear depends on your internet speed.
Summary
Important safety warnings ................................................................... 3Description of your appliance ............................................................. 5Before operating your appliance for the first time ............................... 7Parts of your electric cooke...
3 Please read the user manual carefully and store in a handy place for later reference. The symbols you will see in this booklet have these meanings: WARNING This symbol indicates information concerning your personal safety CAUTION This symbol indicates information on how to avoid damaging the appli...
5 DESCRIPTION OF YOUR APPLIANCE DESCRIPTION 1. Hotplate Control Knob • Adjusts temperature of hotplate. Can be rotated in either direction. 2. Hotplate Indicator Lamp • Comes on when a hotplate is turned on. 3. Oven light switch • Located on oven temperature control knob. 4. 2 Hour Cut-Off Timer • S...