Page 2 - CONTENTS; WELCOME 3; To purchase accessories for your tool, visit
CONTENTS WELCOME 3 Introduction ..................................................................................................... 3Specifications ................................................................................................... 3 SAFETY 4 General Safety Rules .....................
Page 3 - safety for both yourself and others.
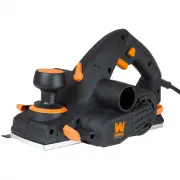
SPECIFICATIONS INTRODUCTION Thanks for purchasing the WEN Thickness Planer. We know you are excited to put your tool to work, but first, please take a moment to read through the manual. Safe operation of this tool requires that you read and understand this operator’s manual and all the labels affixe...
Page 4 - GENERAL SAFETY RULES; WORK AREA SAFETY
GENERAL SAFETY RULES WORK AREA SAFETY 1. Keep work area clean and well lit. Cluttered or dark areas invite accidents. 2. Do not operate power tools in explosive atmo- spheres, such as in the presence of flammable liquids, gases or dust. Power tools create sparks which may ig- nite the dust or fumes....
Page 5 - POWER TOOL USE AND CARE
GENERAL SAFETY RULES 7. If devices are provided for the connection of dust extraction and collection facilities, ensure these are connected and properly used. Use of dust collection can reduce dust-related hazards. POWER TOOL USE AND CARE 1. Do not force the power tool. Use the correct power tool fo...
Page 6 - PLANER SAFETY WARNINGS; PLANER SAFETY
6 PLANER SAFETY WARNINGS PLANER SAFETY 1. Whenever adjusting or replacing any parts on planer, turn switch OFF and remove plug from power source. 2. Make sure all guards are properly attached and securely fastened. 3. Make sure all moving parts are free from interference. 4. Always wear eye protecti...
Page 7 - ELECTRICAL INFORMATION; AMPERAGE; GUIDELINES AND RECOMMENDATIONS FOR EXTENSION CORDS; In the event of a malfunction or breakdown
7 ELECTRICAL INFORMATION AMPERAGE REQUIRED GAUGE FOR EXTENSION CORDS 25 ft. 50 ft. 100 ft. 150 ft. 15A 14 gauge 12 gauge Not Recommended Not Recommended 3. Check with a licensed electrician or service personnel if you do not completely understand the grounding instructions or whether the tool is pro...
Page 8 - UNPACKING; UNPACKING & PACKING LIST; PACKING LIST; Planer
Components UNPACKING With the help of a friend or trustworthy foe, such as one of your in-laws, carefully remove the planer from the packaging and place it on a sturdy, flat surface. Make sure to take out all contents and accessories. Do not discard the packaging until everything is removed. Check t...
Page 9 - TOOL PURPOSE; KNOW YOUR PLANER; PLANER
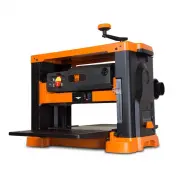
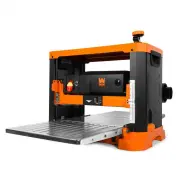
9 TOOL PURPOSE Resurface boards, flatten workpieces, and much more with your WEN Thickness Planer. Refer to the diagram below to become familiarized with the parts and controls of your thickness planer. KNOW YOUR PLANER PLANER Circuit Breaker Power Switch Extension Table Elevation Handle Carrying Ha...
Page 10 - ASSEMBLY & ADJUSTMENTS; ATTACHING THE DEPTH ADJUSTMENT HANDLE
ASSEMBLY & ADJUSTMENTS ATTACHING THE DEPTH ADJUSTMENT HANDLE 1. Secure the depth adjustment handle (Fig. 2 - 1) to the top of the planer using the included socket head cap screw (Fig. 2 - 2). 2. Flip the depth adjustment handle over so the socket head cap screw is covered. NOTE: Each full rotati...
Page 11 - MOUNTING THE PLANER TO A WORK SURFACE; Mounting Holes; OPERATION; SWITCH LOCKOUT
ASSEMBLY & ADJUSTMENTS MOUNTING THE PLANER TO A WORK SURFACE The planer should always be mounted to a stable, level bench or table in a well-lit area. Make sure there is plenty of room for maneuvering the workpiece through the entire cut. Neither the operator nor bystanders should stand in line ...
Page 12 - AVOID DAMAGE TO BLADES
OPERATION AVOID DAMAGE TO BLADES Thickness planers are a precision woodworking machine and should be used on quality lumber only. Do not plane dirty boards; dirt and small stones are abrasive and will wear out the cutting inserts. WARNING! REMOVE NAILS AND STAPLES. Use planer to cut wood only. Avoid...
Page 13 - DEPTH OF CUT; PREPARING WORK
OPERATION DEPTH OF CUT • The depth of cut depends on the width, species, hardness, moisture content, grain direction, and grain structure of the wood.• The maximum depth of cut is 1/8” for workpieces less than 6” wide, and 1/16” for workpieces wider than 6”. The wider the workpiece, the shallower th...
Page 14 - CHECK FOR WORN BLADES; AVOIDING SNIPE
OPERATION CHECK FOR WORN BLADES The blades’ condition will affect cutting precision. Observe the quality of the cut that the planer produces to check the condition of the blades. Dull blades will tear wood fibers and produce fuzzy surfaces. Raised grain will occur when dull blades pound on wood that...
Page 15 - THE DO’S AND DONT’S OF GRAIN DIRECTION; Face; FEEDING WORK
OPERATION THE DO’S AND DONT’S OF GRAIN DIRECTION Always plane with the grain of the wood (in the same direction as the grain). There are six sides to every board: two face grains, two side/edge grains, and two end grains. Never plane with the end grain facing upwards. Only plane side and face grains...
Page 16 - MAINTENANCE; REPLACING BLADES; Gib
MAINTENANCE WARNING! Always turn the planer OFF and disconnect it from the power source before starting any main- tenance work. REPLACING BLADES Blades should always be reversed or replaced as a matched set (at the same time). 1. Get the magnetic blade tool. 2. Adjust the rollercase to a height of a...
Page 18 - TROUBLESHOOTING GUIDE; CLEANING THE PLANER; We strongly recommend always using a dust collection
PROBLEM CAUSE SOLUTION Machine does not start. Machine is not plugged in. Plug machine in. Wrong extension cord size used. Use properly-sized extension cord (see chart on p. 7). Power outlet does not have power. Check power outlet for power. Check breaker for associated circuit. Contact a profession...
Page 20 - EXPLODED VIEW & PARTS LIST
EXPLODED VIEW & PARTS LIST 20 NOTE: Not all parts may be available for purchase. Parts and accessories that wear down over the course of normal use are not covered under the warranty.
Page 21 - Description
EXPLODED VIEW & PARTS LIST No. Part No. Description Qty. 1 PL1252-001 Star Wrench, T25 1 2 PL1326-020 Hex Wrench, 4mm 1 3 Socket Head Cap Screw, M6x8 15 4_S PL1326- 018ASM Elevation Handle As- sembly 1 5_S Top Cover Assembly 1 6 Left Cover 1 7 Screw, M5x12 4 12 Right Cover 1 13 Bearing, 6000ZZ 5...
Page 23 - WARRANTY STATEMENT; LIMITED WARRANTY OF WEN PRODUCTS FOR HOME USE
WARRANTY STATEMENT WEN Products is committed to building tools that are dependable for years. Our warranties are consistent with this commitment and our dedication to quality. LIMITED WARRANTY OF WEN PRODUCTS FOR HOME USE GREAT LAKES TECHNOLOGIES, LLC (“Seller”) warrants to the original purchaser on...