Page 2 - TECHNICAL DATA
TABLE OF CONTENTS Specifications .................................................................................2Introduction ....................................................................................3Pneumatic Nailer Safety Rules ............................................................
Page 3 - INTRODUCTION; maximize safety for both yourself and others.
INTRODUCTION Thanks for purchasing the WEN Coil Roofing Nailer. We know you are excited to put your tool to work, but first, please take a moment to read through the manual. Safe operation of this tool requires that you read and understand this operator’s manual and all the labels affixed to the too...
Page 4 - PNEUMATIC NAILER SAFETY RULES; SAVE THESE SAFETY INSTRUCTIONS.
WORK AREA SAFETY 1. KEEP YOUR WORK AREA CLEAN, uncluttered, and well lit. Do not work on floor surfaces that are slippery with sawdust or wax. Keep the floor clear of oil, scrap, and other debris. 2. DO NOT USE the tool in the presence of flammable dust, gases or fumes. The tool may produce a spark ...
Page 5 - AIR SUPPLY SAFETY; FASTENERS SAFETY
AIR SUPPLY SAFETY 1. USE ONLY CLEAN, DRY, AND REGULATED AIR. Condensation from an air compressor can rust and damage the internal workings of the tool. Regularly drain water and contaminants out from the compressor. An in-line filter is recommended to remove most of these contaminants and prolong th...
Page 6 - TOOL OPERATION & MAINTENANCE SAFETY
TOOL OPERATION & MAINTENANCE SAFETY 1. DO NOT FORCE THE TOOL to do a job for which it was not designed. 2. INSPECT TOOL BEFORE USE. Do not operate if any portion of the tool, trigger, or safety bracket is dam-aged, inoperable, disconnected, or altered. Leaking air, damaged parts, or missing part...
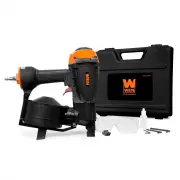
Page 7 - KNOW YOUR NAILER; PACKAGE CONTENTS; Blow Mold Case
KNOW YOUR NAILER Directional ExhaustDeflector Trigger 1/4˝ NPT Air Inlet Magazine Shingle Guide Safety Bracket Depth Setting Wheel Carefully unpack the tool and all accessories from the packaging. Check your tool against the graph below. If any part is damaged or missing, please contact our customer...
Page 8 - PREPARATION & ADJUSTMENTS
Your nailer is designed to operate on dry compressed air at the regulated pressure between 70 and 120 PSI (4.8 and 8.3 bar). Do not operate when the air pressure is outside of the recommended range. The recom-mended air supply setup should include the following: • A pressure regulator - to regulate ...
Page 9 - STEP 3: CONNECTING TOOL TO THE AIR SUPPLY
Air Hose Quick Connector Air Supply Regulator Lubricator Filter PREPARATION & ADJUSTMENTS WARNING: To reduce the risk of misfiring, connect the air supply BEFORE loading fasteners. Make sure the nailer magazine is empty when connecting to the air supply to prevent misfire. Never aim the tip of t...
Page 10 - NAIL SPECIFICATIONS
1. Open the magazine. Pull down the door latch (Fig. 3) and swing door open to the left. Then swing the magazine cover open to the right. 2. Use only the recommended fasteners according to the specifications. STEP 4: LOADING THE FASTENERS (FIG. 3 TO 5) SHINGLE GUIDE (FIG. 6) The shingle guide can be...
Page 11 - TYPES OF TRIGGERS
DIRECTIONAL EXHAUST DEFLECTOR (FIG. 8) Air will be released from the air outlet during operation. Ro-tate the directional exhaust deflector (Fig. 9) on the top of the nailer to direct the released air to your preferred direc-tion, away from yourself and others. PREPARATION & ADJUSTMENTS Fig. 7 F...
Page 12 - OPERATION; SHOOTING NAILS
OPERATION Pull the trigger and press down the safety bracket to drive a fastener. Release the safety bracket while hold-ing down on the trigger, reposition the nailer and engage the safety bracket again to drive the next nail. NOTE: Double firing may occur if the safety bracket is engaged between sh...
Page 13 - CLEARING A JAMMED NAIL
13 OPERATION CLEARING A JAMMED NAIL WARNING: Disconnect air line from tool and remove all fasteners from magazine before making adjustments or personal injury may result. Keep the tool pointed away from yourself and others. WARNING: If nails continue to jam, stop using the nailer. Contact our custom...
Page 14 - MAINTENANCE; LUBRICATION
MAINTENANCE LUBRICATION Routine lubrication of the tool is required for best performance. An automatic in-line oiler is recommended. If tool is used without an in-line oiler, place 4 to 5 drops of pneumatic tool oil into the air inlet of the tool at the beginning of each workday or after about 1 hou...
Page 15 - TROUBLESHOOTING GUIDE
15 TROUBLESHOOTING GUIDE WARNING: Stop using the tool immediately if any of the following problems occur. Repairs and replacements should only be performed by an authorized technician. For any questions, please contact our customer service at (800) 232-1195, M-F 8-5 CST or email us at [email protect...
Page 16 - EXPLODED VIEW AND PARTS LIST; EXPLODED VIEW & PARTS LIST
11 EXPLODED VIEW AND PARTS LIST EXPLODED VIEW & PARTS LIST 16
Page 18 - WARRANTY STATEMENT
WEN Products is committed to building tools that are dependable for years. Our warranties are consistent with this commitment and our dedication to quality. LIMITED WARRANTY OF WEN CONSUMER POWER TOOLS PRODUCTS FOR HOME USE GREAT LAKES TECHNOLOGIES, LLC (“Seller”) warrants to the original purchaser ...