Page 3 - SAFETY INTRODUCTION; SAFETY ALERT SYMBOL:; Indicates danger, warning, or caution. The safety symbols and the
SAFETY INTRODUCTION Thanks for purchasing the WEN Compact Circular Saw. We know you are excited to start sawing through your workpiece, but first, please take a moment to read through the manual. This manual provides information regarding potential safety concerns, as well as helpful assembly and op...
Page 4 - GENERAL SAFETY RULES
WARNING: Dust generated from certain materials can be hazardous to your health. Always operate the tool in a well-ventilated area and wear a dust mask. Use dust collection systems when processing wood and plastics. Dust extractors or dust bags must not be connected when processing metals. PERSONAL S...
Page 5 - Arsenic and chromium from chemically treated lumber.
POWER TOOL USE AND CARE 1. Avoid accidental start-ups. Make sure the power switch is in the OFF position before connecting the plug to a power source or carrying the tool. 2. Check power tool for damaged parts. Check for misalignment of moving parts, jamming, breakage, improper mounting, or any othe...
Page 6 - RULES FOR THE COMPACT CIRCULAR SAW
RULES FOR THE COMPACT CIRCULAR SAW 6 WARNING: Do not let comfort or familiarity with the product replace strict adherence to product safety rules. If you use this tool unsafe or incorrectly, you can suffer serious personal injury. 1. WORK ENVIRONMENT. Do not operate the tool in wet or damp condition...
Page 7 - REDUCING KICKBACK
RULES FOR THE COMPACT CIRCULAR SAW 7 REDUCING KICKBACK Kickback is a sudden reaction to a pinched, bound or misaligned saw blade, causing an uncontrolled saw to lift up and out of the work piece toward the operator. When the blade is pinched or bound tightly by the kerf closing down, the blade stall...
Page 8 - ELECTRICAL INFORMATION; AMPERAGE
WARNING: The double insulated system is intended to protect the user from electric shock resulting from a break in the tool’s internal insulation. Observe all normal safety precautions to avoid electrical shock. 1. POLARIZED PLUGS. To reduce the risk of electric shock, this equipment has a polarized...
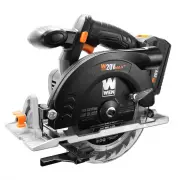
Page 9 - KNOW YOUR COMPACT CIRCULAR SAW
KNOW YOUR COMPACT CIRCULAR SAW Carefully unpack the tool from the packaging. Check all components and compare against the graph below. If any part is damaged or missing, please contact our customer service at (800) 232-1195, M-F 8-5 CST or email us at [email protected]. Tile-cutting Diamond Blade So...
Page 10 - ASSEMBLY & ADJUSTMENTS; SELECT THE RIGHT BLADE
WARNING: Wear safety gloves when handling saw blades to prevent injuries from accidentally contacting the blade tip. 1. Unplug your compact circular saw from the power source. 2. Press down the spindle lock (Fig. 1) to prevent the blade from spinning. With the spindle lock pressed down, use the incl...
Page 11 - Using the Depth Scale:
CUTTING GUIDE INDICATOR (Fig. 6) The cutting guide indicators can be found at the front and rear of the saw base. This guide helps to indicate where the cut will be occurring. Before cutting, draw a guideline on the workpiece and follow the guide-line with the cutting guide to create more accurate c...
Page 12 - INSTALLING THE RIP FENCE
ASSEMBLY & ADJUSTMENTS CONNECTING THE DUST EXTRACTION HOSE (Fig. 6) Dust and chips will be produced during operation that can harm your health and create a mess in your work area. It is recommended to extract the sawdust by connecting your tool to a dust extraction system using the included dust...
Page 13 - OPERATION; OPERATING THE SAW; Side to be cut
CUTTING METAL It is recommended to start with cutting wood to become familiarized with your tool before attempting to cut tougher materials such as metal and some plastics as they require more pressure. Make sure to install the metal blade for metal cutting operations (see page 10). Before cutting m...
Page 14 - MAINTENANCE; WARNING; performing any maintenance.; CLEANING
MAINTENANCE WARNING : To avoid accidents, always disconnect the tool from the power supply before cleaning or performing any maintenance. 14 CLEANING Cleaning your tool immediately after each operation is recommended. Wipe the equipment with a clean cloth or blow away the dust with compressed air at...
Page 15 - TROUBLESHOOTING; Problem; Motor does not start
TROUBLESHOOTING 15 Problem Possible Cause Solution Motor does not start Power cord damaged or not properly plugged in. Check the power cord, extension cord, power plug and the power outlet. Make sure the outlet is functional. Do not use the tool if any cord is damaged. Defective power switch. Stop u...
Page 16 - EXPLODED VIEW & PARTS LIST
Page 18 - LIMITED TWO YEAR WARRANTY
LIMITED TWO YEAR WARRANTY WEN Products is committed to build tools that are dependable for years. Our warranties are consistent with this commitment and our dedication to quality. LIMITED WARRANTY OF WEN CONSUMER POWER TOOLS PRODUCTS FOR HOME USE GREAT LAKES TECHNOLOGIES, LLC (“Seller”) warrants to ...