Page 3 - INTRODUCTION; maximize safety for both yourself and others.
INTRODUCTION Thanks for purchasing the WEN Mini Circular Saw. We know you are excited to put your tool to work, but first, please take a moment to read through the manual. Safe operation of this tool requires that you read and understand this operator’s manual and all the labels affixed to the tool....
Page 4 - GENERAL SAFETY RULES; WORK AREA SAFETY; PERSONAL SAFETY
GENERAL SAFETY RULES Safety is a combination of common sense, staying alert and knowing how your item works. SAVE THESE SAFETY INSTRUCTIONS. WARNING: Read and understand all warnings, cautions and operating instructions before using this tool. Failure to follow all instructions listed below may resu...
Page 5 - POWER TOOL USE AND CARE
GENERAL SAFETY RULES 5. Remove any adjusting key or wrench before turning the power tool on. A wrench or a key left attached to a rotating part of the power tool may result in personal injury. 6. Do not overreach. Keep proper footing and balance at all times. This enables better control of the power...
Page 6 - SPECIFIC RULES FOR THE MINI CIRCULAR SAW
1. TOOL PURPOSE. This circular saw is designed to cut through softwood, tile, and aluminum only. Cut- ting other materials could result in fire, injury, or damage to the workpiece. Using the machine for any other purpose for which it is not designed may result in serious injuries, machine damage and...
Page 8 - LASER SAFETY; BATTERY SAFETY
8 SPECIFIC RULES FOR THE MINI CIRCULAR SAW LASER SAFETY ATTENTION: LASER RADIATION. CLASS 2 LASER. DO NOT STARE INTO THE BEAM. 1. Do not look directly into the laser beam with unprotected eyes. Never look into the path of the beam. 2. Never point the laser beam towards reflective surfaces. Never poi...
Page 9 - GUIDELINES AND RECOMMENDATIONS FOR EXTENSION CORDS; ELECTRICAL INFORMATION; DOUBLE-INSULATED TOOLS
1. EXAMINE EXTENSION CORD BEFORE USE. Make sure your extension cord is properly wired and in good condition. Always replace a damaged extension cord or have it repaired by a qualified person before using it. 2. DO NOT ABUSE EXTENSION CORD. Do not pull on cord to disconnect from receptacle; always di...
Page 10 - KNOW YOUR MINI CIRCULAR SAW; UNPACKING
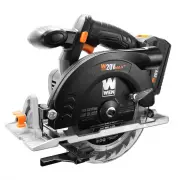
KNOW YOUR MINI CIRCULAR SAW Power Switch Blade Release Button Laser Power Switch Handle Arbor Screw Depth Locking Lever Fence Lock Knob Cutting Guide Notch Cutting Depth Scale Rip Fence HSS Metal-Cutting Blade Diamond Tile-Cutting Blade Dust Extraction Hose M5 Hex Wrench Hex Key Storage UNPACKING Wi...
Page 11 - ASSEMBLY & ADJUSTMENTS; SELECT THE RIGHT BLADE
ASSEMBLY & ADJUSTMENTS SELECT THE RIGHT BLADE Your mini circular saw is a versatile tool that is capable of cutting different materials by using the correct blade. Your tool comes with three blades: a wood-cutting blade (pre-installed), a metal-cutting blade and a tile-cutting blade. Make sure t...
Page 14 - CONNECTING THE DUST EXTRACTION HOSE
Fig. 6 Laser Laser Switch ASSEMBLY & ADJUSTMENTS USING THE LASER (FIG. 6) The laser located on the top of your saw can also be used to in- dicate the line of cut. Unscrew the laser cover and install the two AG13 batteries. Securely replace the laser cover. Switch the laser ON and align the laser...
Page 15 - OPERATION; PREPARING FOR OPERATION; OPERATING THE SAW
OPERATION 15 PREPARING FOR OPERATION 1. Prepare the work space and position power cords away from the cutting area. Connect your saw to a dust extraction system (see the previous section). 2. Select and install the correct saw blade for the material to be cut (see page 10). Check to ensure that the ...
Page 16 - CUTTING METAL
OPERATION CUTTING METAL It is recommended to start with cutting wood to become familiarized with your tool before attempting to cut tougher materials such as metal and some plastics, as they require more pressure. Make sure to install the metal blade for metal cutting operations (see page 12). Befor...
Page 17 - MAINTENANCE; ROUTINE INSPECTION; LUBRICATION
MAINTENANCE ROUTINE INSPECTION Before each use, inspect the general condition of the tool. If any of these following conditions exist, do not use until parts are replaced or the sharpener is properly repaired. Check for: • Loose hardware or improper mounting, • Misalignment or binding of moving part...
Page 18 - TROUBLESHOOTING GUIDE
PROBLEM CAUSE SOLUTION Motor does not start Power cord damaged or not properly plugged in. Check the power cord, extension cord, power plug and the power outlet. Make sure the outlet is func- tional. Do not use the tool if any cord is damaged. Defective power switch. Stop using the tool and contact ...
Page 19 - EXPLODED VIEW & PARTS LIST
EXPLODED VIEW & PARTS LIST 19 1 44 55 20 52 51 27 59 85 49 54 80 79 86 61 68 58 64 63 60 83 28 32 31 89 87 25 26 33 88 84 30 43 82 40 50 46 75 76 45 42 92 57 77 41 56 67 66 65 12 13 14 10 4 5 19 2 23 72 69 70 74 22 6 71 37 91 73 73 62 9 48 17 38 38 11 24 81 21 78 47 90 8 16 39 18 18 29 15 7 53 2...
Page 22 - WARRANTY STATEMENT
WEN Products is committed to building tools that are dependable for years. Our warranties are consistent with this commitment and our dedication to quality. LIMITED WARRANTY OF WEN CONSUMER POWER TOOLS PRODUCTS FOR HOME USE GREAT LAKES TECHNOLOGIES, LLC (“Seller”) warrants to the original purchaser ...