Page 2 - Important Safe Operation Practices; Training; Safe Handling of Gasoline:; Operation; CALIFORNIA PROPOSITION 65
Important Safe Operation Practices 1 2 Training 1. Read, understand, and follow all instructions on the machine and in the manual(s) before attempting to assemble and operate. Keep this manual in a safe place for future and regular reference and for ordering replacement parts. 2. Be familiar with al...
Page 3 - Notice Regarding Emissions; Symbol; SAVE THESE INSTRUCTIONS!
3 S ection 1 — i mportant S afe o peration p racticeS 5. Do not change the engine governor settings or over-speed the engine. The governor controls the maximum safe operating speed of engine. 6. Maintain or replace safety and instruction labels, as necessary. 7. Follow this manual for safe loading, ...
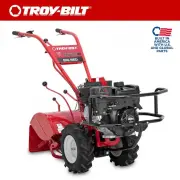
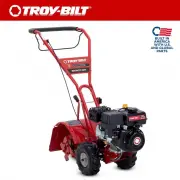
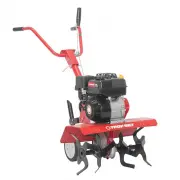
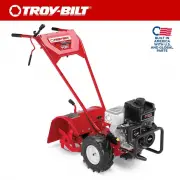
Page 4 - Unpacking Instructions; Thank You
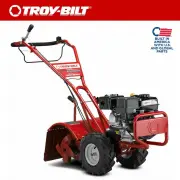
Assembly & Set-Up 2 4 Contents of Carton • Tiller (1) • Handlebar Assembly (1) • Shift Rod (1) • Depth Stake (1) • Operator’s Manual (1) • Engine Operator’s Manual (1) NOTE: This Operator’s Manual covers several models. Garden tiller features may vary by model. Not all features in this manual ar...
Page 5 - Clutch Cable
5 S ection 2 — A SSembly & S et -U p 3. Route the wire over to the left side of the handle and secure with a cable tie on the lower part of the handle. See Figure 2-5. NOTE: Leave a little extra slack in the emergency stop control wire between the cable ties in steps 2 and 3 of this section to a...
Page 6 - Control Rod; Tires; Adjustments; Handle
6 S ection 2 — A SSembly & S et -U p Control Rod 1. Make sure the handle assembly is in the highest position. Refer to the Controls & Operation section. 2. Remove the cotter pins from the control rod, leave the rubber washers on the control rod. See Figure 2-9. Cotter Pin Cotter Pin Rubber W...
Page 7 - Using Emergency Stop Control (If Equipped)
Controls & Operation 3 7 Gear Selection Handle Handle Adjustment Loc k Depth Stake Shift Lever Indicator Clutch Control Emergency Stop Control Figure 3-1 NOTE: This Operator’s Manual covers several models. Garden tiller features may vary by model. Not all features in this manual are applicable t...
Page 8 - Setting The Depth
8 S ection 3 — c ontrolS & o peration Setting The Depth Tilling depth is controlled by the depth stake which can be adjusted to five different settings. Adjust the side shields as you adjust the depth stake. WARNING! Be certain spark plug wire is disconnected and grounded against the engine when...
Page 9 - Service; Maintenance
Service 4 9 WARNING! Disconnect the spark plug wire and ground it against the engine before performing any maintenance or repairs. Maintenance Engine Refer to the separate Engine Operator’s Manual for engine maintenance instructions. Tires Recommended operating tire pressure is approximately 20 p.s....
Page 10 - Tines; Accessing Tine Assembly; Removing Individual Tines; Storage; Problem; Troubleshooting
10 S ection 4 — S ervice Tines Accessing Tine Assembly 1. Remove the three wingnuts from the side shield. See Figure 4-5. Figure 4-5 2. Slide the end cover back and out from the bottom of the tine shield. See Figure 4-6. Figure 4-6 Removing Tine Assembly While not necessary, removing some or all art...
Page 11 - Cultivadora de Dientes Traseros — Serie 450 y serie RT65; anual; ADVERTENCIA; LEA Y SIGA TODAS LAS INSTRUCCIONES DE ESTE MANUAL ANTES DE PONER EN; Importante Medidas importantes de seguridad.. 2; Índice
P.O. BOX 361131 CLEVELAND, OHIO 44136-0019 Cultivadora de Dientes Traseros — Serie 450 y serie RT65 M anual del operador Medidas importantes de seguridad • Configuración • Funcionamiento • Servicio • Solución de problemas ADVERTENCIA LEA Y SIGA TODAS LAS INSTRUCCIONES DE ESTE MANUAL ANTES DE PONER E...
Page 12 - Medidas importantes de seguridad; Capacitación; Manejo seguro de la gasolina:; Funcionamiento; PROPOSICIÓN 65 DE CALIFORNIA
Medidas importantes de seguridad 1 2 Capacitación 1. Lea, entienda y cumpla todas las instrucciones incluidas en la máquina y en el(los) manual(es) antes de intentar realizar el montaje de la unidad y utilizarla. Guarde este manual en un lugar seguro para consultas futuras y periódicas, así como par...
Page 13 - Aviso referido a emisiones; Mantenimiento y Almacenamiento; Símbolo; GUARDE ESTAS INSTRUCCIONES
3 S ección 1 — M edidaS iMportanteS de Seguridad 4. Antes de limpiar, reparar o inspeccionar la máquina, detenga el motor y asegúrese de que los dientes y todas las partes móviles se hayan detenido. Desconecte el cable de la bujía y póngalo haciendo masa contra el motor para evitar que se encienda a...
Page 14 - Montaje y Configuración; El Contenido del Cartón; Desembalar Instrucciones; Manija; Gracias
Montaje y Configuración 2 4 El Contenido del Cartón • Un Cultivadora • Un Unidad de la Manija • Un Varilla de control • Un Depth Stake • Un Manual de Operario • Un Manual de Operario de Motor NOTA: Este Manual abarca varios modelos. características Jardín caña puede variar según el modelo. No todas ...
Page 15 - Cable del Embrague
5 S ección 2 — M ontaje y c onfiguración NOTA: Deje un poco de holgura adicional en el cable de control de parada de emergencia entre los precintos en los pasos 2 y 3 de esta sección para permitir un rango de movimiento completo para el ajuste del mango superior. Figura 2-5 4. Instale el interruptor...
Page 16 - Varilla de Control; Configuración; Neumáticos; Ajustes; Cable del embrague; Manejar
6 S ección 2 — M ontaje y c onfiguración Varilla de Control 1. Asegúrese de que la unidad de la manija esta en la posición más alta. Consulte la sección Conozca la cultivadora. 2. Retire los broches de horquilla de la varilla de control (las arandelas de goma deben quedar en la varilla de control). ...
Page 17 - Controles y Funcionamiento; Control de parada de emergencia del motor (Si; Encendido del motor; Usando el control de parada de emergencia del
Controles y Funcionamiento 3 7 control de parada de emergencia del motor Control de embrague Estaca de profundidad Cambie de puesto el indicador de la palanca Traba de ajuste de la manija Manija selectora de cambios Figura 3-1 NOTA: Este Manual abarca varios modelos. características Jardín caña pued...
Page 18 - Establecimiento de la profundidad
8 S ección 3 — c ontroleS y F uncionamiento Establecimiento de la profundidad La profundidad de labranza está controlada por la estaca de profundidad que se puede regular en cinco posiciones diferentes. Ajuste los protectores laterales al regular la estaca de profundidad. ¡ADVERTENCIA! Cerciórese de...
Page 19 - Servicio; Mantenimiento
Servicio 4 9 ¡ADVERTENCIA! Desconecte el cable de la bujía y póngalo haciendo masa contra el motor antes de realizar cualquier reparación. Mantenimiento Motor Consulte el Manual de Operario de Motor separado para conocer las instrucciones de mantenimiento del mismo. Neumáticos Verifique la presión d...
Page 20 - Problema; Solución de problemas; Tener acceso al montaje de dientes; Almacenamiento fuera de temporada
10 S ección 4 — S ervicio Problema Causa Solución Los dientes no enganchan 1. Hay un objeto extraño entre los dientes. 2. Falta la o las chavetas de horquilla de los dientes. 3. La polea y la polea loca necesitan ajuste. 4. Dificultad en el cambio de marcha. 5. El cable de control no está ajustado c...