Page 4 - “IMPORTANT SAFETY INSTRUCTIONS”; Read all instructions before using.; DANGER; drop into water or other liquid.; WARNING; recommended by the manufacturer as contained in this manual.; This sewing machine is intended for household use.; SAVE THESE INSTRUCTIONS; UK ONLY IMPORTANT PLEASE READ CAREFULLY
4 English “IMPORTANT SAFETY INSTRUCTIONS” When using the sewing machine, basic safety precautions should always be followed, including the following: Read all instructions before using. DANGER - - To reduce the risk of electric shock. 1 The sewing machine should never be left unattended when plugged...
Page 5 - “REGLES DE SECURITE ESSENTIELLES”; Lire toutes les instructions avant d’utiliser la machine.; Remplacez l’ampoule avec une autre de la même puissance, 15 watts.”; CONSERVER CES INSTRUCTIONS
Français “REGLES DE SECURITE ESSENTIELLES” Lors de l’utilisation d’un appareil électrique, des mesuresélémentaires de sécurité doivent toujours être respectées. Lire toutes les instructions avant d’utiliser la machine. DANGER - - Pour réduire les risques de choques électriques. 1. Il ne faut jamais ...
Page 6 - “BELANGRIJKE VEILIGHEIDSINSTRUCTIES”; Lees alle instructies voor gebruik.; GEVAAR
Nederlands “BELANGRIJKE VEILIGHEIDSINSTRUCTIES” Wanneer u de naaimachine gebruikt , dient u altijd een aantal belangrijke veiligheidsmaatregelen in acht te nemen, waaronder de volgende. Lees alle instructies voor gebruik. GEVAAR - - Om het risico van electrische schokken te voorkomen. 1. De naaimach...
Page 7 - “IMPORTANTI ISTRUZIONI DI SICUREZZA”; Leggere tutte le istruzioni prima dell’uso.; PERICOLO; sempre la presa elettrica dopo l’utilizzo e prima della pulizia.; ATTENZIONE; viene utilizzata da o vicino ad un bambino.; CONSERVATE QUESTE ISTRUZIONI
Italiano “IMPORTANTI ISTRUZIONI DI SICUREZZA” Quando usate la macchina per cucire, occorre osservare sempre le elementari norme di sicurezza, compreso quanto segue. Leggere tutte le istruzioni prima dell’uso. PERICOLO - - Per ridurre il rischio di scosse elettriche. 1. Non lasciare incustodita la ma...
Page 8 - CONTENTS
1 English CONTENTS NAMES OF PARTS Side dial type ........................................ 1 ACCESSORIES ........................................ 5 SETTING UP Connecting foot controller andpower cord ............................................ 7Power / Light switch.............................. 7Foo...
Page 9 - SOMMAIRE
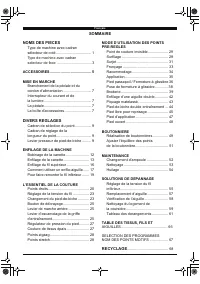
2 Français SOMMAIRE NOMS DES PIECES Type de machine avec cadransélecteur de coté .................................. 1 ACCESSOIRES ........................................ 5 MISE EN MARCHE Branchement de la pédale et ducordon d’alimentation ........................... 7Interrupteur du courant et dela...
Page 10 - INHOUD
3 Nederlands INHOUD NAAM VAN DE DELEN Type met knop aan de zijkant............... 1 ACCESSOIRES ........................................ 5 AANSLUITEN Aansluiten van voetpedaal enlichtnetsnoer ......................................... 8Aan / Uit schakelaar ............................. 8Voetpedaal .....
Page 11 - INDICE
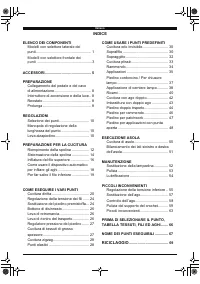
4 Italiano INDICE ELENCO DEI COMPONENTI Modelli con selettore laterale deipunti ...................................................... 1 ACCESSORI ............................................. 5 PREPARAZIONE Collegamento del pedale e del cavodi alimentazione.................................... 8Inte...
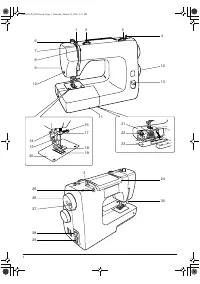
Page 13 - NAMES OF PARTS; Side dial type; ELENCO DEI COMPONENTI; Modelli con selettore laterale dei punti; NAAM VAN DE DELEN; Type met knop aan de zijkant; NOMS DES PIECES; Type de machine avec cadran sélecteur le coté
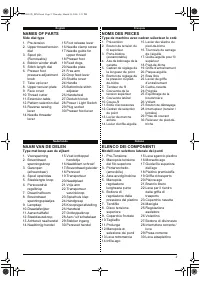
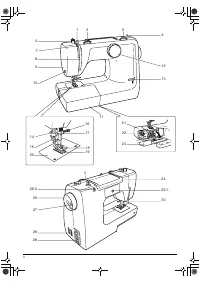
2 Nederlands Italiano English Français NAMES OF PARTS Side dial type 1. Pre-tension2. Upper thread tension dial 3. Spool pin (Removable) 4. Bobbin winder shaft5. Stitch length dial6. Presser foot pressure adjustment knob 7. Take up lever8. Upper tension plate9. Face cover10.Thread cutter11.Extension...
Page 15 - Front dial type; Type de machine avec cadran selecteur de face; Type met knop aan de voorkant; Modelli con selettore frontale dei punti
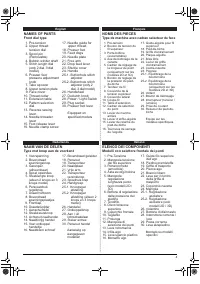
4 English Français Nederlands Italiano NAMES OF PARTS Front dial type NOMS DES PIECES Type de machine avec cadran selecteur de face NAAM VAN DE DELEN Type met knop aan de voorkant ELENCO DEI COMPONENTI Modelli con selettore frontale dei punti 1. Pre-tension2. Upper thread tension dial 3. Spool pin (...
Page 17 - NAMES OF ACCESSORIES; Pied libre de broderie; ELENCO DEGLI ACCESSORI; Borduurmaasvoet
6 Nederlands Italiano English Français NAMES OF ACCESSORIES Standard accessories 1. Zigzag sewing foot (on machine) 2. Zipper foot3. Buttonhole foot4. Buttonhole cutter5. Needle plate screw driver 6. Oiler7. Bobbins (3 pcs.) 8. Ball point needle (1 pc.) 9. Standard needle (3 pcs., #14) 10.Screw driv...
Page 18 - OFF; SETTING UP
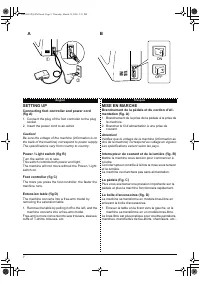
7 English Français OFF ON ➀ ➁ A B SETTING UP Connecting foot controller and power cord (fig A) 1. Connect the plug of the foot controller to the plug socket. 2. Insert the power cord to an outlet. Caution! Be sure the voltage of the machine (information is on the back of the machine) correspond to p...
Page 19 - AANSLUITEN
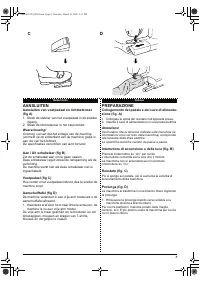
Nederlands Italiano 8 C D AANSLUITEN Aansluiten van voetpedaal en lichtnetsnoer (fig A) 1. Steek de stekker van het voetpedaal in de stekker ingang. 2. Steek de lichtnetsnoer in het stopcontact. Waarschuwing! Overtuig u ervan dat het voltage van de machine (vermeld op de achterkant van de machine) g...
Page 20 - VARIOUS CONTROLS; To insert or remove fabric, and to change presser; DIVERS REGLAGES; position la plus basse a .; FRONT DIAL MODEL
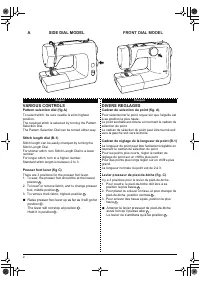
9 English Français L E D O M L A I D E D I S A VARIOUS CONTROLS Pattern selection dial (fig A) To select stitch, be sure needle is at its highest position.The required stitch is selected by turning the Pattern Selection Dial.The Pattern Selection Dial can be turned either way. Stitch length dial (B-...
Page 21 - VERSCHILLENDE BEDIENINGSELEMENTEN; De hendel zal niet in deze stand blijven staan c; REGOLAZIONI
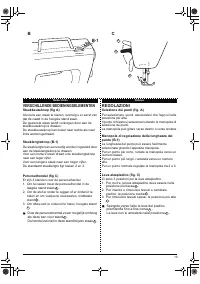
Nederlands Italiano 10 B-1 5 4 3 2 Max 15W c b a C B VERSCHILLENDE BEDIENINGSELEMENTEN Steekkeuzeknop (fig A) Alvorens een steek te kiezen, overtuig u er eerst van dat de naald in de hoogste stand staat.De gewenste steek wordt verkregen door aan de steekkeuzeknop te draaien.De steekkeuzeknop kan zow...
Page 23 - THREADING THE MACHINE; Bobbin winding; ENFILAGE DE LA MACHINE; Bobinage de la canette; NOTE; HET INRIJGEN VAN DE MACHINE; Spoeltje opwinden; OPMERKING; PREPARAZIONE PER LA CUCITURA; Riempimento della spolina
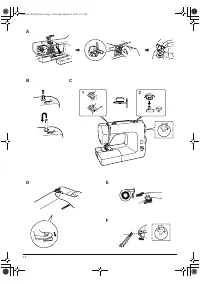
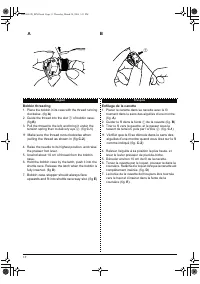
1 2 Nederlands Italiano English Français THREADING THE MACHINE Bobbin winding 1. Set the needle at its highest position by rotating the handwheel towards you. Open the shuttle cover. Hold the latch of bobbin case and pull it out. Release the latch and the bobbin comes out of the bobbin case easily. ...
Page 24 - Bobbin threading
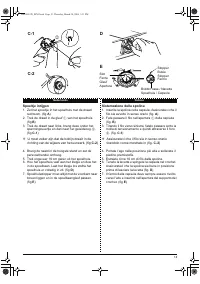
13 English Français ➀ A B Bobbin threading 1. Place the bobbin in its case with the thread running clockwise. (fig A ) 2. Guide the thread into the slot 1 of bobbin case. (fig B ) 3. Pull the thread to the left, and bring it under the tension spring then to delivery eye 2 . (fig C-1 ) ❈ Make sure th...
Page 25 - Spoeltje inrijgen
Nederlands Italiano 1 4 ➁ C-1 D C-2 E SlotFenteGleufApertura StopperButéeStopperFermo Bobbin case / NavetteSpoelhuis / Capsula Spoeltje inrijgen 1. Zet het spoeltje in het spoelhuis met de draad rechtsom. (fig A ) 2. Trek de draad in de gleuf 1 van het spoelhuis. (fig B ) 3. Trek de draad naar links...
Page 27 - Upper threading
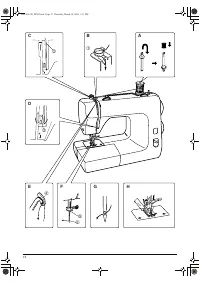
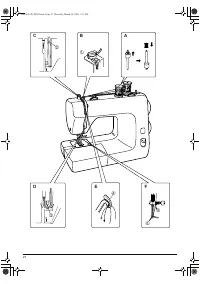
1 6 Nederlands Italiano English Français Upper threading 1. Raise the presser foot lever. Raise the take-up lever to its highest position by rotating the handwheel towards you. 2. Pull out spool pin and insert the shorter side into the machine.Place a spool of thread on spool pin. (fig A ) 3. Pass t...
Page 28 - How to use needle threader; needle; Comment utiliser un enfile-aiguille
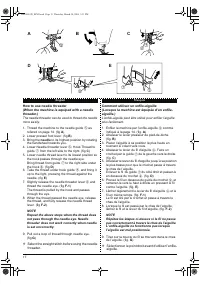
1 7 English Français ➅➆ ➇ ➆ ➈ Max 15W ➄ A B C D E How to use needle threader (When the machine is equiped with a needle threader.) The needle threader can be used to thread the needle more easily. 1. Thread the machine to the needle guide 5 as refered on page 14. (fig A ) 2. Lower presser foot lever...
Page 29 - Het gebruik van de draadinrijger; naald
Nederlands Italiano 1 8 ➅ F-1 F-2 G Het gebruik van de draadinrijger (Als de machine is uitgerust met een draadinrijger) De draadinrijger kan worden gebruikt om de draad makkelijker door het oog van de naald te krijgen. 1. Span de machine in tot de naaldgeleider 5 zoals aangegeven op blz. 14. (fig A...
Page 30 - Bringing up lower thread with presser foot up
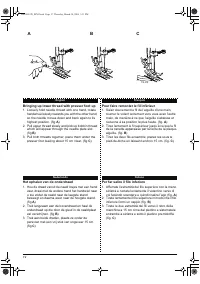
1 9 English Français Nederlands Italiano 15 cm A B C Bringing up lower thread with presser foot up 1. Loosely hold needle thread with one hand, rotate handwheel slowly towards you with the other hand, so the needle moves down and back again to its highest position. (fig A ) 2. Pull upper thread slow...
Page 31 - SEWING BASICS; C D
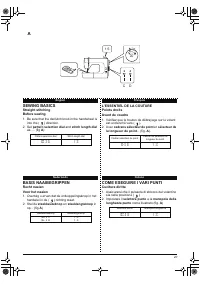
20 English Français Nederlands Italiano 1-5 4 3 A SEWING BASICS Straight stitchingBefore sewing 1. Be sure that the declutch knob in the handwheel is into the ( ) direction. 2. Set pattern selection dial and stitch length dial as..... (fig A ) Pattern selection dial Stitch length dial No. 3 CNo. 4 D...
Page 32 - Straight stitching; Hold the threads for the first few stitches to
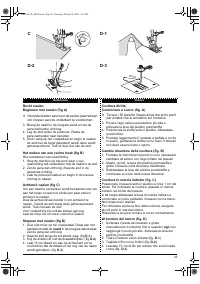
2 1 English Français A B Straight stitching Starting to sew (fig A) ❈ Hold the threads for the first few stitches to avoid knotting on the under surface. 3. Raise the needle to its highest position, and lift the presser foot lever. 4. Place fabric under the presser foot. Lower presser foot.5. Press ...
Page 33 - Recht naaien
Nederlands Italiano 22 15 cm C D-1 D-2 D-3 Recht naaien Beginnen met naaien (fig A) ❈ Houd de draden vast voor de eerste paar steken om knopen aan de onderkant te voorkomen. 3. Breng de naald in de hoogste stand en zet de persvoethendel omhoog. 4. Leg de stof onder de persvoet. Plaats de persvoethen...
Page 34 - Adjusting thread tension
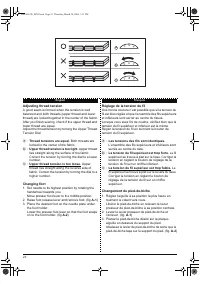
2 3 English Français 6 5 4 5 4 3 7 6 5 a b c Adjusting thread tension A good seam is formed when the tension is well balanced and both threads (upper thread and lower thread) are locked together in the center of the fabric.After you finish sewing, check if the upper thread and lower thread are equal...
Page 35 - Regolazione della tensione dei fili
Nederlands Italiano 24 Regolazione della tensione dei fili Una buona cucitura si ottiene quando le tensioni sono ben bilanciate ed entrambi i fili (filo superiore e filo inferiore) sono incrociati insieme al centro del tessuto.Al termine della cucitura controllate se il filo superiore ed inferiore s...
Page 36 - The Declutch Knob is on the Handwheel. (fig
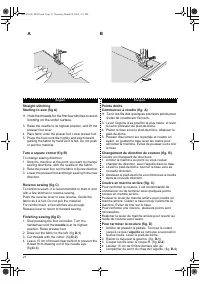
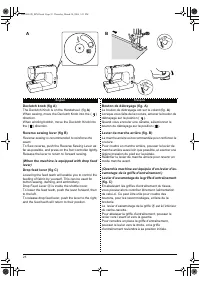
25 English Français A B Declutch knob (fig A) The Declutch Knob is on the Handwheel. (fig A ) When sewing, move the Declutch Knob into the ( ) direction.When winding bobbin, move the Declutch Knob into the ( ) direction. Reverse sewing lever (fig B) Reverse sewing is recommended to reinforce the sea...
Page 38 - Presser foot pressure adjustment knob (fig A)
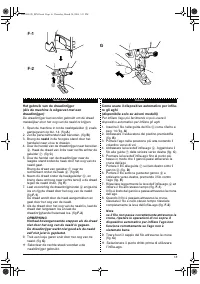
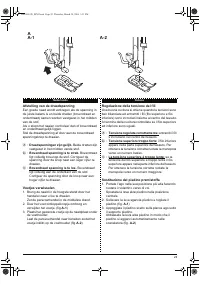
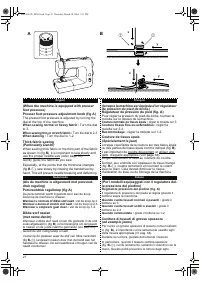
27 English Français Nederlands Italiano ➀ ➀ x y x y A B (When the machine is equipped with presser foot pressure) Presser foot pressure adjustment knob (fig A) The presser foot pressure is adjusted by turning the dial at the top of the machine. When sewing normal or heavy fabric : Turn the dial to 3...
Page 39 - E F G; P Q U
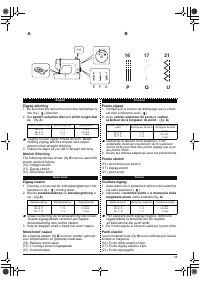
28 English Français Nederlands Italiano 1-5 5 7 6 16 17 21 B A Zigzag stitching 1. Be sure that the declutch knob in the handwheel is into the ( ) direction. 2. Set pattern selection dial and stitch length dial as... (fig A ) Slightly loosen upper thread tension. Betterlooking zigzag stitches requir...
Page 40 - HOW TO USE BUILT IN STITCHES; Blind hem stitch; Overcasting prevents edge of fabric from fraying.; Point de couture invisible; Pour des tissus légers:; Surfiler empêche les bords des tissus de s’effilocher.
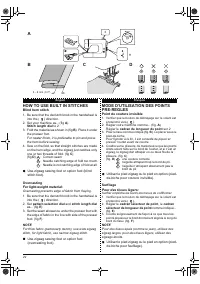
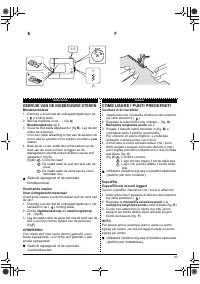
29 English Français 3 - 5 mm (0.2”) a b c 2 8 A D C B HOW TO USE BUILT IN STITCHES Blind hem stitch 1. Be sure that the declutch knob in the handwheel is into the ( ) direction. 2. Set your machine as... (fig A ) Stitch length dial to 2 3. Fold the material as shown in (fig B ). Place it under the p...
Page 41 - COME USARE I PUNTI PREDEFINITI; Cucitura orlo invisibile; Sopraffilo dei tessuti leggeri; Il punto sopraffilo impedisce che i bordi si sfilaccino; GEBRUIK VAN DE INGEBOUWDE STEKEN; Blindzoomsteek; Voor lichtgewicht materiaal:
Nederlands Italiano 30 COME USARE I PUNTI PREDEFINITI Cucitura orlo invisibile 1. Assicurarsi che il pulsante di sblocco del volantino sia nella posizione ( ) 2. Regolate la macchina come indicato... (fig. A ) Manopola lunghezza punto sul 2 3. Piegate il tessuto come mostrato in (fig. B ) e collocat...
Page 42 - Overcasting; Overlocking; Surfilage; Surfiler empêche le bord des tissus de s’effilocher.; Surjet
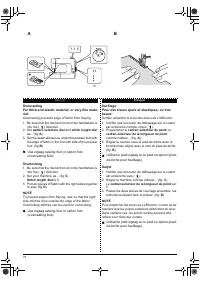
31 English Français 1-1.5 11 B A Overcasting For thick and elastic material, or very fine mate-rial: Overcasting prevents edge of fabric from fraying. 1. Be sure that the declutch knob in the handwheel is into the ( ) direction. 2. Set pattern selection dial and stitch length dial as... (fig A ) 3. ...
Page 43 - Overhands naaien; Sopraffilo; Sopraffilo di tessuti spessi o elastici; Sopraggitto
Nederlands Italiano 32 5 19 D C Overhands naaien Voor dik en elastisch materiaal, of zeer fijn ma-teriaal: Overhands naaien voorkomt rafelen aan de rand vande stof. 1. Overtuig u ervan dat de ontkoppelingsknop in het handwiel in de ( ) richting staat. 2. Zet de steekkeuzeknop en steeklengteknop op.....
Page 44 - Smocking; Stitch length dial; Fronçage; sélecteur de longueur du point; Rimpelen; Steeklengteknop; Cucitura plissé; Manopola lunghezza punto
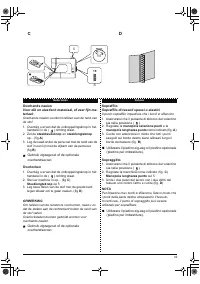
33 English Français Nederlands Italiano 5 20 B A C Smocking 1. Be sure that the declutch knob in the handwheel is into the ( ) direction. 2. Sew two straight lines with very loose thread tension. Make knots in one end. (Long stitch) 3. Gather fabric towards the knots while holding the other end of l...
Page 45 - Mending; Racommodage; Herstelwerk; Steeklengteknop tussen; Rammendo
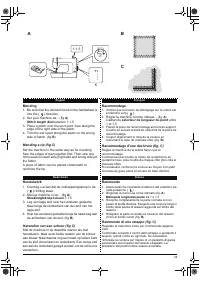
34 English Français Nederlands Italiano 1-1.5 11 B A C Mending 1. Be sure that the declutch knob in the handwheel is into the ( ) direction. 2. Set your machine as... (fig A ) Stitch length dial between 1-1.5 3. Place a patch over the worn part. Sew along the edge of the right side of the patch. 4. ...
Page 46 - Applique work; Application; Applicazioni; Appliqueren; V W
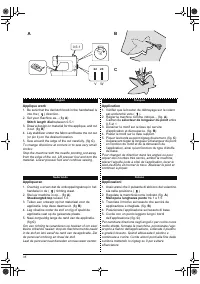
35 English Français Nederlands Italiano 0.5-1 22 23 B A C Applique work 1. Be sure that the declutch knob in the handwheel is into the ( ) direction. 2. Set your machine as... (fig A ) Stitch length dial between 0.5-1 3. Draw a design on material for the applique, and cut it out. (fig B ) 4. Lay sta...
Page 47 - Pied passepoil / Fermeture à glissière
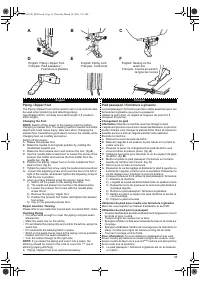
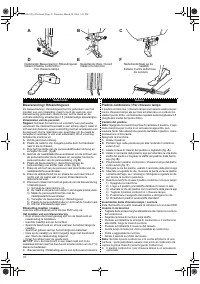
3 6 English Français A B C D E F English: Piping / Zipper FootFrançais: Pied passepoil / Fermeture à glissière English: Piping cordFrançais: Cordonnet English: Sewing on the seam line Français: Coudre en suivant la ligne de couture Piping / Zipper Foot The Piping / Zipper Foot can be used to set in ...
Page 48 - Piedino cordoncino / Per chiusure lampo; Biesversiering / Ritssluitingvoet
Nederlands Italiano 3 7 Piedino cordoncino / Per chiusure lampo Il piedino cordoncino / chiusure lampo può essere usato sia per cucire chiusure lampo sia per fare ed attaccare un cordoncino. Usate il punto dritto, normalmente regolato sulla llunghezza 2.5 (lunghezza media del punto dritto) Cambio de...
Page 50 - Free hand embroidery; Broderie; Cadran de sélecteur de longueur du point; E F G
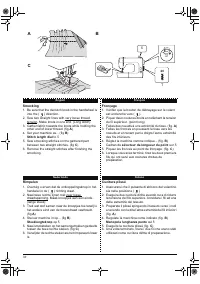
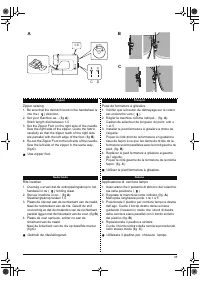
39 English Français 0 5 6 7 A Free hand embroidery 1. Be sure that the declutch knob in the handwheel is into the ( ) direction. 2. Drop feed teeth. (see page 23) 3. Set your machine for SATIN STITCH. (fig A ) Stitch length dial to ZERO 4. Reduce upper thread tension slightly to prevent lower thread...
Page 51 - Borduren; Ricami
Nederlands Italiano 40 Borduren 1. Overtuig u ervan dat de ontkoppelingsknop in het handwiel in de ( ) richting staat. 2. Verzink de transporteur. (zie pag. 24) 3. Stel uw machine in voor satijnsteek. (fig A ) Steeklengteknop op 0 4. Verminder voorzichtig de bovendraadspanning om te voorkomen dat de...
Page 53 - Twin needle threading
42 Nederlands Italiano English Français Twin needle threading 1. Set the extra spool pin on the machine. (The extra spool pin and twin needle are optional accessories and can be supplied with specified machines). Place a spool of thread on each spool pin. (fig A ) 2. Thread the two threads in the sa...
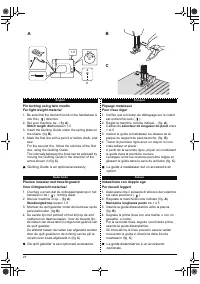
Page 54 - Pin tucking using twin needle; For light weight material; Piquage matelassé; Pour tissu léger; Plooien innaaien met tweelingnaald; Voor lichtgewicht materiaal; Imbastitura con doppio ago; Per tessuti leggeri
43 English Français Nederlands Italiano 1-5 4 B A C Pin tucking using twin needle For light weight material 1. Be sure that the declutch knob in the handwheel is into the ( ) direction. 2. Set your machine as... (fig A ) Stitch length dial between 1-5 3. Insert the Quilting Guide under the spring pl...
Page 55 - Walking Foot
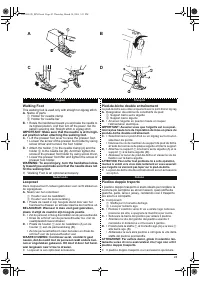
44 English Français Nederlands Italiano A B C D Walking Foot This walking foot is used only with straight or zigzag stitch. A. Name of parts 1 Holder for needle clamp 2 Holder for needle bar B. • Rotate the handwheel toward you and raise the needle to its highest position. And then turn off the powe...
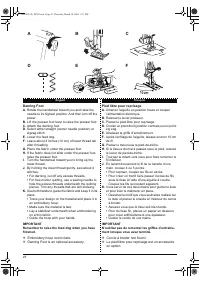
Page 56 - Darning Foot; Embroidery hoop not include.; Pied libre pour reprisage; Cercle à broder non fourni.
45 English Français A B C D E F Darning Foot A. Rotate the handwheel toward you and raise the needle to its highest position. And then turn off the power. B. Lift the presser foot lever to raise the presser foot. C. Attach the darning foot. D. Select either straight (center needle position) or zigza...
Page 57 - Il cerchietto da ricamo non è incluso.; Maasvoet; Borduurhoepel niet inbegrepen.
Nederlands Italiano 46 Piedino per rammendo A. Ruotare il volantino verso di voi e alzate l’ago nella sua posizione plù alta, e spegnete la macchina per cucire. B. Sollevare la barra del piedino per alzare il piedino. C. Mettete il piedino per il rammendo. D. Selezionate un qualsiasi punto dritto (c...
Page 58 - Piecing Foot; Pied d’application
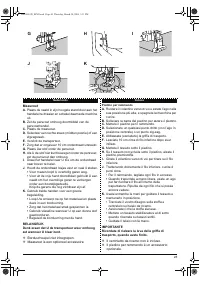
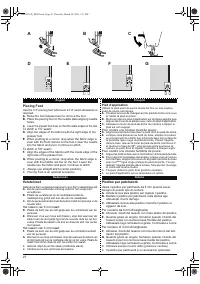
47 English Français Nederlands Italiano A B C D E F G Piecing Foot Use the 1/4” piecing foot whenever a 1/4” seam allowance is required. A. Raise the foot release lever to remove the foot. B. Place the piecing foot on the needle plate aligning needle holes. C. Lower the presser foot lever so that th...
Page 59 - Open Toe Appliqué Foot; Raise the foot release lever to remove the foot.; Pied ouvert; Le pied ouvert est un accessoire en option.; Open Applicatievoet; Alzate la leva alza piedino per togliere il piedino.
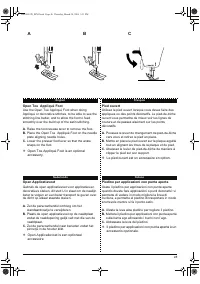
48 English Français Nederlands Italiano A B C Open Toe Appliqué Foot Use the Open Toe Appliqué Foot when doing Appliqué or decorative stitches, to be able to see the stitching line better, and to allow the foot to feed smoothly over the build up of the satin stitching. A. Raise the foot release leve...
Page 60 - Making buttonhole; Inclus dans les accessoires.
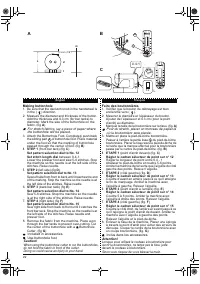
49 English Français 0.3 cm (1/8”) L d t m a b 0.4-1 12 B A C Making buttonhole 1. Be sure that the declutch knob in the handwheel is in the ( ) direction. 2. Measure the diameter and thickness of the button. Add the thickness and 0.3 cm (for bar tacks) to diameter. Mark the size of the buttonhole on...
Page 61 - Cucitura di un’asola; In de accessoireset aanwezig.
Nederlands Italiano 50 Cucitura di un’asola 1. Assicurarsi che il pulsante di sblocco del volantino sia nella posizione ( ). 2. Misurate il diametro e lo spessore del bottone aggiungendo 0,3 cm per i punti di chiusura. Tracciate la dimensione dell’asola sul tessuto (fig. A ) Per materiali elastici, ...
Page 62 - Adjusting stitch balance of buttonhole
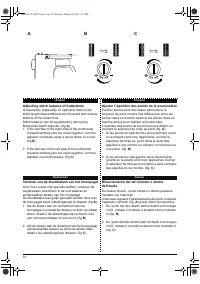
5 1 English Français Nederlands Italiano A B C Adjusting stitch balance of buttonhole Occasionally (especially on speciality fabrics) the stitch length shows differences in forward and reverse stitches of the buttonhole.Stitch balance can be equalized by turning the Buttonhole Stitch Adjuster. (fig ...
Page 63 - Changing light bulb; MAINTENANCE; Changement d’ampoule; ONDERHOUD; Verwisselen van het lampje; MANUTENZIONE; Sostituzione della lampadina
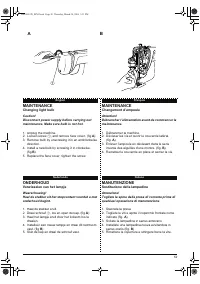
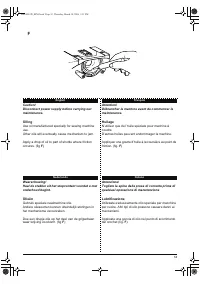
52 English Français Nederlands Italiano ➀ A B MAINTENANCE Changing light bulb Caution!Disconnect power supply before carrying out maintenance. Make sure bulb is not hot. 1. Unplug the machine.2. Loosen screw 1 , and remove face cover. (fig A ) 3. Remove bulb by unscrewing it in an anticlockwise dire...
Page 64 - Cleaning; Schoonmaken; Nettoyage
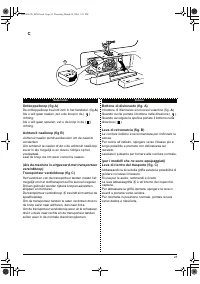
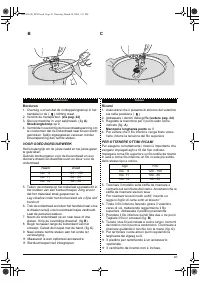
5 3 English Français Nederlands Italiano ➁ ➀ A B C D E Your machine requires cleaning and oiling for good sewing performance.A machine which is used for a few hours a day needs to be cleaned and oiled once a month. Caution!Disconnect power supply before carrying out maintenance. Needle in the raised...
Page 65 - Oiling
54 English Français Nederlands Italiano F Caution!Disconnect power supply before carrying out maintenance. Oiling Use oil manufactured specially for sewing machine use.Other oils will eventually cause mechanism to jam. Apply a drop of oil to part of shuttle where friction occures. (fig F ) Attention...
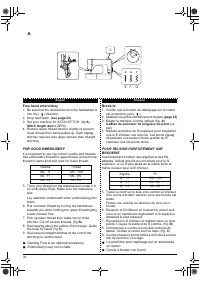
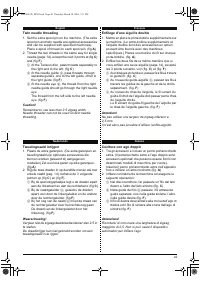
Page 66 - TROUBLE SHOOTING; Lower thread tension adjustment; STORINGEN VERHELPEN; Onderdraad spannings afstelling; PICCOLI INCONVENIENTI; Regolazione della tensione inferiore; SOLUTIONS DE DEPANNAGE; Réglage de la tension du fil inférieur
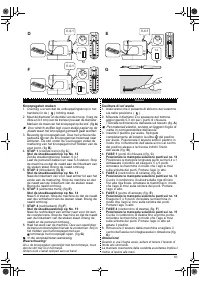
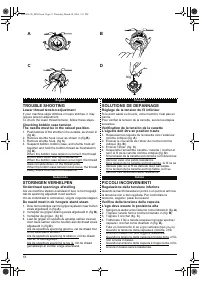
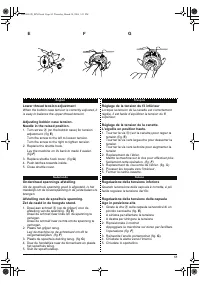
55 English Français Nederlands Italiano 30g A B C D TROUBLE SHOOTING Lower thread tension adjustment If your machine skips stitches or loops stitches, it may require tension adjustment.To check the lower thread tension, follow these steps. Checking bobbin case tensionThe needle must be in the raised...
Page 67 - Draai aan schroef; sulla capsula servendovi di un
56 English Français Nederlands Italiano Réglage de la tension du fil inférieur Lorsque la tension de la canette est correctement réglée, il est facile d’équilibrer la tension du fil supérieur. Réglage de la tension de la canette.L’aiguille en position haute. 1. Tourner la vis a (sur la canette) pour...
Page 70 - Cleaning the shuttle race
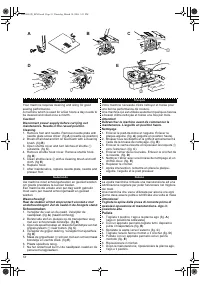
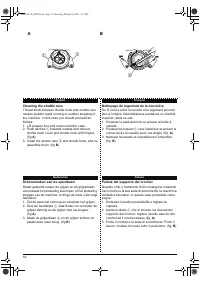
59 English Français Nederlands Italiano ➀ ➀ ➁ A B Cleaning the shuttle race Thread stuck between shuttle hook and shuttle race causes sudden rapid running or sudden stopping of the machine. In this case you should proceed as follows:1. Lift presser foot and remove bobbin case.2. Push latches 1 towar...
Page 71 - Trouble chart
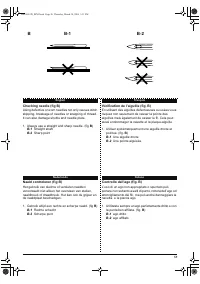
60 English Trouble chart ❈ If trouble is still apparent in the machine, please contact where you purchased or our web. site (Europe only).Do not try to correct fault by yourself. PROBLEM PROBABLE CAUSE CORRECTION Breaking lower thread Thread not wound evenly on the bobbin or not drawn up correctly L...
Page 72 - Tableau des derangements
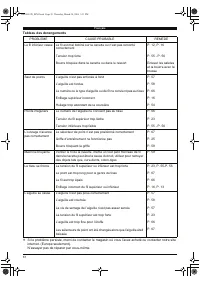
6 1 Français Tableau des derangements ❈ Si le problème persiste, merci de contacter le magasin où vous l’avez acheté ou contacter notre site internet. (Europe seulement).N’essayer pas de réparer par vous-même. PROBLEME CAUSE PROBABLE REMEDE Le fil inférieur casse Le fil est mal bobiné sur la canette...
Page 73 - Storings tabel
62 Nederlands Storings tabel ❈ Als de problemen zich voor blijven doen in de machine, neem dan contact op met het verkooppunt of raadpleeg onze website. (alleen voor Europa).Probeer niet zelf de storing te verhelpen. STORING MOGELIJKE OORZAAK OPLOSSING Breken onderdraad Draad niet goed opgespoeld of...
Page 74 - Piccoli inconvenienti
6 3 Italiano Piccoli inconvenienti ❈ Se l’inconveniente persiste, rivolgetevi a personale tecnico per l’assistenza. Non cercate di riparare il guasto da soli PROBLEMA POSSIBILE CAUSA RIMEDIO Rottura del filo inferiore Il filo è avvolto male sulla spolina o non è risalito correttamente Tensione ecces...
Page 75 - MODEL
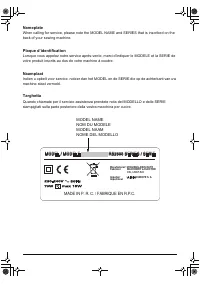
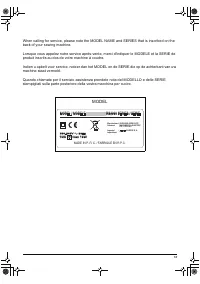
64 When calling for service, please note the MODEL NAME and SERIES that is inscribed on theback of your sewing machine. Lorsque vous appelez notre service après-vente, merci d'indiquer le MODELE et la SERIE deproduit inscrits au dos de votre machine à coudre. Indien u opbelt voor service, noteer dan...
Page 76 - FABRIC, THREAD AND NEEDLE TABLE
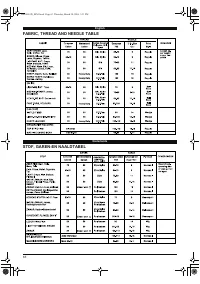
65 Nederlands English FABRIC, THREAD AND NEEDLE TABLE STOF, GAREN-EN NAALDTABEL RS2000-2D_EFNI.book Page 63 Thursday, March 30, 2006 3:31 PM
Page 77 - PRIMA DI SELEZIONARE IL PUNTO, TABELLA TESSUTI, FILI ED AGHI
66 Italiano Français PRIMA DI SELEZIONARE IL PUNTO, TABELLA TESSUTI, FILI ED AGHI TABLE DES TISSUS, FILS ET AIGUILLES RS2000-2D_EFNI.book Page 64 Thursday, March 30, 2006 3:31 PM
Page 78 - NAME OF STITCH PATTERNS
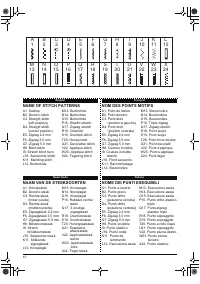
67 English Français Nederlands Italiano 1 2 3 4 5 6 7 8 9 10 11 12 13 14 15 16 17 18 19 20 21 22 23 24 NAME OF STITCH PATTERNS A1. ScallopB2. Domino stitchC3. Straight stitch (left position) D4. Straight stitch (center position) E5. Zigzag 2.2 mmF6. Zigzag 3.5 mmG7. Zigzag 5.0 mmH8. Blind stitchI9. ...
Page 79 - RECYCLING; EU ONLY
68 English Français ޓ DO NOT THROW AWAY!NE PAS JETER ! RECYCLING We are committed to the protection of the environment. We strive to minimize the environmental impact of our products by continuously improving product design and our manufacturing methods. At end of life please dispose of this product...
Page 80 - HERGEBRUIK; RICICLAGGIO
Nederlands Italiano 69 ޓ GOOI DIT NIET WEG!NON SPRECHIAMO NULLA! HERGEBRUIK Wij hebben de verplichting om het milieu te beschermen. Wij moeten streven naar een minimale milieubelasting door onze producten constant te verbeteren voor wat betreft het productontwerp en fabricage methode. Het zich ontdo...
Page 84 - Head Office
679111-CEB30-C Imported by / Importé par : EU ONLY AISIN EUROPE S.A. Web: www.home-sewing.com Head Office Avenue de l'Industrie 21, Parc Industriel, 1420 Braine-L'Alleud BELGIUMTEL: +32 (0) 2 387 0707 FAX: +32 (0) 2 387 1995 UK Branch Unit 4, Swan Business Park, Sandpit Road, Dartford, Kent, DA1 5ED...


 Toyota 2005
User Manual
Toyota 2005
User Manual
 Toyota 2012 Avalon
User Manual
Toyota 2012 Avalon
User Manual
 Toyota Prius HSD
User Manual
Toyota Prius HSD
User Manual
 Toyota MR2
User Manual
Toyota MR2
User Manual
 Toyota RAV 4
User Manual
Toyota RAV 4
User Manual
 Toyota 2010 Prius
User Manual
Toyota 2010 Prius
User Manual
 Toyota Corola 2006
User Manual
Toyota Corola 2006
User Manual
 Toyota 2005 CAMRY
User Manual
Toyota 2005 CAMRY
User Manual
 Toyota 2010 Matrix
User Manual
Toyota 2010 Matrix
User Manual
 Toyota 2011 Tundra
User Manual
Toyota 2011 Tundra
User Manual
 Toyota DTC P0135
User Manual
Toyota DTC P0135
User Manual
 Toyota Matrix 2006
User Manual
Toyota Matrix 2006
User Manual
 Toyota CAMRY SV25
User Manual
Toyota CAMRY SV25
User Manual