Toro 38844 - Manuals
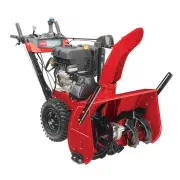
User Manual Toro 38844


Summary
If you are unsure whether or not your machine hasbeen converted for high-altitude use, look for thefollowing label ( Figure 3 ). decal127-9363 Figure 3 WARNING CALIFORNIA Proposition 65 Warning The engine exhaust from this product contains chemicals known to the State of California to cause cancer, ...
• Keep clear of any discharge opening. Keepbystanders, especially small children, out of theoperating area. • Never allow children to operate the machine. Safety and Instructional Decals Safety decals and instructions are easily visible to the operator and are located near any areaof potential dange...
Setup 1 Checking the Engine-Oil Level No Parts Required Procedure Note: Your machine comes with oil in the engine crankcase. Before starting the engine, check the oil level and add oil if necessary. Refer to Checking the Engine-Oil Level (page 17) . 2 Checking the Tire Pressure No Parts Required Pro...
Toro Snow Blowers Manuals
-
 Toro 36003
User Manual
Toro 36003
User Manual
-
 Toro 37799
User Manual
Toro 37799
User Manual
-
 Toro 37805
User Manual
Toro 37805
User Manual
-
 Toro 38474
User Manual
Toro 38474
User Manual
-
 Toro 38475
User Manual
Toro 38475
User Manual
-
 Toro 38701
User Manual
Toro 38701
User Manual
-
 Toro 38752
User Manual
Toro 38752
User Manual
-
 Toro 38753
User Manual
Toro 38753
User Manual
-
 Toro 38755
User Manual
Toro 38755
User Manual
-
 Toro 38756
User Manual
Toro 38756
User Manual
-
 Toro 38757
User Manual
Toro 38757
User Manual
-
 Toro 38838
User Manual
Toro 38838
User Manual
-
 Toro 38842
User Manual
Toro 38842
User Manual
-
 Toro 38890
User Manual
Toro 38890
User Manual