Page 2 - Brand official website; 藍 色 線 條 為 尺 寸 標 示 , 請 勿 印 刷 上 去 !; C o r e P 3; 騎 馬 釘; CHECK; Poki; 刀 模 線; m m
J o i n T t C o m m u n i t y To Re c e i v e B e n e f i t s T t L C S - L i q u i d C o o l i n g S u p p o r t C e r t i f i c a t i o n Dear Valued Customer,Thank you for choosing Thermaltake.As a new user we value your thoughts and opinions and your feedback is important to us. We at Thermaltak...
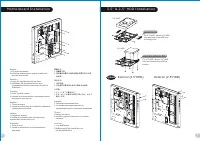
Page 3 - Chapter 1. Product Introduction; C o n t e n t s; Chapter 2. Installation Guide; S p e c i f i c a t i o n
Chapter 1. Product Introduction S p e c i f i c a t i o n A c c e s s o r y Wa r n i n g a n d N o t i c e 1.0 1.1 1.2 01 01 02 C o n t e n t s Chapter 2. Installation Guide 2.0 2.1 2.2 2.3 2.4 2.5 2.6 2.7 2.8 2.9 04 05 06 07 09 11 12 12 13 13 Chapter3 Leads Installation Guide C a s e L E D c o n n ...
Page 4 - Wa r n i n g a n d N o t i c e
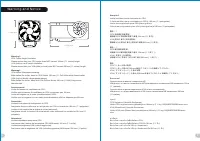
Wa r n i n g a n d N o t i c e < 1 8 0 m m < 2 8 0 m m Wa r n i n g ! ! CPU Cooler Height Limitation: Please ensure that your CPU cooler does NOT exceed 180mm (7.1 inches) height. VGA (Add-on card) Length Limitation: Please ensure that your VGA (Add-on card) does NOT exceed 280mm (11 inches) l...
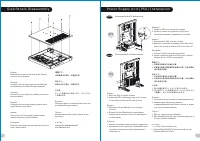
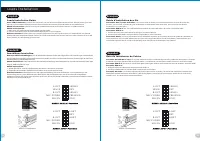
Page 5 - S i d e Pa n e l s D i s a s s e m b l y; Po w e r S u p p l y U n i t ( P S U ) I n s t a l l a t i o n; I T X
S i d e Pa n e l s D i s a s s e m b l y English /Remove the screws on the back of the chassis, and open the side panel Deutsch /Entfernen Sie die Schrauben auf der Rückseite des Gehäuses und öffnen Sie das Seitenteil Français /Enlevez les vis à l’arrière du châssis et ouvrez le panneau latéral Espa...
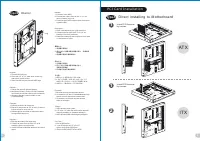
Page 6 - M o t h e r b o a r d I n s t a l l a t i o n
M o t h e r b o a r d I n s t a l l a t i o n English /1.Lay down the chassis.2.Install the motherboard in proper location and secure it with screws. Deutsch /1.Legen Sie das Gehäuse auf die Seite.2.Installieren Sie die Hauptplatine in ihrer vorgesehenen Position und sichern Sie sie mit Schrauben. F...
Page 7 - P C I C a r d I n s t a l l a t i o n; D i r e c t; Type B
Italiano /1. Estrarre il vano HDD.2. Posizionare il disco fisso da 2,5” o 3,5” nel vano e fissarlo con le viti. 3. Fare scorrere l’HDD indietro verso la struttura a gabbia HDD. Português /1. Puxe a bandeja do disco rígido para fora.2. Coloque o disco rígido de 2,5” ou 3,5” na bandeja e fixe com para...
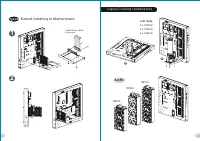
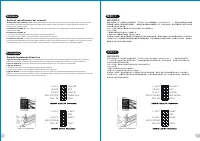
Page 8 - E x t e n d i n s t a l l i n g t o M o t h e r b o a r d; L i q u i d C o o l i n g I n s t a l l a t i o n; L e f t
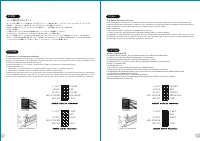
Type B E x t e n d i n s t a l l i n g t o M o t h e r b o a r d I n s t a l l R i s e r C a b l e b y s c r e w s 1 2 L i q u i d C o o l i n g I n s t a l l a t i o n 2 8 c m 3 6 c m 4 2 c m L e f t L e f t S i d e : 3 x 1 4 0 m m 3 x 1 2 0 m m 2 x 1 4 0 m m 1 2 10 11 藍 色 線 條 為 尺 寸 標 示 , 請 勿 印 刷 上...
Page 10 - L e a d s I n s t a l l a t i o n; English; Français
L e a d s I n s t a l l a t i o n G u i d e C a s e L E D C o n n e c t i o n / O n t h e f r o n t o f t h e c a s e , y o u c a n f i n d s o m e L E D s a n d s w i t c h l e a d s . P l e a s e c o n s u l t y o u r u s e r m a n u a l o f y o u r m o t h e r b o a r d m a n u f a c t u r e r , ...
Page 11 - Italiano; 繁 體 中 文; 简体中文
U S B 3 . 0 C o n n e c t i o n L - O U T S E N S E R-O U T M I C - P O W E R M I C - I N S E N S E 2 K E Y S E N S E 1 P R E S E N S E G N D L - O U T R-O U T M I C - P O W E R M I C - I N L - R E T K E Y R-R E T G N D G u i d a d i i n s t a l l a z i o n e d e i c o n t at t i C o n n e s s i o n...
Page 12 - 日 本 語; Русский; Türkçe; ภาษาไทย
U S B 3 . 0 C o n n e c t i o n L - O U T S E N S E R-O U T M I C - P O W E R M I C - I N S E N S E 2 K E Y S E N S E 1 P R E S E N S E G N D L - O U T R-O U T M I C - P O W E R M I C - I N L - R E T K E Y R-R E T G N D リード線の取り付けガイド ケース LED の接続 / ケース前面には、 LED とスイッチリード線があります。 マザーボードメーカーのユーザーマニュアル を参照...