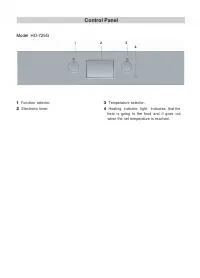
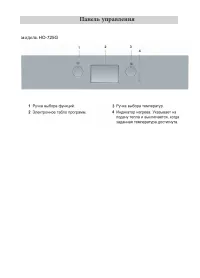
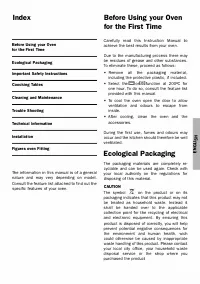
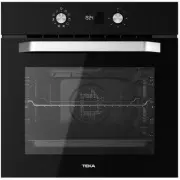
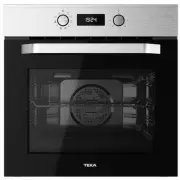
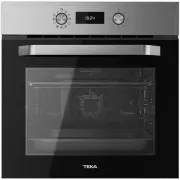
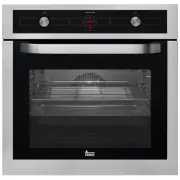
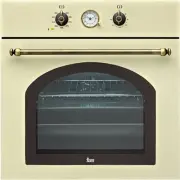
Page 2 - Model; Function selector.; Control Panel; Temperature selector.
Model HO-725G IIl o 1 Function selector. 2 Electronic timer. Control Panel 2 D 3 4 o 3 Temperature selector. 4 Heating indicator light. lndicates that the heat is going to the food and it goes out when the set temperature is reached.
Page 3 - Oven Functions
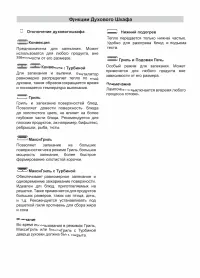
Oven Functions Switch of f oven Conventional It is used for sponges and cakes where theheat received must be uniform to achieve aspongy texture. / Conventional with fan Appropriate for roasts and cakes. The fanspreads the heat uniformly inside the oven. Grill For preparing dishes with super ficial r...
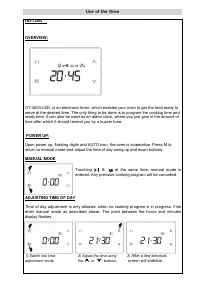
Page 4 - time after which it should remind you by a buzzer tone.; MANUAL MODE; at the same time, manual mode is; ADJUSTING TIME OF DAY; ) Adjust the time using; screen will stabilize.; Use of the Oven
HO-725G OVERVIEW: OT-4000-LED, is an electronic timer, which enables your oven to get the food ready to serve at the desired time. The only thing to be done is to program the cooking time and ready time. It can also be used as an alarm clock, where you just give in the amount of time after which it ...
Page 5 - ) Switch into cooking time
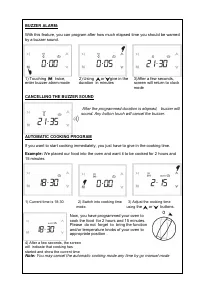
BUZZER ALARM: With this feature, you can program after how much elapsed time you should be warned by a buzzer sound. 1) Touching twice, 2) Using or give in the 3)After a few seconds, enter buzzer alarm mode duration in minutes screen will return to clock mode CANCELLING THE BUZZER SOUND After the pr...
Page 6 - ) Displayed is the ready; Screen just when cooking starts; ) Switch your oven OFF; Your oven will be inoperative until you reset the timer.
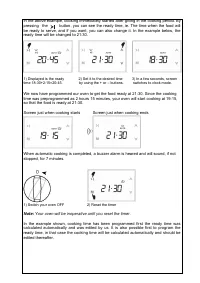
In the above example, cooking immediately started after giving in the cooking period. By pressing the button, you can see the ready time, ie. The time when the food will be ready to serve, and if you want, you can also change it. In the example below, the ready time will be changed to 21:30. 1) Disp...
Page 7 - When activated this feature, just the keys are blocked.; USER PROGRAMMABLE OPTIONS:
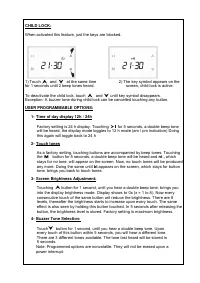
CHILD LOCK: When activated this feature, just the keys are blocked. 1) Touch and at the same time 2) The key symbol appears on the for 1 seconds until 2 beep tones heard. screen, child lock is active. To deactivate the child lock, touch and until key symbol disappears. Exception: A buzzer tone durin...
Page 8 - PRODUCT FICHE
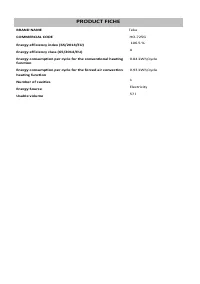
PRODUCT FICHE BRAND NAME COMMERCIAL CODE Energy efficiency index ( 6 5 /2014 /E U ) Energy efficiency class ( 6 5 /2014/EU ) Energy consumption per cycle for the conventional heatingfunction Energy consumption per cycle for the forced air convectionheating function Number of cavities Energy Source U...
Page 9 - модель
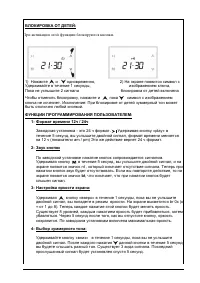
Page 11 - суток с помощью кнопок вверх и вниз.; РУЧНАЯ НАСТРОЙКА; Нажимая и; НАСТРОЙКА ВРЕМЕНИ ДНЯ; описано выше. Точка на дисплее между показателями; Включите режим; Пользование
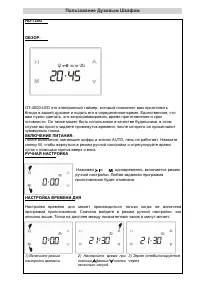
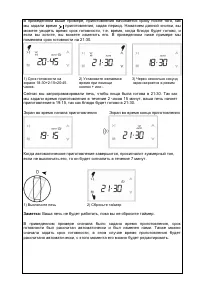
HO-725G ОБЗОР: OT-4000-LED это электронный таймер, который позволяет вам приготовить блюдо в вашей духовке и подать его в определенное время. Единственное, что вам нужно сделать, это запрограммировать время приготовления и срок готовности. Он также может быть использован в качестве будильника, в это...
Page 12 - ЗУММЕРНЫЙ БУДИЛЬНИК; который вы будете оповещены зумерным тоном.; ОТМЕНА ЗУММЕРНОГО ТОНА; После истечения заданного промежутка; ПРОГРАММА АВТОМАТИЧЕСКОГО ПРИГОТОВЛЕНИЯ; Мы поместили продукты в печь, и хотим, чтобы они готовились в
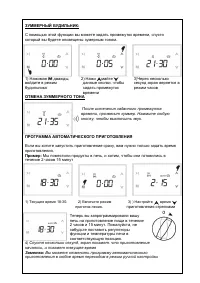
ЗУММЕРНЫЙ БУДИЛЬНИК : С помощью этой функции вы можете задать промежуток времени, спустя который вы будете оповещены зумерным тоном. 1) Нажимая дважды, войдите в режим будильника 2) Нажи майте данные кнопки, чтобы задать промежуток времени 3)Через несколько секунд экран вернется в режим часов ОТМЕНА...
Page 13 - Экран во время начала приготовления
В приведенном выше примере, приготовления начинается сразу после того, как мы задали время приготовления, задав период. Нажатием данной кнопки, вы можете увидеть время cрок готовности, т.е. время, когда блюдо будет готово, и если вы хотите, вы можете изменить его. В приведенном ниже примере мы помен...
Page 15 - ʿʽ˃ˀʫʥh˃ʫyːˁʁhʫˈʤˀʤʁ˃ʫˀhˁ˃hʁhʿˀhʥʽˀʤ
ʿʽ˃ˀʫʥʰ˃ʫʸːˁʶʰʫˈʤˀʤʶ˃ʫˀʰˁ˃ʰʶʰʿˀʰʥʽˀʤ T eka HO-725G ϭϬϲ͘ϱй Ϭ͘ϴϰŬtŚͬĐLJĐůĞ Ϭ͘ϵϯŬtŚͬĐLJĐůĞ ϭ ˑ̸̡̨̛̣̖̯̬̖̭̯̏ ϱϳů ʥ̬̖̦̔ ʺ̨̖̣̔̽ ʰ̸̴̴̡̡̨̡̨̛̛̛̦̖̭̦̖̬̖̯̖̭̜̖̯̦̭̯̔̾̐̾̏ ( 6 5 /2014 /E U ) ʶ̸̴̴̡̨̡̨̛̛̛̣̭̭̦̖̬̖̯̖̭̜̖̯̦̭̯̌̾̐̾̏ ( 6 5 /2014/EU ) ˑ̶̸̨̨̡̨̨̨̛̛̦̖̬̪̯̬̖̣̖̦̖̣̣̼̦̐̍̌̔́̍̐̚ ;̸̡̨̨̛̭̯̯̖̭̌̐Ϳ̦̬̖̌̐̏̌ ˑ̨̨̨̛̦̖̬̪̯̬̖̣̖̦̖̐̍̌̔̚...
Page 17 - Maintenance and lnstallation Manual; 11HCTPYK��� no 3KCnnyaTa��� � ycTaHOBKe
Maintenance and lnstallation Manual ® 111HCTPYK��� no 3KCnnyaTa��� � ycTaHOBKe P21210R01
Page 22 - Coocking Tables
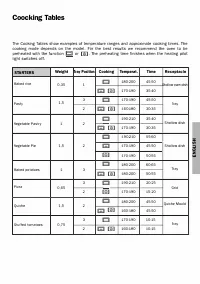
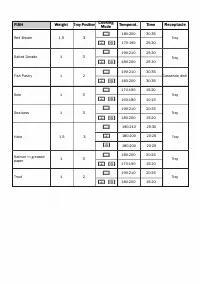
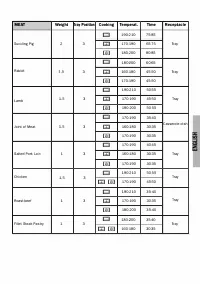
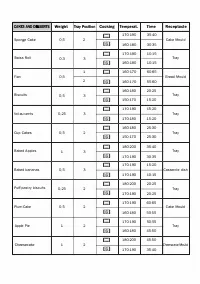
Coocking Tables The Cooking Tables show examples of temperature ranges and approximate cooking times. The cooking mode depends on the model. Far the best results we recommend the oven to be preheated with the function � or [fil. The preheating time finishes when the heating pilot light switches off....
Page 25 - CAKES AND DESSER1S; Weight; ld
CAKES AND DESSER1S Weight Tray Position Cooking Temperat. Time Receptacle ld 170-190 35-40 Sponge Cake 0,5 2 Cake Mould 00 160-180 30-35 ld 170-190 10-15 Swiss Roll 0,3 3 Tray 00 160-180 10-15 1 ld 160-170 60-65 Flan 0,5 Bread Mould 2 00 160-170 55-60 ld 160-180 20-25 Biscuits 0,5 3 Tray 00 150-170 ...
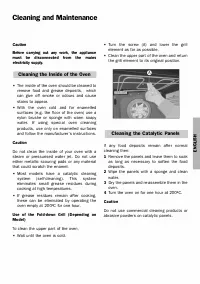
Page 26 - Cleaning and Maintenance; Cleaning the inside of the Oven; Do not clean the inside of your oven with a; Cleaning the Catalytic Panels; lf any food deposits remain after normal
Cleaning and Maintenance Caution Before carrying out any work, the appliance must be disconnected from the mains electricity supply. Cleaning the inside of the Oven • The inside of the oven should be cleaned to remove food and grease deposits, which can give off smoke or odours and cause stains to a...
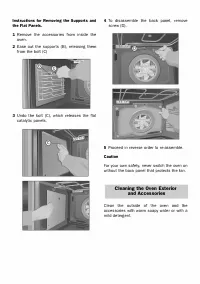
Page 27 - lnstructions for Removing the Supports and; Remove the accessories from inside the; Caution; For your own safety, never switch the oven on; Cleaning the Oven Exterior; Clean the outside of the oven and the
lnstructions for Removing the Supports and the Flat Panels. 1 Remove the accessories from inside the oven. 2 Ease out the supports (8), releasing them from the bolt (C) 3 Undo the bolt (C), which releases the flat catalytic panels. 4 To disassemble the back panel, remove screw (D). 5 Proceed in reve...
Page 28 - Never use metallic scouring pads or; Cleaning the Oven Door; Depending on the oven model, you can remove
Caution Never use metallic scouring pads or commercial or scouring powders that could scratch the enamel. For stainless steel surfaces, proceed with care and only use sponges or cloths that cannot scratch them. To clean the outside of the oven do not attempt to remove the controls, as tor this, the ...
Page 30 - Changing the Oven Bulb; To change the bulb, first ensure that the oven
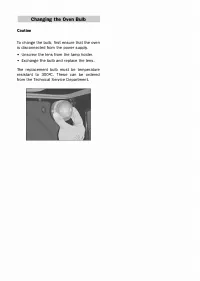
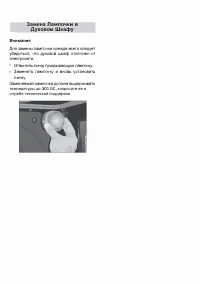
Changing the Oven Bulb Caution To change the bulb, first ensure that the oven is disconnected from the power supply. • Unscrew the lens from the lamp holder. • Exchange the bulb and replace the lens. The replacement bulb must be temperature resistant to 300 2 C. These can be ordered from the Technic...
Page 31 - Trouble Shooting; NB; lf, despite these recommendations, the pro
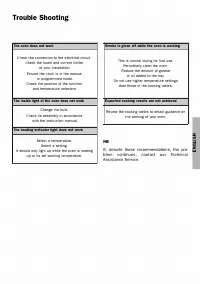
Trouble Shooting The oven does not work Check the connection to the electrical circuit. Check the fuses and current limiter of your installation. Ensure the clock is in the manual or programmed mode. Check the position of the function and temperature selectors The inside llght of the oven does not w...
Page 32 - Technical lnformation; CE; lnstallation; Electrical Connection.; Before lnstallation. Comments
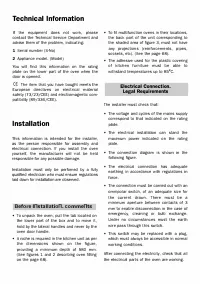
Technical lnformation lf the equipment does not work, please contact the Technical Service Department and advise them of the problem, indicating: 1 Serial number (S-No) 2 Appliance model. (Model) You will find this information on the rating plate on the lower part of the oven when the door is opened...
Page 33 - lnstalling the Oven
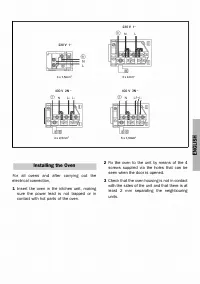
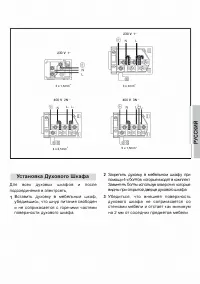
230 V 1- 3x1,5mm' 400V 2N- @ N L., L, 4 x2,5mm' lnstalling the Oven For all ovens and after carrying out the electrical connection, 1 lnsert the oven in the kitchen unit, making sure the power lead is not trapped or in contact with hot parts of the oven. 230 V 1- ® N L 3x4mm 2 400V 3N- @ N L.. L., L...
Page 34 - YnaKOBKa
Co.Qep>1<aH1ı1e npe>K,Qe <ıeM Ha<ıaTb 3Ko11orııı<ıecKafl YnaKOBKa 31 Ba>ı<Hbıe lr1HCTPYKLIIIIIII no 6e3onaCHOCTIII 32 Ky11111HapHb1e Ta611111ı.ıb1 33 '-llllCTKa III npo cpııı11aKTI/IKa 37 He pa6oTaeT AYXOBOH wKacp 41 TeXHlll'leCKafl lr1HcpopMaı.ııııfl 42 YcTaHOBKa 42 CxeMa yc...
Page 35 - e3onacHocTb npııı lllcnorıb30BaHıııııı
Ba)l{Hbıe l'IHCTPYK�1ı11ı1 no 6e3onaCHOCTlı1 3rıeKTpo6e3onaCHOCTb • nıo6bıe AeıııcT0ıııs:ı ııınııı peMOHT annaparn, 8KntoYas:ı 3aMeHy np080Aa nıııTaHıııs:ı, cneAyeT npOV1380AVITb 8 npıııcyTCT8lll€COTPYAHVIK08 ocpıııı..ııııanbHOIII Cny)l(6bı TexHıııYecKoııı noAA€P)l(Klll ııı ıııcnonb300aTb TOnbKO nOA...
Page 37 - TeMnepa1ypa; bl; bl; bl; bl; oo
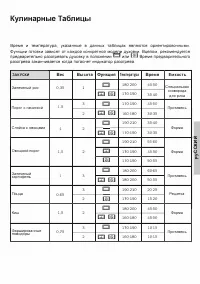
Kyıu1HapHb1e Ta61u11...ıb1 BpeMH lı1 TeMnepaTypa, yKa3aHHble B AaHHblX Ta6rııııı..ıax HBflHIOTCH opıııeHTlı1pOBO'-lHblMlı1. <l:>yHKL.1111111 roTOBKlı1 3aBlı1CHT OT Ka>KAO� KOHKpeTHO� MO�lı1 AYXOBKlı1. Bı..ıerıoM, peKOMeHAyeTCH npeABapıııTeflbHO pa3orpesaTb AYXOBKY B norıo>KeHıııııı Q ııı...
Page 39 - bd
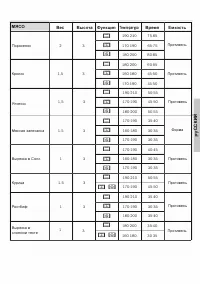
Ms:!CO Bec BblCOTa nopoceHoK 2 3 KpOilvlK 1,5 3 RrHeHOK 1,5 3 MHcHaH 3aneKaHKa 1,5 3 Bbıpe3Ka B Convı 1 3 Kypv11..ja 1,5 3 PoCT6v1cj) 1 3 Bbıpe3Ka B 1 3 cnoeHOM TeCTe «l>yHKl..l�UI TeMnepa1ypa bd 190-210 � 170-190 [fil 180-200 bd 180-200 � 160-180 [fil 170-190 bd 190-210 � 170-190 [fil 180-200 bd...
Page 41 - MCTKa M npocpMnaKTMKa; 1ı1CTKa BHyTpeHHeH; naHeneH
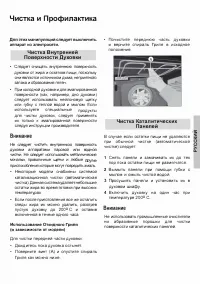
4MCTKa M npocpMnaKTMKa .Qmı :m,tx MaHMnymıı..ıMM cneAyeT BblKnlO'lMTb annapaT M3 3neKTpoceTM. 41ı1CTKa BHyTpeHHeH noeepXHOCTlı1 .QyxOBKlı1 • Cne,ı::ıyer 0Ylı1l1.laTb BHyıpeHHIOIO nosepXHOCTb AyxOBKlı1 OT >t<1ı1pa lı1 OCTaTKOB nıııu.ıııı, noCKOnbKY 0Hlı1 s:ısm:IIOTCSI lı1CTOY Hlı1KOM AblMa, Hen...
Page 42 - MCTKa BHeWHeııı noeepXHOCTl,1
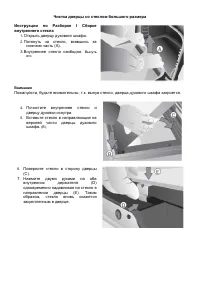
lı1HCTPYKL1101 no Pa36opKe no,QeecoK 11 n110CKl1X naHeileH. 1 Y,ı::ıamne 113 AYXOBKl1 sce BHyTpeHHl1e aKccecyapbı. 2 nornHyTb 3a no,ı::ısecK11 (B), ocrıa611s 11x KpenrıeH11e np11 n0Mouı11 6oma (C). 3 ÜTBl1HTl1Tb 6orıT (C) 11 OCBOÔO,Ql1Tb nrıOCKl1e KaTarı11Tw-ıecK11e naHerı11. 4 ArıH pa36opK11 naHerı...
Page 43 - a Kpas:ı, n OAH111Mll1Te nonyoTKpblTYto ABep4y
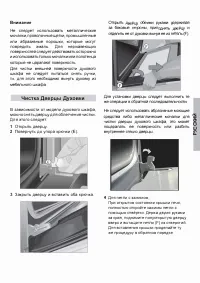
BH1ıtMaH1ıte He cneAyeT 1ı1cnonb30BaTb MeTannw-ıecK1ı1e MOYanKtı1, nposonOYHbıe 1.4erK1ı1, npoMbıwneHHble ıı,nıı, a6pa31ı18Hble nopOWKlı1, KO TOpbıe MOl)'T nospeAlı1Tb 3Manb. Ans:ı Hep >Kaseıo1.4 1ı1x nosepxHOCTeı7ı cneAyeT AelllCTBOBaTb OCTOpO>KHO 1ı1 1ı1cnonb30BaTb ronbKO MOYanKlı1 1ı1rı1ı1 ...
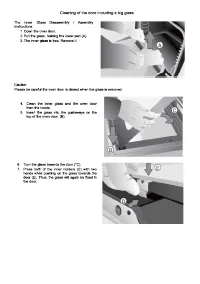
Page 44 - Чистка дверцы со стеклом большого размера; Вынуть; Внимание
Чистка дверцы со стеклом большого размера Инструкции по Разборке I Сборке внутреннего стекла 1. Открыть дверцу духового шкафа. 2. Потянуть за стекло, взявшись за нижнюю часть (А). 3. Внутреннее стекло свободно. Вынуть его. Внимание Пожалуйста, будьте внимательны, т.к. вынув стекло, дверца духового ш...
Page 46 - He pa6oTaeT .Qyxoeo� w Kacp
He pa6oTaeT .Qyxoeo� w Kacp Y6e,ı:ııııTeCb 'ITO OH BKJllO'leH e ceTb nposepbTe npo6Kııı ııı orpaHw-ımenb sawe� :rneKTponposOAKlıl. Y6eAlılTeCb, 4TO YaCbl HaXOAS1TCS1 B nono)KeHlıllıl PY4HOe ııınııı nporpaMMlılpOBaHHOe. nposepbrn nono)KeHıııe Bbı6opa c:pyHKL.1111� ııı TeMnepaTyp. He BKJllO'laeTCR CBe...
Page 47 - C E; YcTaHOBKa; HopMaTMBHble Tpe6oeaHMfl
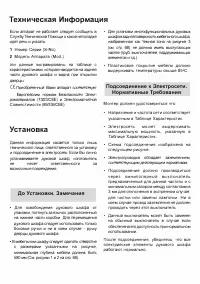
TexH�ı.ıecKas::ı ltiHcpopMa4�s::ı Ec.m1 annapaT He pa60TaeT c.ne,o,yeT coo6u.ı1ı1Tb s Cny>ı<6y TexHıııYeCKOlıl noMOll.llı1 o KaKOlıl Henona,ı:ı,Ke ııı,ı:ıeT peYb ııı yKa3arb: 1 HoMep Cepıııııı (S-No ) . 2 MoAeilb Annaparn (Mod.) 3Tlı1 AaHHbıe BbırpasıııposaHbl Ha Ta6nıııı..ıe c xapaKTepıııCTlı...