Page 2 - ΕΛΛΗΝΙΚΑ
2 Guía de Uso Español Por favor, antes de utilizar su horno por primera vez, lea atentamente las instrucciones de instalación y mantenimiento incluidas en su horno.Dependiendo del modelo, los accesorios incluidos en su horno pueden variar respecto a los mostrados en las imágenes. poRTUGUÊs Antes de ...
Page 3 - Español; Descripción del horno
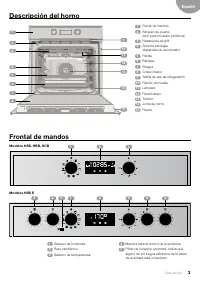
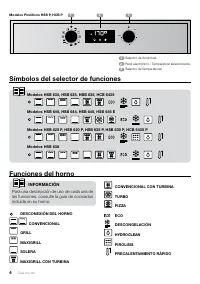
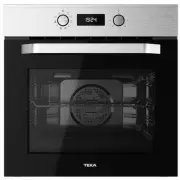
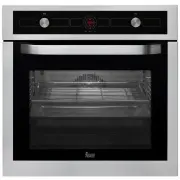
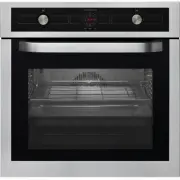
3 Guía de Uso Español Descripción del horno 1 Frente de mandos 2 Bloqueo de puerta (solo para modelos pirolíticos) 3 Resistencia de grill 4 Soporte bandejas (dependiendo del modelo) 5 Parrilla 6 Bandeja 7 Bisagra 8 Cristal interior 9 Salida de aire de refrigeración 10 Fijación al mueble 11 Lámpara 1...
Page 4 - símbolos del selector de funciones; INFoRMaCIóN
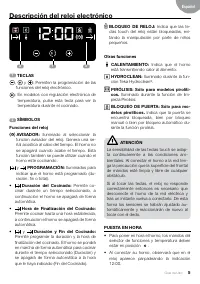
4 Guía de Uso símbolos del selector de funciones Funciones del horno DEsCoNExIóN DEl HoRNo CoNVENCIoNal GRIll MaxIGRIll solERa MaxIGRIll CoN TURBINa CoNVENCIoNal CoN TURBINa TURBo pIZZa ECo DEsCoNGElaCIóN HYDRoClEaN pIRolIsIs pRECalENTaMIENTo RÁpIDo INFoRMaCIóN Para una descripción de uso de cada un...
Page 5 - Descripción del reloj electrónico
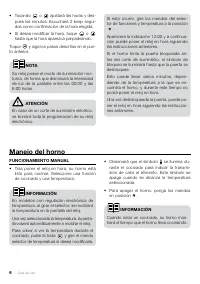
5 Guía de Uso Español Descripción del reloj electrónico 1 TEClas , y : Permiten la programación de las funciones del reloj electrónico. : En modelos con regulación electrónica de temperatura, pulse esta tecla para ver la temperatura durante el cocinado. 2 sÍMBolos Funciones del reloj aVIsaDoR: Ilumi...
Page 6 - NoTa; Manejo del horno; FUNCIoNaMIENTo MaNUal
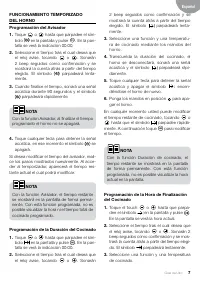
6 Guía de Uso • Tocando o ajustará las horas y des- pués los minutos. Escuchará 2 beep segui-dos como confirmación de la hora elegida. • Si desea modificar la hora, toque o hasta que la hora aparezca parpadeando. Toque y siga los pasos descritos en el pun- to anterior. NoTa Su reloj posee el modo de...
Page 8 - Funciones de seguridad; BloQUEo DE sEGURIDaD paRa NIños
8 Guía de Uso 4. Alcanzada la hora de finalización programa- da, el horno se desconectará, sonará una señal acústica y el símbolo parpadeará rápidamente. 5. Toque cualquier sensor para detener la se-ñal acústica y apagar el símbolo , encen- diéndose el horno de nuevo. 6. Ponga los mandos en posición...
Page 9 - Función Teka Hydroclean; aTENCIóN
9 Guía de Uso Español IMpoRTaNTE Esta función sólo será seleccionable cuando el horno se encuentre con el mando de fun-ciones en la posición de reposo . Una vez bloqueada la puerta, usted podrá comenzar el cocinado normalmente. Para activar/desactivar el bloqueo de puerta, siga estos pasos: 1. Toque...
Page 10 - Función de autolimpieza por pirólisis
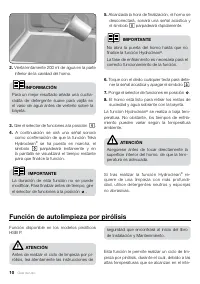
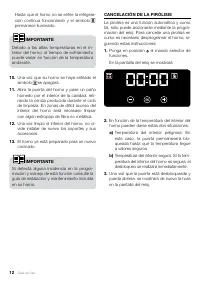
10 Guía de Uso Función de autolimpieza por pirólisis Función disponible en los modelos pirolíticos HSB P. aTENCIóN Antes de realizar el ciclo de limpieza por pi-rólisis, lea atentamente las instrucciones de seguridad que encontrará al inicio del libro de Instalación y Mantenimiento. Esta función le ...
Page 12 - IMpoRTaNTE
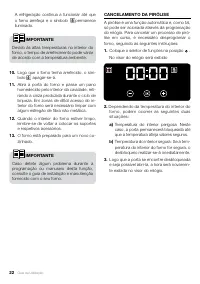
12 Guía de Uso Hasta que el horno no se enfríe la refrigera- ción continua funcionando y el símbolopermanece iluminado. IMpoRTaNTE Debido a las altas temperaturas en el in-terior del horno, el tiempo de enfriamiento puede variar en función de la temperatura ambiente. 10. Una vez que su horno se haya...
Page 13 - Português; Descrição do forno
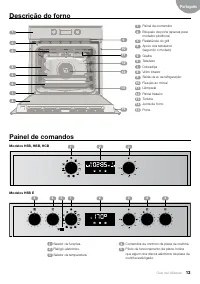
13 Guia de Utilização Português Descrição do forno 1 Painel de comandos 2 Bloqueio da porta (apenas para modelos pirolíticos) 3 Resistência do grill 4 Apoio dos tabuleiros (segundo o modelo) 5 Grelha 6 Tabuleiro 7 Dobradiça 8 Vidro interior 9 Saída de ar de refrigeração 10 Fixação ao móvel 11 Lâmpad...
Page 14 - Funções do forno; INFoRMaÇÃo; símbolos do seletor de funções
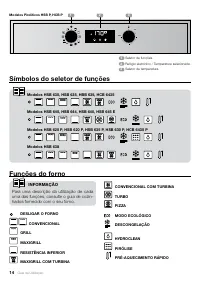
14 Guia de Utilização Funções do forno DEslIGaR o FoRNo CoNVENCIoNal GRIll MaxIGRIll REsIsTÊNCIa INFERIoR MaxIGRIll CoM TURBINa CoNVENCIoNal CoM TURBINa TURBo pIZZa MoDo EColóGICo DEsCoNGElaÇÃo HYDRoClEaN pIRólIsE pRÉ-aQUECIMENTo RÁpIDo INFoRMaÇÃo Para uma descrição da utilização de cada uma das fun...
Page 15 - Descrição do relógio eletrónico
15 Guia de Utilização Português Descrição do relógio eletrónico 1 TEClas , y : Permitem a programação das funções do relógio electrónico. : Em modelos com regulação da tempera- tura eletrónica, prima esta tecla para ver a temperatura durante o cozinhado. 2 sÍMBolos Funções do relógio aVIsaDoR: Ilumi...
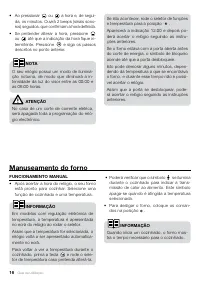
Page 16 - Manuseamento do forno; FUNCIoNaMENTo MaNUal
16 Guia de Utilização • Ao pressionar ou a hora e, de segui- da, os minutos. Ouvirá 2 beeps (sinais sono-ros) seguidos, que confirmam a hora definida. • Se pretender alterar a hora, pressione ou até que a indicação da hora fique in- termitente. Pressione e siga os passos descritos no ponto anterior....
Page 18 - Funções de segurança
18 Guia de Utilização 5. Prima qualquer sensor para parar o sinal sonoro e apagar o símbolo , ligando de novo o forno. 6. Coloque os comandos na posição para desligar o forno. Pode alterar o tempo de cozinhado restante a qualquer momento, bastando para tal premir ou até que o símbolo comece a piscar...
Page 19 - Função Teka Hydroclean; aTENÇÃo
19 Guia de Utilização Português IMpoRTaNTE Esta função só poderá ser selecionada quando o forno se encontrar com o coman-do de funções na posição de repouso . Uma vez bloqueada a porta, pode dar início ao cozinhado normalmente Para ativar/desativar o bloqueio da porta, siga os seguintes passos: 1. P...
Page 20 - Função de autolimpeza por pirólise
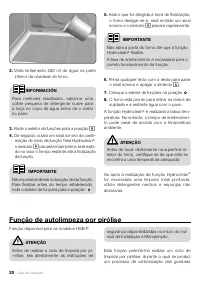
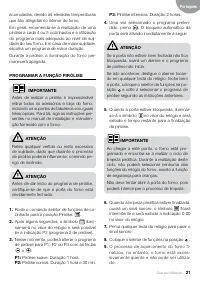
20 Guia de Utilização Função de autolimpeza por pirólise Função disponível para os modelos HSB P. aTENÇÃo Antes de realizar o ciclo de limpeza por pi--rólise, leia atentamente as instruções de segurança disponibilizadas no início do ma-nual de Instalação e Manutenção. Esta função permite-lhe realiza...
Page 23 - English; Description of the oven
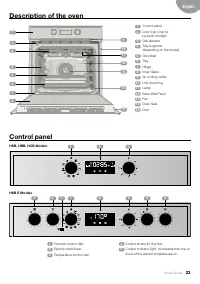
23 User’s Guide English Description of the oven 1 Control panel 2 Door lock (only for pyrolytic models) 3 Grill element 4 Tray supports (depending on the model) 5 Grid shelf 6 Tray 7 Hinge 8 Inner Glass 9 Air cooling outlet 10 Unit mounting 11 Lamp 12 Back Wall Panel 13 Fan 14 Oven Seal 15 Door Cont...
Page 24 - oven functions; INFoRMaTIoN; Function selector symbols
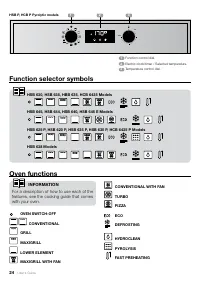
24 User’s Guide oven functions oVEN sWITCH-oFF CoNVENTIoNal GRIll MaxIGRIll loWER ElEMENT MaxIGRIll WITH FaN INFoRMaTIoN For a description of how to use each of the features, see the cooking guide that comes with your oven. CoNVENTIoNal WITH FaN TURBo pIZZa ECo DEFRosTING HYDRoClEaN pYRolYsIs FasT p...
Page 25 - Electronic clock/timer description
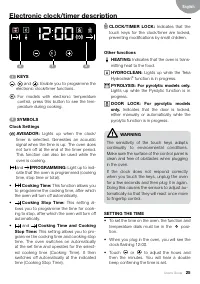
25 User’s Guide English Electronic clock/timer description 1 KEYs , and : Enable you to programme the electronic clock/timer functions. : For models with electronic temperature control, press this button to see the tem-perature during cooking. 2 sYMBols Clock settings aVIsaDoR: Lights up when the cl...
Page 26 - NoTE; oven use
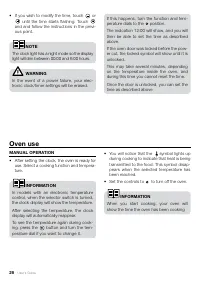
26 User’s Guide • If you wish to modify the time, touch or until the time starts flashing. Touch and and follow the instructions in the previ-ous point. NoTE The clock light has a night mode so the display light will dim between 00:00 and 6:00 hours. WaRNING In the event of a power failure, your ele...
Page 28 - safety instructions; saFETY CHIlD loCK
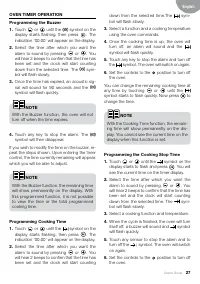
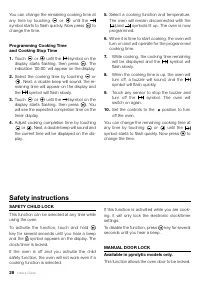
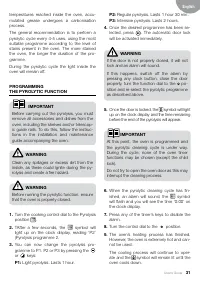
28 User’s Guide You can change the remaining cooking time at any time by touching or until the symbol starts to flash quickly. Now press to change the time. programming Cooking Time and Cooking stop Time 1. Touch or until the symbol on the display starts flashing, then press . The indication ‘00:00’...
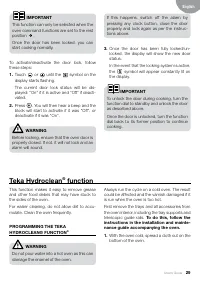
Page 29 - Teka Hydroclean; WaRNING
29 User’s Guide English IMpoRTaNT This function can only be selected when the oven command functions are set to the rest position . Once the door has been locked, you can start cooking normally. To activate/deactivate the door lock, follow these steps: 1. Touch or until the symbol on the display sta...
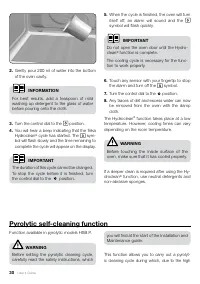
Page 30 - pyrolytic self-cleaning function
30 User’s Guide pyrolytic self-cleaning function Function available in pyrolytic models HSB P. WaRNING Before setting the pyrolytic cleaning cycle, carefully read the safety instructions, which you will find at the start of the Installation and Maintenance guide. This function allows you to carry ou...
Page 32 - IMpoRTaNT
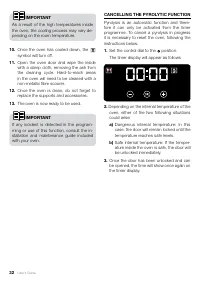
32 User’s Guide IMpoRTaNT As a result of the high temperatures inside the oven, the cooling process may vary de-pending on the room temperature. 10. Once the oven has cooled down, the symbol will turn off. 11. Open the oven door and wipe the inside with a damp cloth, removing the ash from the cleani...
Page 33 - Français; Description du four
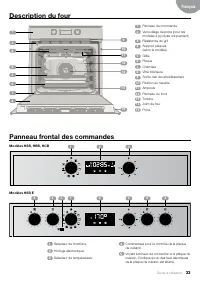
33 Guide d’utilisation Français Description du four 1 Panneau de commande 2 Verrouillage de porte (pour les modèles à pyrolyse uniquement) 3 Résistance du gril 4 Support plaques (selon le modèle) 5 Grille 6 Plaque 7 Charnière 8 Vitre intérieure 9 Sortie dair de refroidissement 10 Fixation au meuble ...
Page 34 - Fonctions du four
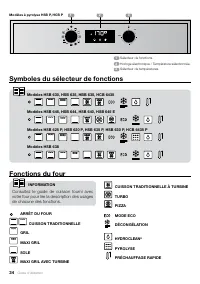
34 Guide d’utilisation Fonctions du four aRRÊT DU FoUR CUIssoN TRaDITIoNNEllE GRIl MaxI GRIl solE MaxI GRIl aVEC TURBINE CUIssoN TRaDITIoNNEllE À TURBINE TURBo pIZZa MoDE ECo DÉCoNGÉlaTIoN HYDRoClEaN ® pYRolYsE pRÉCHaUFFaGE RapIDE INFoRMaTIoN Consultez le guide de cuisson fourni avec votre four pour...
Page 35 - Description de l’horloge électronique
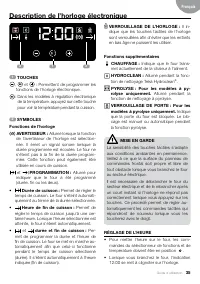
35 Guide d’utilisation Français Description de l’horloge électronique 1 ToUCHEs , et : Permettent de programmer les fonctions de l’horloge électronique. : Dans les modèles à régulation électronique de la température, appuyez sur cette touche pour voir la température pendant la cuisson. 2 sYMBolEs Fo...
Page 36 - REMaRQUE; Fonctionnement du four
36 Guide d’utilisation • Appuyez sur ou pour régler l’heure puis les minutes. 2 bips sonores consécutifs retentissent alors en guise de confirmation de la sélection de l’heure. • Si vous souhaitez modifier l’heure, appuyez sur ou jusqu’à ce que l’heure appa- raisse en clignotant. Appuyez sur et sui-...
Page 38 - Fonctions de sécurité; VERRoUIllaGE DE sÉCURITÉ poUR
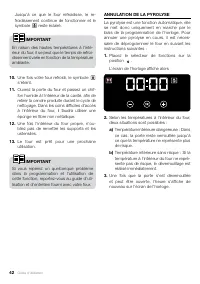
38 Guide d’utilisation 4. Une fois la durée de cuisson écoulée, le four s’éteint, un signal sonore retentit et le sym-bole se met à clignoter rapidement. 5. Appuyez sur n’importe quelle touche pour couper le signal sonore et éteindre le sym-bole . Le four se remet alors sous tension. 6. Placez les c...
Page 39 - Fonction Teka Hydroclean
39 Guide d’utilisation Français IMpoRTaNT Cette fonction ne peut être sélectionnée que si le sélecteur de fonctions du four est placé sur le mode veille . Une fois la porte bloquée, vous pourrez commencer la cuisson normalement Pour activer/désactiver le verrouillage de porte, suivez les étapes suiv...
Page 40 - Fonction d’autonettoyage pyrolytique; MIsE EN GaRDE
40 Guide d’utilisation Fonction d’autonettoyage pyrolytique Fonction disponible sur les modèles à pyrolyse HSB P. MIsE EN GaRDE Avant de procéder au cycle de nettoyage pyrolytique, lisez attentivement les instruc- tions de sécurité que vous trouverez au dé-but du manuel d’installation et d’entretien...
Page 43 - Deutsch; Backofenbeschreibung
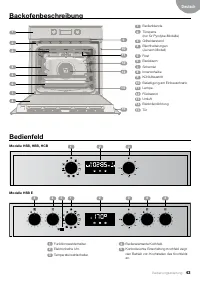
43 Bedienungsanleitung Deutsch Backofenbeschreibung 1 Bedienblende 2 Türsperre (nur für Pyrolyse-Modelle) 3 Grillwiderstand 4 Blechhalterungen (Je nach Modell) 5 Rost 6 Backblech 7 Scharnier 8 Innenscheibe 9 Kühlluftaustritt 10 Befestigung am Einbauschrank 11 Lampe 12 Rückwand 13 Umluft 14 Backofend...
Page 44 - Backofenfunktionen; Funktionswahlschaltersymbole
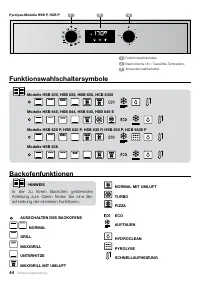
44 Bedienungsanleitung Backofenfunktionen aUssCHalTEN DEs BaCKoFENs NoRMal GRIll MaxIGRIll UNTERHITZE MaxIGRIll MIT UMlUFT NoRMal MIT UMlUFT TURBo pIZZa ECo aUFTaUEN HYDRoClEaN pYRolYsE sCHNEllaUFHEIZUNG HINWEIs In der zu Ihrem Backofen gehörenden Anleitung zum Garen finden Sie eine Be-schreibung de...
Page 45 - Beschreibung der elektronischen Uhr
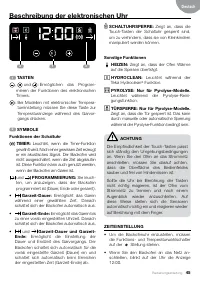
45 Bedienungsanleitung Deutsch Beschreibung der elektronischen Uhr 1 TasTEN , und : Ermöglichen das Program- mieren der Funktionen des elektronischen Timers. : Bei Modellen mit elektronischer Tempera- tureinstellung müssen Sie diese Taste zur Temperaturanzeige während des Garvor-gangs drücken. 2 sYM...
Page 46 - aNMERKUNG; Bedienung des Backofens; MaNUEllER BETRIEB
46 Bedienungsanleitung • Durch Berühren von oder werden die Stunden und danach die Minuten eingestellt. Anschließend ertönen 2 aufeinanderfolgende Pieptöne zur Bestätigung der gewählten Uhrzeit. • Wenn Sie die Uhrzeit ändern möchten, müs- sen Sie oder berühren, bis die Uhrzeit blinkt. Berühren Sie u...
Page 48 - sicherheitsfunktionen; sICHERHEITsspERRE FÜR KINDER
48 Bedienungsanleitung 4. Nach Ablauf der programmierten Zeit schal- tet sich der Backofen aus, es ertönt ein akustisches Signal und das Symbol blinkt schnell. 5. Berühren Sie irgendeine Taste, um das akustische Signal zu stoppen und das Sym-bol auszuschalten. Der Backofen schal- tet sich wieder ein...
Page 50 - selbstreinigungsfunktion anhand pyrolyse; aCHTUNG
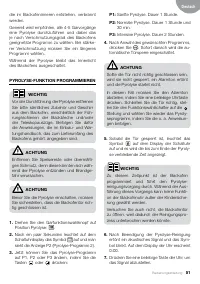
50 Bedienungsanleitung selbstreinigungsfunktion anhand pyrolyse Bei den Pyrolyse-Modellen HSB P erhältliche Funktion. aCHTUNG Bevor Sie den Reinigungszyklus anhand Pyrolyse ausführen, müssen Sie die Sicher- heitsanleitungen im Einbau- und Wartungs-handbuch aufmerksam lesen. Mit dieser Funktion erfol...
Page 52 - WICHTIG
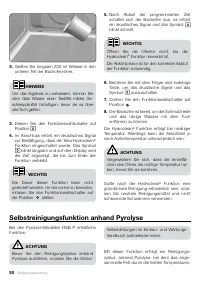
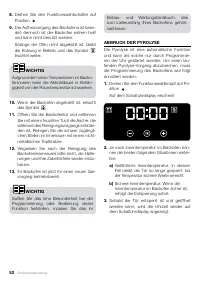
52 Bedienungsanleitung 8. Drehen Sie den Funktionswahlschalter auf Position . 9. Der Aufheizvorgang des Backofens ist been- det; dennoch ist der Backofen extrem heiß und kann nicht benutzt werden. Solange der Ofen nicht abgekühlt ist, bleibt die Kühlung in Betrieb und das Symbol leuchtet weiter. WIC...
Page 53 - Nederlands; Beschrijving van de oven
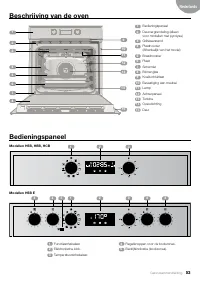
53 Gebruikershandleiding Nederlands Beschrijving van de oven 1 Bedieningspaneel 2 Deurvergrendeling (alleen voor modellen met pyrolyse) 3 Grillweerstand 4 Plaathouder (Afhankelijk van het model) 5 Braadrooster 6 Plaat 7 Scharnier 8 Binnenglas 9 Koelluchtuitlaat 10 Bevestiging aan meubel 11 Lamp 12 A...
Page 54 - Functies van de oven
54 Gebruikershandleiding Functies van de oven UITsCHaKElING VaN DE oVEN CoNVETIoNEEl GRIll MaxIGRIll oVENVloER MaxIGRIll MET TURBINE CoNVENTIoNEEl MET TURBINE TURBo pIZZa ECo oNTDooIEN HYDRoClEaN pYRolYsE sNEl VooRVERWaRMEN INFoRMaTIE Kijk voor een beschrijving van het gebruik van alle functies in d...
Page 55 - Beschrijving van de elektronische klok
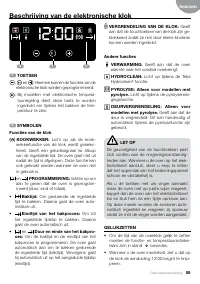
55 Gebruikershandleiding Nederlands Beschrijving van de elektronische klok 1 ToETsEN , en : Hiermee kunnen de functies van de elektronische klok worden geprogrammeerd. : Bij modellen met elektronische tempera- tuurregeling dient deze toets te worden ingedrukt om tijdens het bakken de tem-peratuur te...
Page 56 - opMERKING; Bediening van de oven; HaNDMaTIGE WERKING
56 Gebruikershandleiding • Door of aan te raken kunt u eerst het uur en daarna de minuten gelijkzetten. Daarna hoort u 2 opeenvolgende pieptonen als bevestiging van de gekozen tijd. • Als u de tijd wilt wijzigen, druk dan op of totdat de tijd knippert. Druk in en volg de in het vorige punt om- schre...
Page 58 - Veiligheidsfuncties; KINDERBEVElIGING
58 Gebruikershandleiding 4. Wanneer de geprogrammeerde eindtijd is bereikt, gaat de oven uit. Het alarm gaat af en het symbool gaat snel knipperen. 5. Druk op een willekeurige sensor om het ge-luidssignaal en het symbool uit te scha- kelen en zet de oven opnieuw aan. 6. Zet de knoppen in stand om de...
Page 60 - pyrolytische zelfreinigingsfunctie; lET op
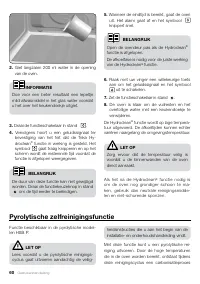
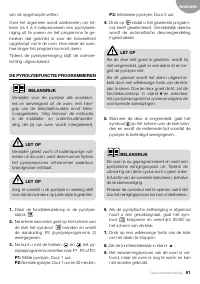
60 Gebruikershandleiding pyrolytische zelfreinigingsfunctie Functie beschikbaar in de pyrolytische model-len HSB P. lET op Lees voordat u de pyrolytische reinigings-cyclus gaat uitvoeren aandachtig de veilig- heidsinstructies die u aan het begin van de installatie- en onderhoudshandleiding vindt. Me...
Page 62 - BElaNGRIJK
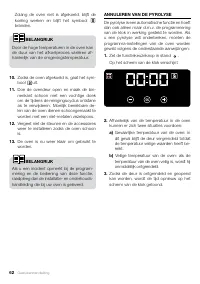
62 Gebruikershandleiding Zolang de oven niet is afgekoeld, blijft de koeling werken en blijft het symbool branden. BElaNGRIJK Door de hoge temperaturen in de oven kan de duur van het afkoelproces variëren af-hankelijk van de omgevingstemperatuur. 10. Zodra de oven afgekoeld is, gaat het sym- bool ui...
Page 63 - Ελληνικά; Περιγραφή του φούρνου
63 Οδηγός χρήσης Ελληνικά Περιγραφή του φούρνου 1 Πίνακας χειρισμού 2 Κλείδωμα πόρτας (μόνο για μοντέλα που διαθέτουν σύστημα πυρόλυσης) 3 Αντίσταση γκριλ 4 Στήριγμα ταψιών (Ανάλογα με το μοντέλο) 5 Σχάρα 6 Ταψί 7 Μεντεσές 8 Εσωτερικό κρύσταλλο 9 Έξοδος αέρα ψύξης 10 Στερέωση στο έπιπλο 11 Λαμπτήρας...
Page 64 - Λειτουργίες του φούρνου; Σύμβολα του διακόπτη επιλογής λειτουργίας
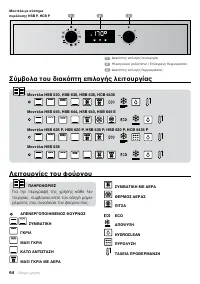
64 Οδηγός χρήσης Λειτουργίες του φούρνου ΑΠΕΝΕΡΓΟΠΟΙΗΜΕΝΟΣ ΦΟΥΡΝΟΣ ΣΥΜΒΑΤΙΚΗ ΓΚΡΙΛ ΜΑΞΙ ΓΚΡΙΛ ΚΑΤΩ ΑΝΤΙΣΤΑΣΗ ΜΑΞΙ ΓΚΡΙΛ ΜΕ ΑΕΡΑ ΣΥΜΒΑΤΙΚΗ ΜΕ ΑΕΡΑ ΘΕΡΜΟΣ ΑΕΡΑΣ ΠΙΤΣΑ ECO ΑΠΟΨΥΞΗ HYDROCLEAN ΠΥΡΟΛΥΣΗ ΤΑΧΕΙΑ ΠΡΟΘΕΡΜΑΝΣΗ ΠΛΗΡΟΦΟΡΙΕΣ Για την περιγραφή της χρήσης κάθε λει- τουργίας, συμβουλευτείτε τον οδηγ...
Page 65 - Περιγραφή του ηλεκτρονικού ρολογιού/timer
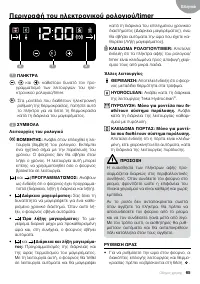
65 Οδηγός χρήσης Ελληνικά Περιγραφή του ηλεκτρονικού ρολογιού/timer 1 ΠΛΗΚΤΡΑ , και : καθιστούν δυνατό τον προ- γραμματισμό των λειτουργιών του ηλε- κτρονικού ρολογιού/timer. : Στα μοντέλα που διαθέτουν ηλεκτρονική ρύθμιση της θερμοκρασίας, πατήστε αυτό το πλήκτρο για να δείτε τη θερμοκρασία κατά τη...
Page 66 - ΣΗΜΕΙΩΣΗ; Χρήση του φούρνου; ΧΕΙΡΟΚΙΝΗΤΗ ΛΕΙΤΟΥΡΓΙΑ
66 Οδηγός χρήσης • Μόλις συνδέσετε τον φούρνο σας στο ρεύ- μα, θα παρατηρήσετε ότι στο ρολόι αναβο- σβήνει η ένδειξη 12:00. • Πατήστε ή για να ρυθμιστούν πρώ- τα οι ώρες και μετά τα λεπτά. Θα ακούσετε 2 ηχητικά σήματα που επιβεβαιώνουν ότι η ώρα που επιλέξατε ρυθμίστηκε. • Αν θέλετε να αλλάξετε την ...
Page 68 - Προγραμματισμός Διάρκειας και Λήξης; Λειτουργίες ασφαλείας; ΚΛΕΙΔΩΜΑ ΑΣΦΑΛΕΙΑΣ ΓΙΑ ΠΑΙΔΙΑ
68 Οδηγός χρήσης 4. Όταν φτάσει η ώρα λήξης του προγράμμα- τος, ο φούρνος θα σβήσει, θα ακουστεί ένα ηχητικό σήμα και το σύμβολο θα αναβο- σβήνει γρήγορα. 5. Πατήστε οποιονδήποτε αισθητήρα για να διακόψετε την ηχητική ειδοποίηση και για να σβήσει το σύμβολο . Ο φούρνος θα ανάψει ξανά. 6. Φέρετε τους...
Page 69 - Λειτουργία Teka Hydroclean
69 Οδηγός χρήσης Ελληνικά ΧΕΙΡΟΚΙΝΗΤΟ ΚΛΕΙΔΩΜΑ ΤΗΣ ΠΟΡΤΑΣ Διαθέσιμη μόνο σε μοντέλα με σύστημα πυρόλυσης. Η λειτουργία αυτή επιτρέπει το κλείδωμα της πόρτας του φούρνου. ΣΗΜΑΝΤΙΚΟ Η λειτουργία αυτή μπορεί να επιλεχθεί μόνο όταν ο διακόπτης επιλογής λειτουργίας του φούρνου βρίσκεται στη θέση αναμονής...
Page 70 - Λειτουργία αυτοκαθαρισμού με σύστημα πυρόλυσης; ΠΡΟΣΟΧΗ
70 Οδηγός χρήσης Λειτουργία αυτοκαθαρισμού με σύστημα πυρόλυσης Λειτουργία διαθέσιμη στα μοντέλα με πυρόλυ- ση HSB P. ΠΡΟΣΟΧΗ Προτού πραγματοποιήσετε τον κύκλο κα- θαρισμού με πυρόλυση, διαβάστε προσε- κτικά τις οδηγίες ασφαλείας που βρίσκονται στην αρχική ενότητα του εγχειριδίου εγκα- τάστασης και ...
Page 72 - ΣΗΜΑΝΤΙΚΟ
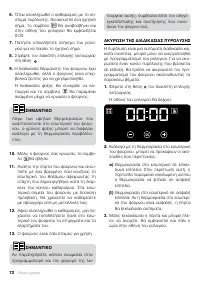
72 Οδηγός χρήσης 6. Όταν ολοκληρωθεί ο καθαρισμός με το σύ- στημα πυρόλυσης, θα ακουστεί ένα ηχητικό σήμα, το σύμβολο θα αναβοσβήνει και στην οθόνη του ρολογιού θα εμφανίζεται 0:00. 7. Πατήστε οποιοδήποτε πλήκτρο του ρολο- γιού για να παύσει το ηχητικό σήμα. 8. Στρέψτε τον διακόπτη επιλογής λειτουργ...