Page 3 - Connection and operation; • Never allow the induction hob to operate unattended, as; Concerning persons
Safety instructions GB 19 Safety instructions Connection and operation • The appliances are constructed in accordance with the rele- vant safety regulations. • Connecting the appliance to the mains and repairing and serv- icing the appliance may only be carried out by a qualified elec-trician accord...
Page 4 - Appliance description; The decorative design may deviate from the illustrations.
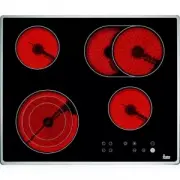
20 Appliance description GB A p p li an ce d es cr ip ti o n The decorative design may deviate from the illustrations. 1. Induction cooking zone front left2. Induction cooking zone back left3. Induction cooking zone back right4. Induction cooking zone front right5. Touch-control operating panel6. Gl...
Page 5 - Operating the hob with the sensor keys; The lock key can be used to lock all of the keys.
Appliance description GB 21 Operating the hob with the sensor keys The ceramic glass hob is operated with touch control sensorkeys. The sensor keys are operated as follows: lightly touch asymbol on the surface of the ceramic glass plate. A buzzer willindicate when the controls have been operated cor...
Page 6 - The hob
22 Operation GB Operation The hob The hob is equipped with an induction cooking mode. An induc-tion coil underneath the glass ceramic hob generates an electro-magnetic alternating field which penetrates the glass ceramicand induces the heat-generating current in the pot base.With an induction cookin...
Page 7 - Cookware for induction hobs; • When buying cooking pots, note that it is frequently the diame-; Power settings
Operation GB 23 Cookware for induction hobs Cookware for induction cooking zones must be made of metaland have magnetic properties. The base must be sufficientlylarge. Only use pots with a base suitable for induction. This is how to establish the suitability of a pot Conduct the magnet test describe...
Page 8 - Operating the keys
24 Operation GB Operating the keys The controls described here expect the pressing of a (selection) key to be followed by the pressing of a subsequent key. The next key will need to be pressed within 10 seconds , otherwise the selection will be deleted.The Plus/ Minus keys can be touched individuall...
Page 9 - Locking
Operation GB 25 Locking The lock can be used to lock key operation and cooking level settings. Onlythe OFF key can be used to switch the hob off. 1. Switch on the hob. Activating the lock (while cooking): 2. Press the Lock key to activate the function. The control lamp above the Lock key will light ...
Page 11 - Automatic boost function; Plus key
Operation GB 27 Automatic boost function Parboiling takes place at power level 9 with the automatic boost function.After a certain time the power level will switch down automatically to a lowersimmering setting (1 to 8).When using the automatic boost function only the simmering setting withwhich the...
Page 12 - Power boost setting
28 Operation GB Keep-warm function With the keep-warm function you can use one of the cooking zones tokeep food warm. The respective cooking zone is operated at a low powerlevel.1. Cookware is placed on a cooking zone and a power level (e.g. 3) is selected. 2. Press the Warming key , the control lam...
Page 13 - Glass ceramic hob
Cleaning and care GB 29 Cleaning and care • Switch the hob off and let it cool down before you clean it.• Never clean the glass ceramic hob with a steam cleaner or similar appliance! • When cleaning make sure that you only wipe lightly over the ON/OFF key . The hob may otherwise be accidentally swit...
Page 15 - Safety instructions for kitchen unit fitters; Important
Instructions for assembly GB 31 Instructions for assembly Safety instructions for kitchen unit fitters • Veneers, adhesives and plastic surfaces of surrounding furni- ture must be temperature resistant (>75°C). If the veneers andsurfaces are not sufficiently heat resistant they can becomedeformed...
Page 16 - Bracket; Electrical connection; • The electrical connection must be carried out by a quali-
32 Instructions for assembly GB Bracket • Insert the hob and align it.• From the bottom, insert the brackets with screws in the holes provided for fastening the brackets, align the brackets andscrew them tight. • Tighten the screws with a hand screw driver only; do not use a battery-operated screw d...
Page 17 - Technical data
Instructions for assembly GB 33 No mains cable present in the factory • To connect the appliance, unscrew the cover of the connection socket on the underside of the appliance in order to be able toaccess the terminal. After connecting the appliance, replacethe cover and secure the connection cable w...