Page 2 - TROUBLESHOOTING GUIDE; Using the correct driving bit is necessary.
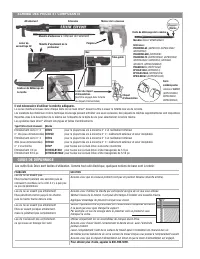
PARTS - SCHEMATIC - COMPONENTS Check the depth adjustment on the attachment. Reset if necessary.You may have missed the substrate.Example: In flooring, this will occur if you miss the joist. TROUBLESHOOTING GUIDE Guide Tube Feed Pawl Lever( Must be engaged in Feed Pawl Assembly Slot) Feed Pawl Assem...
Page 3 - DEEPER
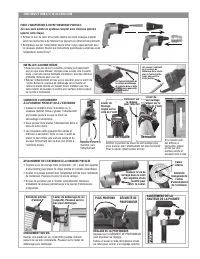
OPERATING INSTRUCTIONS CONNECT ATTACHMENT TO SCREWGUN OR EXTENSION • Insert mandrel in extension or screwgun, slide attachment on and push tight - untilthe locking lever snaps in place. • You can rotate the attachment any way that is desired. • New tools may be tight and hard to lock in place. If so...
Page 4 - Quik Drive
800-999-5099 strongtie.com READ AND FOLLOW ALL INSTRUCTIONSWHEN SERVICING USE ONLY IDENTICAL QUIK DRIVE ® REPLACEMENT PARTS. ATTENTION - Please see screwgun manufacturer’s instructions for safe use of electric power tools. CHANGING NON-SKID TEETH On models with removable non-skid teeth, the nibs can...
Page 5 - PRO SYSTEMS; INSTRUCCIONES DE OPERACIÓN; PRODW; INSTRUCCIONES RÁPIDAS PARA COMENZAR; Instrucciones completas en el interior; primero
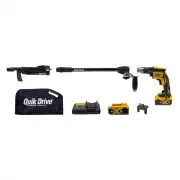
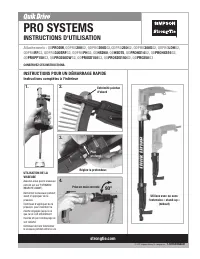
strongtie.com PRO SYSTEMS INSTRUCCIONES DE OPERACIÓN Accesorios: QD PRODW , QDPRO 200 G2, QDPRO 200S G2,QDPRO 250 G2, QDPRO 300S G2, QDPRO LDH G2, QDPRO RF G2, QDPRO 300SRF G2, QDPRO PH G2, QD HSD60 , QD HSD75 , QD PROHX14 G2, QD PROHX516 G2, QD PROPP150 G2, QD PRO250DW G2, QD PROSD150 G2, QD PROSDX...
Page 6 - Use la punta correcta.
ESQUEMA DE PIEZAS Y COMPONENTES Revisar la graduación de la profundidad y ajústela si fuese necesario.Podría no estar penetrando en el substrato.Ejemplo, al atornillar un piso, podría no estar atornillando en la viga. GUÍA DE DIAGNÓSTICO DE PROBLEMAS Guide Tube Palanca liberadora delas puntas Leva d...
Page 8 - Los Accesorios y Sistemas Quik Drive PRO
800-999-5099 strongtie.com LEA Y SIGA TODAS LAS INSTRUCCIONES.AL DARLE SERVICIO A ESTA HERRAMIENTA USE SÓLO REPUESTOS IDÉNTICOS A LOS Quik Drive ® . ATENCIÓN: Para el uso seguro de las pistolas atornilladoras eléctricas, refiérase a las instrucciones de su fabricante CAMBIO DE LOS DIENTES ANTIDESLIZ...
Page 9 - INSTRUCTIONS D'UTILISATION; CONSERVEZ CES INSTRUCTIONS.; INSTRUCTIONS POUR UN DÉMARRAGE RAPIDE; Instructions complètes à l'intérieur; Réglez la profondeur.
s t rongtie.com PRO SYSTEMS INSTRUCTIONS D'UTILISATION Attachements : QD PRODW , QDPRO 200 G2, QDPRO 200S G2,QDPRO 250 G2, QDPRO 300S G2, QDPRO LDH G2, QDPRO RF G2, QDPRO 300SRF G2, QDPRO PH G2, QD HSD60 , QD HSD75 , QD PROHX14 G2, QD PROHX516 G2, QD PROPP150 G2, QD PRO250DW G2, QD PROSD150 G2, QD P...
Page 10 - Il est nécessaire d’utiliser la mèche adéquate.
SCHÉMA DES PIÈCES ET COMPOSANTS Vérifiez l'ajustement de la profondeur sur l'attachement. Réajustez au besoin.Il se peut que vous ayez manqué le support.Par exemple, en cas de vissage dans le plancher, cela se produit si vous manquez la solive. GUIDE DE DÉPANNAGE Tube-guide Levier du cliquet d'alime...
Page 11 - PLUS PROFOND
INSTRUCTIONS D’UTILISATION CONNECTEZ L'ATTACHEMENT À LA VISSEUSE PISTOLET OU À L'EXTENSION • Insérez le mandrin dans l'extension ou la visseuse pistolet, faites-y glisser l'attachementet poussez jusqu'à ce que le levier deverrouillage s'enclenche. • Vous pouvez faire pivoter l'attachement dans le se...
Page 12 - Les attachements et systèmes Quik Drive
LISEZ ET RESPECTEZ TOUTES LES INSTRUCTIONS.LORS DE LA MISE EN SERVICE, N'UTILISEZ QUE DES PIÈCES DE RECHANGE QUIK DRIVE ® IDENTIQUES. ATTENTION : Pour utiliser en toute sécurité votre visseuse pistolet électrique, veuillez consulter les instructions du fabricant. REMPLACEMENT DES DENTS ANTIDÉRAPANTE...