Page 2 - to accumulate on sealing surfaces.
2 PRECAUTIONS TO AVOID POSSIBLE EXPOSURE TO EXCESSIVE MICROWAVE ENERGY (a) Do not attempt to operate this oven with the door open since open-door operation can result in harmful exposure to microwave energy. It is important not to defeat or tamper with the safety interlocks. (b) Do not place any obj...
Page 3 - CUSTOMER ASSISTANCE; FOR US; description of the problem.
CUSTOMER ASSISTANCE IMPORTANT! Register within 10 days of purchase.Register ONLINE at www.sharpusa.com/productregistration To aid in reporting this appliance, please record below the model number and serial number located on the unit. We also suggest you record all the information listed and retain ...
Page 4 - US CONSUMER LIMITED WARRANTY; Your product model number &; of charge for this additional period.; Where to obtain service:; Service Center in those areas.
US CONSUMER LIMITED WARRANTY 4 E SHARP ELECTRONICS CORPORATION (“SHARP”) warrants to the first consumer Purchaser that this SHARP brand product (the “Product”), when shipped in its original container, and sold or distributed in the United States by SHARP or an authorized SHARP dealer or reseller, wi...
Page 5 - LIMITED WARRANTY; Consumer Electronics Products; Congratulations on your purchase!
Revision: 03/21/2016 LIMITED WARRANTY Consumer Electronics Products Congratulations on your purchase! Sharp Electronics of Canada Ltd. (“Sharp”) warrants to the first purchaser for this Sharp brand product (“Product”), when shipped in its original container and sold or distributed in Canada by Sharp...
Page 6 - IMPORTANT SAFETY INSTRUCTIONS; READ ALL INSTRUCTIONS BEFORE USING; To reduce the risk of burns, electric; SAVE THESE INSTRUCTIONS
6 IMPORTANT SAFETY INSTRUCTIONS READ ALL INSTRUCTIONS BEFORE USING When using the appliance, basic safety precautions should be followed, including the following: WARNING To reduce the risk of burns, electric shock, fire, injury to persons or exposure to excessive microwave energy: 1 Read all instru...
Page 7 - INSTALLATION INSTRUCTIONS; UNPACKING AND EXAMINING; CHOOSING A LOCATION FOR
7 IMPORTANT SAFETY INSTRUCTIONS For USA, please go to www.sharpusa.com/ trimkits to access the list of approved trim kits with these ovens. For Canada, please visit relevant product’s page on www.sharp.ca for information on installation options and the list of approved trim kits. 20 Do not mount uni...
Page 8 - ELECTRICAL REQUIREMENTS; EXTENSION CORD; GROUNDING INSTRUCTIONS
8 This appliance must be grounded. This oven is equipped with a cord having a grounding wire with a grounding plug. It must be plugged into a wall receptacle that is properly installed and grounded in accordance with the National Electrical Code and local codes and ordinances. In the event of an ele...
Page 9 - INFORMATION YOU NEED TO KNOW
9 ABOUT YOUR MICROWAVE OVEN This operation manual is valuable: read it carefully and always save it for reference. NEVER use the microwave oven without the turntable and support nor turn the turntable over so that a large dish could be placed in the microwave oven. The turn- table will turn both clo...
Page 10 - ABOUT FOODS
10 ABOUT CHILDREN AND THE MICROWAVE Children below the age of 7 should use the microwave oven with a supervising person very near to them. Between the ages of 7 and 12, the supervising person should be in the same room. The child must be able to reach the microwave oven comfortably.At no time should...
Page 11 - ABOUT UTENSILS AND COVERINGS
11 INFORMATION YOU NEED TO KNOW ABOUT UTENSILS AND COVERINGS It is not necessary to buy all new cookware. Many pieces already in your kitchen can be used successfully in your new convection microwave oven. The chart below will help you decide what utensils and coverings should be used in each mode. ...
Page 13 - PART NAMES; MICROWAVE OVEN; Top
13 PART NAMES MICROWAVE OVEN MENU LABEL AUTO DEFROST AUTO BROIL AUTO ROAST AUTO BAKE Ground Meat Steaks Chicken Pieces Hamburgers Chicken Pieces Steaks Fish Steaks Chicken Turkey Turkey Breast Pork Bundt Cake Cookies French Fries 1 Ventilation openings (Rear side) 2 Oven door with see-through window...
Page 14 - CONTROL PANEL; feature descriptions and usage information is located.
14 CONTROL PANEL PART NAMES Numbers next to the padsheet illustration indicate page numbers where feature descriptions and usage information is located. Interactive Display: Words will light in the display to indicate features and cooking instructions. 29 29 26 24 27 15 30 30 22 27 29 18 16 20 26 27...
Page 15 - TO SET THE CLOCK; CLEAR pad and reset the clock for the correct time; TIME COOKING; High
15 BEFORE OPERATING MANUAL OPERATION Before operating your new microwave oven make sure you read and understand this operation manual completely.• Before the oven can be used, follow these steps: 1 Plug in the oven. W E L C O M E P R E S S C L E A R A N D P R E S S C L O C K will appear. 2 Touch the...
Page 16 - MICROWAVE FEATURES; AUTO DEFROST; DEFROST pad until the display shows the food; AUTO DEFROST CHART; MANUAL DEFROST
16 MICROWAVE FEATURES AUTO DEFROST Auto Defrost automatically defrosts foods shown in the Auto Defrost Chart.• For example, to defrost a 2.0 pound steak: 1 Touch the AUTO DEFROST pad once. 2 Select the desired food by touching the AUTO DEFROST pad until the display shows the food name. Ex. touch twi...
Page 17 - SENSOR COOKING; USING SENSOR SETTINGS:; CLEAR pad and select cooking time and variable; SETTINGS when the HELP indicator is lighted in; MICROWAVE OVEN COOKING
17 SENSOR COOKING Sharp's Sensor is a semi-conductor device that detects the vapor (moisture and humidity) emitted from the food as it heats. The sensor adjusts the cooking times and power levels for various foods and quantities. USING SENSOR SETTINGS: 1 After the oven is plugged in, wait 2 minutes ...
Page 18 - REHEAT
18 MICROWAVE OVEN COOKING REHEAT You can reheat many foods by touching just one pad. You don’t need to calculate reheating time or power level.• For example, to heat prepared chili:Touch the REHEAT pad.When the Sensor detects the vapor emitted from the food, the remainder of reheating time will appe...
Page 19 - SENSOR MENU
19 MICROWAVE OVEN COOKING SENSOR MENU • For example, to cook a baked potato: 1 Touch the SENSOR MENU pad. 2 Select the desired sensor setting. Ex: touch the number pad 1 to cook baked potatoes. 3 Touch the START/TOUCH ON pad. When Sensor detects the vapor emitted from the food, the remainder of cook...
Page 20 - CONVECTION AUTOMATIC OPERATION; AUTO BROIL CHART; AUTO BROIL; LEVEl pad to select More for well done or Less for
20 CONVECTION AUTOMATIC OPERATION AUTO BROIL CHART SETTING/FOOD AMOUNT RACK PROCEDURE 1 Hamburgers 1 - 8 pieces 0.25 lb each Low Use this setting to broil hamburger patties. Place on low rack. 2 Chicken pieces 0.5 - 3.5 lb. Low Arrange pieces on low rack. After cooking, let stand 3-5 minutes. Dark m...
Page 21 - CONVECTION BROILING CHART; Beef
21 CONVECTION AUTOMATIC OPERATION CONVECTION BROILING CHART CUT WEIGHT/ THICKNESS CONVECTION TIME Beef Rib 3/4 -1 in. 7-8 oz. each Rare 10-13 min. Medium 14-16 min. Well Done 17-20 min. Steaks: Sirloin, Porterhouse, T-Bone 1-1 1/2 in. Rare 10-13 min. Medium 14-18 min. Well Done 19-25 min. Chuck Stea...
Page 22 - AUTO ROAST CHART; AUTO ROAST
22 CONVECTION AUTOMATIC OPERATION AUTO ROAST CHART SETTING/FOOD AMOUNT RACK PROCEDURE 1 Chicken 2.5 - 7.5 lb. Low After the cycle ends, cover with foil and let stand for 5 to 10 minutes. 2 Turkey 6.5 - 16.0 lb. Low Season as desired. Place on low rack. After the cycle ends, cover with foil and let s...
Page 23 - COMBINATION ROASTING CHART
23 CONVECTION AUTOMATIC OPERATION COMBINATION ROASTING CHART CUT TIME Beef Roasts (tender cuts) Rare 12-14 min. per lb. at HIGH MIX, 325˚F Medium 13-15 min. per lb. at HIGH MIX, 325˚F Well Done 14-17 min. per lb. at HIGH MIX, 325˚F Roasts (less tender cuts) Rare 12-15 min. per lb. at HIGH MIX, 325˚F...
Page 24 - AUTO BAKE CHART; AUTO BAKE
24 AUTO BAKE CHART SETTING/FOOD AMOUNT RACK PROCEDURE 1 Bundt cake 1 cake No rack Ideal for packaged cake mix or your own recipe. Prepare according to package or recipe directions and place in a greased and floured bundt pan. Place pan in oven. Cool before frosting and serving. 2 Cookies 1 or 2 pizz...
Page 25 - COMBINATION BAKING CHART; Bar Cookies: Your recipe or mix
25 CONVECTION AUTOMATIC OPERATION COMBINATION BAKING CHART ITEM PROCEDURE Cakes: Your recipe or mixTube or Bundt Cakes LOW MIX, 350˚F for three-fourths the recommended time.* Angel Food LOW MIX, 350˚F for 25 to 30 minutes. Loaf Cakes or Quick Breads LOW MIX, 350˚F for three-fourths the recommended t...
Page 26 - CONVECTION COOKING; TO COOK WITH CONVECTION; Note: If you wish to know the programmed oven; TO PREHEAT AND COOK WITH; ON pad after step 2. Preheating will start. When the; BROIL; MANUAL CONVECTION AND AUTOMATIC MIX COOKING
26 The oven should not be used without the turntable in place, and it should never be restricted so that it cannot rotate. You may remove the turntable when preheating the oven and when preparing food to be cooked directly on the turntable. CAUTION The oven cabinet, cavity, door, turntable, turntabl...
Page 27 - SLOW COOK; Note: If you do not change the temperature, omit steps; AUTOMATIC MIX COOKING; High Mix; TO COOK WITH AUTOMATIC MIX; TOUCH ON pad after step 2. Preheating will start.
27 MANUAL CONVECTION AND AUTOMATIC MIX COOKING CAUTION The oven cabinet, cavity, door, turntable, turntable support, racks and dishes will become hot. To PREVENT BURNS, use thick oven gloves when removing the food or turntable from the oven. SLOW COOK Slow Cook is preset at 300˚F for 4 hours. The te...
Page 28 - HELPFUL HINTS FOR; AUTOMATIC MIX COOKING:
28 MANUAL CONVECTION AND AUTOMATIC MIX COOKING HELPFUL HINTS FOR CONVECTION AND AUTOMATIC MIX COOKING Your convection microwave oven can cook any food perfectly because of the number of ways it can cook: microwave only, automatic mix, convection only or broil. This operation manual tells you how to ...
Page 29 - AUDIBLE SIGNAL ELIMINATION; SETTINGS, the number; LANGUAGE SELECTION; HELP; CLEAR pad or during cooking.; OTHER FEATURES
29 HELP/SETTINGS HELP/SETTINGS provides 5 features which make using your microwave oven easy because specific instructions are provided in the interactive display. 1. SAFETY LOCK The safety lock prevents unwanted microwave oven operation, such as by small children. The microwave oven can be set so t...
Page 30 - CLEAR pads. If easier, unplug the microwave oven
30 OTHER FEATURES MORE OR LESS TIME ADJUSTMENT Should you discover that you like any of the Sensor Menu, Reheat, Popcorn or Auto Defrost settings slightly more done, touch the POWER LEVEL pad once after touching your selection. The display will show M O R E . For slightly less done, touch the POWER ...
Page 31 - CLEANING AND CARE
31 CLEANING AND CARE EXTERIOR The outside surface is painted. Clean the outside with mild soap and water; rinse and dry with a soft cloth. Do not use any type of household or abrasive cleaner. DOOR Wipe the window on both sides with a damp cloth to remove any spills or spatters. Metal parts will be ...
Page 32 - SERVICE CALL CHECK; Please check the following before calling for service:
32 SERVICE CALL CHECK Please check the following before calling for service: 1 Place one cup of water in a glass measuring cup in the microwave oven and close the door securely. Operate the microwave oven for one minute at HIGH 100%. A. Does the microwave oven light come on? YES _____ NO _____ B. Do...
Page 33 - SPECIFICATIONS
33 AC Line Voltage: UL Rating Single phase 120V, 60Hz, AC only CSA Rating Single phase 117V, 60Hz, AC only AC Power Required: UL Rating 1.55 kw, 13.0 amps. (Microwave/Convection) CSA Rating 1.5 kw, 13.0 amps. (Microwave/Convection) Output Power: Microwave* Convection Heater 900 watts 1450 watts Freq...
Page 35 - À C; onve; MODÈLES
F our M iC ro -o ndes À C onve Ction MANUEL D'UTILISATION MODÈLES SMC1585BB / SMC1585BS SMC1585BW B = Noir, S = Acier inoxydable, W = Blanc SMC1585BS PRÉCAUTIONS POUR ÉVITER LE RISQUE D’UNE EXPOSITION AUX MICRO-ONDES ......... 2 AIDE À LA CLIENTÈLE .............................. 3 GARANTIE LIMITÉE ....
Page 36 - produits de nettoyage s’accumuler sur les surfaces d’étanchéité.
2 PRÉCAUTIONS POUR ÉVITER LE RISQUE D’UNE EXPOSITION AUX MICRO-ONDES (a) Ne pas essayer de faire fonctionner ce four lorsque la porte est ouverte, car le fonctionnement avec la porte ouverte pourrait entraîner une exposition dangereuse aux micro-ondes. Il est essentiel de ne pas rendre inopérant le ...
Page 37 - AIDE À LA CLIENTÈLE; AU CANADA
AIDE À LA CLIENTÈLE IMPORTANT ! Veuillez enregistrer votre produit dans les 10 jours suivant la date d'achat.Faites l'enregistrement EN LIGNE au www.sharpusa.com/productregistration Afin de faciliter les appels de service concernant cet appareil, veuillez inscrire ci-dessous le numéro de modèle et l...
Page 38 - GARANTIE LIMITÉE; Produits électroniques de grande consommation; Merci d’avoir choisi la marque Sharp!
GARANTIE LIMITÉE Produits électroniques de grande consommation Merci d’avoir choisi la marque Sharp! Sharp Électronique du Canada Ltée (« Sharp ») garantit à l'acheteur initial de ce Produit de marque Sharp (le « Produit ») que, s’il est emballé dans son contenant original et s’il est vendu ou distr...
Page 39 - IMPORTANTES CONSIGNES DE SÉCURITÉ; LIRE TOUTES LES INSTRUCTIONS AVANT L'EMPLOI; Pour réduire les risques de; LIRE ET CONSERVER CES DIRECTIVES
5 IMPORTANTES CONSIGNES DE SÉCURITÉ LIRE TOUTES LES INSTRUCTIONS AVANT L'EMPLOI Certaines précautions de sécurité devraient toujours être prises lorsqu’on se sert d’appareils électriques : AVERTISSEMENT Pour réduire les risques de brûlures, de chocs électriques, de feu, de blessures ou d’exposition ...
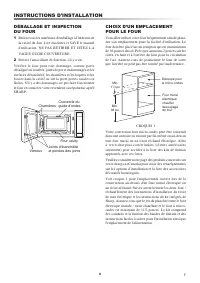
Page 40 - INSTRUCTIONS D'INSTALLATION; DÉBALLAGE ET INSPECTION
6 INSTRUCTIONS D'INSTALLATION DÉBALLAGE ET INSPECTION DU FOUR 1 Retirez tous les matériaux d'emballage à l'intérieur de la cavité du four. Lire enceintes et SAVE le manuel d'utilisation. NE PAS RETIRER ET JETEZ LA VAGUE GUIDE COUVERTURE. 2 Retirez l'autocollant de fonction, s'il y a un. Vérifiez le ...
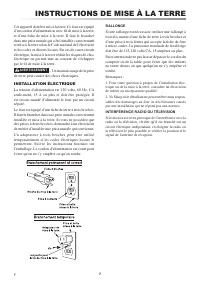
Page 41 - INSTALLATION ÉLECTRIQUE; RALLONGE; INSTRUCTIONS DE MISE À LA TERRE
7 Cet appareil doit être mis à la terre. Ce four est équipé d’un cordon d’alimentation avec fil de mise à la terre, et d’une fiche de mise à la terre. Il faut le brancher dans une prise murale qui a été installée correctement et mise à la terre selon le Code national de l’électricité et les codes et...
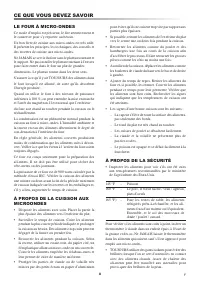
Page 42 - CE QUE VOUS DEVEZ SAVOIR
8 LE FOUR À MICRO-ONDES Ce mode d’emploi est précieux; le lire attentivement et le conserver pour s’y reporter, au besoin.Un bon livre de cuisine aux micro-ondes est très utile. Il présente les principes, les techniques, des conseils et des recettes de cuisine aux micro-ondes.Ne JAMAIS se servir du ...
Page 43 - À PROPOS DES ENFANTS ET DU; POPCORN
9 • Diriger la vapeur loin du visage et des mains afin d’éviter des brûlures. Soulever doucement la partie la plus éloignée des couvercles et des pellicules et ouvrir lentement les sacs de maïs soufflé ou de cuisson en les tenant loin du visage. • Rester près du four quand il fonctionne et vérifier ...
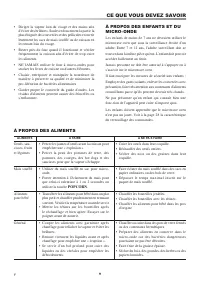
Page 44 - USTENSILES ET COUVERCLES
10 CE QUE VOUS DEVEZ SAVOIR USTENSILES ET COUVERCLES Il n’est pas nécessaire d’acheter une nouvelle batterie de cuisine. Beaucoup de vos récipients peuvent très bien servir à la cuisson dans votre nouveau four micro-ondes à convection. Le tableau ci-dessous vous aidera à choisir les ustensiles et co...
Page 46 - LES PARTIES DE LA MICRO-ONDE
12 LES PARTIES DE LA MICRO-ONDE MICROWAVE OVEN AIDE-MÉMOIE ACCESSOIRES Les accessoires qui suivent sont conçus spécialement pour une utilisation dans le four unique- ment en cuisson par convexion, combinaison ou gril. NE PAS LES UTILISER EN CUISSON MICRO-ONDES UNIQUEMENT. Ne pas remplacer ces suppor...
Page 47 - FEUILLE DES TOUCHES
13 FEUILLE DES TOUCHES LES PARTIES DE LA MICRO-ONDE Les chiffres à côté de l’illustration des touches indiquent les pages où on retrouve la description des caractéristiques et les renseignements concernant l’utilisation. Affichage du panneau de contrôle : Des mots apparaîtront dans l’affichage pour ...
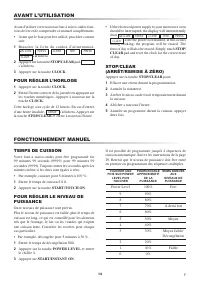
Page 48 - POUR RÉGLER L’HORLOGE; TEMPS DE CUISSON
14 AVANT L’UTILISATION FONCTIONNEMENT MANUEL Avant d'utiliser votre nouveau four à micro-ondes font- vous de lire et de comprendre ce manuel complètement.• Avant que le four peut être utilisé, procédez comme suit: 1 Bra ncher la f iche du cordon d’a l i ment at ion. W E L C O M E P R E S S C L E A R...
Page 49 - MICRO-ONDES PARTICULARITÉS; DÉCONGÉLATION MANUELLE
15 MICRO-ONDES PARTICULARITÉS AUTO DEFROST (DÉCONGÉLATION) Le mode « Auto Defrost » décongèle automatiquement les aliments montrés dans le tableau de décongélation.• Par exemple, décongeler un 2,0 livre le bifteck : 1 Appuyer sur la touche AUTO DEFROST. 2 Sélectionner le type d’aliment voulu en acti...
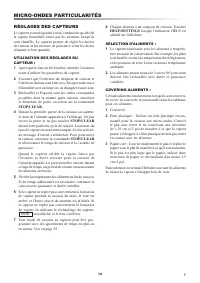
Page 50 - RÉGLAGES DES CAPTEURS; UTILISATION DES RÉGLAGES DU; HELP/SETTINGS lorsque l'indicateur HELP est; SÉLECTION D’ALIMENTS :
16 RÉGLAGES DES CAPTEURS Le capteur est un dispositif à semi-conducteur qui décèle la vapeur (humidité) émise par les aliments lorsqu’ils sont chauffés. Le capteur permet de régler les durées de cuisson et les niveaux de puissance selon les divers aliments et leur quantité. UTILISATION DES RÉGLAGES ...
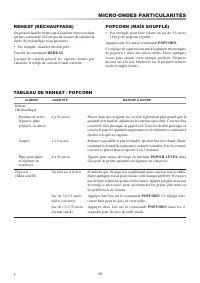
Page 51 - TABLEAU DE REHEAT / POPCORN
17 MICRO-ONDES PARTICULARITÉS REHEAT (RÉCHAUFFAGE) On peut réchauffer beaucoup d’aliments en ne touchant qu’une commande. Il n’est pas nécessaire de calculer la durée de réchauffage ni sa puissance.• Par exemple, chauffer du chili prêt : Toucher la commande REHEAT.Lorsque le capteur perçoit les vape...
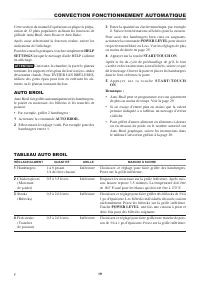
Page 53 - CONVECTION FONCTIONNEMENT AUTOMATIQUE; SETTINGS lorsque le message d’aide HELP s’allume
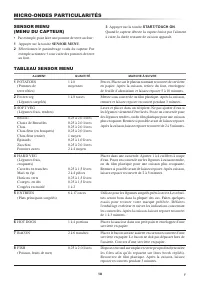
19 CONVECTION FONCTIONNEMENT AUTOMATIQUE Cette section du manuel d’opérations explique la prépa- ration de 12 plats populaires utilisant les fonctions de grillade Auto Broil, Auto Roast et Auto Bake.Après avoir sélectionné la fonction voulue, suivez les indications de l’affichage.Pour des conseils p...
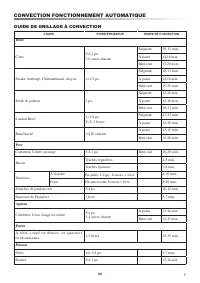
Page 54 - GUIDE DE GRILLAGE À CONVECTION; Bœuf
20 CONVECTION FONCTIONNEMENT AUTOMATIQUE GUIDE DE GRILLAGE À CONVECTION COUPE POIDS/ÉPAISSEUR TEMPS DE CONVECTION Bœuf Côtes 3/4 -1 po. 7-8 onces chacun Saignant 10-13 min. À point 14-16 min. Bien cuit 17-20 min. Steaks: Surlonge, Châteaubriand, Aloyou 1-1 1/2 po. Saignant 10-13 min. À point 14-18 m...
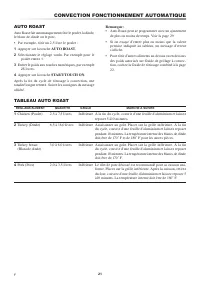
Page 55 - TABLEAU AUTO ROAST
21 CONVECTION FONCTIONNEMENT AUTOMATIQUE TABLEAU AUTO ROAST RÉGLAGE/ALIMENT QUANTITÉ GRILLE MARCHE À SUIVRE 1 Chicken (Poulet) 2,5 à 7,5 livres Inférieure À la fin du cycle, couvrir d’une feuille d’aluminium et laissez reposer 5 à10 minutes. 2 Turkey (Dinde) 6,5 à 16,0 livres Inférieure Assaisonner ...
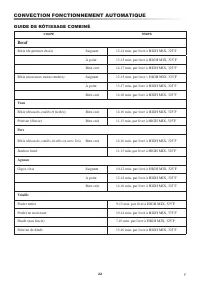
Page 56 - GUIDE DE RÔTISSAGE COMBINÉ; Veau
22 CONVECTION FONCTIONNEMENT AUTOMATIQUE GUIDE DE RÔTISSAGE COMBINÉ COUPE TEMPS Bœuf Rôtis (de premier choix) Saignant 12-14 min. par livre à HIGH MIX, 325˚F À point 13-15 min. par livre à HIGH MIX, 325˚F Bien cuit 14-17 min. par livre à HIGH MIX, 325˚F Rôtis (morceaux moins tendres) Saignant 12-15 ...
Page 57 - TABLEAU AUTO BAKE; LEVEL pour entrer une durée de cuisson inférieure
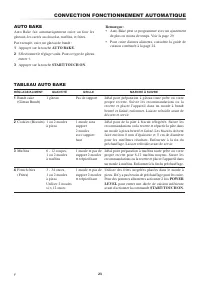
23 AUTO BAKE Auto Bake fait automatiquement cuire au four les gâteaux, les carrés au chocolat, muffins, et frites.Par exemple, cuire un gâteau de bundt : 1 Appuyer sur la touche AUTO BAKE. 2 Sélectionner le réglage voulu. Pour ce type de gâteau entrer 1 . 3 Appuyer sur la touche START/TOUCH ON. Rema...
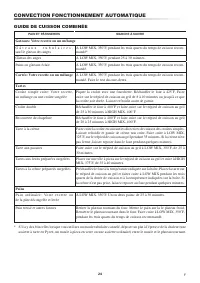
Page 58 - GUIDE DE CUISSON COMBINÉE
24 CONVECTION FONCTIONNEMENT AUTOMATIQUE GUIDE DE CUISSON COMBINÉE PAIN ET PÂTISSERIES MARCHE À SUIVRE Gateaux: Votre recette ou un mélangeG â t e a u x t u b u l a i r e s , sauf le gâteau des anges À LOW MIX, 350˚F, pendant les trois quarts du temps de cuisson recom- mandé*. Gâteau des anges À LOW...
Page 59 - CUISSON PAR CONVECTION; CUIRE PAR CONVECTION; Remarque : Si l’on souhaite connaître la température; PRÉCHAUFFAGE ET CUISSON PAR; CUISSON PAR CONVECTION/COMBINAISON AUTOMATIQUE
25 Le four ne doit pas être utilisé sans que le plateau tournant soit installé et la rotation ne doit jamais être entravée. Le plateau tournant peut être retiré pour préchauffer le four et pour préparer des aliments à cuire directement sur le plateau. ATTENTION L’enceinte, la chambre, la porte le pl...
Page 60 - Remarque : Si la température ne doit pas être changée,; CUISSON AVEC COMBINAISON; POUR PRÉCHAUFFER ET CUIRE AVEC; Remarque : Pour programmer un préchauffage seul,
26 CUISSON PAR CONVECTION/COMBINAISON AUTOMATIQUE de reprogrammer complètement le four si du temps additionnel était nécessaire. Refermer simplement la porte du four et réactiver START/TOUCH ON pour reprendre jusqu’à la fin du temps maximum. • Si plus de temps de gril est nécessaire, reprogram- mer ...
Page 61 - CONSEILS UTILES POUR; CUISSON PAR CONVECTION :
27 CUISSON PAR CONVECTION/COMBINAISON AUTOMATIQUE CONSEILS UTILES POUR CUISSON PAR CONVECTION ET COMBINAISON AUTOMATIQUE Votre four à micro-ondes et convection peut cuire parfaitement les aliments du fait des nombreux modes de cuisson qu’il permet : micro-ondes seulement, com- binaison automatique, ...
Page 62 - TOUCH ON. Si on veut ensuite activer une commande; CLOCK. L’heure est affichée aussi longtemps que; AUTRES PARTICULARITÉS PRATIQUES
28 HELP/SETTINGS La touche HELP/SETTINGS facilite l’emploi du four en permettant l’affichage d’instructions pour 5 fonctions. 1. VERROUILLAGE DE SÉCURITÉ Le verrouillage de sécurité évite une utilisation indésir- able du four à micro-ondes par des enfants par exemple. Le four peut être configuré pou...
Page 63 - TOUCH ON. Le four cesse immédiatement de; LEVEL. La puissance s’affiche temps que le doigt reste
29 AUTRES PARTICULARITÉS PRATIQUES HELP Chaque configuration des modes Auto Defrost, Auto Broil, Auto Roast, Auto Bake, Sensor Menu, Reheat et Popcorn est accompagnée d’un conseil de cuisson. Pour le lire, toucher la commande HELP/SETTINGS à chaque fois que HELP est activé à l’affichage interactif p...
Page 64 - NETTOYAGE ET ENTRETIEN
30 NETTOYAGE ET ENTRETIEN Débrancher le cordon secteur avant de nettoyer, ou lais- ser la porte ouverte pour inactiver le four micro-ondes durant son nettoyage. EXTÉRIEUR La surface extérieure du four est peinte. Nettoyez l’extérieur à l’eau et au savon doux; rincez et séchez avec un linge doux. N’e...
Page 65 - APPEL DE SERVICE; Vérifier ce qui suit avant de faire appel à un réparateur :
31 APPEL DE SERVICE Vérifier ce qui suit avant de faire appel à un réparateur : 1 Placer une tasse d’eau dans un verre gradué dans le four et bien fermer la porte. Faire fonctionner le four pendant 1 minute à puissance ÉLEVÉE 100 %. A. Est-ce que la lumière du four est allumée? OUI _____ NON _____ B...
Page 66 - FICHE TECHNIQUE
32 Tension d’alimentation : UL Monophasé 120 V, 60 Hz, courant alternatif seulement CSA Monophasé 117 V, 60 Hz, courant alternatif seulement Alimentation requise : UL 1,55 kW, 13,0 A (micro-onde/convection) CSA 1,5 kW, 13,0 A (micro-onde/convection) Puissance de sortie : Micro-ondes* Chauffage à con...


 Sharp AX1100JS
User Manual
Sharp AX1100JS
User Manual
 Sharp AX1500JS
User Manual
Sharp AX1500JS
User Manual
 Sharp KB6524PSY
User Manual
Sharp KB6524PSY
User Manual
 Sharp R1210TY
User Manual
Sharp R1210TY
User Manual
 Sharp R1214TY
User Manual
Sharp R1214TY
User Manual
 Sharp R1514TY
User Manual
Sharp R1514TY
User Manual
 Sharp R1874TY
User Manual
Sharp R1874TY
User Manual
 Sharp R1881LSY
User Manual
Sharp R1881LSY
User Manual
 Sharp R20A0W
User Manual
Sharp R20A0W
User Manual
 Sharp R210DW
User Manual
Sharp R210DW
User Manual
 Sharp R211DB
User Manual
Sharp R211DB
User Manual
 Sharp R211DW
User Manual
Sharp R211DW
User Manual
 Sharp R-217E
User Manual
Sharp R-217E
User Manual
 Sharp R-21LCFS
User Manual
Sharp R-21LCFS
User Manual
 Sharp R231ZS
User Manual
Sharp R231ZS
User Manual
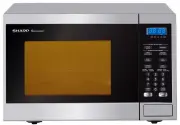
 Sharp R-247E
User Manual
Sharp R-247E
User Manual
 Sharp R291ZST
User Manual
Sharp R291ZST
User Manual
 Sharp R30A0W
User Manual
Sharp R30A0W
User Manual
 Sharp R32BST
User Manual
Sharp R32BST
User Manual