Page 2 - Index
Page 2 Index 1. Before Installation 3 Important Information 3 2. Maintenance & Service 4 LED Bulb Replacement 5 Electrical Cord 5 For Users 5 3. Description 6 Rangehood Contents 6 Operation 6 Cutout Size 6 4. Installation 7 Rangehood Size Vs Cooktop Size 7 Overhead Cabinet Rangehood Installation...
Page 3 - Before Installation; Important
Page 3 1. Before Installation Important • Please read this section thoroughly before attempting to install or operate the rangehood. Inspect your product upon receipt. Any damage or defects MUST be reported within 48 hours, or no claim will be recognised. • Before installing the electrical connectio...
Page 4 - Maintenance & Service; Maintenance and Service
Page 4 2. Maintenance & Service • CAUTION: Accessible parts may become hot when used with cooking appliances.• We recommend this appliance be installed and repaired by a qualified technician. • It is dangerous to modify any part of this appliance. Modification of any kind, will immediately void ...
Page 5 - LED Bulb Replacement; Electrical Cord
Page 5 2. Maintenance & Service LED Bulb Replacement • Switch off the power to the canopy hood and allow the bulb to cool.• Remove the bulb by turning it by hand in an anti clockwise direction• Care must be taken to avoid the bulb falling onto the hob top• Replace the bulb by inserting it into t...
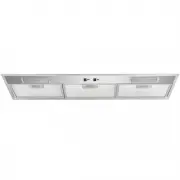
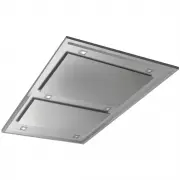
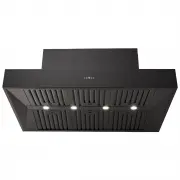
Page 6 - Description; Rangehood Contents; Cutout Size
Page 6 3. Description Rangehood Contents 1. Power to external motor system 2. Male Plug (Main Power 240V) 3. Single 200mm Outlet 4. Reducer – only for Hiflow & Isodrive 650 motors 5. Filter 6. Light Note: Filter and light quantity may vary from model to model. 1 2 3 4 5 6 (60cm – 572mm approx.) ...
Page 7 - Installation; Rangehood Size vs Cooktop Size; Overhead cabinet Rangehood Installation position
Page 7 4. Installation Rangehood Size vs Cooktop Size In addition to the size, the height of the rangehood above the cooktop is important to obtain the best performance. INADEQUATE Rangehood smaller than cooking zone ADEQUATE Rangehood same size as cooking zone OPTIMAL Rangehood larger than cooking ...
Page 8 - Mounting Instructions
Page 8 4. Installation Mounting Instructions It is STRONGLY RECOMMENDED that the rangehood be installed centrally over the cooktop. This will greatly improve its performance. Minimum height from the hob top surface to the underside face of the rangehood:• 650mm electric cooktop• 650mm gas cooktop An...
Page 9 - MOUNTING POINTS; FRONT VIEW
Page 9 4. Installation MOUNTING POINTS The diagrams below are a guide for all mounting points. FRONT VIEW TOP VIEW BOTTOM VIEW SIDE VIEW SIDE VIEW FRONT VIEW TOP VIEW BOTTOM VIEW SIDE VIEW SIDE VIEW Bottom View Front View Side View Mounting point A and B need to be tighted with slightly angled screw...
Page 10 - Overview; Flexi Ducting; NOTE: For more information, please refer
Page 10 4. Installation Overview 1 2 3 4 5 6 7 8 9 1. XDrive-600 Motor 2. Roof Seal Kit (Dektite)* 3. Support Straps* 4. Attach Flexi Duct to Bell-Mouth Adaptor using duct tape and cable tie. DO NOT rip the ducting. 5. Motor Power Lead (Male Plug) 6. Rangehood to Motor Lead (Female Plug) 7. Main Pow...
Page 11 - Condensation Information; Cooking with Induction Cooktops
Page 11 5. Condensation Information Cooking with Induction Cooktops Cooking with an induction or similar cooktop, may produce condensation on the rangehood. Unlike basic electric or gas cooking, induction cooktops heat food and liquid instantly, which in turn, produces vapours rapidly. Because of th...
Page 12 - Troubleshooting
Page 12 6. Troubleshooting Troubleshooting If the product does not work: Before you contact the service centre, make sure the product is plugged in, the electrical fuse (on selected models) is in correctly and electrical wiring is connected. Do not take any action that will damage the product. Check...
Page 13 - Service; Faulty Installation
Page 13 7. Service Faulty Installation It is not the responsibility of Schweigen to rectify any incorrect installations. A service call out fee will be charged for any Schweigen technician that attends a call, whereby it is established that the fault is due to an incorrect installation or non-manufa...
Page 14 - Specifications; Technical Specifications; DIMENSIONS
Page 14 8. Specifications Technical Specifications Model EV-6UCQ & EV-9UCQ Feeding Voltage 220-240V 50Hz Lamp Power 2 x 3W LED Approval Number DIMENSIONS EV-6UCQ EV-9UCQ 866 900mm 261 295 245 237 267 30 245 600mm 566 295 261 237 267 30
Page 15 - Disclaimer
Page 15 9. Disclaimer Disclaimer Under our policy of continuous product development, product specifications may change without notice. Prospective purchasers should therefore check with the retailer to ensure this publication correctly describes the products being offered for sale. All information s...