Page 2 - Contents; Connections
Contents e-Manual Guide Viewing the e-Manual 1 Scrolling a Page 1 Using the Top Icons 1 Returning to the Home Page 1 Searching the Index 2 Searching Pages 2 Closing the e-Manual 2 Jumping to a Menu Item 2 Updating the e-Manual Connections Aerial Connection Video Device Connections 5 HDMI Connection ...
Page 4 - TV Settings
72 Schedule Viewing 72 Schedule Recording 72 Checking the Programme Info 73 Channel List 73 Change Channels 73 Sorting 74 Genre 74 Change the Broadcast Signal 74 Change the Channel List Schedule Viewing 75 Digital Channel Schedule Viewing 75 Guide 75 Programme Info 76 Analogue Channel Schedule Viewi...
Page 5 - SMART TV Features
106 Sleep Timer 106 On Timer 107 Off Timer Screen Protection and Maintenance 108 Eco Solution 109 Screen Burn Protection 109 Pixel Shift 109 Auto Protection Time 110 Scrolling 110 Side Grey 110 Auto Protection Time Password 111 Password Change 111 Programme Rating Lock Additional Features 112 Changi...
Page 6 - Other Information
133 VOD Rating Lock 133 Miscellaneous Photos, Videos & Music 134 Restrictions 135 Supported File Formats 135 USB Device Connection 135 USB Device Removal 135 Playing all the Content on a Storage Device 135 Clearing the Recent Playlist 136 Using Networked External Storage Devices 137 Allowing DLN...
Page 7 - Troubleshooting
167 Supported music file formats 168 Video Codec 169 Video Codecs 169 Other Restrictions 169 Video Decoders 169 Audio Decoders 170 3D Precautions 170 CAUTION 171 SAFETY PRECAUTIONS 172 WARRANTY Licence Troubleshooting Screen Sound 3D TV Connection 179 Aerial (Air / Cable / Satellite) Connection 180 ...
Page 8 - Scrolling a Page; Returning to the Home Page
1 Viewing the e-Manual The embedded e-Manual contains information about your TV's key features. This TV has a built-in user guide. To read it, use one of the following methods: ● Open the Support menu and choose e-Manual (Troubleshooting) . ● Press the E-MANUAL button on the standard remote control....
Page 9 - Searching Pages; Jumping to a Menu Item; Updating the e-Manual
2 Searching Pages Press the { button or select on the top of the screen to access the search screen. Enter a search phrase and select Done . Select an item from the search results list to navigate to the relevant page. Closing the e-Manual To close the e-Manual, press and hold the RETURN button or s...
Page 10 - Aerial Connection
3 Aerial Connection Refer to the diagram and connect the aerial cable to the aerial input connector. Make sure that you do not bend the cable. The number of connectors and their names and locations may vary depending on the model. Connect the correct aerial cable for your viewing environment (over-t...
Page 11 - Video Device Connections
4 Video Device Connections This TV has a wide range of connectors for video input from video devices such as Blu-ray players, DVD players, camcorders and gaming consoles. Below is a list of featured connectors shown in descending order of picture quality. ● HDMI ● Component ● AV Connect the video de...
Page 12 - HDMI Connection
4 5 HDMI Connection Refer to the diagram and connect the HDMI cable to the video device's HDMI output connector and the TV's HDMI input connector. One of the following HDMI cable types is recommended: ● High-Speed HDMI Cable ● High-Speed HDMI Cable with Ethernet Use an HDMI cable with a thickness of...
Page 14 - SCART Connection
6 7 SCART Connection Connect the TV’s SCART input connector to the device’s SCART output connector using a SCART cable. An extra audio connection is not needed because SCART also carries audio. " SCART can only carry standard-definition video.
Page 15 - Audio Device Connections
8 Audio Device Connections This SMART TV has a wide range of connectors for audio input from devices such as amplifiers, Blu-ray players and DVD players. For better audio quality, it is a good idea to use an AV receiver. ● Digital Audio (Optical) ● ARC (Audio Return Channel) The number of connectors...
Page 16 - Headphone Connection
8 9 ARC (Audio Return Channel) This TV supports 3D and ARC (Audio Return Channel) functions via an HDMI cable. ARC enables digital sound to be output using just an HDMI cable. However, ARC is only available through the HDMI (ARC) port and only when the TV is connected to an ARC-enabled AV receiver. ...
Page 17 - Computer Connection
10 Computer Connection This TV has the following computer connection ports: ● HDMI ● HDMI-to-DVI For the highest picture quality, connect the computer to the HDMI/DVI port. Not all computers are HDMI-enabled. In this case, use an HDMI-to-DVI cable to connect the computer to the TV. Refer to the "...
Page 19 - Switching Between Video Sources
12 Switching Between Video Sources Press SOURCE button to switch between devices connected to the TV. For example, to switch to a game console connected to the second HDMI connector, press SOURCE button. From the Source list, select HDMI2 . The connector names may vary depending on the product. Sele...
Page 20 - Programming
12 13 Programming Scan and index available channels. You can also remove channels from the index, and designate favourites channels for a more convenient TV viewing experience. Programming is not necessary if you are connected to a cable or satellite receiver. Auto Tuning Screen Menu > Broadcasti...
Page 22 - Manual Tuning; When Aerial Source is set to Air or Cable
14 15 Manual Tuning Screen Menu > Broadcasting > Channel Settings > Manual Tuning Try Now Scans for a channel manually and stores in the TV. " If a channel is locked using the Channel Lock function, the PIN input window appears. " This function may not be supported depending on the ...
Page 23 - Transfer Channel List; Delete CAM Operator Profile
16 Channel mode ● P (programme mode) When tuning is complete, the broadcasting stations in your area have been assigned to position numbers from P0 to P99. You can select a channel by entering the position number in this mode. ● C (aerial channel mode) / S (cable channel mode) These two modes allow ...
Page 24 - Satellite System
16 17 Satellite System Screen Menu > Broadcasting > Channel Settings > Satellite System Try Now A set of satellite dish settings must be configured for each wanted satellite before performing a channel scan. Satellite System is available when Aerial is set to Satellite . " The PIN input...
Page 26 - Scanning for Satellite Channels
18 19 Scanning for Satellite Channels Screen Menu > Broadcasting > Channel Settings > Manual Tuning Press Scan after setting the items below. ● Transponder Selects the transponder. ● Scan Mode Selects either free or all channels to store. ● Network Search Enable / Disable network search. ● ...
Page 27 - Channel Management
20 Channel Management Screen Menu > Broadcasting > Edit Channel Try Now Try Now Broadcasting Auto Tuning Aerial Air Channel List Guide Schedule Manager Edit Channel Edit Favourites " The displayed image may differ depending on the model. Remove channels from the index, and rename analogue ...
Page 29 - Remove Channels; Number Change; Channel Unlock
22 Remove Channels Screen Menu > Broadcasting > Edit Channel Remove registered channels from the index. Removing channels appearing in the Recently Viewed or Most Viewed list clears the channels from the list only and does not remove them from the index. 11 From the screen, select the channels...
Page 30 - Common Interface
22 23 Common Interface Screen Menu > Broadcasting > Common Interface Try Now ● CI Menu This enables the user to select from the CAM-provided menu. Select the CI Menu based on the menu PC Card. ● CAM video transcoding You can configure the setting to transcode the video codec from the CAM autom...
Page 31 - Audio Options
24 Audio Options Screen Menu > Broadcasting > Audio Options Try Now ● Audio Language Try Now (Digital channels only) Change the default value for audio languages. ● Primary audio : Set the primary audio language. ● Secondary audio : Set the secondary audio language. " The available languag...
Page 32 - Favourites Channels; Add Channels
24 25 Favourites Channels Screen Menu > Broadcasting > Edit Favourites Try Now Broadcasting Auto Tuning Aerial Air Channel List Guide Schedule Manager Edit Channel Edit Favourites " The displayed image may differ depending on the model. You can designate frequently watched channels as favo...
Page 33 - Rearrange the Favourites Channels List; Rename a Favourites Channel List; Copy a Favourites Channels List
26 Rearrange the Favourites Channels List Rearrange the order of the channels in a Favourites Channels List. 11 Press b button to bring up the favourites channels list and select the channel you wish to move. 21 Press a button to rearrange the order of the selected channel. Select Done E or press th...
Page 34 - Network Configuration; Wired Network
26 27 Network Configuration Connecting the TV to a network gives you access to online services such as the Smart Hub and AllShare Play, as well as software updates. Wired Network There are three ways to connect the TV to a Local Area Network (LAN). ● External Modem ● ① IP Router + ② External Modem ●...
Page 35 - Wireless Network
28 Wireless Network Connect the TV to the Internet using a standard router or modem. LED 5300 series Insert the Samsung wireless LAN adapter (WIS09ABGNX, WIS12ABGNX) into one of the TV’s USB ports, referring to the illustration. Without this connection, the TV cannot connect to the Internet wireless...
Page 37 - Wired Network Setup; Automatic Wired Network Setup
30 Wired Network Setup Screen Menu > Network > Network Settings Try Now Network Network Status Network Settings Wi-Fi Direct AllShare Settings Device Name [TV]Samsung LE... " The displayed image may differ depending on the model. Automatic Wired Network Setup The TV's wired network connect...
Page 38 - Manual Wired Network Setup
30 31 Manual Wired Network Setup If the network requires a static IP address, enter the IP address, subnet mask, gateway and DNS values to connect to the network manually. To get the IP address, subnet mask, gateway and DNS values, contact your Internet Service Provider (ISP). Refer to the "Dyna...
Page 40 - Failed Wired Connection; No network cable found; Unable to connect to the network; Connected to a local network, but not to the Internet; Network setup complete, but unable to connect to the Internet
32 33 Failed Wired Connection No network cable found Try Now Try Now Make sure the network cable is plugged in. If it is connected, make sure the router is turned on. If it is on, try turning if off and on again. IP auto setting failed Try Now Perform the following or set the IP address manually fro...
Page 41 - Wireless Network Setup; Automatic Wireless Network Setup
34 Wireless Network Setup Screen Menu > Network > Network Settings Network Network Status Network Settings Wi-Fi Direct AllShare Settings Device Name [TV]Samsung LE... " The displayed image may differ depending on the model. Automatic Wireless Network Setup Connect the TV to the Internet v...
Page 42 - Manual Wireless Network Setup
34 35 Manual Wireless Network Setup If the network requires a static IP address, enter the IP address, subnet mask, gateway and DNS values to connect to the network manually. To get the IP address, subnet mask, gateway and DNS values, contact your Internet Service Provider (ISP). Refer to the "D...
Page 44 - WPS Button; Failed Wireless Connection; Unable to connect to a wireless router; IP auto setting failed
36 37 WPS Button If the router has a WPS push button, you can use it to connect the TV to the router automatically. WPS automatically configures the SSID and WPA key settings. 11 Setting Network Type to Wireless automatically displays a list of available wireless networks. 21 Select WPS(PBC) and the...
Page 45 - Dynamic versus Static IP Addresses
38 Unable to connect to the network Try Now Check the following: 11 Check the IP Settings . 21 Enter the correct security key if required. 31 If this does not work, contact your Internet Service Provider for more information. Connected to a local network, but not to the Internet Try Now 11 Make sure...
Page 46 - Checking the Network Status
38 39 Checking the Network Status Screen Menu > Network > Network Status Try Now Network Network Status Network Settings Wi-Fi Direct AllShare Settings Device Name [TV]Samsung LE... " The displayed image may differ depending on the model. View the current network and Internet status.
Page 47 - AllShare Settings; Rename the TV
40 Wi-Fi Direct Screen Menu > Network > Wi-Fi Direct Try Now Network Network Status Network Settings Wi-Fi Direct AllShare Settings Device Name [TV]Samsung LE... " The displayed image may differ depending on the model. Connect a mobile device that supports Wi-Fi Direct to the TV without us...
Page 48 - Smart Touch Control; Connecting to the TV
41 Smart Touch Control The Smart Touch Control makes it easier and more convenient to use the TV. For example, you can use the remote control's built-in touchpad to move the focus and make selections as you would on a computer using a mouse. In addition, you can use the virtual remote panel displaye...
Page 49 - Reconnecting the Smart Touch Control; Battery Low Alarm
42 Reconnecting the Smart Touch Control If you need to reestablish the connection between the TV and the Smart Touch Control, press the pairing button at the back of the Smart Touch Control toward the Remote receiver of the TV. <The Smart Touch Control pairing button> The pairing button can be...
Page 50 - Buttons and Descriptions
42 43 Buttons and Descriptions " The product colour and shape may vary depending on the model.
Page 52 - Special Functions
44 45 Special Functions Press and hold the following Smart Touch Control buttons to access various special functions. Buttons Descriptions MUTE / AD Press and hold this button to select Audio Description and Subtitle . (Depending on the country or region.) Touchpad Press and hold the touchpad while ...
Page 53 - Touchpad; Dragging
46 Touchpad Use the touchpad to perform various commands. Navigate to Tutorial ( Screen Menu > System > Device Manager > Smart Touch Control Settings > Tutorial ) to view an on-screen guide to using the Smart Touch Control. Try Now Dragging Drag on the touchpad in the desired direction. ...
Page 54 - Pressing and Dragging
46 47 Flicking Flick on the touchpad in the desired direction. This moves the focus or scrolls the screen based on the direction and speed of the flick. Pressing and Holding Press and hold the touchpad while watching TV to display CH List on the screen. In addition, you can tap and hold the touchpad...
Page 56 - Changing Channels by Entering Numbers; Numerical Input Guide; Adjusting the Touchpad
48 49 Changing Channels by Entering Numbers While watching TV, tap on the protruding line on the left or right edge of the touchpad to bring up the numerical input window on the screen. Use your finger to enter the number for the channel you want to watch. The recognised number is displayed on the s...
Page 57 - Show Status and Notification Banner; Recommendations; Searching
50 Show Status and Notification Banner Press the MORE button on the Smart Touch Control and then select STATUS on the virtual control panel to display the status and notification banner at the top of the screen. Refer to "Status and Notification" banner for more information. Recommendations ...
Page 58 - Using the Virtual Remote Control
50 51 Using the Virtual Remote Control Press MORE button to display the virtual remote panel on the screen. The virtual remote panel consists of a number panel, a playback control panel, and a quick access panel. Use the touchpad to select numbers and buttons. Press and hold the MORE button. A quick...
Page 59 - Universal Remote Setup; Connecting the IR EXTENDER CABLE
52 Universal Remote Setup Screen Menu > System > Device Manager > Universal Remote Setup Try Now This TV has a universal remote control feature that lets you control cable boxes, Blu-ray players, home theatres, and other third-party external devices connected to the TV using the TV's remote...
Page 61 - Entering Text using the Onscreen Keypad; Entering Text using the QWERTY Keypad; Additional Features
54 Entering Text using the Onscreen Keypad An onscreen keypad appears when you need to enter text (entering the network password, logging into your Samsung account, etc.), allowing you to enter text using your remote control. Entering Text using the QWERTY Keypad Use the QWERTY keypad as you would a...
Page 62 - SMART Interaction; Precautions; Face Recognition
54 55 SMART Interaction This TV features SMART Interaction, which recognises a user's voice, actions, and face to enable TV operations without the use of a remote control. The motion control and facial recognition features require a separately-sold TV camera installed on the TV. Make sure that the T...
Page 63 - Motion Control
56 Motion Control Motion Control works by using the camera, so the user must be within the camera's recognition range. The camera's recognition range varies depending on the ambient light level and other factors. Run Motion Control Environment Test before using Motion Control to determine the camera...
Page 65 - Enabling Voice Recognition
58 Operating Environment The voice recognition rate varies depending on the volume/tone, pronunciation, and ambient environment (TV sound and ambient noise). Voice Recognition Tutorial Screen Menu > Smart Features > Voice Recognition > Voice Recognition Tutorial Try Now This lets you famili...
Page 66 - Basic Voice Recognition Use; Voice Recognition Settings
58 59 Basic Voice Recognition Use You can use the following commands anytime while Voice Recognition is active: ● All Voice Commands : Say "Guide me" and then "Show all commands" to display a complete list of voice commands by category. Say the name of a category. ● Available Voice C...
Page 67 - Interactive Voice Recognition Commands; Deactivating Voice Recognition
60 Interactive Voice Recognition Commands Interactive Voice Recognition allows you to set up a Timer Recording / Timer Viewing, access VODs, search and launch applications, and execute various other commands without having to remember specific commands or keywords. Saying "Turn off the TV in 30 ...
Page 68 - Operating Environment
60 61 Motion Control Screen Menu > Smart Features > Motion Control Try Now Motion Control Motion Control On Animated Motion Guide Off Pointer Speed Medium Motion Control Environment Test Motion Control Tutorial " The displayed image may differ depending on the model. Use Motion Control to ...
Page 69 - Motion Control Tutorial; Motion Control Activation
62 Motion Control Environment Test Screen Menu > Smart Features > Motion Control > Motion Control Environment Test Run this test before using Motion Control to ensure proper functionality. 11 Run Motion Control Environment Test and select Start within 1.5m and 4m of the TV. If light reflect...
Page 70 - Using the Basic Motion Controls; Motion Control Options
62 63 Using the Basic Motion Controls Available motion commands may vary, depending on what the TV is currently doing. ● Pointing Navigation : This action moves the cursor to the desired position. ● Run / Select : Make a fist to select an option or execute a command. Keeping your fist clenched is li...
Page 71 - Motion Control Screen; The Screen Composition while Viewing TV
64 Motion Control Screen The Screen Composition while Viewing TV Launching Motion Control while watching TV displays the following icons on the screen. Icon Description / Adjust the volume. Turns the TV sound on/off. / Changes the channel. Check the recommended programme information and aerial times...
Page 72 - The Smart Hub Screen Composition
64 65 The Smart Hub Screen Composition Launching Motion Control while using Smart Hub displays the following icons on the screen. Icon Description / Adjust the volume. However, this can only be used from On TV . Turns the TV sound on / off. However, this can only be used from On TV . / Changes the c...
Page 73 - Retrieving Icons on the Screen
66 Retrieving Icons on the Screen When using Motion Control with Smart Hub, the icons will disappear automatically after two seconds of inactivity. To retrieve the icons, move the pointer to one of the three edges shown below (marked in blue) and then hold it there for 1 second. The icons will reapp...
Page 74 - Note the following when using Face Recognition.
66 67 Face Recognition Users can register their faces and log into their Smart Hub accounts through Face Recognition. One face may be registered per account. Depending on the ambient brightness level and the user's skin tone, the TV may have difficulty recognizing the user's face. Refer to the "...
Page 75 - Face Registration; Face Recognition Login
68 Face Registration A Smart Hub login is required to register a face. Log into the Smart Hub. Create a new account if you do not already have one. 11 Open the Smart Features > Samsung Account > Edit profile menu, and select Register face . 21 Read the instruction, select OK , and then enter t...
Page 76 - Using Peripheral Devices; Keyboard Connection; Keyboard Use
68 69 Using Peripheral Devices Device Manager Keyboard Settings Mouse Settings Smart Touch Control Settings Universal Remote Setup " The displayed image may differ depending on the model. This TV can be controlled with a keyboard and a mouse instead of a remote control. These peripheral devices ...
Page 77 - Mouse Connection; Mouse Use
70 Mouse Connection Screen Menu > System > Device Manager > Mouse Settings Try Now Connect a mouse to the TV and right-click on the mouse to bring up the Go To screen. You can then use the screen menu, Smart Hub, and other TV functions using the mouse as you would on a computer. To use a US...
Page 78 - TV Viewing; Programme Info; Change the Broadcast Signal; Guide; Change Channels
71 TV Viewing Broadcasting Auto Tuning Aerial Air Channel List Guide Schedule Manager Edit Channel Edit Favourites " The displayed image may differ depending on the model. Use this feature to view the programme guide and programme information more easily. However, these features are not availabl...
Page 81 - Genre
74 Genre Drag left on the touchpad or press the left arrow button on the remote control and then selects Genre . Select a desired TV channel genre. Genre can only be used when the Channel List's Channel Mode is set to Added Channels. However, the Added Channels must contain genre information. For LE...
Page 82 - Schedule Viewing; Digital Channel Schedule Viewing
74 75 Schedule Viewing Method 1: Screen Menu > Broadcasting > Schedule Manager Try Now Method 2: Select the Virtual Remote panel's or the regular remote's GUIDE button to activate Guide screen, and then press the { button. Broadcasting Auto Tuning Aerial Air Channel List Guide Schedule Manager...
Page 84 - Schedule Recording
76 77 Schedule Recording Method 1: Screen Menu > Broadcasting > Schedule Manager Method 2: Select the Virtual Remote panel's or the regular remote's GUIDE button to activate Guide screen, and then press the { button to activate Schedule Manager screen. and then select Schedule . A popup menu w...
Page 85 - Dedicated Recording Device Setup
78 ● Device Performance Test must be performed on the USB storage device connected to the TV before a recording can be made. A Device Performance Test can be performed from Smart Guide or Photos, Videos & Music . If recording is selected from Guide or the Programme Info and the USB storage devic...
Page 86 - Dedicated Recording Device Management; Programme Recording; Instant Recording
78 79 Dedicated Recording Device Management Manage the external storage device that has been configured as the dedicated recording device. 11 Press and launch Smart Hub. Select Recorded TV from the bottom of the On TV or Photos, Videos & Music screen to display a list of connected devices. Selec...
Page 87 - Specified Time and Date; Edit Timer List
80 Programme Info Select the virtual remote panel's or the regular remote's INFO button. The information screen for the programme currently watching appears. From the information screen, press the touchpad, and then you can record the programme. Alternatively, drag left or right on the touchpad and ...
Page 88 - Recorded Programme Playback; Changing the Viewing Mode
80 81 Recorded Programme Playback Press and launch Smart Hub. Select Recorded TV from the bottom of the Smart Guide or Photos, Videos & Music screen. Select the external storage device containing the recorded programmes to display a list of available recordings. Try Now Select a programme from t...
Page 90 - Additional Recorded Programme Playback Settings
82 83 Additional Recorded Programme Playback Settings ● Repeat Select the Repeat on-screen button. This changes the repeat mode. Repeat One repeats the current programme only. Repeat All repeats all programmes contained in the folder. ● Picture Size Select the Picture Size on-screen button and then ...
Page 91 - Timeshift
84 Timeshift Timeshift temporarily records the current programme. Using this feature, users can pause and resume a live programme and even scan through it backward or forward. However, Timeshift is only available for digital channels. In addition, activating the Timeshift function, only certain func...
Page 92 - Activating the Timeshift function
84 85 Activating the Timeshift function Press ∂ while watching TV to activate the Timeshift function. The Timeshift Progress Bar appears on the screen. The Timeshift control buttons and functions are as follows: ● † / … : You can change the playback speed by a factor of up to 7. To restore normal pl...
Page 94 - Activating 3D Mode; Setting 3D Effects
86 87 Activating 3D Mode Screen Menu > Picture > 3D > 3D Mode Try Now Choose a 3D mode according to the input signal. Available 3D modes may vary depending on the input signal. Some 3D contents may differ preferred 3D mode. In this case, change the desired 3D mode for watching. Select a 3D ...
Page 96 - Analogue Screen Calibration; Fine Tune; Subtitles
88 89 Analogue Screen Calibration Channel Settings Country (Area) English Manual Tuning Fine Tune Transfer Channel List Delete CAM Operator Profile Satellite System " The displayed image may differ depending on the model. Analogue pictures can become shaky and full of noise. If this happens, you...
Page 97 - Show Subtitles; Subtitle Options; Changing the Teletext Language
90 Show Subtitles Screen Menu > Broadcasting > Subtitle Try Now Show subtitles. Subtitles will be displayed when you choose a broadcast that supports subtitles. Switches subtitles On or Off . ● Subtitle Mode Try Now Sets the subtitle mode. ● Subtitle Language Try Now Sets the subtitle language...
Page 98 - Basic Picture Settings; Changing the Picture Mode
91 Basic Picture Settings Screen Menu > Picture The basic image settings alter the look and feel of the image displayed on the TV screen. Changing the Picture Mode Screen Menu > Picture > Picture Mode Try Now Picture Picture Mode Standard • Backlight 14 • Contrast 100 • Brightness 45 • Shar...
Page 99 - Picture Quality; Applying the Current Picture Quality Setting to Another Input
92 Picture Quality Screen Menu > Picture Choose a Picture Mode and then select the following options to display a slide bar that allows the corresponding setting to be adjusted. Adjust the value by dragging left/right on the touchpad and change the setting by dragging up/down on the touchpad. Adj...
Page 100 - Picture Size
92 93 Picture Size Screen Menu > Picture > Picture Size > Picture Size Try Now Most TV programmes and videos are displayed in full screen, but some programmes and videos don’t fit the screen. Users can change the picture size for such programmes and videos. However, the available size optio...
Page 101 - Screen Position; Picture Off; Picture Reset
94 Screen Position Screen Menu > Picture > Picture Size > Zoom/Position Try Now The screen position can be adjusted if Picture Size is set to Wide Zoom , Zoom . Zoom is not available when Picture Size set to Wide Zoom . 11 To adjust the screen position, select Zoom/Position and then Zoom/Po...
Page 106 - Calibrating the Screen Display; Auto Adjustment; PC Screen Adjustment
98 99 Calibrating the Screen Display Auto Adjustment Screen Menu > Picture > Auto Adjustment Automatically adjusts the picture's frequency, position, and fine tune settings in the PC mode. " Available in PC mode only. " This option is only available on the LED 5400 model. PC Screen Adj...
Page 107 - Using Your Product as a Computer (PC) Display
100 Using Your Product as a Computer (PC) Display Entering the Video Settings (Based on Windows 7) For your product to work properly as a computer display, you must enter the correct video settings. " Depending on your version of Windows and your video card, the procedure on your PC will probabl...
Page 108 - Basic Sound Settings; Changing the Sound Mode
100 101 Basic Sound Settings Screen Menu > Sound Sound Sound Mode Standard Sound Effect 3D Audio Low Speaker Settings Additional Settings Reset Sound " The displayed image may differ depending on the model. Use the Sound Settings to change the sound mode, enable/disable surround sound, adjust...
Page 109 - Adjusting the Sound Settings; Auto Volume; TV Installation Type; D Audio; Sound Reset
102 Adjusting the Sound Settings Screen Menu > Sound > Sound Effect Try Now Use sound effects to alter how the TV projects sound. These options are available only when Speaker Select is set to TV Speaker and Sound Mode is set to Standard . ● DTS TruSurround Produces sound that will make you fe...
Page 110 - Speaker Settings; Speaker Select; Additional Settings; DTV Audio Level
102 103 Speaker Settings If the TV's audio is sent to an external device such as a home theatre system, you can designate which speakers to use and make adjustments to eliminate decoding speed echoes. Speaker Select Screen Menu > Sound > Speaker Settings > Speaker Select Try Now Sound Sound...
Page 111 - Digital Audio Out; Dolby Digital Comp; Samsung Audio Device Connection
104 Digital Audio Out Screen Menu > Sound > Additional Settings > Digital Audio Out Try Now This SMART TV is SPDIF-enabled. The Sony Philips Digital Interface (SPDIF) provides digital audio output to speakers and various digital devices, including A/V Receivers and home theatres. This featu...
Page 112 - Clock and Timer; Setting the Time; Auto
104 105 Clock and Timer System Setup Menu Language English Time Device Manager Eco Solution Auto Protection Time 2 hours Data Service Disable " The displayed image may differ depending on the model. Use the clock and timer to make scheduled use of the TV easier and more efficient. Once the clock...
Page 113 - Manual; Sleep Timer; On Timer
106 Manual Manually enter the time. Set Clock Mode to Manual and then select Clock Set to enter the current time and date. Clock Set : Set the current Date and Time . Try Now Time Zone : Select your time zone. " This function is only available when the Clock Mode is set to Auto. DST : Switches t...
Page 114 - Off Timer
106 107 ● Source Selects a signal source from the list. Specify a channel or source to be displayed when the TV turns on. To specify a USB device, a USB device must first be connected to the TV. To playback media from an HDMI or Component source such as a DVD player or Blu-ray player, the device mus...
Page 115 - Screen Protection and Maintenance; Eco Solution
108 Screen Protection and Maintenance System Setup Menu Language English Time Device Manager Eco Solution Auto Protection Time 2 hours Data Service Disable " The displayed image may differ depending on the model. Several onboard functions exist that help maintain the TV beyond its useful lifespa...
Page 116 - Screen Burn Protection; Pixel Shift; Auto Protection Time
108 109 Screen Burn Protection Screen Menu > System > Screen Burn Protection This feature is only available for PDP TVs. To reduce the possibility of screen burn, the TV uses Pixel Shift screen burn prevention technology. Pixel Shift moves the picture slightly on the screen to avoid over-using...
Page 117 - Scrolling; Side Grey
110 Scrolling Screen Menu > System > Screen Burn Protection > Scrolling This removes after-images on the screen by illuminating all the pixels on the PDP according to a set pattern. Use this when there are after-images or symbols on the screen, especially when a still image was displayed on...
Page 118 - Password; Password Change; Programme Rating Lock
110 111 Password System Eco Solution Auto Protection Time 2 hours Data Service Disable General Change PIN Anynet+ (HDMI-CEC) On DivX® Video On Demand " The displayed image may differ depending on the model. This TV requires a password to lock out channels and to reset its settings to the factory...
Page 119 - Changing the Menu Language; Game Mode; Precautions and Restrictions
112 Additional Features System Setup Menu Language English Time Device Manager Eco Solution Auto Protection Time 2 hours Data Service Disable " The displayed image may differ depending on the model. There are many elements available for customizing the TV for individual user preferences. Changin...
Page 120 - BD Wise; Menu Transparency; Sound Feedback; Panel Locking
112 113 BD Wise Screen Menu > System > General > BD Wise Connecting a Samsung DVD player, Blu-ray player, or home theatre system that supports BD Wise enables you to enjoy the richest colours and picture quality possible. Enabling BD Wise automatically optimizes the TV's resolution. This fe...
Page 121 - Booting Logo; Anti Flicker; DivX® Video On Demand
114 Booting Logo Screen Menu > System > General > Boot Logo Try Now Enable/disable displaying the logo while the TV starts up. Anti Flicker Screen Menu > System > General > Anti Flicker Try Now Change the power frequency for the cable to stop the camera from flickering. " This ...
Page 122 - Smart Hub; Agreements Required to Use Smart Hub
115 Smart Hub Screen Menu > Smart Features > Open Smart Hub Try Now Smart Hub is the core of Samsung Smart TV. It turns the TV into a multi-purpose entertainment centre. With Smart Hub, viewers can surf the web, download applications, and stay in touch with family and friends through social ne...
Page 123 - Creating a Samsung Account; Creating a Samsung Account Using a Facebook Account; Terms & Conditions and Privacy Policy
116 Samsung Account Screen Menu > Smart Features > Samsung Account Create a Samsung account so you can take advantage of all Smart Hub has to offer. Set up accounts for each household member so each member can access their own accounts on Facebook, Twitter, etc. You also need a Samsung account...
Page 125 - Resetting Smart Hub; Keyword Search; Sports Mode
118 Resetting Smart Hub Screen Menu > Smart Features > Reset Smart Hub It is possible to remove Samsung accounts and everything linked to them, including apps, from the TV. Enter the password when accessing this menu. To use Smart Hub fully again after resetting it, users are required to agree...
Page 126 - Status and Notification; Motion Control Configuration
118 119 Status and Notification A notification message window appears at the top of the screen when important messages concerning application updates and Samsung account logins are available. This message window notifies the user of the TV's operating status. Motion Control Configuration Enable/disa...
Page 127 - Social Settings; Application Check
120 Social Social Friends' Picks What's Hot Friends Video Call " The displayed image may differ depending on the model. Watch the latest YouTube videos and you and your friends' video posts on Facebook and Twitter. You can also make video calls to friends by the TV Camera (sold separately). This...
Page 130 - Searching for Apps
122 123 Installing Standard Applications Launching Smart Hub for the first time and loading the Apps screen, the TV is automatically downloads and installs the basic applications that correspond to the network your TV is connected to. The types of basic applications may vary depending on your locati...
Page 131 - Apps Management; Edit My Apps
124 Apps Management You can customise the My Apps screen. You can also manage installed applications and configure application update settings. Edit My Apps Move applications to My Apps. Navigate to More Apps screen, select Options , and then select Edit My Apps . You can customise the My Apps scree...
Page 132 - Setting up the Application Auto Update
124 125 Deleting Applications Delete applications installed on your TV. Deleting an application deletes all data associated with that application. Navigate to More Apps screen, select Options , and then select Delete . Select all the applications you wish to delete. Select all the applications you w...
Page 133 - Fitness; Creating a Profile; Kids
126 Fitness Fitness is an application that helps you stay fit. Create a profile, set up an exercise plan, and start exercising according to a structured regimen. Read and agree to the terms and conditions before using Fitness. Try Now [ Do a warm-up or some stretches before exercising. Users must st...
Page 134 - Web Browser; Social Networks; Linking Service Accounts; D Explorer
126 127 Web Browser Web Browser is a web-browsing application. Using Web Browser, you can browse the Internet on your TV as you would on your computer and even watch TV while you surf the web. The browsing experience, however, may not be the same as it is on your computer. Use a keyboard and mouse f...
Page 135 - Apps Settings; Auto Ticker; Push Notifications Settings; Properties
128 Apps Settings Screen Menu > Smart Features > Apps Settings Try Now Configure the apps installed on your TV. Auto Ticker Screen Menu > Smart Features > Apps Settings > Auto Ticker Configure selected tickers to display automatically when the TV is turned on. A ticker is a service th...
Page 137 - On TV Settings; On TV Setup
130 On TV Settings Screen Menu > Smart Features > On TV Settings Customize the On TV screen. On TV Setup Set a broadcast media type and TV stations for the On TV screen, following the on-screen instructions. Recommendation Notice With this enabled, when one of popular TV programmes that the us...
Page 139 - Sub Menus on the bottom of the main screen
132 Films and TV Shows Films and TV Shows Favourites Featured Movies TV Shows Purchased " The displayed image may differ depending on the model. Use the Films and TV Shows feature to purchase and watch movies and TV shows without a DVD/Blu- ray player. Films and TV Shows is a content aggregator ...
Page 140 - Miscellaneous
132 133 Custom Recommendations List If you are using Films and TV Shows for the first time or you have not logged into your Samsung account, new and popular movies and TV shows will be shown in the Recommendation list. Try the custom recommendations list, which makes custom recommendations based on ...
Page 141 - Restrictions
134 Photos, Videos & Music Photos, Videos & Music Photos Videos Music Recorded TV All Content " The displayed image may differ depending on the model. Open Smart Hub and select Photos, Videos & Music . Enjoy photo, video and music files from an external storage device directly on you...
Page 142 - USB Device Removal; Playing all the Content on a Storage Device; Clearing the Recent Playlist
134 135 Supported File Formats This TV is capable of playing back the following types of files. For more information, refer to the "Subtitle and Media Contents file formats, and Codec" section. ● Photos: bmp, jpg, mpo, png ● Music: aac, flac, m4a, mpa, mp3, ogg, wma ● Video: 3gp, avi, asf, f...
Page 143 - Using Networked External Storage Devices
136 Using Networked External Storage Devices This TV can directly display media files from web storage devices and computers and DLNA-enabled devices connected to the TV over a network. To display the media files on an external storage device, the device must support DLNA and be connected to the sam...
Page 144 - Allowing DLNA Device Connections; AllShare; Exporting Contents
136 137 Allowing DLNA Device Connections Screen Menu > Network > AllShare Settings Selecting Content Sharing from AllShare Settings screen displays a list of external storage devices connected to the same network as the TV. Select a device to allow it to connect to the TV. You can only play me...
Page 145 - Video Playback; Changing the view mode; Playlist Creation; Opening a Different File
138 Video Playback Select the video file from the list or press ∂ to play video. Use the remote control or the on-screen buttons to control the video playback. Tap the touchpad or press the regular remote's E button to display the screen control buttons. Press RETURN to hide them. To stop playing th...
Page 147 - Additional Video Playback Settings
140 Additional Video Playback Settings ● Repeat Select the Repeat Mode on-screen button. This changes the repeat mode. Repeat One repeats the current file only, whereas Repeat All repeats all files contained in the folder. ● Picture Size Select the Picture Size button and then select the picture siz...
Page 148 - Music Playback
140 141 Music Playback Select the music file from the list or press ∂ to play music. To stop playing the file, press ∫ or RETURN . Try Now Changing the view mode On the file list screen, select View on the top right of the screen and choose a category. The file list is sorted by the chosen category....
Page 149 - Photo Playback; Slideshow Settings
142 Photo Playback Select a photo from the list to display it on the screen. Use the remote control or the on-screen buttons to control the photo playback. Tap the touchpad or press the regular remote's E button to display the screen control buttons. Press RETURN to hide them. To stop playing the fi...
Page 150 - Mini Player; Additional Photo Playback Settings
142 143 Mini Player When viewing photos with background music, you can control the music. Select Background Music from among the on-screen control buttons and select Mini Player . You can pause playback or skip to the previous or next song. Additional Photo Playback Settings ● Zoom : Select the Zoom...
Page 152 - Switching between Anynet+ Devices
144 145 Anynet+ (HDMI-CEC) Setup Screen Menu > System > Anynet+ (HDMI-CEC) Try Now Enable/disable Anynet+ (HDMI-CEC). ● Anynet+ (HDMI-CEC) Enables/disables Anynet+ (HDMI-CEC). Disabling this turns off all Anynet+ related features. Try Now ● Auto Turn Off Turns off external devices when the TV ...
Page 153 - ARC
146 Anynet+ (HDMI-CEC) Device Menu Once the TV has switched over to the selected device, you can access the device's menu using the TV's remote control. Select the Virtual Remote panel's or the regular remote's TOOLS button to display the list. Select Anynet+ (HDMI-CEC) from the list. The following ...
Page 154 - Mirroring Mobile Device Screens on the TV; Screen Mirroring; Mobile Device Connection
146 147 Mirroring Mobile Device Screens on the TV This TV is capable of displaying mobile device screens. You can use the following features to enjoy video, photo, and music files from mobile devices directly on your TV. ● Use the Screen Mirroring menu to display a mobile device's screen on the TV. ...
Page 155 - Remote Management; What is Remote Support?
148 Support The TV has several built-in systems designed for user and TV system support. Remote Management Screen Menu > Support > Remote Management Try Now Support Remote Management e-Manual (Troubleshooting) Self Diagnosis Software Update Use Mode Home Use Contact Samsung " The displayed...
Page 157 - Self Diagnosis; Picture Test
150 e-Manual Screen Menu > Support > e-Manual (Troubleshooting) This TV features a built-in electronic user manual. It is a comprehensive guide for using your Samsung SMART TV. Refer to the "Viewing the e-Manual" for more information. Self Diagnosis Screen Menu > Support > Self D...
Page 158 - Sound Test; Motion Control Environment Check; Signal Information; Reset
150 151 Sound Test Screen Menu > Support > Self Diagnosis > Sound Test Try Now Use the built-in melody to check for sound problems. If no melody is played by the TV’s speakers, make sure Speaker Select is set to TV Speaker and then try again. If the problem persists, there may be a problem ...
Page 159 - Updating the Software; Update now; Manual Update
152 Updating the Software Screen Menu > Support > Software Update Try Now Check your TV's software version and upgrade it if necessary. [ DO NOT turn off the TV’s power until the upgrade is complete. The TV will turn off and on automatically after completing the software upgrade. All video and...
Page 160 - Auto update; Standby Mode Upgrade Settings; Manage Satellite Channels (when the aerial was set to Satellite); Usage Mode; Support Info
152 153 Auto update Screen Menu > Support > Software Update > Auto update Try Now This option upgrades the TV while it is in Standby Mode. In Standby Mode, the TV appears to be turned off but still has access to the Internet. This allows the TV to upgrade itself automatically while it is no...
Page 161 - Data Service; Using Data Service
154 Data Service This functions is only available on Italy. Allows the user to use information (text, still images, graphics, documents, software, etc.) transmitted via broadcast media. Auto Run Data Service Screen Menu > System > Auto Run Data Service Sets whether or not to automatically run ...
Page 162 - Main Data Service buttons and their functions
154 155 Main Data Service buttons and their functions ● a (Data Service) Displays the Data Service list and immediately starts Data Service. ● BACK Returns to the previous screen. ● Colour Button Perform functions corresponding to each Colour button image displayed on the screen during Data Service....
Page 163 - HbbTV
156 HbbTV This function may not be available, depending on the country. You will be able to access services from entertainment providers, online providers and CE manufactures through the HbbTV. " In some countries, HbbTV is a data service. " This service may be supported in other countries. ...
Page 164 - Connecting to a TV Viewing Card slot; To connect the CI CARD, follow these steps:; Using the “CI or CI+ CARD”
156 157 Connecting to a TV Viewing Card slot To connect the CI CARD, follow these steps: Using the “CI or CI+ CARD” To watch paid channels, the “CI or CI+ CARD” must be inserted. " Turn the TV off to connect or disconnect a CI card. ● If you don’t insert the “CI or CI+ CARD”, some channels will ...
Page 165 - To connect the CI CARD Adapter, follow these steps:
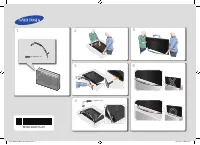
158 To connect the CI CARD Adapter, follow these steps: " We recommend attaching the adapter before installing the wall mount, or inserting the “CI or CI+ CARD”. " Turn the TV off to connect or disconnect a CI card adapter. <TV Rear> 11 Insert the CI CARD Adapter into the two holes on ...
Page 167 - Teletext Feature
160 Teletext Feature (Depending on the country) The index page of the Teletext service gives you information on how to use the Service. For Teletext information to be displayed correctly, channel reception must be stable. Otherwise, information may be missing or some pages may not be displayed. "...
Page 169 - Anti-theft Kensington Lock; Display Resolution; IBM
162 Anti-theft Kensington Lock A Kensington Lock is a physical device that can be used to protect the TV against theft. Look for the Kensington slot on the back of the TV. The slot has a K icon next to it. Wrap the lock around an object that is too heavy to carry and then thread it through the TV's ...
Page 170 - VESA DMT
162 163 VESA DMT Resolution Standard frequency Horizontal Frequency (KHz) Vertical Frequenzcy (Hz) Pixel Clock Frequency (MHz) Sync Polarity (H / V) 640x480 60Hz 31.469 59.940 25.175 -/- 640x480 72Hz 37.861 72.809 31.500 -/- 640x480 75Hz 37.500 75.000 31.500 -/- 800x600 60Hz 37.879 60.317 40.000 +/+...
Page 171 - Picture Size and Input Signal; Supported 3D Resolutions; D Format: Frame Packing
164 Picture Size and Input Signal Picture Size Input Signal Auto Wide ATV, EXT, AV, DTV (576i/p, 720p), DTV (1080i, 1080p) 16:9 ATV, EXT, AV, DTV (576i/p, 720p, 1080i, 1080p), Component (480i/p, 576i/p, 720p, 1080i, 1080p), HDMI (480i/p, 576i/p, 720p, 1080i, 1080p) Wide Zoom, Zoom ATV, EXT, AV, DTV ...
Page 172 - Component; Digital Channel; Computer via HDMI
164 165 Component Resolution Frequency (Hz) 1280 x 720p 50 / 59.94 / 60 1920 x 1080i 50 / 59.94 / 60 1920 x 1080p 23.98 / 24 / 25 / 29.97 / 30 / 50 / 59.94 / 60 Digital Channel Resolution Frequency (Hz) 1280 x 720p 50 / 59.94 / 60 1920 x 1080i 50 / 59.94 / 60 1920 x 1080p 25 Videos/Photos Refer to t...
Page 173 - Subtitle and Media Contents file formats, and Codec; External; Internal
166 Subtitle and Media Contents file formats, and Codec Subtitle External Name File Extension MPEG-4 Timed text .ttxt SAMI .smi SubRip .srt SubViewer .sub Micro DVD .sub or .txt SubStation Alpha .ssa Advanced SubStation Alpha .ass Powerdivx .psb Internal Name Container Xsub AVI SubStation Alpha MKV ...
Page 175 - Video Codec
168 Video Codec File Extension Container Video Codec Resolution Frame rate (fps) Bit rate (Mbps) Audio Codec *.avi Divx 3.11 / 4 / 5 / 6 *.mkv *.asf MPEG4 SP/ASP *.wmv *.mp4 AVI MKV H.264 BP/MP/HP AC3 LPCM *.3gp *.vro ASF MP4 Motion JPEG 1920x1080 (WMV v7,v8, ADPCM(IMA, MS) AAC *.mpg *.mpeg 3GP MOV ...
Page 176 - Video Codecs; Other Restrictions; Audio Decoders
168 169 Video Codecs Other Restrictions Codecs may not function properly if there is a problem with the content data. Video content does not play or does not play correctly if there is an error in the content or container. Sound or video may not work if they have standard bit rates/frame rates above...
Page 177 - D Precautions; CAUTION
170 3D Precautions CAUTION IMPORTANT HEALTH AND SAFETY INFORMATION FOR 3D IMAGES. READ THE FOLLOWING CAUTIONS BEFORE YOU OR YOUR CHILD USE THE 3D FUNCTION. ● Adults should frequently check on children who are using the 3D function. If there are any complaints of tired eyes, headaches, dizziness or n...
Page 178 - SAFETY PRECAUTIONS
170 171 SAFETY PRECAUTIONS The following safety instructions are to ensure your personal safety and prevent property damage. Please read them to ensure the proper use of the product. ● Do not place the product in a location exposed to direct sunlight, heat, fire or water. This may result in a produc...
Page 179 - WARRANTY; PROCEDURE FOR MAKING A WARRANTY CLAIM; WARRANTY CONDITIONS
172 WARRANTY This Samsung product is warranted for the period of the listed period at the table (Refer to the warranty period table by the country) from the original date of purchase, against defective materials and workmanship. In the event that warranty service is required, you should first return...
Page 181 - Licence
174 Licence DivX Certified® to play DivX® video up to HD 1080p, including premium content.DivX®, DivX Certified® and associated logos are trademarks of Rovi Corporation or its subsidiaries and are used under licence.ABOUT DIVX VIDEO: DivX® is a digital video format created by DivX, LLC, a subsidiary...
Page 186 - Connection
178 179 3D TV There is something wrong with the TV. Try this! The 3D Active Glasses are not working correctly. Make sure the glasses are turned on.The 3D Active Glasses may not work properly if there is another 3D product or electronic device turned on near the glasses or TV.If there is a problem, k...
Page 187 - Networking
180 Computer Connection There is something wrong with the TV. Try this! The "Mode Not Supported" message appears. Set your PC’s output resolution so it matches a resolution supported by the TV. The video is OK but there is no audio. If you are using an HDMI connection, check the audio output...
Page 191 - Schedule Recording / Timeshift
184 Schedule Recording / Timeshift There is something wrong with the TV. Try this! The TV cannot recognise the USB device or the Format Device , Check Device and Device Performance Test functions fail. Refer to the USB device's manual and see if data can be stored on it.Check if the USB device is in...


 Samsung 105S9W (UE105S9WATXUA)
User Manual
Samsung 105S9W (UE105S9WATXUA)
User Manual
 Samsung 24N4500 (UE24N4500AUXUA)
User Manual
Samsung 24N4500 (UE24N4500AUXUA)
User Manual