Page 2 - Contents
©2009 SAMSUNG ELECTRONICS CO., LTD. It is strictly forbidden to copy or use any parts of this mamual • witrout permission from SAMSUNG ELECTRONICS CO., LTDProduct specifications or contents of this manual may be • changed without prior notice due to upgrade of product functions. Instructional icons ...
Page 3 - Safety precautions
3 Do not overload wall outlets, extension cords, or • adaptors beyond their intended capacity, as this may result in fire or electrical shock. Route all power supply cords away from traffic areas • and other objects so that they are not likely to be stepped on or pinched by items placed on or agains...
Page 5 - Get started; What’s in the box
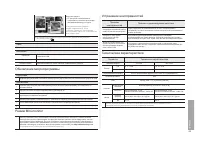
5 Get started What’s in the box Digital frame Power cable/Adapter USB cable (for SPF-87H) USB cable (for SPF-107H) User manual/Warranty Get to know your frame Buttons Button Description Turn the frame on or off Access menus Scroll through menus or items (up/down/left/right) Select menus or items Ret...
Page 6 - Set up your frame
Get started 6 Set up your frame Connect the adapter and turn the power on Do not put too much pressure on the support or force it to rotate in the wrong direction. The support may be broken. For an SPF-87H, you do not need to connect the adapter when the frame is connected to a PC with the USB cable...
Page 7 - Connect external memory devices; Connect to a PC
Get started 7 Connect external memory devices You can connect USB memory devices or SD memory cards to the frame. Connect to a PC You can download photos (p. 10) or use the frame as a mini-monitor by connecting to a PC. Example: SPF-87H For the SPF-87H, you can use the PC as the power • source by co...
Page 8 - Access the Main menus
Get started 8 Access the Main menus Main menu screen Item Description More information Photo Browse photos stored in the internal memory or on an external memory device and access options. p. 15 Clock Set the current time and select a time format. p. 19 Settings Customize settings. p. 20 When the Ph...
Page 9 - Select a language for the screen display
Get started 9 In the Main menu screen (p. 1 8), press [ / ] to select Settings , and then press [ ]. Press [ 2 / ] to select Options , and then press [ ]. Press [ 3 / ] to select Language , and then press [ ]. Press [ 4 / ] to select a language you want, and then press [ ]. Press [ 5 ] to switch to ...
Page 10 - To transfer photos from a PC; To disconnect the frame from a PC; Transfer photos from a PC
Get started 10 To transfer photos from a PC Connect the frame to a PC with the supplied USB cable. (p. 1 7) When the frame is turned off, connect it to the PC first and then turn it on. Press [ 2 / ] to select Mass Storage/Mini-Monitor , and then press [ ]. The frame will be recognized as a removabl...
Page 11 - To select a memory device; To pause or resume playing the slideshow; Play a slideshow; Select a memory device for a slideshow
11 To select a memory device In the Main menu screen (p. 1 8), press [ / ] to select Photo , and then press [ ]. Press [ 2 / ] to select one of the following memory devices, and then press [ ]. Item Description Frame memory Internal memory SD SD memory card (external) USB USB memory device (external...
Page 12 - To select a view mode; Select a view mode for a slideshow
Play a slideshow 12 To select a view mode Press [ 1 ] during a slideshow. Press [ 2 / ] to select Slideshow Mode , and then press [ ]. Press [ 3 ] repeatedly to select the view mode. Each time you press [ • ], the view mode changes ( Single → Photo & Clock → Photo & Calendar → Multiview 1 → ...
Page 13 - To select slideshow effects; Select slideshow effects
Play a slideshow 13 To select slideshow effects Press [ 1 ] during a slideshow. Press [ 2 / ] to select Slideshow Settings , and then press [ ]. Press [ 3 / ] to select one of the following menus, and then press [ ]. Item Description Transition Select a transition effect ( No Effect , Fade , Blind ,...
Page 14 - To use slideshow menus; Use slideshow menus
Play a slideshow 14 To use slideshow menus Press [ 1 ] during a slideshow. Press [ 2 / ] to select one of the following menus, and then press [ ]. Item Description Stop / Start Slideshow Pause or resume the slideshow Slideshow Mode Select a view mode (p. 12) Slideshow Settings Select a transition ef...
Page 15 - Browse and manage photos; Browse photos
15 In the Main menu screen (p. 1 8), press [ / ] to select Photo , and then press [ ]. Press [ 2 / ] to select a memory device ( Frame memory , SD , USB ), and then press [ ]. Press [ 3 / ] or [ / ] to browse photos. To view photos in a folder, select the folder, and then press [ ]. Press [ 4 ] or [...
Page 16 - To copy photos; Copy photos
Browse and manage photos 16 To copy photos Select the photo you want to copy, and then press [ 1 ]. To copy all photos in a folder, select the folder. • Press [ 2 / ] to select Copy , and then press [ ]. To copy all photos in the selected folder (subfolders not included), • select Copy all files . P...
Page 17 - To delete a photo during a slideshow; Delete photos
Browse and manage photos 17 In the Main menu screen (p. 1 8), press [ / ] to select Photo , and then press [ ]. Select the photo you want to delete, and then press [ 2 ]. To delete all photos in a folder, select the folder. Press [ 3 / ] to select Delete , and then press [ ]. To delete all photos in...
Page 18 - Use photo menus
Browse and manage photos 18 Press [ 1 ] while browsing photos. Press [ 2 / ] to select one of the following menus, and then press [ ]. When you select a folder, Item Description Open Open the selected folder Copy Copy the selected folder to another memory device Delete Delete the selected folder (p....
Page 19 - To customize clock settings; Customize clock settings
19 To customize clock settings In the Main menu screen (p. 1 8), press [ / ] to select Clock , and then press [ ]. Press [ 2 ]. Press [ 3 / ] to select one of the following menus, and then press [ ]. Item Description Date and Time Set the current date and time Time Format Select how time is displaye...
Page 20 - Customize settings; Options menus
20 In the Main menu screen (p. 1 8), press [ / ] to select Settings and then press [ ]. Press [ 2 / ] to select Options , and then press [ ]. Press [ 3 / ] to select one of the following menus, and then press [ ]. Item Description Language Select a language for the display (p. 9) Brightness Adjust t...
Page 21 - Preference menus
Customize settings 21 In the Main menu screen (p. 1 8), press [ / ] to select Settings and then press [ ]. Press [ 2 / ] to select Preference , and then press [ ]. Press [ 3 / ] to select one of the following menus, and then press [ ]. Item Description Starting Mode Select a mode to be activated whe...
Page 23 - Before use; System requirements for using the frame; Appendix; Use as a PC mini-monitor
23 Before use Read the Frame Manager User Manual to install the program properly. • Use the USB cable provided with the frame. • Do not use the frame as a primary monitor. The screen may not work • properly.Only the [ • ], [ ], [ / ] and [ ] buttons are active when you use the frame as a mini-monito...
Page 24 - Firmware update
Appendix 24 Visit 1 http://www.samsung.com and search for SPF-87H or SPF-107H. Follow the on-screen instructions to download the firmware. 2 Connect the external memory device (SD memory card or 3 USB memory device) to the PC. Copy the latest firmware you have downloaded to the 4 external memory dev...
Page 25 - Troubleshooting
Appendix 25 Troubleshooting Try the following if you have trouble using the frame. Issue Resolution The frame will not turn on. Check if the power cable is connected properly. When connecting the frame to a PC with the USB connector, the screen blinks and the frame turns off automatically. There may...
Page 27 - Specifications; Correct disposal of the frame
Appendix 27 Specifications Model name SPF-87H SPH-107H Panel Type 8” TFT LCD 10” TFT LCD Resolution 800 x 480 1024 x 600 File formats JPEG (Progressive and CMYK formats not supported) Built-in memory 1GB USB Host (USB 1.1) / Device (USB 2.0) Power Rating External DC 12V Consumption On: 5.2 W / Off: ...
Page 28 - Regulatory Compliance Statements; FCC Class B Notice
Appendix 28 Regulatory Compliance Statements Your Samsung product compliance class is marked in the user manual. Federal Communications Commission (FCC) - USA • Industry Canada Equipment Standard for Digital Equipment (ICES-003) - Canada • Voluntary Control Council for Interference (VCCI) - Japan • ...
Page 30 - VCCI Class B Notice; 警告使用者
Appendix 30 VCCI Class B Notice この装置は、情報処理装置等電波障害自主規制協議(VCCI)の基準に基づくクテスB情報技術装置です。 この装置は、家庭環境で使用することを目的としていますが、この装置がラジオやテレビジョン受信機に近接して 使用されると、 受信障害を引き起こすことがあります。 取扱説明書に従って正しい取り扱いをして下さい。 警告使用者 這是甲類資訊類產品,在居住環境中使用時,可能會造成射頻幹擾,在這種情況下,使用者會被要求採取某些適當的對策。 European Notice (Europe Only) Products with the CE mar...
Page 31 - Italian Homologation Notice; Russia Only - PCT Notice
Appendix 31 Italian Homologation Notice Questo apparecchio e fabbricato in conformita al D.M.28.08.95 n.548ed in particolare a quanto specificato nell Art.2, comma 1.Questo apparecchio e fabbricato nella U.E. in conformita al D.M.28.08.95 n.548Art.2, comma 1 ed al D.M.26.03.92 Art.1-. For products p...
Page 32 - Wiring the Mains Power Supply Plug (UK Only)
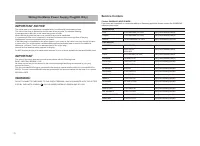
Appendix 32 Wiring the Mains Power Supply Plug (UK Only) IMPORTANT NOTICE The mains lead on this equipment is supplied with a moulded plug incorporating a fuse. The value of the fuse is indicated on the pin face of the plug and, if it requires replacing, a fuse approved to BSI1362 of the same rating...
Page 33 - Contact information of SAMSUNG WORLDWIDE
Appendix 33 Contact information of SAMSUNG WORLDWIDE If you have any questions or comments relating to Samsung products, please contact Region Country Contact Center Web Site North America CANADA 1-800-SAMSUNG (726-7864) www.samsung.com/ca MEXICO 01-800-SAMSUNG (726-7864) www.samsung.com/mx U.S.A 1-...
Page 37 - Index
Appendix 37 Index A aspect ratio, 14 B brightness, 14buttons, 5 C Clock clock type, 19date and time, 19date format, 19time format, 19 connect external memory devices, 7PC, 7 F firmware upgrade, 24Frame Manager, 23 H home background, 21 L language, 9 M Main menus, 8mass storage, 10mini-monitor, 23 O ...