Page 2 - features of your new laser product; SPECIAL FEATURES
2 _Features of your new laser product features of your new laser product Your new machine is equipped with a number of special features that improve the quality of the documents you print.With the machine, you can: Print with excellent quality and speed • You can print with a resolution of up to 120...
Page 3 - FEATURES BY MODELS
Features of your new laser product_ 3 FEATURES BY MODELS The machine is designed to support all of your document needs – from printing and copying, to more advanced networking solutions for your business.Basic features of this machine include: ( : Included, O: Optional, Blank: Not Available) ABOUT T...
Page 4 - FINDING MORE INFORMATION
4 _Features of your new laser product FINDING MORE INFORMATION You can find information for setting up and using your machine from the following resources, either as a print-out or onscreen. Quick Install Guide Provides information on setting up your machine and this requires that you follow the ins...
Page 5 - safety information; IMPORTANT SAFETY SYMBOLS AND PRECAUTIONS; What the icons and signs in this user’s guide mean:
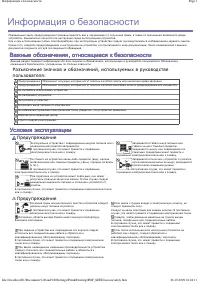
Safety information_ 5 safety information IMPORTANT SAFETY SYMBOLS AND PRECAUTIONS What the icons and signs in this user’s guide mean: These warning signs are here to prevent injury to you and others. Follow them explicitly. After reading this section, keep it in a safe place for future reference. WA...
Page 6 - LASER SAFETY STATEMENT
6 _Safety information LASER SAFETY STATEMENT The printer is certified in the U.S. to conform to the requirements of DHHS 21 CFR, chapter 1 Subchapter J for Class I(1) laser products, and elsewhere is certified as a Class I laser product conforming to the requirements of IEC 825.Class I laser product...
Page 7 - PERCHLORATE WARNING
Safety information_ 7 OZONE SAFETY During normal operation, this machine produces ozone. The ozone produced does not present a hazard to the operator. However, it is advisable that the machine be operated in a well ventilated area.If you need additional information about ozone, request your nearest ...
Page 8 - FCC Information to the User; Canadian Radio Interference Regulations; FAX BRANDING
8 _Safety information CORRECT DISPOSAL OF BATTERIES IN THIS PRODUCT (Applicable in the European Union and other European countries with separate battery return systems.) This marking on the battery, manual or packaging indicates that the batteries in this product should not be disposed of with other...
Page 9 - RINGER EQUIVALENCE NUMBER; You should also know that:
Safety information_ 9 RINGER EQUIVALENCE NUMBER The Ringer Equivalence Number and FCC Registration Number for this machine may be found on the label located on the bottom or rear of the machine. In some instances you may need to provide these numbers to the telephone company.The Ringer Equivalence N...
Page 10 - DECLARATION OF CONFORMITY (EUROPEAN COUNTRIES); Approvals and Certifications
10 _Safety information REPLACING THE FITTED PLUG (FOR UK ONLY) Important The mains lead for this machine is fitted with a standard (BS 1363) 13 amp plug and has a 13 amp fuse. When you change or examine the fuse, you must re-fit the correct 13 amp fuse. You then need to replace the fuse cover. If yo...
Page 11 - OPENSSL LICENSE; ORIGINAL SSLEAY LICENSE
Safety information_ 11 OPENSSL LICENSE Copyright (c) 1998-2001 The OpenSSL Project. All rights reserved.Redistribution and use in source and binary forms, with or without modification, are permitted provided that the following conditions are met: 1. Redistributions of source code must retain the abo...
Page 13 - INTRODUCTION; contents
Contents_ 13 contents 2 Features of your new laser product 5 Safety information INTRODUCTION 17 17 Printer overview 17 Front view 17 Rear view 18 Control panel overview 19 Understanding the Status LED 20 Menu overview 21 Supplied software 21 Printer driver features 21 Printer driver 21 PostScript dr...
Page 14 - COPYING
14 _Contents contents COPYING 37 37 Selecting the paper tray 37 Copying 37 Changing the settings for each copy 37 Darkness 37 Original Type 37 Reduced or enlarged copy 38 Changing the default copy settings 38 ID card copying 38 Using special copy features 38 Collation 39 2-up or 4-up copying 39 Post...
Page 15 - MAINTENANCE
Contents_ 15 contents 49 Activating secure receiving mode 49 Receiving faxes in memory 49 Other ways to fax 49 Sending a fax to multiple destinations 49 Sending a delayed fax 50 Sending a priority fax 50 Forwarding faxes 51 Fax setup 51 Changing the fax setup options 52 Changing the default document...
Page 16 - ORDERING SUPPLIES AND ACCESSORIES
16 _Contents contents 65 Clearing paper jams 65 In the paper feed area 66 In the manual tray 66 In the toner cartridge area 66 In the paper exit area 66 In the duplex unit area 67 In the optional tray 68 Understanding display messages 70 Solving other problems 70 Paper feeding 71 Printing problems 7...
Page 17 - introduction; These are the main components of your machine:; PRINTER OVERVIEW; Front view
Introduction _ 17 introduction These are the main components of your machine: This chapter includes: • Printer overview • Control panel overview • Understanding the Status LED • Menu overview • Supplied software • Printer driver features PRINTER OVERVIEW Front view Rear view 1 Document width guides ...
Page 18 - CONTROL PANEL OVERVIEW
18 _ Introduction CONTROL PANEL OVERVIEW 1 ID Copy You can copy both sides of the ID Card like a driver’s license to a single side of paper. See page 38. 2 Direct USB Allows you to directly print files stored on a USB Memory device when it is inserted into the USB memory port on the front of your ma...
Page 19 - UNDERSTANDING THE STATUS LED
Introduction _ 19 UNDERSTANDING THE STATUS LED The color of the Status LED indicates the machine's current status. STATUS DESCRIPTION Off • The machine is powered off-line. • The machine is in power save mode. When data is received, or any button is pressed, it switches to on-line automatically. Gre...
Page 20 - MENU OVERVIEW
20 _ Introduction MENU OVERVIEW The control panel provides access to various menus to set up the machine or use the machine’s functions. These menus can be accessed by pressing Menu . Refer to the following diagram. Some menus may not appear in the display depending on options or models. If so, it i...
Page 21 - SUPPLIED SOFTWARE; Printer driver
Introduction _ 21 SUPPLIED SOFTWARE After you have set up your machine and connected it to your computer, you must install the printer software. If you are a Windows or Macintosh OS, install the software from the supplied CD and if you are a Linux OS user, download the software from the Samsung webs...
Page 22 - getting started; SETTING UP THE HARDWARE
22 _ Getting started getting started This chapter gives you step-by-step instructions for setting up the machine. This chapter includes: • Setting up the hardware • System requirements • Setting up the network • Installing the software • Machine's basic settings SETTING UP THE HARDWARE This section ...
Page 23 - SYSTEM REQUIREMENTS; Windows
Getting started _ 23 SYSTEM REQUIREMENTS Before you begin, ensure that your system meets the following requirements: Windows Your machine supports the following Windows operating systems. Macintosh Linu x OPERATING SYSTEM REQUIREMENT (RECOMMENDED) CPU RAM FREE HDD SPACE Windows 2000 Pentium II 400 M...
Page 24 - SETTING UP THE NETWORK; Supported operating systems
24 _ Getting started SETTING UP THE NETWORK You need to set up the network protocols on the machine to use it as your network printer. You can set up the basic network settings through the machine's control panel. Supported operating systems The following table shows the network environments support...
Page 25 - Using SetIP program; Installing the program; INSTALLING THE SOFTWARE
Getting started _ 25 Using SetIP program This program is for the network IP setting using the MAC address which is the hardware serial number of the network printer card or interface. Especially, it is for the network administrator to set several network IPs at the same time. Installing the program ...
Page 26 - MACHINE'S BASIC SETTINGS; Altitude adjustment
26 _ Getting started 4. Select Typical installation for a network printer , and then click Next . 5. The list of machines available on the network appears. Select the printer you want to install from the list and then click Next . • If you do not see your machine on the list, click Update to refresh...
Page 27 - Setting the date and time; Speaker volume; Entering characters using the number keypad; Entering alphanumeric characters
Getting started _ 27 Setting the date and time The current date and time are shown on the display when your machine is on and ready to work. All of your faxes will have the date and time printed on them. 1. Press Menu until System Setup appears on the bottom line of the display and press OK . 2. Pre...
Page 28 - Keypad letters and numbers; Using the save modes; Toner Save mode; Setting print job timeout
28 _ Getting started Keypad letters and numbers Correcting numbers or names If you make a mistake while entering a number or name, press the left arrow button to delete the last digit or character. Then enter the correct number or character. Inserting a pause With some telephone systems, you must di...
Page 29 - Changing the font setting
Getting started _ 29 Changing the font setting Your machine has preset the font for your region or country. If you want to change the font or set the font for special condition such as the DOS environment, you can change the font setting as follows: 1. Ensure that you have installed the printer driv...
Page 30 - loading originals and print media; LOADING ORIGINALS; On the scanner glass
Loading originals and print media _ 30 loading originals and print media This chapter introduces you how to load originals and print media into your machine. This chapter includes: • Loading originals • Selecting print media • Changing the size of the paper in the paper tray • Loading paper • Printi...
Page 31 - SELECTING PRINT MEDIA
Loading originals and print media _ 31 2. Load the original face up into the ADF. Make sure that the bottom of the original stack matches the paper size marked on the document input tray. 3. Adjust the document width guides to the paper size. SELECTING PRINT MEDIA You can print on a variety of print...
Page 32 - Specifications on print media
Loading originals and print media _ 32 Specifications on print media TYPE SIZE DIMENSIONS WEIGHT A CAPACITY B Plain paper Letter 216 x 279 mm (8.5 x 11 inches) • 60 to 105 g/m 2 (16 to 28 lb bond) for the tray • 60 to 163 g/m 2 (16 to 43 lb bond) for the manual tray • 250 sheets of 80 g/m 2 (20 lb b...
Page 33 - Media sizes supported in each mode
Loading originals and print media _ 33 Media sizes supported in each mode Guidelines for special print media MODE SIZE SOURCE Copy mode Letter, A4, Legal, Oficio, US Folio, Executive, JIS B5, A5, A6 • tray 1 • optional tray 2 • manual tray Print mode All sizes supported by the machine • tray 1 • opt...
Page 34 - LOADING PAPER; Loading paper in the tray 1 or optional tray
34 _ Loading originals and print media CHANGING THE SIZE OF THE PAPER IN THE PAPER TRAY To load longer sizes of paper, such as Legal-sized paper, you need to adjust the paper guides to extend the paper tray. 1. Press and hold the guide lock, and slide the paper length guide to locate it in the corre...
Page 35 - PRINTING ON SPECIAL PRINT MATERIALS; Feeding the print material manually
Loading originals and print media _ 35 PRINTING ON SPECIAL PRINT MATERIALS The machine can hold special sizes and types of print material, such as postcards, note cards, and envelopes. Especially, it is useful for single page printing on letterhead or colored paper. Feeding the print material manual...
Page 36 - ADJUSTING THE OUTPUT SUPPORT; Stacking papers firmly; SETTING THE PAPER SIZE AND TYPE
36 _ Loading originals and print media ADJUSTING THE OUTPUT SUPPORT The printed pages stack on the output tray, and the output support will help the printed pages align. To let the output support correctly align the pages you need to pull it out appropriately depending on the paper size. Stacking pa...
Page 37 - copying; SELECTING THE PAPER TRAY; Darkness; To select from the predefined copy sizes:
37 _ Copying copying This chapter gives you step-by-step instructions for copying documents. This chapter includes: • Selecting the paper tray • Copying • Changing the settings for each copy • Changing the default copy settings • ID card copying • Using special copy features • Printing on both sides...
Page 38 - CHANGING THE DEFAULT COPY SETTINGS; Collation
38 _ Copying CHANGING THE DEFAULT COPY SETTINGS The copy options, including darkness, original type, copy size, and number of copies, can be set to those most frequently used. When you copy a document, the default settings are used unless they have been changed by using the corresponding buttons on ...
Page 39 - Poster copying
Copying _ 39 2-up or 4-up copying Your machine can print 2 or 4 original images reduced to fit onto one sheet of paper. 1. Press Copy . 2. Load originals face up into the ADF, or place a single original face down on the scanner glass.For details about loading an original, see page 30. 3. Press Menu ...
Page 40 - PRINTING ON BOTH SIDES OF PAPER
40 _ Copying PRINTING ON BOTH SIDES OF PAPER You can set the machine to print documents on both sides of paper. (SCX- 4x28 Series only) 1. Press Copy . 2. Press Menu until Copy Setup appears on the bottom line of the display and press OK . 3. Press the left/right arrow until Duplex Print appears and...
Page 41 - scanning; SCANNING BASICS; SCANNING FROM THE CONTROL PANEL; Scanning to application programs
41 _ Scanning scanning Scanning with your machine lets you turn pictures and text into digital files that can be stored on your computer. This chapter includes: • Scanning basics • Scanning from the control panel • Scanning by a network connection • Changing the settings for each scan job • Changing...
Page 42 - Setting scan information in Samsung Scan Manager.; SCANNING BY A NETWORK CONNECTION; Preparing for network scanning; User authentication for network scanning; Setting up an e-mail account
42 _ Scanning 10. To scan from the default setting, press Start . Press the left/right button until the setting you want appears then press OK. 11. Scanning begins. Setting scan information in Samsung Scan Manager. You can find out about Samsung Scan Manager program information and installed scan dr...
Page 43 - Scanning to Email; CHANGING THE SETTINGS FOR EACH SCAN JOB; Registering speed email numbers
Scanning _ 43 Scanning to Email You can scan and send an image as an email attachment. You first need to set up your email account in SyncThru™ Web Service. See page 42.Before scanning, you can set the scan options for your scan job. See page 43. 1. Make sure that your machine is connected to a netw...
Page 44 - Using Address Book entries; Speed email numbers; Searching Address Book for an entry; Searching sequentially through memory; Printing Address Book
44 _ Scanning Using Address Book entries To retrieve an email address, use the following ways: Speed email numbers When you are prompted to enter a destination address while sending an email, enter the speed email number at which you stored the address you want.• For a one-digit speed email location...
Page 45 - basic printing; This chapter explains common printing tasks.; PRINTING A DOCUMENT; CANCELING A PRINT JOB
Basic printing _ 45 basic printing This chapter explains common printing tasks. This chapter includes: • Printing a document • Canceling a print job PRINTING A DOCUMENT Your machine allows you to print from various Windows, Macintosh, or Linux applications. The exact steps for printing a document ma...
Page 46 - faxing; SENDING A FAX; Setting the fax header; Resolution
46 _ Faxing faxing This chapter gives you information about using your machine as a fax machine. This chapter includes: • Sending a fax • Receiving a fax • Other ways to fax • Fax setup SENDING A FAX Setting the fax header In some countries, you are required by law to indicate your fax number on any...
Page 47 - RECEIVING A FAX
Faxing _ 47 5. Press Stop/Clear to return to ready mode. Sending a fax automatically 1. Press Fax . 2. Load originals face up into the ADF, or place a single original face down on the scanner glass. For details about loading an original, see page 30. Ready to Fax appears on the top line of the displ...
Page 49 - Activating secure receiving mode; Printing received faxes; Receiving faxes in memory; OTHER WAYS TO FAX; Sending a fax to multiple destinations
Faxing _ 49 Activating secure receiving mode 1. Press Fax . 2. Press Menu and then press OK when Fax Feature appears on the bottom line of the display. 3. Press the left/right arrow until Secure Receive appears and press OK . 4. Press the left/right arrow until On appears and press OK . 5. Enter a f...
Page 50 - Adding pages to a delayed fax; Sending a priority fax; Forwarding sent faxes to another fax machine
50 _ Faxing 12. If an original is placed on the scanner glass, select Yes to add another page. Load another original and press OK . When you have finished, select No at the Another Page? prompt. The machine returns to ready mode. The display reminds you that you are in ready mode and that a delayed ...
Page 51 - Forwarding received faxes to email address; FAX SETUP; Changing the fax setup options; Sending options
Faxing _ 51 machine. Forwarding received faxes to email address You can set your machine to forward incoming faxes to the email address you entered. 1. Press Fax . 2. Press Menu until Fax Feature appears on the bottom line of the display and press OK . 3. Press the left/right arrow until Forward app...
Page 52 - Changing the default document settings; Speed dial numbers
52 _ Faxing Changing the default document settings The fax options, including resolution and darkness, can be set to the most frequently used modes. When you send a fax, the default settings are used if they are not changed by using the corresponding button and menu. 1. Press Fax . 2. Press Menu unt...
Page 53 - Group dial numbers; Deleting a Address Book entry
Faxing _ 53 Group dial numbers If you frequently send the same document to several destinations, you can group these destinations and set them under a group dial number. You can then use a group dial number to send a document to all of the destinations within the group. You can set up to 100 group d...
Page 55 - Customizing Scan to USB; PRINTING FROM A USB MEMORY DEVICE; To print a document from a USB memory device:; BACKING UP DATA; Backing up data
Using USB flash memory (SCX-4x28 Series only) _ 55 6. Press OK when Yes appears to scan more pages. Load an original and press Start . Regardless of the button you press, the color mode is decided as customized. See “Customizing Scan to USB” on page 55.Otherwise, press the left/right arrow to select...
Page 56 - MANAGING USB MEMORY; Deleting an image file
56 _ Using USB flash memory (SCX-4x28 Series only) MANAGING USB MEMORY You can delete image files stored on a USB memory device one by one or all at once by reformatting the device. Deleting an image file 1. Insert the USB memory device into the USB memory port on your machine. 2. Press Direct USB ....
Page 57 - maintenance; PRINTING REPORTS; Printing a report
Maintenance _ 57 maintenance This chapter provides information for maintaining your machine and the toner cartridge. This chapter includes: • Printing reports • Clearing memory • Cleaning your machine • Maintaining the cartridge • Replacing the toner cartridge • Maintenance parts • Managing your mac...
Page 58 - CLEARING MEMORY; Cleaning the outside
58 _ Maintenance CLEARING MEMORY You can selectively clear information stored in your machine’s memory. 1. Press Menu until System Setup appears on the bottom line of the display and press OK . 2. Press the left/right arrow until Clear Setting appears and press OK . 3. Press the left/right arrow unt...
Page 59 - Cleaning the scan unit
Maintenance _ 59 3. Grasp the handles on the toner cartridge and pull to remove the cartridge from the machine. 4. With a dry lint-free cloth, wipe away any dust and spilled toner from the toner cartridges area and their cavities. 5. Locate the long strip of glass (LSU) inside the cartridge compartm...
Page 60 - MAINTAINING THE CARTRIDGE; Toner cartridge storage
60 _ Maintenance MAINTAINING THE CARTRIDGE Toner cartridge storage Toner cartridges contain components that are sensitive to light, temperature, and humidity. Samsung suggests users follow the recommendations to ensure the optimum performance, highest quality, and longest life from your new Samsung ...
Page 61 - REPLACING THE TONER CARTRIDGE
Maintenance _ 61 4. Slide the toner cartridge back into the machine. 5. Close the front cover. Make sure the cover is securely latched. REPLACING THE TONER CARTRIDGE • The status LED and the toner-related message on the display indicates that the toner cartridge should be replaced. • Incoming faxes ...
Page 62 - Clearing the Toner Empty message; MAINTENANCE PARTS; Checking replaceables
62 _ Maintenance 8. Close the front cover. Make sure the cover is securely latched, and then turn the machine on. Clearing the Toner Empty message When the Toner Empty message appears you can configure not to see this message again not to disturb you. 1. Press Menu until System Setup appears on the ...
Page 63 - To access SyncThruTM Web Service:; CHECKING THE MACHINE’S SERIAL NUMBER
Maintenance _ 63 5. Align the left end of the ADF roller with the slot and push the right end of the roller into the right slot. Rotate the bushing on the right end of the roller toward the document input tray. 6. Close the ADF cover. MANAGING YOUR MACHINE FROM THE WEBSITE If you have connected your...
Page 64 - troubleshooting; TIPS FOR AVOIDING PAPER JAMS; Input Misfeed
64 _ Troubleshooting troubleshooting This chapter gives helpful information for what to do if you encounter an error. This chapter includes: • Tips for avoiding paper jams • Clearing document jams • Clearing paper jams • Understanding display messages • Solving other problems TIPS FOR AVOIDING PAPER...
Page 65 - Exit misfeed; CLEARING PAPER JAMS; In the paper feed area
Troubleshooting _ 65 Exit misfeed 1. Remove any remaining pages from the ADF. 2. Seize the misfeed paper, and remove the paper from the document output tray by carefully pulling it to the right using both hands. 3. Load the removed pages back into the ADF. Roller misfeed 1. Open the scanner lid. 2. ...
Page 66 - In the manual tray; In the toner cartridge area; In the duplex unit area
66 _ Troubleshooting In the manual tray When you print using the manual tray and the machine detects that there is either no paper or that the paper has been improperly loaded, follow the next steps to release the jammed paper. 1. Check if the paper is stuck in the feeding area, and if so, pull it o...
Page 67 - In the optional tray
Troubleshooting _ 67 2. Remove the jammed paper from the duplex unit. If the paper does not come out with the duplex unit, remove the paper from the bottom of the machine. If you cannot find the jammed paper, or if there is any resistance removing the paper, stop pulling and go to step 3. 3. Open th...
Page 68 - UNDERSTANDING DISPLAY MESSAGES
68 _ Troubleshooting UNDERSTANDING DISPLAY MESSAGES Messages appear on the control panel display to indicate the machine’s status or errors. Refer to the tables below to understand the messages’ meaning and correct the problem if necessary. Messages and their meanings are listed in alphabetical orde...
Page 70 - SOLVING OTHER PROBLEMS; Paper feeding
70 _ Troubleshooting SOLVING OTHER PROBLEMS The following chart lists some conditions that may occur and the recommended solutions. Follow the suggested solutions until the problem is corrected. If the problem persists, call for service. Paper feeding Toner Exhausted T A toner cartridge has reached ...
Page 71 - Printing problems
Troubleshooting _ 71 Printing problems CONDITION POSSIBLE CAUSE SUGGESTED SOLUTIONS The machine does not print. The machine is not receiving power. Check the power cord connections. Check the power switch and the power source. The machine is not selected as the default printer. Select Samsung SCX-4x...
Page 72 - Printing quality problems; Bb
72 _ Troubleshooting Printing quality problems If the inside of the machine is dirty or paper has been loaded improperly, you may notice a reduction in print quality. See the table below to clear the problem. The printer does not print PDF file correctly. Some parts of graphics, text, or illustratio...
Page 73 - AaBbCc
Troubleshooting _ 73 Toner smear • Clean the inside of the machine. See page 58. • Check the paper type and quality. See page 31. • Remove the toner cartridge and install a new one. See page 61. Vertical repetitive defects If marks repeatedly appear on the printed side of the page at even intervals:...
Page 74 - Copying problems
74 _ Troubleshooting Copying problems Loose toner • Clean the inside of the machine. See page 58. • Check the paper type and quality. See page 31. • Remove the toner cartridge and install a new one. See page 61. • If the problem persists, the machine may require repair. Contact a service representat...
Page 75 - Scanning problems
Troubleshooting _ 75 Scanning problems Fax problems CONDITION SUGGESTED SOLUTIONS The scanner does not work. • Make sure that you place the original to be scanned face down on the scanner glass, or face up in the ADF. • There may not be enough available memory to hold the document you want to scan. ...
Page 76 - Common Windows problems
76 _ Troubleshooting Common PostScript problems (SCX-4x28 Series only) The following situations are PS language specific and may occur when several printer languages are being used. Common Windows problems Blank areas appear at the bottom of each page or on other pages, with a small strip of text at...
Page 77 - Common Linux problems
Troubleshooting _ 77 Common Linux problems CONDITION SUGGESTED SOLUTIONS The machine does not print. • Check if the printer driver is installed in your system. Open Unified Driver configurator and switch to the Printers tab in Printers configuration window to look at the list of available printers. ...
Page 79 - Common Macintosh problems
Troubleshooting _ 79 Common Macintosh problems CONDITION SUGGESTED SOLUTIONS The printer does not print PDF file correctly. Some parts of graphics, text, or illustrations are missing. Incompatibility between the PDF file and the Acrobat products: Printing the PDF file as an image may solve this prob...
Page 80 - ordering supplies and accessories; SUPPLIES
80 _ Ordering supplies and accessories ordering supplies and accessories This chapter provides information on purchasing cartridges and accessories available for your machine. This chapter includes: • Supplies • Accessories • How to purchase SUPPLIES When the toner runs out, you can order the follow...
Page 81 - installing accessories; UPGRADING A MEMORY MODULE; Installing a memory module
Installing accessories _ 81 installing accessories Your machine is a full-featured model that has been optimized to meet most of your printing needs. Recognizing that each user may have different requirements, however, Samsung makes several accessories available to enhance your machine’s capabilitie...
Page 83 - specifications; GENERAL SPECIFICATIONS
Specifications _ 83 specifications This chapter guides you about this machine’s specifications such as various features. This chapter include: • General specifications • Printer specifications • Scanner specifications • Copier specifications • Facsimile specifications GENERAL SPECIFICATIONS The symb...
Page 84 - PRINTER SPECIFICATIONS
84 _ Specifications PRINTER SPECIFICATIONS SCANNER SPECIFICATIONS ITEM DESCRIPTION Printing method Laser beam printing Printing speed a a. It will be affected by operating system used, computing performance, application software, connecting method, media type, media size and job complexity. • SCX-4x...
Page 85 - COPIER SPECIFICATIONS
Specifications _ 85 COPIER SPECIFICATIONS FACSIMILE SPECIFICATIONS ITEM DESCRIPTION Copy Speed a a. Copy speed is based on Single Document Multiple Copy. • SCX-4x24 Series: Up to 24 cpm (A4), 25 cpm (Letter) • SCX-4x28 Series: Up to 28 cpm(A4), 30 cpm (Letter) Copy resolution Text Scan/Printing: Up ...
Page 86 - glossary
86 _ Glossary glossary ADF An Automatic Document Feeder (ADF) is a mechanism that will automatically feed an original sheet of paper so that the machine can scan some amount of the paper at once. AppleTalk AppleTalk is a proprietary suite of protocols developed by Apple, Inc for computer networking....
Page 90 - index
90 _Index index A Address Book group dial numbers 52 speed dial numbers 51 Address Book, use 42 ADF rubber pad, replace 61 ADF, load 29 adjustment altitude 26 alarm sound 27 Ans/Fax mode, receiving mode 47 C characters, enter 27 cleaning inside 57 outside 57 scan unit 58 clock mode 26 collation, spe...
Page 92 - contact samsung worldwide
Contact SAMSUNG worldwide _ 92 contact samsung worldwide If you have any comments or questions regarding Samsung products, contact the Samsung customer care center. COUNTRY/REG ION CUSTOMER CARE CENTER WEB SITE ARGENTINE 0800-333-3733 www.samsung.com/ar AUSTRALIA 1300 362 603 www.samsung.com/au AUST...
Page 96 - Samsung Printer
Page 97 - ONTENTS
1 S OFTWARE SECTION C ONTENTS Chapter 1: I NSTALLING P RINTER S OFTWARE IN W INDOWS Installing Printer Software ........................................................................................................ 5 Installing Software for Local Printing .............................................
Page 101 - Installing Printer; Installing Printer Software; Installing Software for Local Printing
Installing Printer Software in Windows 5 1 Installing Printer Software in Windows This chapter includes:• Installing Printer Software• Reinstalling Printer Software• Removing Printer Software N OTE : The following procedure is based on Windows XP, for other operating systems, refer to the correspond...
Page 107 - Reinstalling Printer Software
Installing Printer Software in Windows 11 the network, set the printer as the default printer, and change the port name of each printer. Click Next. To install this software on a server, select the Setting up this printer on a server checkbox. 7 After the installation is finished, a window appears a...
Page 108 - Removing Printer Software
Installing Printer Software in Windows 12 N OTE : If your printer is not already connected to the computer, the following window will appear. • After connecting the printer, click Next.• If you don’t want to connect the printer at this time, click Next, and No on the following screen. Then the insta...
Page 109 - Basic Printing; Printing a Document
Basic Printing 13 2 Basic Printing This chapter explains the printing options and common printing tasks in Windows. This chapter includes:• Printing a Document• Printing to a file (PRN)• Printer Settings - Layout Tab- Paper Tab- Graphics Tab- Extras Tab- About Tab- Printer Tab- Using a Favorite Sett...
Page 110 - Printer Settings
Basic Printing 14 Printing to a file (PRN) You will sometimes need to save the print data as a file for your purpose. To create a file: 1 Check the Print to file box at the Print window. 2 Select the folder and assign a name of the file and then click OK. Printer Settings You can use the printer pro...
Page 111 - Layout Tab; Paper Tab
Basic Printing 15 Layout Tab The Layout tab provides options to adjust how the document appears on the printed page. The Layout Options includes Multiple Pages per Side, Poster Printing and Booklet Printing. See “Printing a Document” on page 13 for more information on accessing printer properties. P...
Page 112 - Graphics Tab
Basic Printing 16 TypeSet Type to correspond to the paper loaded in the tray from which you want to print. This will let you get the best quality printout. If not, print quality may not be acheived as you want.Thick Paper: 24 lb to 28 lb (90~105 g/m 2 ) thick paper. Thin Paper: 16 lb to 19 lb (60~70...
Page 113 - Extras Tab
Basic Printing 17 Advanced OptionsYou can set advanced settings by clicking the Advanced Options button. • TrueType Options: This option determines what the driver tells the printer about how to image the text in your document. Select the appropriate setting according to the status of your document....
Page 114 - About Tab; Using a Favorite Setting
Basic Printing 18 About Tab Use the About tab to display the copyright notice and the version number of the driver. If you have an Internet browser, you can connect to the Internet by clicking on the web site icon. See “Printing a Document” on page 13 for more information about accessing printer pro...
Page 115 - Advanced Printing
Advanced Printing 19 3 Advanced Printing This chapter explains printing options and advanced printing tasks. N OTE : • Your printer driver Properties window that appears in this User’s Guide may differ depending on the printer in use. However the composition of the printer properties window is simil...
Page 116 - Printing Posters; Printing Booklets
Advanced Printing 20 Printing Posters This feature allows you to print a single-page document onto 4, 9, or 16 sheets of paper, for the purpose of pasting the sheets together to form one poster-size document. N OTE : The poster printing option is available when 600 dpi is selected in the resolution ...
Page 117 - Printing on Both Sides of Paper
Advanced Printing 21 Printing on Both Sides of Paper You can print on both sides of a sheet of paper. Before printing, decide how you want your document oriented.The options are: • Printer Setting, if you select this option, this feature is determined by the setting you’ve made on the control panel ...
Page 118 - Using Watermarks; Using an Existing Watermark; Creating a Watermark
Advanced Printing 22 Using Watermarks The Watermark option allows you to print text over an existing document. For example, you may want to have large gray letters reading “DRAFT” or “CONFIDENTIAL” printed diagonally across the first page or all pages of a document. There are several predefined wate...
Page 119 - Using Overlays; Creating a New Page Overlay; Using a Page Overlay; Deleting a Page Overlay
Advanced Printing 23 Using Overlays What is an Overlay? An overlay is text and/or images stored in the computer hard disk drive (HDD) as a special file format that can be printed on any document. Overlays are often used to take the place of preprinted forms and letterhead paper. Rather than using pr...
Page 120 - Using Windows; Advanced; Using Help
Using Windows PostScript Driver (SCX-4x28 Series) 24 4 Using Windows PostScript Driver (SCX- 4x28 Series) If you want to use the PostScript driver provided with your system CD-ROM to print a document.PPDs, in combination with the PostScript driver, access printer features and allow the computer to c...
Page 121 - Using Direct Printing; Overview Direct Printing Utility; Using the shortcut icon; Using the right-click menu
Using Direct Printing Utility (SCX-4x28 Series) 25 5 Using Direct Printing Utility (SCX-4x28 Series) This chapter explains how to use Direct Printing Utility to print PDF files without having to open the files. C AUTION • You can not print PDF files that are restricted to print. Deactivate the print...
Page 122 - Sharing the Printer; Setting Up a Host Computer
Sharing the Printer Locally 26 6 Sharing the Printer Locally You can connect the printer directly to a selected computer, which is called “host computer,” on the network. The following procedure is for Windows XP. For other Windows OS, refer to the corresponding Windows User's Guide or online help. ...
Page 123 - Using Samsung SmarThru Office
Scanning 27 7 Scanning Scanning with your machine lets you turn pictures and text into digital files on your computer. Then you can fax or e-mail the files, display them on your web site or use them to create projects that you can print using Samsung SmarThru software or the WIA driver.This chapter ...
Page 124 - Uninstalling Samsung SmarThru Office; Using Onscreen Help File
Scanning 28 - Send by E-mail: To send documents by E-mail while working within the SmarThru Office.To send scanned images or documents by e-mail, you must have a mail client program, like Outlook Express, which has been set up with your e-mail account. - Send by FTP: To upload a document file to ser...
Page 125 - Scanning Using the WIA Driver; Windows XP; Windows 7
Scanning 29 3 Open an application, such as PhotoDeluxe or Photoshop. 4 Open the TWAIN window and set the scan options. 5 Scan and save your scanned image. N OTE : You need to follow the program’s instructions for acquiring an image. Please refer to the user’s guide of the application. Scanning Using...
Page 126 - Using Smart Panel; Understanding Smart Panel
Using Smart Panel 30 8 Using Smart Panel Smart Panel is a program that monitors and informs you of the status of the printer, and allows you to customize the printer’s settings. If you are a Windows or Macintosh OS user, Smart Panel is installed automatically when you install the printer software. I...
Page 127 - Using Printer Settings Utility
Using Smart Panel 31 Driver Setting (Only for Windows) You can use the printer properties window, which allows you to access all of the printer options you need for using your printer. For details, See “Printer Settings” on page 14. Opening the Troubleshooting Guide Using the troubleshooting guide, ...
Page 128 - Using Your Printer in; Getting Started; Installing the Unified Linux Driver
Using Your Printer in Linux 32 9 Using Your Printer in Linux You can use your machine in a Linux environment. This chapter includes:• Getting Started• Installing the Unified Linux Driver• Using the Unified Driver Configurator• Configuring Printer Properties• Printing a Document• Scanning a Document ...
Page 129 - Uninstalling the Unified Linux Driver
Using Your Printer in Linux 33 6 When the installation is complete, click Finish. The installation program has added the Unified Driver Configurator desktop icon and Samsung Unified Driver group to the system menu for your convenience. If you have any difficulties, consult the onscreen help that is ...
Page 130 - Printers Configuration
Using Your Printer in Linux 34 Using the Unified Driver Configurator Unified Linux Driver Configurator is a tool primarily intended for configuring Printer or MFP devices. Since an MFP device combines the printer and scanner, the Unified Linux Driver Configurator provides options logically grouped f...
Page 131 - Scanners Configuration; Ports Configuration
Using Your Printer in Linux 35 Classes Tab The Classes tab shows a list of available printer classes. • Refresh : Renews the classes list.• Add Class... : Allows you to add a new printer class.• Remove Class : Removes the selected printer class. Scanners Configuration In this window, you can monitor...
Page 132 - Configuring Printer Properties; Printing from Applications
Using Your Printer in Linux 36 Configuring Printer Properties Using the properties window provided by the Printers configuration, you can change the various properties for your machine as a printer. 1 Open the Unified Driver Configurator. If necessary, switch to Printers configuration. 2 Select your...
Page 133 - Printing Files; Scanning a Document
Using Your Printer in Linux 37 The following four tabs display at the top of the window. •General - allows you to change the paper size, the paper type, and the orientation of the documents, enables the duplex feature, adds start and end banners, and changes the number of pages per sheet. •Text - al...
Page 134 - Using the Image Manager
Using Your Printer in Linux 38 The document is scanned and the image preview appears in the Preview Pane. 7 Change the scan options in the Image Quality and Scan Area sections.•Image Quality: allows you to select the color composition and the scan resolution for the image. •Scan Area: allows you to ...
Page 136 - Using Your Printer with; Installing Software
Using Your Printer with a Macintosh 40 10 Using Your Printer with a Macintosh Your printer supports Macintosh systems with a built-in USB interface or 10/100 Base-TX network interface card. When you print a file from a Macintosh computer, you can use the CUPS driver by installing the PPD file. N OTE...
Page 137 - Setting Up the Printer; For a Network-connected
Using Your Printer with a Macintosh 41 Setting Up the Printer Set up for your printer will be different depending on which cable you use to connect the printer to your computer—the network cable or the USB cable. For a Network-connected N OTE : Some printers do not support a network interface. Befor...
Page 138 - Printing
Using Your Printer with a Macintosh 42 Printing N OTES : • The Macintosh printer’s properties window that appears in this User’s Guide may differ depending on the printer in use. However the composition of the printer properties window is similar. • You can check your printer name in the supplied CD...
Page 140 - Duplex Printing
Using Your Printer with a Macintosh 44 Printing Multiple Pages on One Sheet of Paper You can print more than one page on a single sheet of paper. This feature provides a cost-effective way to print draft pages. 1 From your Macintosh application, select Print from the File menu. 2 Select Layout. 3 Se...
Page 141 - Scanning with USB
Using Your Printer with a Macintosh 45 Scanning You can scan docoments using Image Capture program. Macintosh OS offers Image Capture program. Scanning with USB 1 Make sure that your machine and computer are turned on and properly connected to each other. 2 Place a single document face down on the d...
Page 142 - NDEX
46 S OFTWARE SECTION I NDEX A advanced printing, use 19 B booklet printing 20 C canceling scan 29 D document, print Macintosh 42 Windows 13 double-sided printing 21 E Extras properties, set 17 F favorites settings, use 18 G Graphics properties, set 16 H help, use 18 , 24 I install printer driver Mac...