Page 3 - ONTACT; SAMSUNG WORLD WIDE
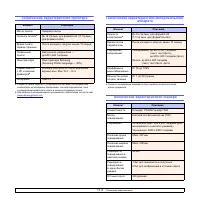
C ONTACT SAMSUNG WORLD WIDE If you have any comments or questions regarding Samsung products, contact the Samsung customer care center. Country Customer Care Center Web Site ARGENTINE 0800-333-3733 www.samsung.com/ar AUSTRALIA 1300 362 603 www.samsung.com/au AUSTRIA 0800-SAMSUNG (726-7864) www.samsu...
Page 4 - ONTENTS; Software overview
C ONTENTS About this user’s guide ................................................................................................................................................. iFinding more information .................................................................................................
Page 6 - About this user’s guide; Finding more information
i About this user’s guide This user’s guide provides information about basic understanding of the machine as well as detailed explanation on each step during the actual usage. Both novice users and professional users can refer to this guide for installing and using the machine.This explanation is ma...
Page 7 - Safety and Regulatory Information
ii Safety and Regulatory Information Important Precautions and Safety Information When using this machine, these basic safety precautions should always be followed to reduce risk of fire, electric shock and injury to people:1 Read and understand all instructions. 2 Use common sense whenever operatin...
Page 8 - Ozone Safety
iii Ozone Safety During normal operation, this machine produces ozone. The ozone produced does not present a hazard to the operator. However, it is advisable that the machine be operated in a well ventilated area.If you need additional information about ozone, please request your nearest Samsung dea...
Page 9 - Fax Branding
iv Fax Branding The Telephone Consumer Protection Act of 1991 makes it unlawful for any person to use a computer or other electronic device to send any message via a telephone facsimile machine unless such message clearly contains in a margin at the top or bottom of each transmitted page or on the f...
Page 10 - Declaration of Conformity (European Countries)
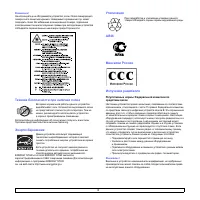
v Declaration of Conformity (European Countries) Approvals and Certifications The CE marking applied to this product symbolizes Samsung Electronics Co., Ltd. Declaration of Conformity with the following applicable 93/68/EEC Directives of the European Union as of the dates indicated: January 1, 1995 ...
Page 12 - Introduction; Special features
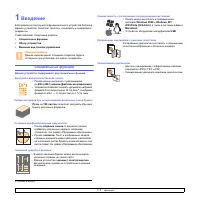
1 .1 <Introduction> 1 Introduction Thank you for purchasing this Samsung multifunctional product. Your machine provides printing, copying and scanning functions. This chapter includes: • Special features • Machine overview • Control panel overview Caution • This product is high glossy. Please ...
Page 13 - Machine overview; Front view
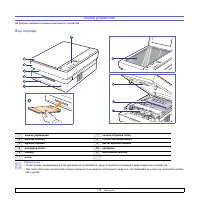
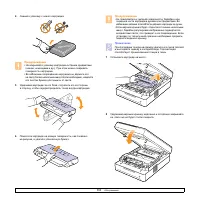
1 .2 <Introduction> Machine overview These are the main components of your machine. Front view Note • All illustrations on this user’s guide may differ from your machine.• The surface of the output tray may become hot if you print a large number of pages at once. Please make sure that you do n...
Page 14 - Rear view
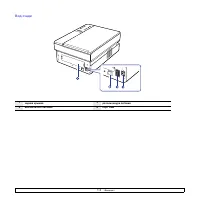
1 .3 <Introduction> Rear view 1 rear cover 3 power receptacle 2 power switch 4 USB port
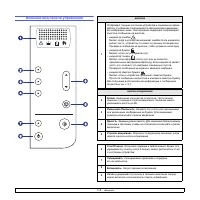
Page 15 - Control panel overview
1 .4 <Introduction> Control panel overview display 1 Shows the current status and prompts during an operation. The message shows with specific LEDs as below. LEDs are working with short message on a display. • error LED Blinks when the error occurs on your machine. If it blinks rapidly, the ma...
Page 16 - Software overview; Supplied software
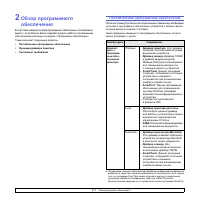
2 .1 <Software overview> 2 Software overview This chapter gives you an overview of the software that comes with your machine. Further details on how to use the software are explained in the Software section. This chapter includes: • Supplied software • Printer driver features • System requirem...
Page 19 - Getting Started; Setting up the hardware
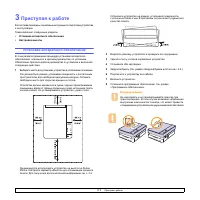
3 .1 <Getting Started> 3 Getting Started This chapter gives you step-by-step instructions for setting up the machine. This chapter includes: • Setting up the hardware • Altitude adjustment Setting up the hardware This section shows the steps to set up the hardware which is explained in the Qui...
Page 20 - Altitude adjustment
3 .2 <Getting Started> Altitude adjustment The print quality is affected by atmospheric pressure, which is determined by the height of the machine above sea level. The following information will guide you on how to set your machine to the best print quality or best quality of print. The altitu...
Page 21 - Loading originals
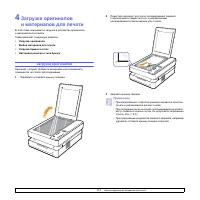
4 .1 <Loading originals and print media> 4 Loading originals and print media This chapter introduces you how to load originals and print media into your machine. This chapter includes: • Loading originals • Selecting print media • Loading paper in the tray • Setting the paper size and type Loa...
Page 22 - Selecting print media; Guidelines for selecting and storing print media
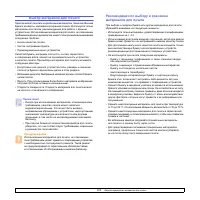
4 .2 <Loading originals and print media> Selecting print media You can print on a variety of print media, such as plain paper, labels, and transparencies. Always use print media that meet the guidelines for use with your machine. Print media that does not meet the guidelines outlined in this u...
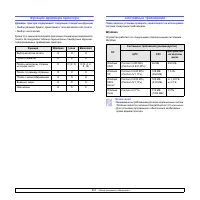
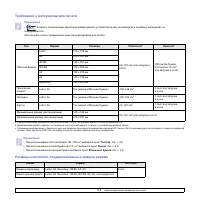
Page 23 - Specifications on print media; Media sizes supported in each mode
4 .3 <Loading originals and print media> Specifications on print media Note • Due to the nature of the product, the envelope type of media cannot be used with your machine. •Use the print media type mentioned below only. Note •When you use the thick paper (90 to 120 g/m 2 , 24 to 32 lb bond), ...
Page 24 - Guidelines for special print media
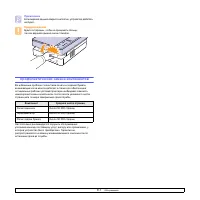
4 .4 <Loading originals and print media> Guidelines for special print media Media type Guidelines Transparencies • To avoid damaging the machine, use only transparencies designed for use in laser machines. • Transparencies used in the machine must be able to withstand the machine’s fusing temp...
Page 25 - Loading paper in the tray; Changing the paper size in the tray
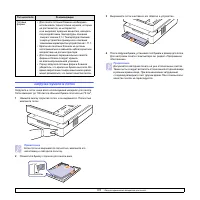
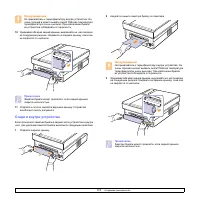
4 .5 <Loading originals and print media> Loading paper in the tray Load the print media you use for the majority of your print jobs in the tray. The tray can hold a maximum of 100 sheets of 75 g/m 2 ( 2 0 lb bond) plain paper. 1 Press the tray open button, then the tray pops out. Pull the tray...
Page 26 - Setting the paper size and type
4 .6 <Loading originals and print media> 2 After inserting paper into the tray, while pinching the paper width guide as shown, move it toward the stack of paper until it lightly touches the side of the stack. Do not press the guide too tightly to the edge of the paper; the guide may bend the p...
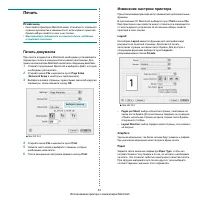
Page 27 - Copying
5 .1 <Copying> 5 Copying This chapter gives you information about using your machine as a copy machine. This chapter includes: • Copying originals • Changing the settings for each copy Copying originals This is the normal and usual procedure for copying your originals. 1 Load originals place a...
Page 28 - Scanning; Scanning basics
6 .1 <Scanning> 6 Scanning Scanning with your machine lets you turn hard copy originals into digital files. Refer to the Scanning part of Software section. This chapter includes: • Scanning basics • Scanning to an application using a local connection Scanning basics Your machine offers the fol...
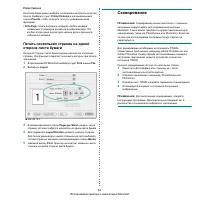
Page 29 - Basic printing; Printing a document
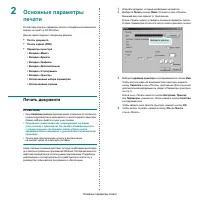
7 .1 <Basic printing> 7 Basic printing This chapter explains common printing tasks. Your machine allows you to print from various Windows, Macintosh, or Linux applications. Note The following procedure is for Windows operating system. For Linux and Macintosh, see Software section. Printing a d...
Page 30 - Maintenance; Printing a machine report; Cleaning your machine; Cleaning the outside
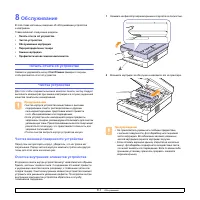
8 .1 <Maintenance> 8 Maintenance This chapter provides information for maintaining your machine and the toner cartridge. This chapter includes: • Printing a machine report • Cleaning your machine • Maintaining the cartridge • Redistributing toner • Replacing the toner cartridge • Maintenance P...
Page 32 - Cleaning the scan unit; Maintaining the cartridge
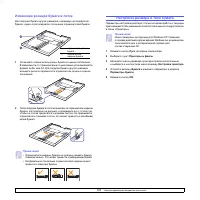
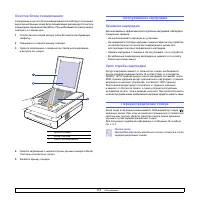
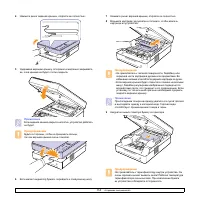
8 .3 <Maintenance> Cleaning the scan unit Keeping the scan unit clean helps ensure the best possible copies. We suggest that you clean the scan unit at the start of each day and during the day, as needed. 1 Slightly dampen a soft lint-free cloth or paper towel with water. 2 Lift and open the s...
Page 34 - Replacing the toner cartridge
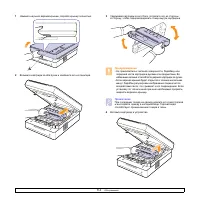
8 .5 <Maintenance> 5 Hold the top cover and close it slowly and carefully, until the cover is the cover is securely latched. Note If the top cover is not completely closed, the machine will not operate. Caution Be careful not to pinch your fingers, since the top cover is very heavy. Replacing ...
Page 36 - Maintenance Parts
8 .7 <Maintenance> Note If the top cover is not completely closed, the machine will not operate. Caution Be careful not to pinch your fingers, since the top cover is very heavy. Maintenance Parts To avoid print quality and paper feed problems resulting from worn parts, and to maintain your mac...
Page 37 - Troubleshooting; Tips for avoiding paper jams; In the paper feed area and rear the machine
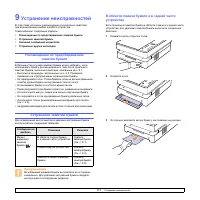
9 .1 <Troubleshooting> 9 Troubleshooting This chapter gives helpful information on what to do if you encounter a problem. This chapter includes: • Tips for avoiding paper jams • Clearing paper jams • Understanding display messages • Solving other problems Tips for avoiding paper jams By select...
Page 39 - Rear and inside the machine
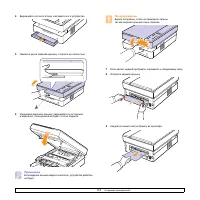
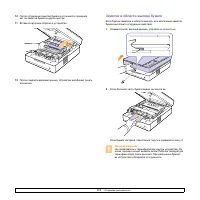
9 .3 <Troubleshooting> 10 Hold both edges of the rear cover, and align it as shown in the following figure. Press the rear cover firmly until it clicks. Note If the rear cover is not completely closed, the paper jam may occur. 11 Open and close the top cover firmly. The machine will resume pri...
Page 41 - In the exit area
9 .5 <Troubleshooting> 10 After removing the jammed paper, check for paper which may be jammed in other parts of the machine. 11 Slide the toner cartridge back into the machine. 12 Close the top cover firmly. The machine will resume printing. In the exit area If paper is jammed in the paper ex...
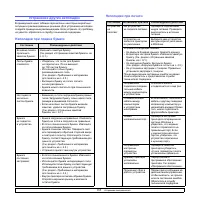
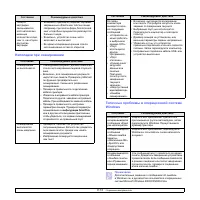
Page 43 - Understanding display messages
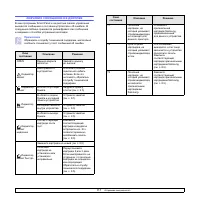
9 .7 <Troubleshooting> Understanding display messages Messages appear on the Smart Panel program window or on the control panel display to indicate machine status or errors. Refer to the tables below to understand the messages meaning to correct the problem, if necessary. Note When you call fo...
Page 44 - Printing problems
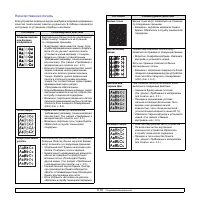
9 .8 <Troubleshooting> Solving other problems The following chart lists some conditions that may occur and the recommended solutions. Follow the suggested solutions until the problem is corrected. If the problem persists, please call for service. Paper feeding problems Condition Suggested solu...
Page 46 - Printing quality problems
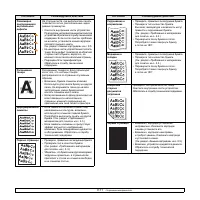
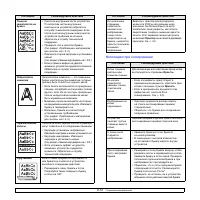
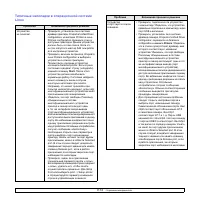
9 .10 <Troubleshooting> Printing quality problems If the inside of the machine is dirty or paper has been loaded improperly, you may notice a reduction in print quality. See the table below to clear the problem. Condition Suggested solutions Light or faded print If a vertical white streak or f...
Page 48 - Copying problems
9 .12 <Troubleshooting> Loose toner • Clean the inside of the machine. Contact a service representative to clean the inside of the machine. After cleaning the inside of the machine, if you still have the same problems, contact a service representative. • Check the paper type and quality. (See ...
Page 50 - Common Linux problems
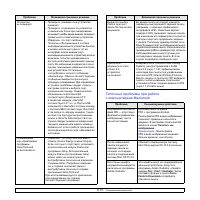
9 .14 <Troubleshooting> Common Linux problems Problem Possible cause and solutions The machine does not print. • Check if the printer driver is installed in your system. Open Unified Driver configurator and switch to the Printers tab in Printers configuration window to look at the list of avai...
Page 51 - Common Macintosh problems
9 .15 <Troubleshooting> The machine does not scan. • Check if a document is loaded into the machine. • Check if your machine is connected to the computer. Make sure if it is connected properly if an I/O error is reported while scanning. • Check if the port is not busy. Since functional compone...
Page 52 - Supplies; How to purchase
10 .1 <Ordering supplies and accesso- 10 Ordering supplies and accessories This chapter provides information on purchasing cartridges and accessories available for your machine. This chapter includes: • Supplies • How to purchase Supplies Note The optional parts or features may differ by countrie...
Page 53 - Specifications; General specifications
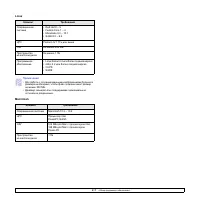
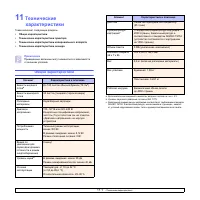
11 .1 <Specifications> 11 Specifications This chapter includes: • General specifications • Printer specifications • Copier specifications • Scanner specifications Note The numbers herein is subject to change according to its install environment. General specifications Item Specifications and D...
Page 54 - Copier specifications; Scanner specifications
11 .2 <Specifications> Copier specifications Item Description Copy speed a a. Copy speed is based on single document multiple copy. Up to 16 cpm in A4 (17 cpm in Letter) First copy out time from coldboot: Less than 15 seconds Copy resolution Scan: up to 600 x 300 dpi (Text, Text/Photo) up to 6...
Page 55 - Glossary
12 .1 <Glossary> 12 Glossary Control Panel A control panel is a flat area where control or monitoring instruments are displayed. They are typically found in top or front of the machine. Coverage This is the printing term used for toner usage measurement on printing and generally used as 5% cov...
Page 56 - NDEX
1 C cleaning inside 8.1 outside 8.1 scan unit 8.3 control panel 1.2 , 1.4 Copies 1.4 Darkness 1.4 Reduce/Enlarge 1.4 Scan to PC 1.4 Start Copy 1.4 Stop/Clear 1.4 Up/Down arrows 1.4 copy copying 5.1 darkness 5.1 original type 5.1 paper size 5.1 reduce/enlarge 5.1 solving copy problems 9.12 D driver f...
Page 57 - Samsung Printer; Software section
Page 61 - Installing Printer; Installing Printer Software
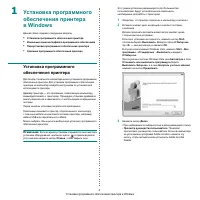
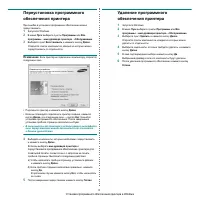
Installing Printer Software in Windows 4 1 Installing Printer Software in Windows This chapter includes:• Installing Printer Software• Changing the Software Language• Reinstalling Printer Software• Removing Printer Software Installing Printer Software You can install the printer software for local p...
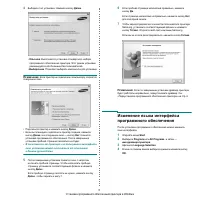
Page 63 - Reinstalling Printer Software; Removing Printer Software
Installing Printer Software in Windows 6 Reinstalling Printer Software You can reinstall the software if installation fails. 1 Start Windows. 2 From the Start menu select Programs or All Programs → your printer driver name → Maintenance. 3 Select Repair and click Next . You will see a component list...
Page 64 - Basic Printing; Printing a Document
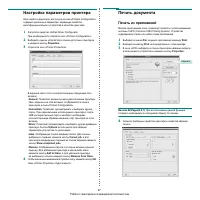
Basic Printing 7 2 Basic Printing This chapter explains the printing options and common printing tasks in Windows. This chapter includes:• Printing a Document• Printing to a file (PRN)• Printer Settings - Layout Tab- Paper Tab- Graphics Tab- Extras Tab- About Tab- Printer Tab- Using a Favorite Setti...
Page 65 - Printer Settings
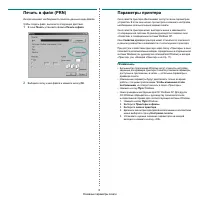
Basic Printing 8 Printing to a file (PRN) You will sometimes need to save the print data as a file for your purpose. To create a file: 1 Check the Print to file box at the Print window. 2 Select the folder and assign a name of the file and then click OK. Printer Settings You can use the printer prop...
Page 66 - Layout Tab; Paper Tab
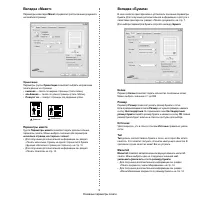
Basic Printing 9 Layout Tab The Layout tab provides options to adjust how the document appears on the printed page. Paper Orientation Paper Orientation allows you to select the direction in which information is printed on a page. • Portrait prints across the width of the page, letter style. • Landsc...
Page 67 - Graphics Tab
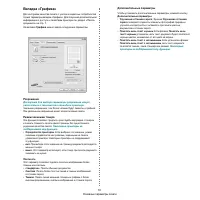
Basic Printing 10 Graphics Tab Use the following Graphic options to adjust the print quality for your specific printing needs. See “Printing a Document” on page 7 for more information on accessing printer properties. Click the Graphic tab to display the properties shown below. Resolution The Resolut...
Page 68 - Extras Tab
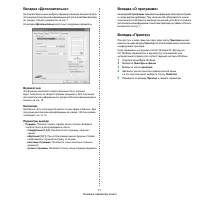
Basic Printing 11 Extras Tab You can select output options for your document. See “Printing a Document” on page 7 for more information about accessing the printer properties.Click the Extras tab to access the following feature: WatermarkYou can create a background text image to be printed on each pa...
Page 69 - Using a Favorite Setting; Using Help
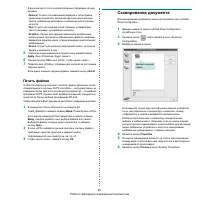
Basic Printing 12 Using a Favorite Setting The Favorites option, which is visible on each properties tab, allows you to save the current properties settings for future use. To save a Favorites item: 1 Change the settings as needed on each tab. 2 Enter a name for the item in the Favorites input box. ...
Page 70 - Advanced Printing
Advanced Printing 13 3 Advanced Printing This chapter explains printing options and advanced printing tasks. N OTE : • Your printer driver Properties window that appears in this User’s Guide may differ depending on the printer in use. However the composition of the printer properties window is simil...
Page 71 - Printing Posters
Advanced Printing 14 Printing Posters This feature allows you to print a single-page document onto 4, 9, or 16 sheets of paper, for the purpose of pasting the sheets together to form one poster-size document. 1 To change the print settings from your software application, access printer properties. S...
Page 72 - Using Watermarks; Using an Existing Watermark; Creating a Watermark
Advanced Printing 15 Using Watermarks The Watermark option allows you to print text over an existing document. For example, you may want to have large gray letters reading “DRAFT” or “CONFIDENTIAL” printed diagonally across the first page or all pages of a document. There are several predefined wate...
Page 73 - Using Overlays; Creating a New Page Overlay; Using a Page Overlay; Deleting a Page Overlay
Advanced Printing 16 Using Overlays What is an Overlay? An overlay is text and/or images stored in the computer hard disk drive (HDD) as a special file format that can be printed on any document. Overlays are often used to take the place of preprinted forms and letterhead paper. Rather than using pr...
Page 74 - Sharing the Printer; Setting Up a Host Computer
Sharing the Printer Locally 17 4 Sharing the Printer Locally You can connect the printer directly to a selected computer, which is called “host computer,” on the network. The following procedure is for Windows XP. For other Windows OS, refer to the corresponding Windows User's Guide or online help. ...
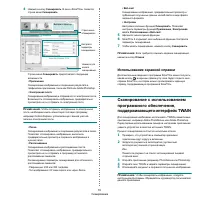
Page 75 - Uninstalling Samsung SmarThru; Using Samsung SmarThru
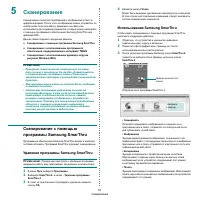
Scanning 18 5 Scanning Scanning with your machine lets you turn pictures and text into digital files on your computer. Then you can fax or e-mail the files, display them on your web site or use them to create projects that you can print using Samsung SmarThru software or the WIA driver.This chapter ...
Page 76 - Using Onscreen Help File
Scanning 19 4 Click Scan To. The Scan To menu bar appears on the SmarThru 4 window. Scan To lets you use the following services:•ApplicationScanning an image and placing it in an image editor application, such as Paint or Adobe Photoshop. •E-mailScanning an image and emailing it. Allows you to scan ...
Page 77 - Scanning Using the WIA Driver; Windows XP
Scanning 20 Scanning Using the WIA Driver Your machine also supports the Windows Image Acquisition (WIA) driver for scanning images. WIA is one of the standard components provided by Microsoft Windows XP and works with digital cameras and scanners. Unlike the TWAIN driver, the WIA driver allows ...
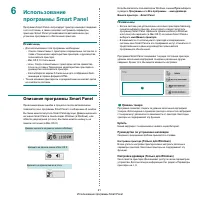
Page 78 - Using Smart Panel; Understanding Smart Panel
Using Smart Panel 21 6 Using Smart Panel Smart Panel is a program that monitors and informs you of the status of the printer, and allows you to customize the printer’s settings. Smart Panel is installed automatically when you install the printer software. N OTES : • To use this program, you need: - ...
Page 79 - Using Printer Settings Utility
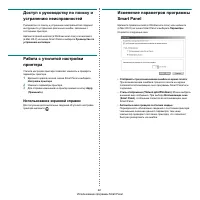
Using Smart Panel 22 Opening the Troubleshooting Guide Using the troubleshooting guide, you can view solutions for error status problems.Right-click (in Windows or Linux) or click (in Mac OS X) the Smart Panel icon and select Troubleshooting Guide. Using Printer Settings Utility Using the Printer Se...
Page 80 - Using Your Printer in; Installing the Unified Linux Driver
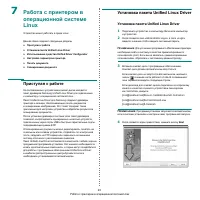
Using Your Printer in Linux 23 7 Using Your Printer in Linux You can use your machine in a Linux environment. This chapter includes:• Getting Started• Installing the Unified Linux Driver• Using the Unified Driver Configurator• Configuring Printer Properties• Printing a Document• Scanning a Document ...
Page 81 - Uninstalling the Unified Linux Driver
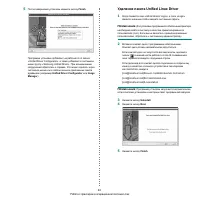
Using Your Printer in Linux 24 5 When the installation is complete, click Finish. The installation program has added the Unified Driver Configurator desktop icon and Samsung Unified Driver group to the system menu for your convenience. If you have any difficulties, consult the onscreen help that is ...
Page 82 - Printers Configuration
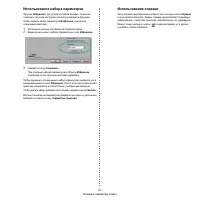
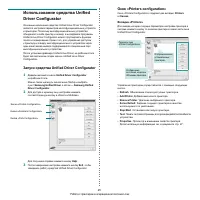
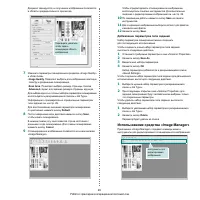
Using Your Printer in Linux 25 Using the Unified Driver Configurator Unified Linux Driver Configurator is a tool primarily intended for configuring Printer or MFP devices. Since an MFP device combines the printer and scanner, the Unified Linux Driver Configurator provides options logically grouped f...
Page 83 - Scanners Configuration; Ports Configuration
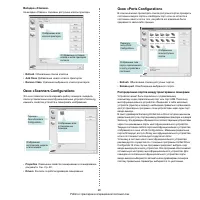
Using Your Printer in Linux 26 Classes Tab The Classes tab shows a list of available printer classes. • Refresh : Renews the classes list.• Add Class... : Allows you to add a new printer class.• Remove Class : Removes the selected printer class. Scanners Configuration In this window, you can monitor...
Page 84 - Configuring Printer Properties; Printing from Applications
Using Your Printer in Linux 27 Configuring Printer Properties Using the properties window provided by the Printers configuration, you can change the various properties for your machine as a printer. 1 Open the Unified Driver Configurator. If necessary, switch to Printers configuration. 2 Select your...
Page 85 - Printing Files; Scanning a Document
Using Your Printer in Linux 28 The following four tabs display at the top of the window. •General - allows you to change the paper size, the paper type, and the orientation of the documents, enables the duplex feature, adds start and end banners, and changes the number of pages per sheet. •Text - al...
Page 86 - Using the Image Manager
Using Your Printer in Linux 29 The document is scanned and the image preview appears in the Preview Pane. 7 Change the scan options in the Image Quality and Scan Area sections.•Image Quality: allows you to select the color composition and the scan resolution for the image. •Scan Area: allows you to ...
Page 88 - Using Your Printer with; Installing Software; Printer driver
Using Your Printer with a Macintosh 31 8 Using Your Printer with a Macintosh Your printer supports Macintosh systems with a built-in USB interface or 10/100 Base-TX network interface card. When you print a file from a Macintosh computer, you can use the CUPS driver by installing the PPD file. N OTE ...
Page 89 - Scan driver; Setting Up the Printer
Using Your Printer with a Macintosh 32 Scan driver Installing the Scan driver 1 Make sure that you connect your printer to the computer. Turn on your computer and printer. 2 Insert the CD-ROM which came with your printer into the CD-ROM drive. 3 Double-click CD-ROM icon that appears on your Macintos...
Page 90 - Printing
33 Printing N OTES : • The Macintosh printer’s properties window that appears in this User’s Guide may differ depending on the printer in use. However the composition of the printer properties window is similar. • You can check your printer name in the supplied CD- ROM. Printing a Document When you ...