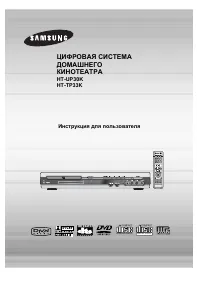
Page 2 - PREP
1 2 Safety Warnings Precautions Ensure that the AC power supply in your house complies with the identification sticker located on the back of your player. Install yourplayer horizontally, on a suitable base (furniture), with enough space around it for ventilation (3~4inches). Make sure the ventilati...
Page 3 - Features; Power Saving Function; Contents; Super Digital Sound Master
4 Features 3 Multi-Disc Playback & AM/FM Tuner The HT-DS1770/DS1870 combines the convenience of multi-disc playback capability, including DVD-AUDIO, DVD-VIDEO, VCD, CD, MP3-CD, DivX, CD-R/RW, and DVD- R/RW, with a sophisticated AM/FM tuner, all in a single player. Power Saving Function The HT-DS...
Page 4 - Disc Recording Format; Notes on Discs; Playable Discs; Copy Protection
CD-R Discs • Depending on the disc recording device (CD-Recorder or PC ) and the condition of the disc, some CD-R discs may not be playable. • Use a 650MB/74 minute CD-R. Avoid CD-R media, as they may not be playable. • If possible, do not use CD-RW (Rewritable) media, as they may not be playable. •...
Page 5 - Description; Accessories; —Front Panel—; —Rear Panel—
Audio Cable Video Cable Remote Control FM Antenna User's Manual AM Antenna Auto Sound Calibration Microphone 7 Description Accessories PREP ARA TION —Front Panel— Power ( ) button Function button Disc Tray Volume control Headphone Jack Play/Pause ( ) button Tuning Down & Skip ( ) buttons Tuning ...
Page 6 - Insert Remote Batteries; Range of Operation of the Remote Control; —Remote Control—
To open the remote control cover, push thetop of the cover, then slide downward. 10 Insert Remote Batteries The remote control can be used up to approximately 23feet/7 meters in a straight line. It can also be operated ata horizontal angle of up to 30° from the remote controlsensor. Range of Operati...
Page 7 - Connecting the Speakers; CONNECTIONS; Back of the Speakers; Selecting the Listening Position
12 11 Connecting the Speakers Before moving or installing the product, be sure to turn off the power and disconnect the power cord. CONNECTIONS • Make sure the colors of the speaker terminalsmatch the colors of the connecting jacks. • Insert the black wire into the black (–) terminal and the gray wi...
Page 8 - Connecting the Video Out to TV; METHOD 2; Better Quality; Good Quality; METHOD 3; Best Quality; Function; Selecting the Video Format
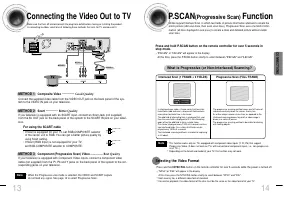
13 CONNECTIONS 14 Connecting the Video Out to TV METHOD 2 Scart ............... Better Quality If you television is equipped with an SCART input, connect an Scart Jack (not supplied)from the AV OUT jack on the back panel of the system to the SCART IN jack on your televi-sion. METHOD 1 Composite Vide...
Page 9 - Connecting an External Analog Component; Connecting External Components; Connecting an External Digital Component
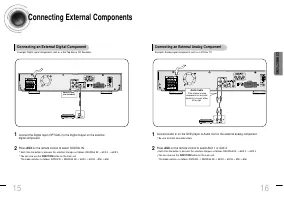
16 15 CONNECTIONS Press AUX on the remote control to select AUX 1 or AUX 2. • Each time the button is pressed, the selection changes as follows: DIGITAL IN ➝ AUX 1 ➝ AUX 2 . • You can also use the FUNCTION button on the main unit.The mode switches as follows: DVD/CD ➝ DIGITAL IN ➝ AUX1 ➝ AUX2 ➝ FM ➝...
Page 10 - Cooling Fan; Connecting the FM and AM Antennas; FM antenna connection
18 17 CONNECTIONS The cooling fan dissipates the heat generated inside the unit so that the unit can be operatednormally. The cooling fan is activated automatically to supply cool air to the unit. Please observe the following cautions for your safety. • Make sure the unit is well-ventilated. If the ...
Page 11 - Before Using Your DVD Player; Disc terminology
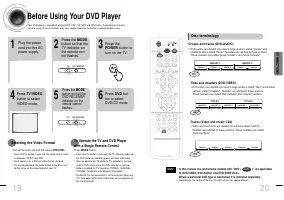
20 19 CONNECTIONS Before Using Your DVD Player Your DVD player is capable of playing DVD, VCD, CD, MP3 and JPEG discs.Depending on the discyou are using, these instructions may vary slightly. Read the instructions carefully before using. • Each time the button is pressed, the TV indicator (red) andt...
Page 12 - Disc Playback; Checking the Remaining Time; Each time the REMAIN button is pressed; Press the REMAIN button.
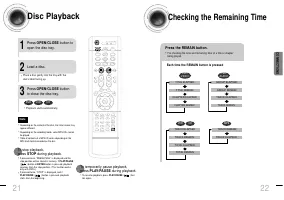
Disc Playback • Depending on the content of the disc, the initial screen mayappear different. • Depending on the recording mode, some MP3-CDs cannotbe played. • Table of contents of a MP3-CD varies depending on theMP3 track format recorded on the disc. • To resume playback, press PLAY/PAUSE ( ) but-...
Page 13 - In Stop mode, use; JPEG Disc Playback
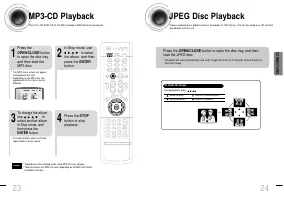
24 CONNECTIONS • Depending on the recording mode, some MP3-CDs may not play. • Table of contents of a MP3-CD varies depending on the MP3 track formatrecorded on the disc. Note MP3-CD Playback Data CDs (CD-ROM, CD-R, CD-RW) encoded in MP3 format can be played. 2 In Stop mode, use to select the album,...
Page 14 - DivX Playback; During playback, press the button.; OPERA; Subtitle Display; If the disc has more than one subtitle file; Zoom Function
5 Minute Skip function Fast playback 26 • When playing the DivX disk, you can play the file with extension of AVI only. • Among the available DivX audio formats, DTS Audio is not supported. • WMV V8 is not supported for WMV files. • When burning a subtitle file to a CD-ROM with your PC, be sure to b...
Page 15 - Displaying Disc Information; Fast Playback; Press and hold .; Slow Playback
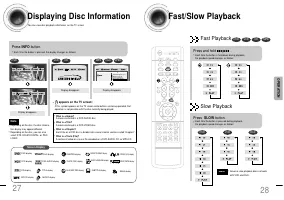
28 27 OPERA TION Displaying Disc Information You can view disc playback information on the TV screen. Press INFO button. • Each time the button is pressed, the display changes as follows: DVD Display disappears Display disappears Display disappears VCD CD Something like youBack for goodLove of my li...
Page 16 - Repeat Playback; To Select a Repeat Playback Mode in the Disc Information Screen; Skipping Scenes/Songs; Briefly press .
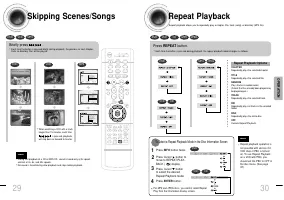
Repeat Playback Repeat playback allows you to repeatedly play a chapter, title, track (song), or directory (MP3 file). Press REPEAT button. • Each time the button is pressed during playback, the repeat playback mode changes as follows: DVD VCD CD MP3 JPEG • Repeat playback operation isnot possible w...
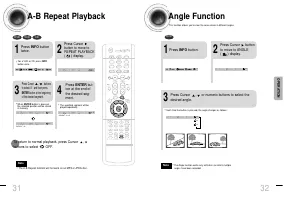
Page 17 - Angle Function
A-B Repeat Playback 32 • The A-B Repeat function will not work on an MP3 or JPEG disc. 2 Press Cursorbutton to move toREPEAT PLAYBACK ( ) display. • For a VCD or CD, press INFObutton once. 1 Press INFO buttontwice. A - A -? REPEAT : A— A - B REPEAT : A—B • The specified segment will beplayed repeate...
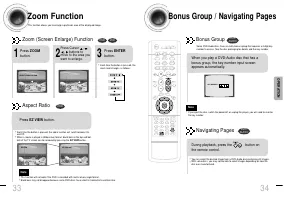
Page 18 - Aspect Ratio; Press ZOOM; Bonus Group / Navigating Pages; Bonus Group; Navigating Pages
34 Zoom Function This function allows you to enlarge a particular area of the displayed image. Zoom (Screen Enlarge) Function DVD VCD Aspect Ratio DVD 2 Press Cursor , , , buttons to move to the area youwant to enlarge. 1 Press ZOOM button. • Each time the button is pressed, thezoom level changes as...
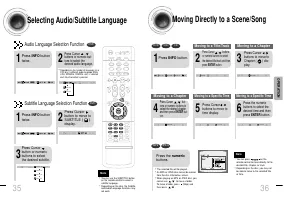
Page 19 - Moving Directly to a Scene/Song; Moving to a Title/Track; tons or numeric buttons to; and then press ENTER but-; Selecting Audio/Subtitle Language; Audio Language Selection Function
36 Moving Directly to a Scene/Song • The selected file will be played. • An MP3 or JPEG disc cannot be movedfrom the disc information screen. • When playing an MP3 or JPEG disc, youcannot use , to move a folder. To move a folder, press (Stop) andthen press , . DVD VCD CD MP3 JPEG 2 Press Cursor , bu...
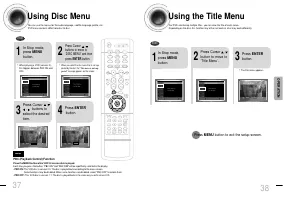
Page 20 - Using the Title Menu; Press MENU button to exit the setup screen.; Using Disc Menu; Press ENTER
Using the Title Menu For DVDs containing multiple titles, you can view the title of each movie.Depending on the disc, this function may either not work at all or may work differently. 2 Press Cursor ,button to move to‘Title Menu’. DVD 1 In Stop mode,press MENU button. 3 Press ENTER button. • The tit...
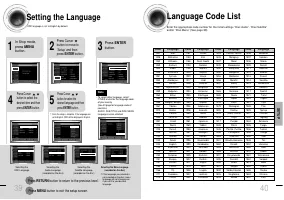
Page 21 - Setting the Language; SETUP; Language Code List; Press RETURN button to return to the previous level.
39 40 * If the language you selected isnot recorded on the disc, menulanguage will not change evenif you set it to your desiredlanguage. Selecting the OSD Language Selecting the Audio Language (recorded on the disc) Setting the Language OSD language is set to English by default. 4 • Once the setup i...
Page 22 - Setting TV Screen type; WIDE; Adjusting the TV Aspect Ratio (Screen Size)
41 42 Setting TV Screen type 2 1 4 3 In Stop mode,press MENUbutton. Press Cursorbutton to move to‘Setup’ and thenpress ENTER button. • Once the setup is complete, you willbe taken to the previous screen. Press Cursorbutton to move to ‘TVDISPLAY’ and thenpress ENTER button. Press Cursor ,button to se...
Page 24 - Setting the Password
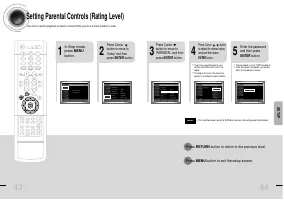
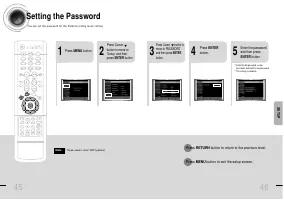
2 1 Press MENU button. Press Cursorbutton to move to‘Setup’ and thenpress ENTER button. 4 • Enter the old password, a newpassword, and confirm new password. • The setting is complete. 3 5 Press RETURN button to return to the previous level. Press MENU button to exit the setup screen. 45 46 Press Cur...
Page 25 - Setting the Wallpaper
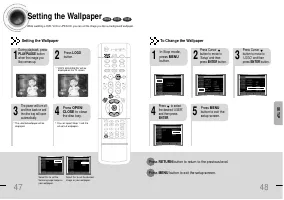
47 48 Setting the Wallpaper While watching a DVD, VCD or JPEG CD, you can set the image you like as background wallpaper. DVD VCD JPEG SETUP • “ COPY LOGO DATA ” will be displayed on the TV screen. • The selected wallpaper will bedisplayed. • You can repeat Steps 1 and 2 toset up to 3 wallpapers. 2 ...
Page 26 - DVD Playback Mode; AV SYNC Setup
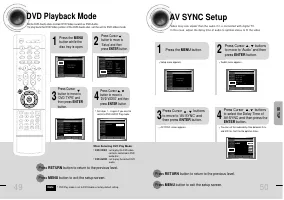
2 1 Press the MENUbutton while thedisc tray is open. Press Cursorbutton to move to‘Setup’ and thenpress ENTER button. 4 3 Press RETURN button to return to the previous level. Press MENU button to exit the setup screen. 49 50 Press Cursorbutton to move to‘DVD TYPE’ andthen press ENTERbutton. Press Cu...
Page 27 - Press TEST TONE button.
2 1 4 3 Setting the Speaker Mode Signal outputs and frequency responses from the speakers will automatically be adjustedaccording to your speaker configuration and whether certain speakers are used or not. Setting the Test Tone Press the Test Tone to check the speaker connections and to adjust the s...
Page 28 - Setting the Delay Time; Setting up the Speaker Delay Time
Setting the Delay Time If the speakers cannot be placed at equal distances from the listening position, you can adjust thedelay time of the audio signals from the center and rear speakers. 53 54 Setting up the Speaker Delay Time When 5.1CH Surround Sound is played, you can enjoy the best sound ifthe...
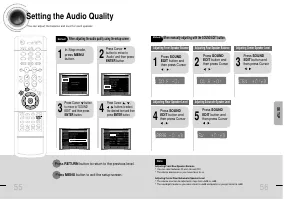
Page 29 - Setting the Audio Quality; , buttons to select; When adjusting the audio quality using the setup screen; When manually adjusting with the SOUND EDIT button; Adjusting Front Speaker Balance
55 Setting the Audio Quality Y o u c a n a d j u s t t h e b a l a n c e a n d l e v e l f o r e a c h s p e a k e r . 2 1 4 3 In Stop mode,press MENUbutton. Press Cursor button to move to‘Audio’ and then pressENTER button. Press Cursor buttonto move to ‘SOUNDEDIT’ and then pressENTER button. Press ...
Page 30 - Setting the DRC; Press Cursor
SETUP 57 58 Setting the DRC (Dynamic Range Compression) Y o u c a n u s e t h i s f u n c t i o n t o e n j o y D o l b y D i g i t a l s o u n d w h e n w a t c h i n g m o v i e s a tl o w v o l u m e a t n i g h t . 1 2 Press MENUbutton. Press Cursorbutton to move to‘Audio’ and thenpress ENTERbut...
Page 31 - Auto Sound Calibration Setup; REMOVE MIC; To Verify the Auto Sound Calibration
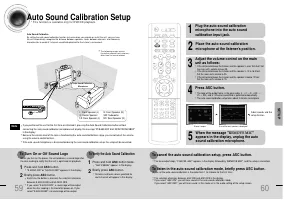
60 59 Auto Sound Calibration Setup Auto Sound CalibrationBy setting the auto sound calibration function just once when you relocate or install the unit, you can havethe unit automatically recognize the distance between speakers, levels between channels, and frequencycharacteristics to create 5.1-cha...
Page 32 - Live Surround Mode; MUSIC
62 61 Live Surround Mode You can reproduce a 2-channel sound source, suchas CD, and radio broadcast, in 5.1-channelsurround sound. SUPER 5.1 • Each time the button is pressed, theselection alternates between SUPER5.1 and SUPER OFF. • Select "SUPER 5.1" to play 2-channelsound in 5.1 channels....
Page 33 - Dolby Pro Logic II Mode; Dolby Pro Logic II Effect; Press PL II MODE button.; PL II EFFECT button; Press; PL II EFFECT button; Press; PL II EFFECT button
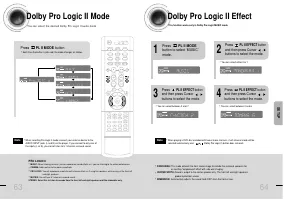
63 64 Dolby Pro Logic II Mode Y o u c a n s e l e c t t h e d e s i r e d D o l b y P r o L o g i c I I a u d i o m o d e . Dolby Pro Logic II Effect This function works only in Dolby Pro Logic MUSIC mode. Press PL II MODE button. PRO LOGIC II • MUSIC: When listening to music, you can experience sou...
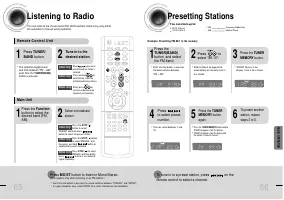
Page 34 - Automatic Tuning 2; Manual Tuning; Automatic Tuning 1; R e m o t e C o n t r o l U n i t; RADIO OPERA
65 66 Listening to Radio You can listen to the chosen band (FM, AM broadcast stations) by using eitherthe automatic or manual tuning operation. Presetting Stations 2 1 • The selection toggles backand forth between "FM ➝ AM" each time the TUNER(BAND)button is pressed. Tune in to thedesired st...
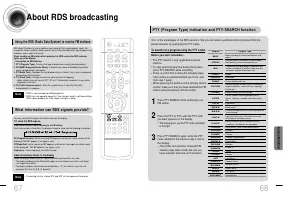
Page 35 - About RDS broadcasting; Using the RDS (Radio Data System) to receive FM stations
About RDS broadcasting • RDS is not available for AM broadcasts. • RDS may not operate correctly if the station tuned is not transmittingRDS signal properly or if the signal strength is weak. • If searching finishes at once,“ PS ”,and “ RT ” will not appear on the display. Using the RDS (Radio Data ...
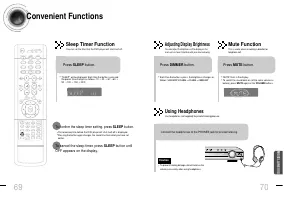
Page 36 - Convenient Functions; To confirm the sleep timer setting, press SLEEP button.; Sleep Timer Function; MISCELLANEOUS; Adjusting Display Brightness; Mute Function
69 70 Convenient Functions • The remaining time before the DVD player will shut itself off is displayed. • Pressing the button again changes the sleep time from what you have setearlier. To confirm the sleep timer setting, press SLEEP button. • "SLEEP" will be displayed. Each time the button...
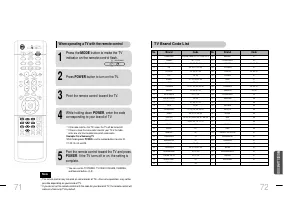
Page 37 - Point the remote control toward the TV.; TV Brand Code List
• The remote control may not work on some brands of TVs. Also some operations may not bepossible depending on your brand of TV. • If you do not set the remote control with the code for your brand of TV, the remote control willwork on a Samsung TV by default. When operating a TV with the remote contr...
Page 38 - Before Calling for Service; Symptom
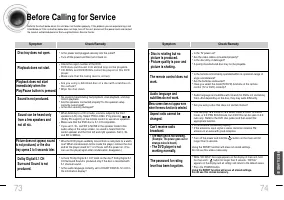
74 73 Before Calling for Service Refer to the chart below when this unit does not function properly. If the problem you are experiencing is notlisted below or if the instruction below does not help, turn off the unit, disconnect the power cord, and contactthe nearest authorized dealer or Samsung Ele...
Page 39 - Specifications; Handling discs; Cautions on Handling and Storing Discs
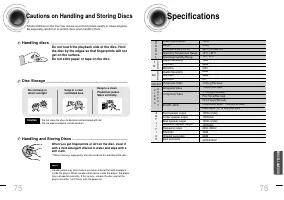
76 Specifications 75 Do not touch the playback side of the disc. Holdthe disc by the edges so that fingerprints will notget on the surface.Do not stick paper or tape on the disc. Do not keep indirect sunlight Keep in a coolventilated area Keep in a cleanProtection jacket.Store vertically. When you g...
Page 40 - Notes on Terminology
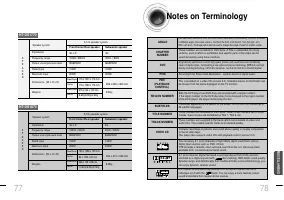
78 77 MISCELLANEOUS Impedance Frequency range Output sound pressure level Rated input Maximum input SPEAKER 5.1ch speaker system Front/Center/Rear speaker 4 Ω x 5 150Hz~20KHz 85dB/W/M 100W 200W Subwoofer speaker 4 Ω 30Hz~150Hz 86dB/W/M 100W 200W Speaker system Dimensions (W x H x D) Weights HT-DS177...


 Samsung HT-DS400
Manual
Samsung HT-DS400
Manual
 Samsung HT-H6550WM
User Manual
Samsung HT-H6550WM
User Manual
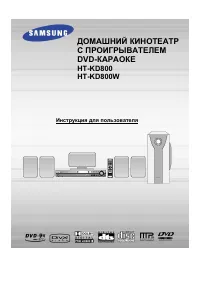 Samsung HT-KD800
User Manual
Samsung HT-KD800
User Manual
 Samsung HT-KP10
User Manual
Samsung HT-KP10
User Manual
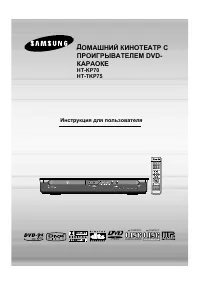 Samsung HT-KP70
User Manual
Samsung HT-KP70
User Manual
 Samsung HT-P10
User Manual
Samsung HT-P10
User Manual
 Samsung HT-P10K
User Manual
Samsung HT-P10K
User Manual
 Samsung HT-P70K
User Manual
Samsung HT-P70K
User Manual
 Samsung HT-Q20
User Manual
Samsung HT-Q20
User Manual
 Samsung HT-TP33K
User Manual
Samsung HT-TP33K
User Manual
 Samsung HT-UP30K
User Manual
Samsung HT-UP30K
User Manual
 Samsung HW-Q60T/XY
User Manual
Samsung HW-Q60T/XY
User Manual
 Samsung HW-Q70TXY
User Manual
Samsung HW-Q70TXY
User Manual
 Samsung HW-Q90R/XY
User Manual
Samsung HW-Q90R/XY
User Manual
 Samsung HW-Q950TXY
User Manual
Samsung HW-Q950TXY
User Manual
 Samsung HW-T450XY
User Manual
Samsung HW-T450XY
User Manual
 Samsung HW-T550XY
User Manual
Samsung HW-T550XY
User Manual
 Samsung HT-A100
User Manual
Samsung HT-A100
User Manual