Page 2 - Contents; Package Content; Correct Disposal of This Product
2 Contents Package Content 3 Accessories / Product specifications 3 At a Glance 4 At a Glance / General 4 Display and buttons 5 Removing the filter 6 Assembling the filter 7 Operation Features 10 Turning the power on/off / Controlling the fan speed 10 Sleep mode / Timed on/off function / Display lig...
Page 3 - Accessories; User manual 1 EA; Product specifications; Model name
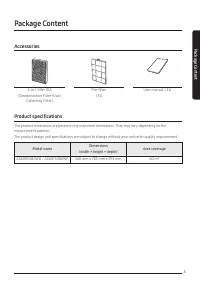
3 Package C ontent Package Content Accessories 2-in-1 filter 1EA (Deodorization Filter+Dust Collecting Filter) Pre-filter 1 EA User manual 1 EA Product specifications The product dimensions are based on the maximum dimensions. They may vary depending on the measurement position.The product design an...
Page 4 - General; At a Glance
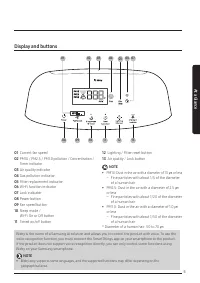
4 At a Glance General 08 11 01 02 03 09 10 06 07 04 12 05 At a Glance 01 Air outlet (top) 02 Display and buttons 03 Display lighting 04 Filter holder 05 Air inlet / Front panel 06 Handle (rear side) 07 Dongle mount • This model is provided with integrated Wi-Fi connectivity and does not require an e...
Page 5 - Display and buttons; PM10: Dust in the air with a diameter of 10 μm or less; NOTE
5 At a Glance Display and buttons 08 09 13 10 12 11 03 04 05 06 01 07 02 01 Current fan speed 02 PM10 / PM2.5 / PM1.0 pollution / Concentration / Timer indicator 03 Air quality indicator 04 Gas pollution indicator 05 Filter replacement indicator 06 Wi-Fi function indicator 07 Lock indicator 08 Power...
Page 6 - Removing the filter; STEP 1
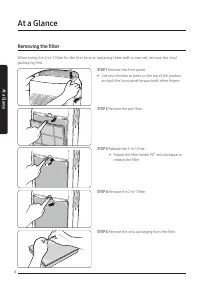
6 At a Glance Removing the filter When using the 2-in-1 filter for the first time or replacing them with a new set, remove the vinyl packaging first. STEP 1 Remove the front panel. • Use your thumbs to press on the top of the product and pull the front panel forward with other fingers. STEP 2 Remove...
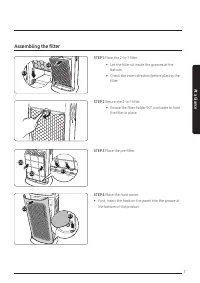
Page 7 - Assembling the filter
7 At a Glance Assembling the filter STEP 1 Place the 2-in-1 filter. • Let the filter sit inside the grooves at the bottom. • Check the insert direction before placing the filter. STEP 2 Secure the 2-in-1 filter. • Rotate the filter holder 90° clockwise to hold the filter in place. STEP 3 Place the p...
Page 8 - STEP 5
8 At a Glance At a Glance STEP 5 Before using new filter, reset the filter replacement reminders. • Press and hold the Lighting [ ] button for 3 seconds or longer. NOTE • The product is not as effective when it is operated without filter. • You may notice a subtle odour from fresh filter when using ...
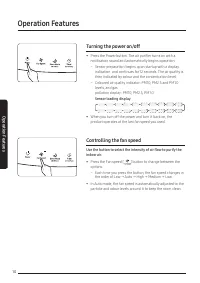
Page 10 - Turning the power on/off; Sensor loading display; Controlling the fan speed; Use the button to select the intensity of air flow to purify the; Operation Features
10 Oper ation F eatur es Operation Features Turning the power on/off • Press the Power button. The air purifier turns on with a notification sound and automatically begins operation. – Sensor preparation begins upon startup with a display indication and continues for 12 seconds. The air quality is t...
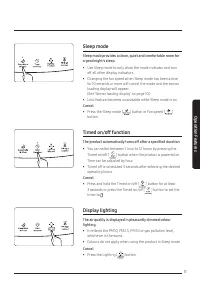
Page 11 - Sleep mode; You can select between 1 hour to 12 hours by pressing the; Display lighting
11 Oper ation F eatur es Sleep mode Sleep mode provides a clean, quiet and comfortable room for a good night's sleep. • Use Sleep mode to only allow the mode indicator and turn off all other display indicators. • Changing the fan speed when Sleep mode has been active for 10 seconds or more will canc...
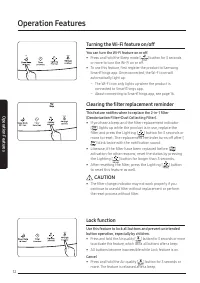
Page 12 - You can turn the Wi-Fi feature on or off.; Clearing the filter replacement reminder; This feature notifies when to replace the 2-in-1 filter; CAUTION; Use this feature to lock all buttons and prevent unintended
12 Oper ation F eatur es Operation Features Turning the Wi-Fi feature on/off You can turn the Wi-Fi feature on or off. • Press and hold the Sleep mode [ ] button for 3 seconds or more to turn the Wi-Fi on or off. • To use this feature, first register the product to Samsung SmartThings app. Once conn...
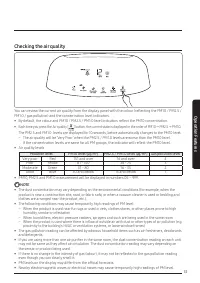
Page 13 - Checking the air quality; Pollution level
13 Oper ation F eatur es Checking the air quality You can review the current air quality from the display panel with the colour (reflecting the PM10 / PM2.5 / PM1.0 / gas pollution) and the concentration level indicators. • By default, the colour and PM10 / PM2.5 / PM1.0 level indicators reflect the...
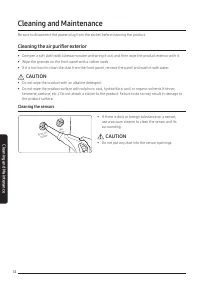
Page 14 - Cleaning the air purifier exterior; Cleaning the sensors; • If there is dust or foreign substance on a sensor,; • Do not put any dust into the sensor openings.; Cleaning and Maintenance
14 Cl eaning and Maint enanc e Cleaning the air purifier exterior • Dampen a soft cloth with lukewarm water and wring it out, and then wipe the product exterior with it. • Wipe the grooves on the front panel with a cotton swab. • If it is too hard to clean the dust from the front panel, remove the p...
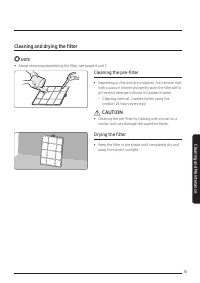
Page 15 - Cleaning and drying the filter; Cleaning the pre-filter; Drying the filter
15 Cl eaning and Maint enanc e Cleaning and drying the filter NOTE • About removing/assembling the filter, see pages 6 and 7. Cleaning the pre-filter • Depending on the dust accumulation, first remove dust with a vacuum cleaner and gently wash the filter with a pH-neutral detergent diluted in lukewa...
Page 16 - To connect the product to a Wi-Fi network,; Checking the Internet connectivity; Downloading the SmartThings app; SmartThings app
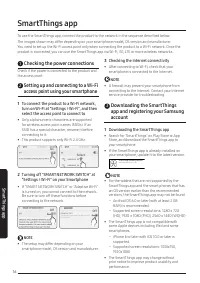
16 Smar tThings app To use the SmartThings app, connect the product to the network in the sequence described below. The images shown may differ depending on your smartphone model, OS version and manufacturer.You need to set up the Wi-Fi access point only when connecting the product to a Wi-Fi networ...
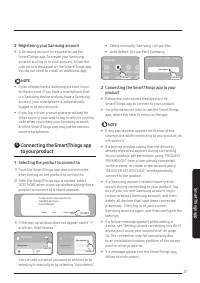
Page 17 - Registering your Samsung account; Connecting the SmartThings app; Selecting the product to connect to; Connecting the SmartThings app to your
17 Smar tThings app 2 Registering your Samsung account • A Samsung account is required to use the SmartThings app. To create your Samsung account and log in to your account, follow the instructions displayed on the SmartThings app. You do not need to install an additional app. NOTE • If you already ...
Page 18 - Open Source Announcement
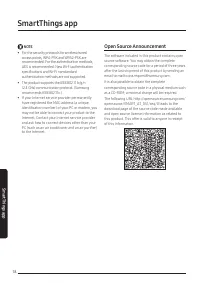
18 Smar tThings app SmartThings app NOTE • For the security protocols for wireless/wired access points, WPA-PSK and WPA2-PSK are recommended. For the authentication methods, AES is recommended. New Wi-Fi authentication specifications and Wi-Fi nonstandard authentication methods are not supported. • ...
Page 19 - Controlling your air purifier with SmartThings app; Check the indoor air cleanliness.
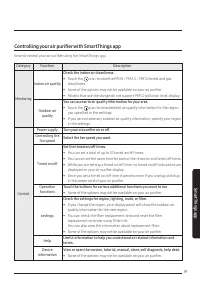
19 Smar tThings app Controlling your air purifier with SmartThings app Smartly control your air purifier using the SmartThings app. Category Function Description Monitoring Indoor air quality Check the indoor air cleanliness. • Touch the icon to view the PM10 / PM2.5 / PM1.0 levels and gas cleanline...
Page 20 - Operation; The air purifier does not operate.; Sound; The air purifier makes strange noises.; Odours; The air purifier smells strange.; Before Requesting Service; Appendix
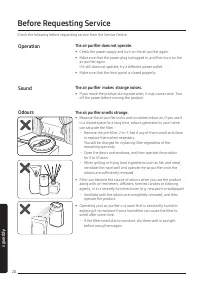
20 Appendix Operation The air purifier does not operate. • Check the power supply and turn on the air purifier again.• Make sure that the power plug is plugged in, and then turn on the air purifier again. If it still does not operate, try a different power outlet. • Make sure that the front panel is...
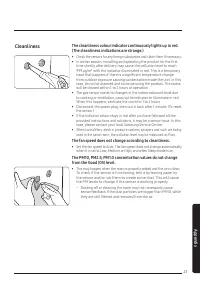
Page 21 - Cleanliness; The cleanliness colour indicator continuously lights up in red.
21 Appendix Cleanliness The cleanliness colour indicator continuously lights up in red. (The cleanliness indications are strange.) • Check the sensors for any foreign substances and clean them if necessary. • In winter season, installing and operating the product for the first time shortly after del...
Page 22 - Display; The filter replacement indicator is always turned on.; Air circulation; The fan does not seem to circulate the air evenly.
22 Appendix Before Requesting Service Display The PM10, PM2.5, PM1.0 concentration values are the same continuously. • When the air is clean, you may not see a difference between the PM10, PM2.5 and PM1.0 levels. To check if the sensor is functioning, test it by tearing paper by the sensor and/or ru...
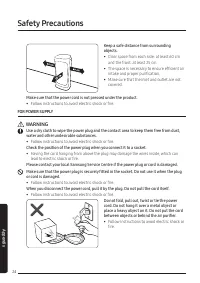
Page 23 - Safety Precautions; FOR INSTALLATION; WARNING; Only connect to a socket that can provide the; Install the product on a solid flat ground.
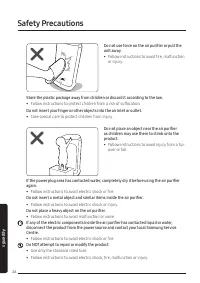
23 Appendix Safety Precautions WARNING Hazards or unsafe practices that may result in severe personal injury or death. CAUTION Hazards or unsafe practices that may result in minor personal injury or property damage. Follow directions. Do NOT attempt. Make sure the machine is grounded to prevent elec...
Page 24 - FOR POWER SUPPLY
24 Appendix Safety Precautions Keep a safe distance from surrounding objects. • Clear space from each side: at least 60 cm and the front: at least 25 cm • The space is necessary to ensure efficient air intake and proper purification. • Make sure that the inlet and outlet are not covered. Make sure t...
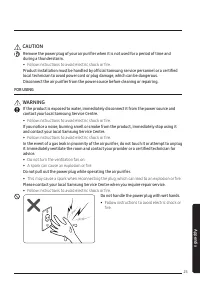
Page 25 - during a thunderstorm.; FOR USING; contact your local Samsung Service Centre.
25 Appendix CAUTION Remove the power plug of your air purifier when it is not used for a period of time and during a thunderstorm. • Follow instructions to avoid electric shock or fire. Product installation must be handled by official Samsung service personnel or a certified local technician to avoi...
Page 26 - Do not use force on the air purifier or pull the
26 Appendix Safety Precautions Do not use force on the air purifier or pull the unit away. • Follow instructions to avoid fire, malfunction or injury. Store the plastic package away from children or discard it according to the law. • Follow instructions to protect children from a risk of suffocation...
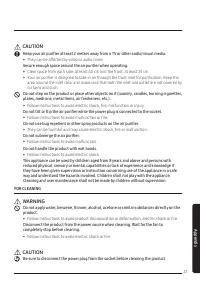
Page 27 - • They can be affected by video or audio noise.; FOR CLEANING; completely stop before cleaning.
27 Appendix CAUTION Keep your air purifier at least 2 meters away from a TV or other audio/visual media. • They can be affected by video or audio noise. Secure enough space around the air purifier when operating. • Clear space from each side: at least 60 cm and the front: at least 25 cm • Your air p...
Page 28 - Reference
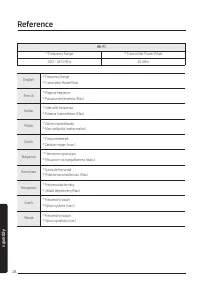
28 Appendix Wi-FI ¹⁾ Frequency Range ²⁾ Transmitter Power (Max) 2412 - 2472 MHz 20 dBm English ¹⁾ Frequency Range ²⁾ Transmitter Power(Max) French ¹⁾ Plage de fréquence ²⁾ Puissance de l’émetteur (Max.) Italian ¹⁾ Intervallo frequenza ²⁾ Potenza trasmettitore (Max) Polish ¹⁾ Zakres częstotliwości²⁾ ...
Page 30 - Bulgarian
30 Appendix Reference Bulgarian С настоящото Samsung декларира, че това радиооборудване е в съответствие с Директива 2014/53/ЕС и със съответните законови изисквания в Обединеното кралство. Пълният текст на ЕС Декларацията за съответствие и Декларацията за съответствие за Обединеното кралство е нали...
Page 31 - Memo
Page 32 - QUESTIONS OR COMMENTS?
COUNTRY CALL OR VISIT US ONLINE AT UK 0330 SAMSUNG (7267864) www.samsung.com/uk/support IRELAND (EIRE) 0818 717100 www.samsung.com/ie/support GERMANY 06196 77 555 66 *HHP 06196 77 555 77 *OTH www.samsung.com/de/support FRANCE 01 48 63 00 00 www.samsung.com/fr/support ITALIA 800-SAMSUNG (800.7267864)...